
Glasstek OAI Hood

Thread Starter
Registered User
Joined: Dec 2012
Posts: 1,605
From: Fuquay Varina NC
Glasstek OAI Hood
There has been a lot of discussion on the quality of aftermarket OAI Hoods. I thought I would share my experience with the Glasstek hood that I purchased from The Parts Place. This hood initially cost approx. $700.00. After I purchase the hood I took it to the paint shop.
They had it outside working on it in the direct sun on a 95 deg day. When the hood got hot in the sun blisters started forming from air pockets in the gelcoat. To repair the hood we had to find all the air pockets by gently heating it with a heat gun. We then ground out the blisters with a dremel tool. The first 2 pics show some areas of the hood where the pockets have been ground out and are ready to be filled with resin.
7cf0eaea-a225-4ec5-a4cc-f851778c7a34_zps5b00c2d9.jpg
55f90c0f-c576-4f89-a19c-5366a3dbfd85_zps359d3f32.jpg
bcd9dabb-1f04-4ca7-bb00-105ecede423f_zps67123c39.jpg
Holes have been filed and are being sanded flush
d51858bf-78d9-46fc-ac95-1b7a7e626662_zps653d4132.jpg
IMG_2341_zpsa0251308.jpg
a couple different angles showing the extent of damaged areas. Also note the rough primer finish that comes on the hood. I looked at some hoods at a show this year that have a slick smooth finish. The back edge of the hood is too thick and has to be worked to get it to the right dimension to get the trim molding on.
116cdecd-624c-427a-ad20-0597fbf0a96f_zps84a943a8.jpg
The hood does come with cutouts and provisions for the factory latch assembly. The bolt holes do not line up and will have to be filled and redrilled. The underside finish of the hood is horrible.
9b6cd9e6-6977-47da-9c9d-2a3ddb1fa9f9_zps37267659.jpg
Ok the end result. I spent 8 hours of my time (no charge) finding the air pockets, digging them out and refilling them. The body shop had 15 hours @ $75.00 per hour with epoxy primer and block sanding to get it to this point. Hind sight is 20/20. I have a lot of time and money tied up getting this to a point I can use it. My paint guy said it was the worst hood he had ever dealt with. If I could have a do-over it would be with something other than a Glasstek Hood
Last edited by Sampson; Dec 8, 2013 at 08:08 PM.
Registered User
Joined: Mar 2013
Posts: 226
From: Long Island, NY
Wow, that is rough. I'm sorry you had to deal with that. When it's time for me to do a hood, I'm going with OEM or Thornton for exactly this reason. Please post pictures of the end result, though.
Registered User
Joined: Jul 2008
Posts: 4,533
From: Chi-town
yes a definite bummer, but.... My original hood probably had at least that much time into it to get the waves out of it. Look at any original hood that hasn't been blocked sanded and worked on and it will be wavy. Not saying its as bad as what you had to deal with, just trying to point out some of your cost would have gone into an original hood as well (just trying to alleviate some of your pain  )
)
)
Thread Starter
Registered User
Joined: Dec 2012
Posts: 1,605
From: Fuquay Varina NC
yes a definite bummer, but.... My original hood probably had at least that much time into it to get the waves out of it. Look at any original hood that hasn't been blocked sanded and worked on and it will be wavy. Not saying its as bad as what you had to deal with, just trying to point out some of your cost would have gone into an original hood as well (just trying to alleviate some of your pain )
)
Thread Starter
Registered User
Joined: Dec 2012
Posts: 1,605
From: Fuquay Varina NC
One other thought on this hood is I was lucky that we were doing this work in the summer and that the hood sat in the sun. It would have been really bad if we prepped it and painted it over all those air pockets. Get to the first car show next summer and all these bubbles start forming under the paint
Mr. Johnson
Joined: Feb 2012
Posts: 574
From: Cleveland Ohio
I purchased a glasstec as well and had about 10 hours of sanding and filling the lake size low spot in the driver scoop. the black primer was rough and almost all of it had to be removed to find imperfections. I had to do way more filling and blocking on this then I would of hoped for. the lip was oversized on the trailing edge but the front matched up perfectly. the hinge bolts were perfect on mine. I've forgotten to bolt it down three times now (once was the painter) and have had the hood pop up driving down the road. The hood is still perfect, no flex or damage. Can't say the same for the three sets or repo hinges @ 250 bucks a set! Overall I love my hood but that's only because after spending hours on it to make it mine.
Registered User
Joined: Jun 2011
Posts: 731
From: Nova Scotia
One other thought on this hood is I was lucky that we were doing this work in the summer and that the hood sat in the sun. It would have been really bad if we prepped it and painted it over all those air pockets. Get to the first car show next summer and all these bubbles start forming under the paint

Registered User
Joined: Jun 2008
Posts: 1,015
From: Near Muskegon Michigan
My Glasstek hood was not nearly that bad and I have had no pops in the sun. Maybe it was late on a Friday with happy hour looming when yours was done! I also had to cut down the rear portion and sand it to install my trim. All in all, for the price, I only had about 8 hours of my time in to it. No body shops.
Registered User
Joined: Apr 2011
Posts: 137
From: Macedon,NY
I bought a fiber concepts hood last year. Haven't done anything with it yet. Looks pretty decent initially. I'll have some finish work to do on the opening on the scoops . It has provision for factory latch which looks like it should line up OK. I'll let you know what I get into when I start prepping it for paint but so far I see no major obvious issues.
Registered User
Joined: Jun 2011
Posts: 2,866
From: Carrolllton Texas
I bought a fiber concepts hood last year. Haven't done anything with it yet. Looks pretty decent initially. I'll have some finish work to do on the opening on the scoops . It has provision for factory latch which looks like it should line up OK. I'll let you know what I get into when I start prepping it for paint but so far I see no major obvious issues.
A couple of other issues you might want to check. I bought a FC hood for my car as well. Had the following issues:
1) The scoop openings needed A LOT of work, as you mention, to get them anywhere close to decent looking
2) The whole center area of the hood was slightly depressed and my body man had to put some serious work into getting it level.
3) The rear lip where the trim snaps onto was REALLY too fat and needs a lot of material removal before the trim will install
4) One of the nuts in hood that captures the hinge to hood bolt was attached at a weird angle (the rear passenger side one) and caused some installation issues. I could not start the bolt well, and wound up stripping out the nut.
5) I don't remember the specific issue, but I had to do some rigging on a couple of the front grille opening trim screws to get the trim attached.
6) The underside of the hood looks pretty unfinished - if this is important to you.
7) Biggest problem - the rear underside of the hood is too thick. When the hood is closed, it actually is touching the cowl area. I could not get it to shut properly until I removed the cowl to hood weatherstripping, and even then it still rubs. I've tried shimming it every way, but it doesn't help much. Afterwards, I read here on CO this is a common problem on the non-Thornton aftermarket hoods. The only solution is to have the bottom of the hood worked to get some clearance.
8) I am now getting some "wrinkling" going on with the finish. I fear it is the trapped bubbles coming to the surface as others have mentioned.
The guy at FC is really nice, but it is a 795.00 hood. If getting it really right is important to you, get the Thornton. Expensive at first, more cost effective in the long run.
Last edited by costpenn; Dec 11, 2013 at 11:02 AM.
Thread Starter
Registered User
Joined: Dec 2012
Posts: 1,605
From: Fuquay Varina NC
A couple of other issues you might want to check. I bought a FC hood for my car as well. Had the following issues:
1) The scoop openings needed A LOT of work, as you mention, to get them anywhere close to decent looking
Same with Glasstek
2) The whole center area of the hood was slightly depressed and my body man had to put some serious work into getting it level.
Same with Glasstek
3) The rear lip where the trim snaps onto was REALLY too fat and needs a lot of material removal before the trim will install
Same with Glasstek
4) One of the nuts in hood that captures the hinge to hood bolt was attached at a weird angle (the rear passenger side one) and caused some installation issues. I could not start the bolt well, and wound up stripping out the nut.
No problem with mine here. The hinge area lined up perfect and no problem with the bolts.
5) I don't remember the specific issue, but I had to do some rigging on a couple of the front grille opening trim screws to get the trim attached.
Holes must be drilled for the hood trim pieces
Also the holes are there to install the front latch but there are no provisions for bolts.
6) The underside of the hood looks pretty unfinished - if this is important to you.
Underside of Glasstek hood looks horrible!
7) Biggest problem - the rear underside of the hood is too thick. When the hood is closed, it actually is touching the cowl area. I could not get it to shut properly until I removed the cowl to hood weatherstripping, and even then it still rubs. I've tried shimming it every way, but it doesn't help much. Afterwards, I read here on CO this is a common problem on the non-Thornton aftermarket hoods. The only solution is to have the bottom of the hood worked to get some clearance.
Same issue with Glasstek.
8) I am now getting some "wrinkling" going on with the finish. I fear it is the trapped bubbles coming to the surface as others have mentioned.
See pics above for Glasstec
The guy at FC is really nice, but it is a 795.00 hood. If getting it really right is important to you, get the Thornton. Expensive at first, more cost effective in the long run.
X2 on this Joe. Unless you have considerable time and paint prep skills so that you can perform the work yourself you will end up with more money in a hood of inferior quality!
Thread Starter
Registered User
Joined: Dec 2012
Posts: 1,605
From: Fuquay Varina NC
Almost done
At the end of the day if you work through the issues and have deep enough pockets the end result can still be nice. I finally got the hood trimmed out and lined up yesterday. Still need the stripes put on. I ended up with some fitment issues between the hood and the grills. Since both are repos I was not sure which was the culprit. If you are interested in how I fixed this you can check out my build site at:
https://classicoldsmobile.com/forums...442-clone.html
[IMG]URL=http://s1310.photobucket.com/user/Stephen_Sampson/media/Mobile%20Uploads/IMG_20140105_165452755_zps8931d331.jpg.html]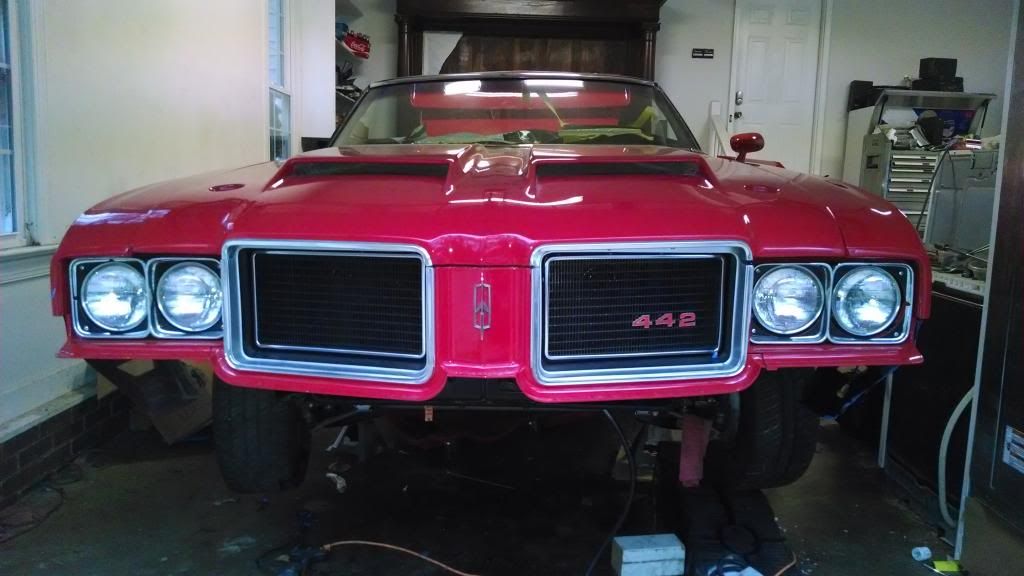 [/URL][/IMG]
https://classicoldsmobile.com/forums...442-clone.html
[IMG]URL=http://s1310.photobucket.com/user/Stephen_Sampson/media/Mobile%20Uploads/IMG_20140105_165452755_zps8931d331.jpg.html]
[/URL][/IMG]
Thread Starter
Registered User
Joined: Dec 2012
Posts: 1,605
From: Fuquay Varina NC
The Rant continues
This part of the project is the gift that keep on giving. giving me a PIA that is. The hood came as a kit with the light weight springs that do not hold the hood up and the hood hold downs and brackets. I thought today would be a good opportunity to install the hood hold downs. Kind of the finishing touch. Shouldn't take too long right. That's what I said about 4.5 hours ago and I am still not finished. The brackets for the pins are not even close to being right. When I say not close, the holes are about 1.5 inches off. What a freaking nightmare. I will be calling TPP in the am
Registered Luser
Joined: Aug 2006
Posts: 3,785
From: LI,NY

Registered User
Joined: Sep 2012
Posts: 776
From: chicago il
I say something is wrong guys. I have a glass tek hood and had 0 problems and several others feel the same way about there products. I agree the aftermarket hinges have to have a prop rod or different springs. I would also like to add that maybe somewhere the product was changed out also. by the way did you put any chemicals on the hood? The hood could have a chemical reaction to things that are not designed to work with it.
72 Olds CS
Joined: Jun 2011
Posts: 6,657
I have the lightweight springs from pp w my glass trek hood. The hood opens and closes ( and stays up when open) just like the steel hood w original springs. The glass hood feels about the same as the steel hood effort wise opening and closing
My lock brackets could have better alignment, but they are close enough that w some adjustments they work properly.
My lock brackets could have better alignment, but they are close enough that w some adjustments they work properly.
Thread Starter
Registered User
Joined: Dec 2012
Posts: 1,605
From: Fuquay Varina NC
I say something is wrong guys. I have a glass tek hood and had 0 problems and several others feel the same way about there products. I agree the aftermarket hinges have to have a prop rod or different springs. I would also like to add that maybe somewhere the product was changed out also. by the way did you put any chemicals on the hood? The hood could have a chemical reaction to things that are not designed to work with it.
we had not sprayed the hood with anything at the point it started blistering. The bubbles formed under the primer. Maybe the hood was made late on Friday but it was definitely due to air pockets in the glass.
Thread Starter
Registered User
Joined: Dec 2012
Posts: 1,605
From: Fuquay Varina NC
I have the lightweight springs from pp w my glass trek hood. The hood opens and closes ( and stays up when open) just like the steel hood w original springs. The glass hood feels about the same as the steel hood effort wise opening and closing
My lock brackets could have better alignment, but they are close enough that w some adjustments they work properly.
My lock brackets could have better alignment, but they are close enough that w some adjustments they work properly.
Did your brackets come with the hood? These are so far off that I had to cut them to get them close where they needed to be. The hole was not even in the ballpark of where it needed to be. Could you take a pic of your bracket?
I bleed Oldsmobile
Joined: Dec 2007
Posts: 1,390
From: Iowa
I had no problems with mine but that was 10+ years ago........If your doing a concourse restore I wouldn't go with a Glasstek hood...Mine is more go than show so the little issues didnt bother me......That thick back lip the chrome didn't fit over,I taped that off and painted it chrome........Did a little work to even out the eyebrow moldings....Got my light weight springs from Fusick as I remember.....I have a no name cowl on there now for room for the Victor intake.......I plan on a raised scoop one from Rocket Racing soon........

Registered User
Joined: Jun 2011
Posts: 731
From: Nova Scotia
This part of the project is the gift that keep on giving. giving me a PIA that is. The hood came as a kit with the light weight springs that do not hold the hood up and the hood hold downs and brackets. I thought today would be a good opportunity to install the hood hold downs. Kind of the finishing touch. Shouldn't take too long right. That's what I said about 4.5 hours ago and I am still not finished. The brackets for the pins are not even close to being right. When I say not close, the holes are about 1.5 inches off. What a freaking nightmare. I will be calling TPP in the am
"Trying to fix her right"
Joined: Oct 2012
Posts: 749
From: Bartlett IL
Did you have any directions to do this? I have to install mine from the parts place, and of course there is no instructions. I assume you just drill a hole in the hood, but do you have to remove the pin on the "pin" to get it threw the hood? Any help (and maybe pictures) on this would be greatly appreciated.
Thread Starter
Registered User
Joined: Dec 2012
Posts: 1,605
From: Fuquay Varina NC
Did you have any directions to do this? I have to install mine from the parts place, and of course there is no instructions. I assume you just drill a hole in the hood, but do you have to remove the pin on the "pin" to get it threw the hood? Any help (and maybe pictures) on this would be greatly appreciated.
"Trying to fix her right"
Joined: Oct 2012
Posts: 749
From: Bartlett IL
Sorry I don't have any pics and the car is in the shop having the stripes done now. Is your hood a Glasstek? I think I centered the pin in the depression in the hood and then put play dough on the lock down brackets. I gently lowered the hood so the pins made a depression in the play dough and then adjusted the brackets accordingly. Hope this helps and good luck.
Thread Starter
Registered User
Joined: Dec 2012
Posts: 1,605
From: Fuquay Varina NC
Pretty sure I just drilled 1 size bigger than the pin. Just enough oversize that there was no resistance on the pin. Important to keep the drill perpendicular to the hood. Remember you are drilling through the top of the hood and the bottom of the hood and there is a void in between. Good luck!

Thread
Thread Starter
Forum
Replies
Last Post


