When you click on links to various merchants on this site and make a purchase, this can result in this site earning a commission. Affiliate programs and affiliations include, but are not limited to, the eBay Partner Network.
Well, car is running fine, body straight, 65-70 mph no problem, so I figured I would dive into the No Tail Lights or Dash Lights, probably just a fuse.
Apparently this car, although it is solid, sat outside for some time, had a windshield leak, and the inside became very moist and mildewy, thus the reason I pulled out the carpeting (solid floor) and steam cleaned the seats, but that moisture did some damage to the "Fuse Box".
So, little electrical cleaner, grabbed my rifle cleaning kit, has a nice wire brush on it that fits right into the fuse inserts, should do the trick.
No luck, those fuse inserts fell apart when hit with the brush.
So now I'm looking at replacing that fuse box.
Can't find anyone that sells re-pops, so for the group:
Q. Anybody out there know where I can track down a fuse box for the '64
Q. Anybody ever installed a "newer type" fuse box, ones with the small square newer fuses?
Q. Anybody ever just by-pass the fuse box and wire up all the wires with "in-line" fuse (I'm not sure about that idea)?
I built my own wiring harness using a fuse box from a mid 80s square body truck. It obviously can be done, but it�s definitely time consuming!! Be prepared to study lots of wiring diagrams, and spend lots of time in uncomfortable positions.
The nice thing about GM is they never really change wire color/function much over the years. that will make things much easier. If you decide to try it, be sure to get the matching firewall connector plugs, and as much of the original wire as possible. Be sure to use the correct wiring splice procedures, and splice protection. Get lots of extra terminals, and try to plan out as much as possible before cutting the first wire.
Unless you really want later style ATO fuses, it might be much easier just to find a good used fuse box and splice it in. It�s still going to be time consuming, but if you work slowly and only one wire at a time should be fairly straightforward.
I know it is going to be a tedious job, and interesting on the available clips (GM Fuse Clip - #18[-91), if I go that route, but:
I found a replacement fuse box (original) and just bought it for $50.00, plus shipping. I'm thinking I can simply, one wire at a time, replace wires, old to new!
1964-65 Olds Cutlass 442 F85 Original Under Dash Fuse Box GM OEM
Just curious, just in case this "used" fuse box doesn't work out; anybody ever purchase and install these:
Universal 21 Circuit Wiring Harness Kit, Universal Extra Long Wire 21 Circuit Wiring Harness Standard Color 17 Fuses for GM Chevy Chrysler Dodge Ford Hotrods Plymouth Mopar Mercury Ratrods
Just curious, just in case this "used" fuse box doesn't work out; anybody ever purchase and install these:
Universal 21 Circuit Wiring Harness Kit, Universal Extra Long Wire 21 Circuit Wiring Harness Standard Color 17 Fuses for GM Chevy Chrysler Dodge Ford Hotrods Plymouth Mopar Mercury Ratrods
WARNING! Danger Will Robinson! Not for the faint of heart!
Yeah, I did one of those. My 67 is not stock in any respect so it wasn't a "wire for wire" replacement. You get a lot more circuits that you may not need or want like power windows, power locks, fuel pump, electric fan, etc. If you have plans to modify your car later, these circuits can be a bonus. If not, you can coil the wires up and hide them or cut them off. The "universal" quality of the kit means you will need a great deal of patience and concentration to get everything connected up properly. Best to have good wiring and troubleshooting skills!
It strikes me that these "painful" wiring kits are one-size-fits-none and are just as much if not more work than just fixing the OEM harness. You still have to route and install terminals on all the wires, so how is this any easier than the OEM harness? In any case, spend the money and get a correct, quality crimping tool for Packard 56 terminals, and learn how to use it correctly. This is not rocket science.
Joe, one of the ongoing arguments (friendly) I have with a really good friend of mine, is when working on any part of a car (classic) I always say: "...........this isn't rocket science".
Then I explain that since he has a shop, all the tools, two lifts and does this everyday, whereas I do it as an enjoyable "hobby", in my back shop and often are lying on the floor (no-lift), he knows more of the tricks of the trade, shortcuts etc., but if I put in 2 or 3 starters, fuel pumps, whatever, the 4th one is going in quicker, so with that agreement, "not rocket science", let me say:
I am going to repair the fuse box with a new (original, I found on eBay), and do the "one-wire at a time", splicing. Can't find an aftermarket fuse box for the '64 anywhere, so I thought this way would work.
As for "not rocket science", I'm simply (as noted above) going to have the old, next to the new, and again: one-wire at a time splice, replace.
If you watch Google videos, and probably because they are pushing the product, most say: "Replace the entire harness, new box and all".
It is going to be time-consuming, and the fact that the box where it iis located isn't going to make the job a "tabletop" job. I may remove the seat, but not going to remove the steering column, even throw that would really make it easier.
It strikes me that these "painful" wiring kits are one-size-fits-none and are just as much if not more work than just fixing the OEM harness. You still have to route and install terminals on all the wires, so how is this any easier than the OEM harness? In any case, spend the money and get a correct, quality crimping tool for Packard 56 terminals, and learn how to use it correctly. This is not rocket science.
Bingo!!
Psinless spent lots of money on advertising, and it obviously paid off. The few Painless kits I have installed expected you to reuse connector body�s (the parts that are usually corroded or damaged) using cheap butt connectors.
Yea, been watching, reading a lot of videos and reports on all the upgrade harnesses out there. I just want to get the Olds back on the road for this Ohio cruising season, come winter will go the entire harness route.
On another note, I love the look of the inner headlight being "Amber", so drove up to Summit (40 miles from me), told them what I wanted, BANG, got-em, drove home, attempted to put them in, and "No Two Prong Connections"?
Just came back from Summit, they don't carry "Two Prong" Amber front head lights.
So: They sell (Amazon) a "stick on" Headlight Tint (Amber), cheap, like $7.00.
On another note, I love the look of the inner headlight being "Amber", so drove up to Summit (40 miles from me), told them what I wanted, BANG, got-em, drove home, attempted to put them in, and "No Two Prong Connections"?
So what IS the connection? I mean, it's two wires, right? That shouldn't be particularly difficult to mate to the two wires on the OEM harness.
Well, the headlight (original) has a two-prong insert connection, the one (Amber) from Summit had No two-prong, and yes, if I wanted to, I could have cut the female connector from the car and simply wired up the two wires to the Summit Headlamp, but............I didn't want to go that route, so I simply returned them, and now looking a a "Tint" for the headlamp.
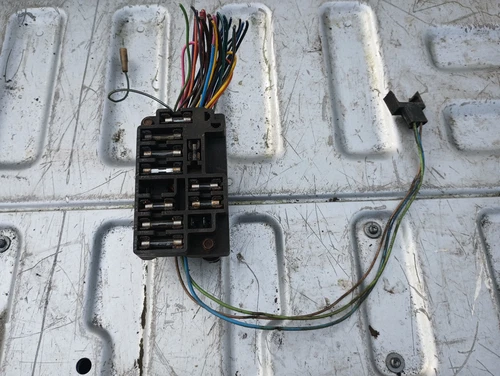
I'm replacing the entire fuse box; there have to be at least 20 wires coming into that box.
I WISH it were "2 Wires:"
Here is what your "2 Wires" looks like
Read it again. I was asking about your amber headlights. Of course this is a classic example of why it can be confusing to run a thread off track as opposed to starting a new thread.
Well, the headlight (original) has a two-prong insert connection, the one (Amber) from Summit had No two-prong, and yes, if I wanted to, I could have cut the female connector from the car and simply wired up the two wires to the Summit Headlamp, but............I didn't want to go that route, so I simply returned them, and now looking a a "Tint" for the headlamp.
Sorry Joe!
Still not answering the question. I ASSUME the Summit headlights just had two wires? You COULD have simply crimped male spade connectors onto the wires and plugged them into the factory harness connector.
Joe, agree on the "should not introduce another subject", sorry. Yes, I could have easily made the headlamp work, crimping wires, but I thought possibly that Summit would have the original "two prong" headlamp; they didn't, so I just returned them, now I can pick them up anytime. The biggest problem now is replacing the fuse box, and if that goes ok, I'll probably do the "make it fit" on the headlams.
The purchased "Used but New 2 Me" fuse box is supposed to arrive today (July 9th,25), so it will be today or tomorrow that the work begins. I'm not sure if I am going to do the "One-Wire-At-A-Time" splice job - OR - look at getting the Del Mar replacement kit, and repair the old..............haven't decided. I'll try to take some pics for those who may want to watch the work, progress, take care.
The purchased "Used but New 2 Me" fuse box is supposed to arrive today (July 9th,25), so it will be today or tomorrow that the work begins. I'm not sure if I am going to do the "One-Wire-At-A-Time" splice job - OR - look at getting the Del Mar replacement kit, and repair the old..............haven't decided. I'll try to take some pics for those who may want to watch the work, progress, take care.
The Del Mar terminals are not a "replacement kit", just a bag of new terminals.
If I am understanding this correctly, the Del replacement terminals are simply terminals, but if I decide to remove the old fuse box, I can remove the old and replace the new terminals. That is the damage to the existing box, terminals corroded and rusted out.
If I am understanding this correctly, the Del replacement terminals are simply terminals, but if I decide to remove the old fuse box, I can remove the old and replace the new terminals. That is the damage to the existing box, terminals corroded and rusted out.
So, what ya think, just an opinion: Would you "cut and splice" the new into the old, or Get the Del inserts, and attempt to "repair", replace the inserts into the existing box?
Well, here is where I am at and my plans for my 64. If you've been following my posts, I was planning to replace the fuse box, as it is a little corroded. This all began with "No Tail Lights". So,I found and bought a used fuse box off eBay, and was going to splice it in. Well, that plan has changed simply due to the time and work involved, and I want to drive this Olds before the Ohio weather turns.
So, I plan to simply get those tail lights working by running a hot wire back to them, sort of a "Road Kill" repair, which you won't see.
As I went in the back, I *using a test light, could not get power to the tail light wires, even after I connected the fuse box tail light wires with an "in-line fuse" splice job, BUT
I found a "Hot Wire" (key on) running back to the trunk.
It is a wire that has a plastic snap connector, and snaps into a wire running to the other light
Does one know what this wire is for?
Now, before you tell me to get a wiring diagram, I agree and have a big swap meet coming up this weekend, so I'll see if I can find a good Shop Manual, or order the diagram online, but before that if anyong can identify this "Hot Wire" , Plastic Clip, let me know, thanks.
An unconnected hot wire to the trunk is likely for the optional trunk light. And before you make a half-fast repair to the tail lights, you DO understand how the tail lights and brake/turn lights work through the common 1157 bulbs, right?
Joe, I truly, truly respect and appreciate your replies, find them very helpful, but when one chats via "text", well, there are a lot of unknowns of the two;
I am fairly familiar with the cars electrical system, any cars wiring, etc., and "Yes" I understand the wiring for the tail lights, turn signals, brake lights (brake pedal activator), parking (running lights) and other wiring travel all over, not directly from power (battery) to the bulb itself, thus the time consuming re-wiring, installation (if one chooses) to install a new, replacement harness.
But, as I pointed out, there is always, not the best, not the correct way to get something working, just to get it working.
I can recall when my "clutch cable" broke on one of my classic VW Bugs. if you know anything about that cable, it runs from the front pedal, through the concealed center of the cab hub, to the rear (engine location) of the car. Just to get home, I borrowed my friend's Dremel, cut a hole in the center tunnel, and "micky'd" the cable to where I could work on it, not correctly, but it got me home. I'm sure we all have similar "quick fix" stories.
What I am saying, until I do this repair correctly, without creating any more damage to the Olds, ensuring that it is "safe", I simply want to get power to those rear tail lights working.
So:
1. Fuse box that holds the fuse marked "tail lights", the fuse holders are destroyed - I'm going to take those wires and insert an "in-line fuse" connector?
2. If I then get power to the rear lights (which I have not), then simply wire those lights (inserts) back together.
3. If I don't get power, or cannot figure out why "no power", I am going to track down a "powered wire" going to the back, and do a "quick tap", lights on? - That wire we discussed shows power.
As for that wire that is showing "power", it has a "clip" to connect to another wire. I thought it was for the trunk light, but I was not sure.
I will be grabbing a wire diagram, but again, just wanting to get on the road, have some tail lights if needed, and see what's next
This is not a "KinDig", or "Fatom Garage", or "Texas Metal" type repair, more of a "Road Kill", ger-r-running job.
As I went in the back, I *using a test light, could not get power to the tail light wires, even after I connected the fuse box tail light wires with an "in-line fuse" splice job, BUT
I found a "Hot Wire" (key on) running back to the trunk.
It is a wire that has a plastic snap connector, and snaps into a wire running to the other light
Does one know what this wire is for?
Originally Posted by joe_padavano
An unconnected hot wire to the trunk is likely for the optional trunk light.
PREAMBLE: I don't have a 1964 Wiring diagram to view.
Albeit, I'm unclear of the wiring. However, if that wire is energized only in the "key on" position (as you stated), I'd think the wire might be for the reverse lamps/lights? I'd have thought an optional trunk light might/should be configured/wired independent of a "key on" position? I don't know, just throwing it out there.
Vintage: I thought the same, and if I could show you where the wire connects too, we would both be correct, "Reverse Lamps". Again, going to poke around today if I find time, time is the problem at this point, and see what I can find out. As I stated earlier, Big Swap Meet in my area this weekend, hope it doesn't rain, and maybe I can track down a wiring diagram, shop book, or who knows, are rear tail lamp harness.
I can't speak to accuracy of this/these wiring diagram(s); yet, I've seen them used before. The obvious authoritative wiring diagrams are included in the 1964 Oldsmobile Chassis Service Manual(s). At any rate, you might have a look on this page...it may shed some light.
Note there appears to be a left page & right page.
Well, looking at those diagrams simply supports my position when working on Classic Cars, don't mind a little mechanical work, wrenching, spraying some WD, little knuckle busting, don't mind some "minor body work", little sanding, cutting, tack weld, little putty, painting - BUT - when it comes to "electrical work", "trouble shooting", I HATE IT!
PREAMBLE: I don't have a 1964 Wiring diagram to view.
Albeit, I'm unclear of the wiring. However, if that wire is energized only in the "key on" position (as you stated), I'd think the wire might be for the reverse lamps/lights? I'd have thought an optional trunk light might/should be configured/wired independent of a "key on" position? I don't know, just throwing it out there.
No external light circuit is powered simply by key on. The backup lights are only powered when the shifter is in reverse. The tail lights and license plate lamp are powered from the headlight switch. The turn/stop lights are powered from either the turn signal switch or the brake light switch, depending on which function is being used. ONLY the trunk light circuit is powered from the key, since the light itself has a mercury switch that only makes contact when the trunk lid is opened.
No external light circuit is powered simply by key on. The backup lights are only powered when the shifter is in reverse. The tail lights and license plate lamp are powered from the headlight switch. The turn/stop lights are powered from either the turn signal switch or the brake light switch, depending on which function is being used. ONLY the trunk light circuit is powered from the key, since the light itself has a mercury switch that only makes contact when the trunk lid is opened.
The "connecting wire" I was speaking of, which showed "power", key on or no,t is either the "back-up" or "license plate" lamp based on where it is going. The "trunk lamp" wire is easy to identify, also a "connection".
So the question now is "why" is there "power" going to that assumed "back-up" (reverse) wire or "license plate" lamp when NO KEY is on?
As for the following
No external light circuit is powered simply by key on - Agree, knew that but again, the "why" to the question above.
The backup lights are only powered when the shifter is in reverse - Again, obvious and knew that..
The tail lights and license plate lamp are powered from the headlight switch - Agree, and when I have "power" to the back-up / license plate lame, switch IS NOTACTIVATED?.
The turn/stop lights are powered from either the turn signal switch or the brake light switch, depending on which function is being used - Obvious and known..
Only the trunk light circuit is powered by the key, as the light itself has a mercury switch that only makes contact when the trunk lid is opened.= Knew about the "mercury switch", actually have two in the back shop
Summary: The fuse box is damaged. Some wires (previous owner) have been cut or taped, so I have to figure out "what was done", "where they ran wires", and "why" that back, connected wire has power on, even when No Light Switch,
No Turn Signal,
No Brake is applied?
__________________
OK, been discussing and playing around with the wiring, harness, fuse box enough - DECISION - NEW "UPGRADED" FULL HARNESS - FUSE BOX INSTALLATION!
There are several 'Harness Kits" (full, complete) out there, several YouTube videos, and support out there, but I'll ask the group:
"What, in the opinion of those who did the "Upgrade", "Installation" is the best, e.g., what they provide, installation, and price consideration, New Upgrade Harness would you recommend"?