Brightening the repro Rally Pac (and other RP stuff!)
 December 9th, 2009, 09:52 AM
#1
Registered User
Thread Starter
Join Date: Feb 2008
Location: Plano, TX
Posts: 11,798
Brightening the repro Rally Pac (and other RP stuff!)
I have received several request on how to do this, so i would like to share with everyone.
Since I think real gauges should be a requirement in EVERY car, i wanted to install the Rally Pac in my 72 Cutlass to keep it looking factory... I went with the Parts Place repro kit but I think they are all the same thing, regardless where it was bought.
It fit well, despite having to make a custom wire harness for it. On the downside, the night backlighting is VERY substandard. In fact, the lights inside the tach are useless. You cannot see the numbers for clock or tach - just the tach pointer. The blue tint is missing, too. The gauge cluster has better lighting and has the blue color, but still not as good as the original speedo.
First I experimented with the light bulbs. The gauges came with the (incorrect) very dim 161 bulbs, so I tried blue 168's and regular 168's. The blue ones were still too dim and way too blue. The regular 168s were brighter but still looked bad.
I had pulled the speedo out also and took it inside for cleaning, lubing, and lens polishing. I then noticed the ring just under the lens of the speedo is black on the outside and light blue on the underside (to reflect a bluish light on the gauge markings…)
I opened up the tach and the new gauge cluster (bend out the tabs) - the rings were black on both sides! THAT was the main problem with the lighting. I ran over to Hobby Lobby to get model paint in light (sky) blue and white. Using the blue color in the speedo as a reference, I mixed up some white and light blue paint to match the speedo colors. (I actually made the color a little more blue, as the speedo paint was a bit faded.
I painted the rings light blue in both gauges. I now set up all three clusters in the back room and hooked them up to a bench-top power supply. The gauge cluster was much brighter and bluer and the tach was better but not bright enough...
I then realized the inside of the tach's housing was not painted at all! (The gauge cluster WAS painted light blue from the factory). So I painted the whole inside of the tach housing gloss white and some other internal surfaces with the light blue paint mixture. Here is what it looked like after then:
To color match to the speedo, more white was applied to the outer gauges to give the desired color. I left the 168 bulbs int here, but 194's could have worked, too. I put 168s in the speedo to match the gauges and all were close enough. Nice! Now all three clusters have 168 bulbs. The floodlights for the A/C controls were upped to 194 bulbs to match the brightness of the clusters.
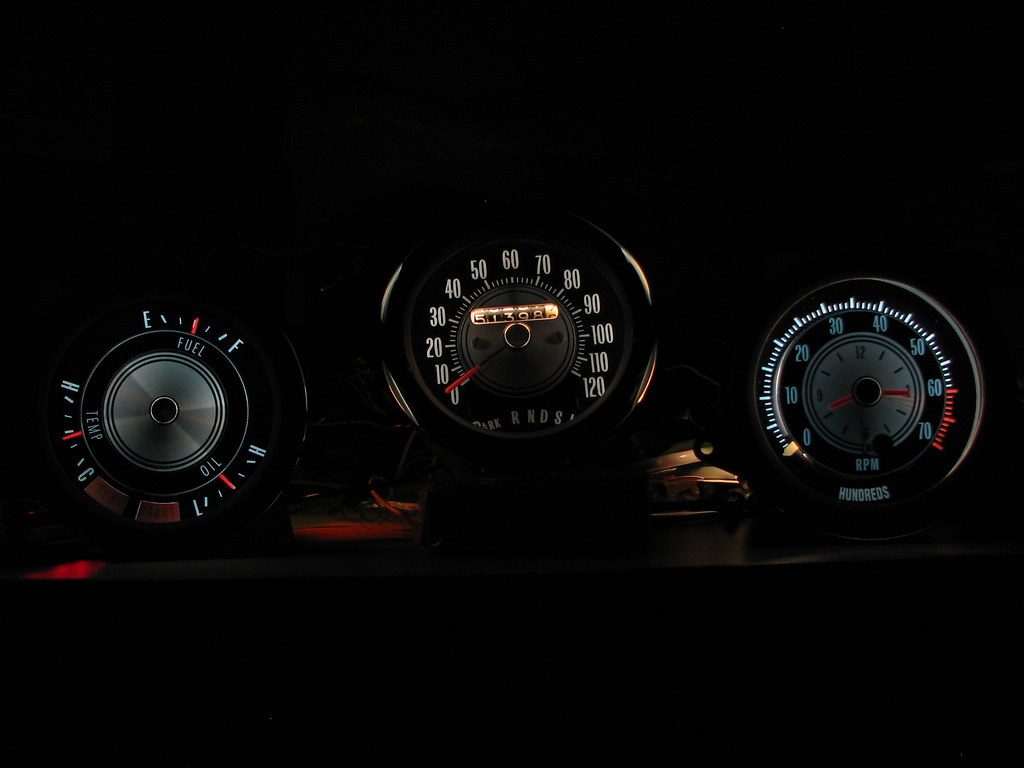
They are very readable and the brightness is enough that I use the rheostat to turn them down.
Here they are installed:

Reinstalled, lit up, and working!
Remember the speedo was NOT repainted inside - just cleaned up. Ket think on the speedo is to not use liquid to clean the face - it can lighten the lettering and remove its ability to reflect light.
The other pods were painted to help match the speedo. The left pod appears dimmer, but there are less markings. Any more light would make the aluminum center too bright...
--Now you might be thinking the gauges and the floodlights are WAY different colors, but they do match closely (at least through my eyes). Either the camera sees them very differently or my eyes see them as close to the same...
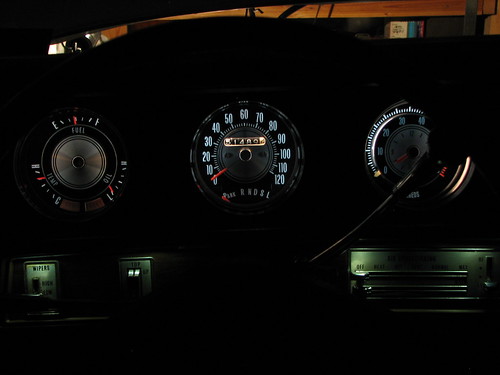
Here is another shot with different camera settings:

The real color is more between the two; go figure... (yes, I should have pulled the shifter down before taking this shot...)
Now the repros YOU might get could differ than the ones I have, so adjust your procedures as needed. Also keep in mind that this could void the warranty, if one even comes with them in the first place.
Hopefully the factory will paint them like they should.
NOTE: My gauges fogged up after cleaning - must have been residual moisture in the cases when reassembled and installed in in the car when it was cold out. After a day or two, it was gone, never to return.
Picture 1 - The guts of the speedometer. Note the light blue paint in the case. The underside of the black ring was this color, too. The speedo was cleaned up, but NOT painted. It looked too good and made the reference for the other gauges.
Picture 2 - To open, bend the tabs as shown, simply moving the screwdriver towards the top of the tach to avoid damaging anything. No servicable parts inside, but we sure can paint it!
Picture 3 - Painting the ring for the tach. I could not get the **** off, so i used a paper towel to keep paint off the lens.
Picture 4 - This tach case inside needs to be painted light blue, or even white for better results.
Picture 5 - The gauge cluster was already painted light blue inside, so I was in the process of just painting the underside of the ring. (Paint the whole ring, of course.)
Since I think real gauges should be a requirement in EVERY car, i wanted to install the Rally Pac in my 72 Cutlass to keep it looking factory... I went with the Parts Place repro kit but I think they are all the same thing, regardless where it was bought.
It fit well, despite having to make a custom wire harness for it. On the downside, the night backlighting is VERY substandard. In fact, the lights inside the tach are useless. You cannot see the numbers for clock or tach - just the tach pointer. The blue tint is missing, too. The gauge cluster has better lighting and has the blue color, but still not as good as the original speedo.
First I experimented with the light bulbs. The gauges came with the (incorrect) very dim 161 bulbs, so I tried blue 168's and regular 168's. The blue ones were still too dim and way too blue. The regular 168s were brighter but still looked bad.
I had pulled the speedo out also and took it inside for cleaning, lubing, and lens polishing. I then noticed the ring just under the lens of the speedo is black on the outside and light blue on the underside (to reflect a bluish light on the gauge markings…)
I opened up the tach and the new gauge cluster (bend out the tabs) - the rings were black on both sides! THAT was the main problem with the lighting. I ran over to Hobby Lobby to get model paint in light (sky) blue and white. Using the blue color in the speedo as a reference, I mixed up some white and light blue paint to match the speedo colors. (I actually made the color a little more blue, as the speedo paint was a bit faded.
I painted the rings light blue in both gauges. I now set up all three clusters in the back room and hooked them up to a bench-top power supply. The gauge cluster was much brighter and bluer and the tach was better but not bright enough...
I then realized the inside of the tach's housing was not painted at all! (The gauge cluster WAS painted light blue from the factory). So I painted the whole inside of the tach housing gloss white and some other internal surfaces with the light blue paint mixture. Here is what it looked like after then:
To color match to the speedo, more white was applied to the outer gauges to give the desired color. I left the 168 bulbs int here, but 194's could have worked, too. I put 168s in the speedo to match the gauges and all were close enough. Nice! Now all three clusters have 168 bulbs. The floodlights for the A/C controls were upped to 194 bulbs to match the brightness of the clusters.
They are very readable and the brightness is enough that I use the rheostat to turn them down.
Here they are installed:
Reinstalled, lit up, and working!
Remember the speedo was NOT repainted inside - just cleaned up. Ket think on the speedo is to not use liquid to clean the face - it can lighten the lettering and remove its ability to reflect light.
The other pods were painted to help match the speedo. The left pod appears dimmer, but there are less markings. Any more light would make the aluminum center too bright...
--Now you might be thinking the gauges and the floodlights are WAY different colors, but they do match closely (at least through my eyes). Either the camera sees them very differently or my eyes see them as close to the same...
Here is another shot with different camera settings:
The real color is more between the two; go figure... (yes, I should have pulled the shifter down before taking this shot...)
Now the repros YOU might get could differ than the ones I have, so adjust your procedures as needed. Also keep in mind that this could void the warranty, if one even comes with them in the first place.
Hopefully the factory will paint them like they should.
NOTE: My gauges fogged up after cleaning - must have been residual moisture in the cases when reassembled and installed in in the car when it was cold out. After a day or two, it was gone, never to return.
Picture 1 - The guts of the speedometer. Note the light blue paint in the case. The underside of the black ring was this color, too. The speedo was cleaned up, but NOT painted. It looked too good and made the reference for the other gauges.
Picture 2 - To open, bend the tabs as shown, simply moving the screwdriver towards the top of the tach to avoid damaging anything. No servicable parts inside, but we sure can paint it!
Picture 3 - Painting the ring for the tach. I could not get the **** off, so i used a paper towel to keep paint off the lens.
Picture 4 - This tach case inside needs to be painted light blue, or even white for better results.
Picture 5 - The gauge cluster was already painted light blue inside, so I was in the process of just painting the underside of the ring. (Paint the whole ring, of course.)
Last edited by Lady72nRob71; January 13th, 2011 at 06:29 AM. Reason: Add'l info, bigger picture.

 December 9th, 2009, 10:17 AM
#5
Registered User
Thread Starter
Join Date: Feb 2008
Location: Plano, TX
Posts: 11,798
Not at all. That is NOT fun, especially in cold December.
That was why I liked this particular painting job. I did it all in a warm house, under warm flood lights, in the kitchen next to the beer fridge, eating homemade Christmas cookies, drinking eggnog, while wearing pajamas and a bath robe... How much more comfier could I have been?
I did this two years ago and from what I remember, the gauges all came out from the top, too.
Hmmm ---- maybe THIS is what you were refering to during reinstallation...
" I carefully reinstalled the speedometer and tested its lights. One thing to be careful of is to drop the shift indicator linkage way back in the open area. When I dropped it down the first time, it fell into a tight area between the column and a support bracket and got so stuck that it took me about 40 minutes to free it... After finally freeing it, I dropped the linkage WAY back, secured the speedo and adjusted the shift indicator. "
That was why I liked this particular painting job. I did it all in a warm house, under warm flood lights, in the kitchen next to the beer fridge, eating homemade Christmas cookies, drinking eggnog, while wearing pajamas and a bath robe...
How much more comfier could I have been? I did this two years ago and from what I remember, the gauges all came out from the top, too.
Hmmm ---- maybe THIS is what you were refering to during reinstallation...
" I carefully reinstalled the speedometer and tested its lights. One thing to be careful of is to drop the shift indicator linkage way back in the open area. When I dropped it down the first time, it fell into a tight area between the column and a support bracket and got so stuck that it took me about 40 minutes to free it... After finally freeing it, I dropped the linkage WAY back, secured the speedo and adjusted the shift indicator. "
Last edited by Lady72nRob71; December 9th, 2009 at 10:28 AM.
December 9th, 2009, 11:49 AM
#7
Registered User

Join Date: Sep 2009
Location: Canada
Posts: 255
i have received several request on how to do this, so i would like to share with everyone.
since i think real gauges should be a requirement in every car, i wanted to install the rally pac in my 72 cutlass to keep it looking factory... I went with the parts place repro kit but i think they are all the same thing, regardless where it was bought.
it fit well, despite having to make a custom wire harness for it. On the downside, the night backlighting is very substandard. In fact, the lights inside the tach are useless. You cannot see the numbers for clock or tach - just the tach pointer. The blue tint is missing, too. The gauge cluster has better lighting and has the blue color, but still not as good as the original speedo.
first i experimented with the light bulbs. The gauges came with the (incorrect) very dim 161 bulbs, so i tried blue 168's and regular 168's. The blue ones were still too dim and way too blue. The regular 168s were brighter but still looked bad.
i had pulled the speedo out also and took it inside for cleaning, lubing, and lens polishing. I then noticed the ring just under the lens of the speedo is black on the outside and light blue on the underside (to reflect a bluish light on the gauge markings�)
i opened up the tach and the new gauge cluster (bend out the tabs) - the rings were black on both sides! That was the main problem with the lighting. I ran over to hobby lobby to get model paint in light (sky) blue and white. Using the blue color in the speedo as a reference, i mixed up some white and light blue paint to match the speedo colors. (i actually made the color a little more blue, as the speedo paint was a bit faded.
i painted the rings light blue in both gauges. I now set up all three clusters in the back room and hooked them up to a bench-top power supply. The gauge cluster was much brighter and bluer and the tach was better but not bright enough...
i then realized the inside of the tach's housing was not painted at all! (the gauge cluster was painted light blue from the factory). So i painted the whole inside of the tach housing and some other internal surfaces with the light blue paint mixture.
to color match to the speedo, more blue or white can be applied to give the desired color. I lef tthe 168 bulbs int here, but 194's could have worked, too. I put 168s in the speedo to match the gauges and all were close enough. Nice! Now all three clusters have 168 bulbs. The floodlights for the a/c controls were upped to 194 bulbs to match the brightness of the clusters.
they are very readable and the brightness is enough that i use the rheostat to turn them down.
reinstalled, lit up, and working!
remember the speedo was not repainted inside - just cleaned up. The other pods were painted to help match the speedo. The left pod appears dimmer, but there are less markings. Any more light would make the aluminum center too bright...
--now you might be thinking the gauges and the floodlights are way different colors, but they do match closely (at least through my eyes). Either the camera sees them very differently or my eyes see them as close to the same...
the real color is more between the two; go figure... (yes, i should have pulled the shifter down before taking this shot...)
now the repros you might get could differ than the ones i have, so adjust your procedures as needed. Also keep in mind that this could void the warranty, if one even comes with them in the first place.
hopefully the factory will paint them like they should.
picture 1 - the guts of the speedometer. Note the light blue paint in the case. The underside of the black ring was this color, too.
picture 2 - bend the tabs as shown, simply moving the screwdriver towards the top of the tach to avoid damaging anything.
picture 3 - painting the ring for the tach. I could not get the **** off, so i used a paper towel to keep paint off the lens.
picture 4 - this tach case inside needs to be painted light blue, or even white.
picture 5 - the gauge cluster was already painted light blue inside, so i was in the process of just painting the underside of the ring. (paint the whole ring, of course.)
December 10th, 2009, 05:22 AM
#9
Registered User
Thread Starter
Join Date: Feb 2008
Location: Plano, TX
Posts: 11,798
December 10th, 2009, 07:33 AM
#10
Thanks for the great information Rob. At some point, I would like to put in the Rally Pac setup in my 71.
I was kind of hoping that when I purchased the aftermarket setup that it would be a simple installation. But no, there's always more to do. Especially when your a perfectionist because I would want all the lights to look the same too!
I was kind of hoping that when I purchased the aftermarket setup that it would be a simple installation. But no, there's always more to do. Especially when your a perfectionist because I would want all the lights to look the same too!
December 10th, 2009, 07:50 AM
#11
Registered User
Join Date: Jul 2008
Location: Chi-town
Posts: 4,511
wow, nice job, they look awesome - hope mine look that good. I did the same to mine but did not test them yet as they are at the body shop waiting to be put in. I have original gauges, the ones from the Parts Place are pretty darn close the only real difference is the thickness of the needle on the tach and the thickness of the font - Also you can use a orange sharpie to color in the needle if that was faded like mine.
 September 14th, 2010, 01:14 PM
#12
Registered User
Thread Starter
Join Date: Feb 2008
Location: Plano, TX
Posts: 11,798
Rally pac wire rearranging
There would be a small hole (or slot) in the gauge-side of the connector.
Push wire upwards and hold, insert suitable tool (big paper clip or jeweler's screwdriver) into the small hole from the connector top side and push it in firmly (usually you can feel it 'pop' a little), and pull wire out from the bottom. When the wire comes out, use a small sccrewdriver to re bend the tang that was pushed in during removal. This will ensure wire will lock in again when reinserted.
Here is a demo of wire removal: (disregard my post-it-note cheatsheet)...")

Below is how the connector should look (for rally gauges) when done. (Tape or heat shrink the black seat belt light wire, as it is not needed. Rally Pac equipped cars have the seat belt light mounted on the top of the dash pad.)

If changing to gauges, replacing the sending units will be required. There will be one small green wire to disconnect from the ignition switch to disable the temp light bulb test feature to prevent pegging of the temp gauge when cranking the engine.
Right tool for the right job is right! I have one odd-sized skinny long nail i set aside just for terminal releasing!
Here are some more wiring diags:

Push wire upwards and hold, insert suitable tool (big paper clip or jeweler's screwdriver) into the small hole from the connector top side and push it in firmly (usually you can feel it 'pop' a little), and pull wire out from the bottom. When the wire comes out, use a small sccrewdriver to re bend the tang that was pushed in during removal. This will ensure wire will lock in again when reinserted.
Here is a demo of wire removal: (disregard my post-it-note cheatsheet)...
Below is how the connector should look (for rally gauges) when done. (Tape or heat shrink the black seat belt light wire, as it is not needed. Rally Pac equipped cars have the seat belt light mounted on the top of the dash pad.)
If changing to gauges, replacing the sending units will be required. There will be one small green wire to disconnect from the ignition switch to disable the temp light bulb test feature to prevent pegging of the temp gauge when cranking the engine.
Right tool for the right job is right! I have one odd-sized skinny long nail i set aside just for terminal releasing!
Here are some more wiring diags:
Last edited by Lady72nRob71; June 3rd, 2012 at 09:42 AM. Reason: added last wiring diag
 November 8th, 2010, 05:44 AM
#14
Registered User
Thread Starter
Join Date: Feb 2008
Location: Plano, TX
Posts: 11,798
Thanks!
I do have to say the gauge set is pertty good. The only problem with mine was the poor lighting, resulting in the above operation.
They were a bit costly, but I do not regret it.
I think all cars should have gauges...
Here is more info on the repro sets:
https://classicoldsmobile.com/forums/other/30263-rally-pack-quality.html#post236324
https://classicoldsmobile.com/forums/electrical/18886-aftermarket-rally-gauges.html#post133199
Last edited by Lady72nRob71; January 5th, 2011 at 08:16 AM. Reason: added info
April 12th, 2011, 08:45 AM
#15
I havent attempted removing the gauges or any part of the instrument panel. is it pretty self explanatory? care to share any tips? I dont want to damage any parts of my dash by doing something stupid. I have a 72 cutlass convertible which is my first classic car and I dont want to somehow do something dumb to damage it.
April 12th, 2011, 08:51 AM
#16
Registered User
Thread Starter
Join Date: Feb 2008
Location: Plano, TX
Posts: 11,798
Most confusing part is removing the plastic bezel around the instruments.
There are two screws at the top and the two screws that hold the blue lamp lenses above the AC and wiper controls. Pull your shifter down (column shift only) and gently pull the top part out and it should slide out. Gauge removal is self explainitory, just don't drop any screws.
The connectors pull straight off and the speedo cable has a clip that you have to push or pull to disengage (forgot the details on that one...)
When reinstalling, do NOT overtighten the screws to avoid stripping threads or breaking the plastic. They could be brittle from over the years.
April 12th, 2011, 11:45 AM
#17
Same can be done for the area under the console that illuminates the driving status (Park..R,N,D etc.) The bulb in this area also has the light blue background. When I removed my console this past weekend to paint it, I noticed, as Rob did that the blue area was INCREDIBLY dirty and virtually covered with a black film. I cleaned out the area so the blue shows through and things are brighter and clearer.
April 17th, 2011, 08:02 PM
#18
Registered User

Join Date: Apr 2009
Location: chicago
Posts: 42
Robs right, installed my rally pack from the parts place could hardly tell that the lites were on , followed Robs instructions what a difference. Also installed all new 168 bulbs. Anyone who is planning to install a rally pack should just go ahead and follow these instuctions BILL
April 17th, 2011, 08:19 PM
#19
Registered User

Join Date: May 2009
Location: USA
Posts: 2,200
 May 13th, 2011, 08:07 AM
#21
Registered User
Thread Starter
Join Date: Feb 2008
Location: Plano, TX
Posts: 11,798
Here is some details on my Rally Pac installation, woven into this thread:
https://classicoldsmobile.com/forums...e-jumping.html
For those who installed the repro rally pac and found that the temp gauge reads high, it does!
Here is what you can do about it...
https://classicoldsmobile.com/forums...html#post26717
https://classicoldsmobile.com/forums...e-jumping.html
For those who installed the repro rally pac and found that the temp gauge reads high, it does!
Here is what you can do about it...
https://classicoldsmobile.com/forums...html#post26717
April 1st, 2012, 08:37 AM
#22
Registered User
Join Date: Aug 2011
Posts: 127
Rob - thanks a million for your step by step and pics on this.
I just did it with my '72 442. Replaced the bulbs with LED and painted the guage cans a little darker then yours, a sky blue. I did all three and also got some correct thickness lexan and replaced the scratched and hazy plastic lens covers too.
Its incredible and looks like new.
Heres a pic....not great but have a look.
April 1st, 2012, 06:16 PM
#24
Registered User
Thread Starter
Join Date: Feb 2008
Location: Plano, TX
Posts: 11,798
Rob - thanks a million for your step by step and pics on this.
I just did it with my '72 442. Replaced the bulbs with LED and painted the guage cans a little darker then yours, a sky blue. I did all three and also got some correct thickness lexan and replaced the scratched and hazy plastic lens covers too.
I just did it with my '72 442. Replaced the bulbs with LED and painted the guage cans a little darker then yours, a sky blue. I did all three and also got some correct thickness lexan and replaced the scratched and hazy plastic lens covers too.
As you found out, you can alter the paint colors and the bulb colors to get just the look you want. Practice on one gauge, then when it is just right, repeat it on the others!
April 3rd, 2012, 07:03 PM
#25
Registered User
Join Date: Aug 2011
Posts: 127
Thanks!
Yes, the colour is sweet when you see it in person. The pic doesn't really do it justice and is taken without the engine running....I suspect it would be a tad brighter with the engines fired and the system charging.
Those little plastic bulb holders are coming apart tho. Chintzy plastic that's forty years old. I hope not to have to change bulbs anytime soon.
As a side note, I took some light sandpaper to the circuit boards where the each of the bulbs screw into place and make contact with the board. Just to remove the corrosion or tarnish from the surface and ensure a good contact.
April 6th, 2012, 08:57 PM
#26
Registered User
Join Date: Aug 2009
Location: California
Posts: 26
Rob - thanks for all the info you have posted about the gauges. It's helped a lot. I got mine in the mail today and got the stock gauges removed before the sun went down. Install will happen tomorrow. I just wanted to verify on the wire harness for the gauge cluster before I tackle it though. On another post I read you only have to swap two wires. Their finished picture didnt look like yours though. Your first picture looks like mine but it appears that you swapped pretty much all the wires around in the second picture. Is that how I should do it?
 April 24th, 2012, 05:28 AM
#29
Registered User
Thread Starter
Join Date: Feb 2008
Location: Plano, TX
Posts: 11,798
You can do this, but one has to be careful to not change the colors or brightness too far from the target goal. A little change can make a big difference. Some experimentation on one gauge will needed to find just the right look to use on all of them. One can be very creative doing this!
August 21st, 2012, 08:48 PM
#30
Registered User
Thread Starter
Join Date: Feb 2008
Location: Plano, TX
Posts: 11,798
And remember, the painting of illumination reflectors can go well beyond the car hobby.
I just restored an old 1980 GE clock radio (that I had always admired when I was a kid) that had poor illumination.
This model uses an LCD clock and is lit up with a GE259 incandecent bulb. User replaceable, too!
Notice the plastic has yellowed from years of constant heat and light - compare with the new paint being applied...

I first painted it all white with two coats of model paint.
As that was drying, I replaced the drfective blue-capped grain o' wheat lamp in the dial pointer...

At this point, the display was brighter but too orangy when compared to the dial pointer.
So then I added enough blue to match the clock display to the dial pointer. The bottom cover is white painted already and was in perfect condition.

Due to the operating temperature of the bulb, you can see why blue is needed to give a whiter appearance. Note the new white paint looks yellow with the lamp on. The dimmer the bulb is, the more yellow there is.
So here it is, with display colors better matched than from the factory.

Turn out the lights and the whitish light really pops!

And that is in the middle brightness setting.
I love it when I am successful with a project!
So why this radio? Well it works, looks good, is easy to use, sounds great (4" speaker), and I can see it easily at night.
My newer one's night light died, its buttons were next to impossible to use or even identify, volume control touchy, and it sounded like crap. I am slowly replacing my broke 'new' stuff with good old stuff...
I just restored an old 1980 GE clock radio (that I had always admired when I was a kid) that had poor illumination.
This model uses an LCD clock and is lit up with a GE259 incandecent bulb. User replaceable, too!
Notice the plastic has yellowed from years of constant heat and light - compare with the new paint being applied...
I first painted it all white with two coats of model paint.
As that was drying, I replaced the drfective blue-capped grain o' wheat lamp in the dial pointer...
At this point, the display was brighter but too orangy when compared to the dial pointer.
So then I added enough blue to match the clock display to the dial pointer. The bottom cover is white painted already and was in perfect condition.
Due to the operating temperature of the bulb, you can see why blue is needed to give a whiter appearance. Note the new white paint looks yellow with the lamp on. The dimmer the bulb is, the more yellow there is.
So here it is, with display colors better matched than from the factory.
Turn out the lights and the whitish light really pops!
And that is in the middle brightness setting.
I love it when I am successful with a project!
So why this radio? Well it works, looks good, is easy to use, sounds great (4" speaker), and I can see it easily at night.
My newer one's night light died, its buttons were next to impossible to use or even identify, volume control touchy, and it sounded like crap. I am slowly replacing my broke 'new' stuff with good old stuff...
September 20th, 2012, 06:48 PM
#32
JC
Join Date: Feb 2012
Location: So Florida
Posts: 1,069
Rob, anyone else....you got any good engine harness, front lamp harness, etc diagrams you could post? (CSM\ASM are helpful but need more nitty gritty with wire colors) I got some diagrams Ive collected that arent so readable once you zoom in- too blurry...yet normal size they are still unreadable. Doing all the wiring in the whole car, except dash...for now that is!
adding original Tick Tock tach, too. The existing wiring has been hacked and parts of it are no longer reliable to use as a guide, not to mention the gremlins in the system before I tore it all down. I labeled all I could, but new harnesses have way more wires. I figured out some of them, but still unsure on some others here and there.
Thx.
September 20th, 2012, 07:33 PM
#33
Just an Olds Guy
Join Date: Jul 2008
Location: Edmonton, AB. And "I am Can 'eh' jun - eh"
Posts: 24,525
Rob, anyone else....you got any good engine harness, front lamp harness, etc diagrams you could post? (CSM\ASM are helpful but need more nitty gritty with wire colors) I got some diagrams Ive collected that arent so readable once you zoom in- too blurry...yet normal size they are still unreadable. Doing all the wiring in the whole car, except dash...for now that is!
September 25th, 2012, 11:39 AM
#36
JC
Join Date: Feb 2012
Location: So Florida
Posts: 1,069
Al, yes I did catch that post. It's just I cant make out the details of the pic. But it looks like a good diagram he has there that you can only see partially. Be nice to have a copy of that diagram, or a full hi res pic of it, or any other legible full or partial wiring diagram thats out there on engine and front lighting harness.
December 28th, 2012, 08:15 PM
#38
Registered User
Thread Starter
Join Date: Feb 2008
Location: Plano, TX
Posts: 11,798
For those experiencing temp reading that seem too high with the new repro RP,
see here to calibrate it to the sender you are using.
https://classicoldsmobile.com/forums...rally-pac.html
Great - glad I could help!
Let us know how it goes. Apply 12V to the lamps in the gauges to see what they look like out of the box. I am curious if they will ever fix their illumination issue.........
see here to calibrate it to the sender you are using.
https://classicoldsmobile.com/forums...rally-pac.html
Let us know how it goes. Apply 12V to the lamps in the gauges to see what they look like out of the box. I am curious if they will ever fix their illumination issue.........


