Power window conversion
 December 9th, 2008, 08:05 AM
#41
Registered User
Thread Starter
Join Date: Feb 2008
Location: Plano, TX
Posts: 11,798
I can use the garage door tracks just overhead...
You guys are just full of clever ideas! -Thanks!
My door panels are supposed to arrive on Friday, so i hope to get these regs replaces by then. I can then assemble the rear quarter panels over the weekend...
You guys are just full of clever ideas! -Thanks!
My door panels are supposed to arrive on Friday, so i hope to get these regs replaces by then. I can then assemble the rear quarter panels over the weekend...
 December 9th, 2008, 08:42 AM
#42
car guy
Join Date: Apr 2008
Location: Dallas TX
Posts: 5,659
Might be a little late but another option is street rod type switches that you mount the original crank handles too. You look in the car it looks like roll up windows but I light tug and it rolls up or down. Only draw back is you don't have a master switch for the driver.
December 9th, 2008, 09:05 AM
#44
Registered User
Thread Starter
Join Date: Feb 2008
Location: Plano, TX
Posts: 11,798
Might be a little late but another option is street rod type switches that you mount the original crank handles too. You look in the car it looks like roll up windows but I light tug and it rolls up or down. Only draw back is you don't have a master switch for the driver.
I was also concerned with breakage, as most who see the cranks, would be inclined to put a bunch of pressure on them to open the windows, not knowing they were just 'switches'.
") December 9th, 2008, 09:11 AM
December 9th, 2008, 09:11 AM
#45
car guy
Join Date: Apr 2008
Location: Dallas TX
Posts: 5,659
December 10th, 2008, 09:25 AM
#46
Registered User
Thread Starter
Join Date: Feb 2008
Location: Plano, TX
Posts: 11,798
More issues with the kit...
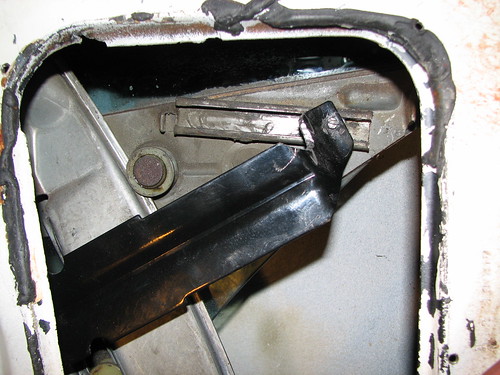
Upon a real good lookover yesterday, I noticed that both of the front regulators have broken rollers; see pics.
This just right out of the box.
There is no sign of evidence of someone else trying to install them, so it might be damage inflicted in production.
Luckily, noone at the PP argued and they will see what they can do for me. I will surely not absorb any cost from this...
Mike seems to be the nicer guy there, so i try to get him when possible.
Geez... If it is not one thing, it's another...
December 10th, 2008, 12:34 PM
#47
Registered User
Join Date: Oct 2008
Location: North East PA
Posts: 766
Another trick I used to hold the window up is a set of spring clamps with the rubber tips, got them at Harbor Freight for about a buck apiece, anyway pulled the window up put one clamp on each end and let the clamps rest on top of the door. By the way Lady is comeing along nice!
December 10th, 2008, 12:53 PM
#48
Registered User
Thread Starter
Join Date: Feb 2008
Location: Plano, TX
Posts: 11,798
That is even a better method of holding windows - my neighbors have lots of those clips and the other stronger ratchet types, so I am sure I can borrow some.
It is safer, too, as I can see already myself getting wrapped up and perhaps even hung in ropes hanging about. This tiny garage is for the birds!
 (literally...)
December 10th, 2008, 07:34 PM
(literally...)
December 10th, 2008, 07:34 PM
#50
Registered
Join Date: Jul 2006
Location: Northeast Ohio
Posts: 4,430
That is even a better method of holding windows - my neighbors have lots of those clips and the other stronger ratchet types, so I am sure I can borrow some.
It is safer, too, as I can see already myself getting wrapped up and perhaps even hung in ropes hanging about. This tiny garage is for the birds! (literally...)
It is safer, too, as I can see already myself getting wrapped up and perhaps even hung in ropes hanging about. This tiny garage is for the birds!
(literally...)
Last edited by Bluevista; December 10th, 2008 at 07:46 PM.
December 11th, 2008, 07:02 AM
#51
Registered User
Thread Starter
Join Date: Feb 2008
Location: Plano, TX
Posts: 11,798
I realized I would have had a rope angling across my only isle that I can actually walk in (no shuffling).
I knew what I would eventually do.
I did not earn the nickname "Murphy" for nothing!
December 11th, 2008, 07:03 AM
#52
Registered User
Thread Starter
Join Date: Feb 2008
Location: Plano, TX
Posts: 11,798
Lucky guy... 
I can walk next to about 1/2 of one side, shuffle the rest of that side and the front and the other side. I would have to become 2" thick to make it around the back...
Moral of the story: don't be cheap when building your garage... Always add a couple feet to each side.
I can walk next to about 1/2 of one side, shuffle the rest of that side and the front and the other side. I would have to become 2" thick to make it around the back...
Moral of the story: don't be cheap when building your garage... Always add a couple feet to each side.
Last edited by Lady72nRob71; December 11th, 2008 at 07:07 AM.
December 11th, 2008, 07:14 AM
#53
Moderator
Join Date: Jun 2008
Location: Atlanta, Georgia
Posts: 17,635
December 11th, 2008, 07:39 AM
#54
Registered User
Thread Starter
Join Date: Feb 2008
Location: Plano, TX
Posts: 11,798
December 11th, 2008, 11:07 AM
#55
Registered
Join Date: Jul 2006
Location: Northeast Ohio
Posts: 4,430

If it's too cold you should fire up that seat for warmth. I want a seat heater for this.

I finished my door panels and buttoning up everything else yesterday evening so now I need more to do or I'll get cabin fever. I have to find a tilt column so I can drive the car without my knees sticking out all over the place.
Allan
Last edited by Bluevista; December 11th, 2008 at 11:10 AM.
December 16th, 2008, 07:11 PM
#56
Registered User
Join Date: Oct 2008
Location: North East PA
Posts: 766
http://cgi.ebay.com/ws/eBayISAPI.dll...MEWA:IT&ih=007
Hey Rob, not sure if you still need this switch but I saw it on e-bay today
Hey Rob, not sure if you still need this switch but I saw it on e-bay today
December 22nd, 2008, 07:59 AM
#57
Registered User
Thread Starter
Join Date: Feb 2008
Location: Plano, TX
Posts: 11,798
The next weekend on a warm day preceding arctic front # 2, I tried installing a power regulator into the rear left quarter… I drilled out the four new mounting holes at the dimples already popped in the sheetmetal. The bolts and holes line up but that was as good as it got... (Yes, this is a picture of the right side...)
The spring tab stuck out to far and the reg would not mount flat. And even if it did, the arm roller was about �” away from the glass channel! The manufacturer of the kit, Auto City Classics, looked at some pictures and verified the kit “was” for my year and body style… I wonder if my car was built with the wrong quarters?? I think they are selling a one-size-and-style-fits-all” kit.
Here is the new electric quarter regulator and my old crank unit…
I pondered on my current choices: Return this kit and “try” a different kit with late style wiring, or just buy replacement electric regs and make my own wiring harness, or hunt aimlessly for months through select, distant junkyards that abide by the ”new” rules, or go back to the old cranks?
I did like the wiring harness of this kit and the fact it works with the old factory-type switches. I already had it installed except for in the front doors. I had the switches already…
A few days later, I decided it would take less time and effort to just make this ACC kit work for me.
On a 65* Saturday in between some 20* days, I spent a good 8 hours installing the rear quarter regulators.
I found that using spacers between the reg and the sheet metal would be the easiest; I did not want to do arm bending. So using some scrap �” and 3/8” aluminum bar stock, I made up eight 1” square spacers and drilled them with �” holes for the bolts…
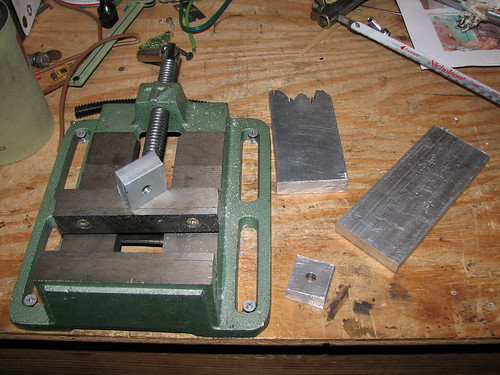
For the left regulator, I ended up using three �” spacers and one 3/8” spacer. The latter was used at the top front position.
For test power, I connected a 6amp battery charger to the window harness to limit current through the motors during installation. This helped to prevent severe injury, should my fingers get in the wrong place, AND it helped to point out binding spots easier. I installed the switches into the hanging wiring but had to cover the exposed terminals. During installation, I checked for binding each step of the way and this spacer setup seemed to work well. The only other thing to do was to adjust the down-stops to accommodate the different sized reg arms.
When I got to the right side, I noticed the window rollers were sloppy. Since the regulator was pulled, I just removed the upper glass stop and yanked the whole glass ***’y out to replace some rollers…
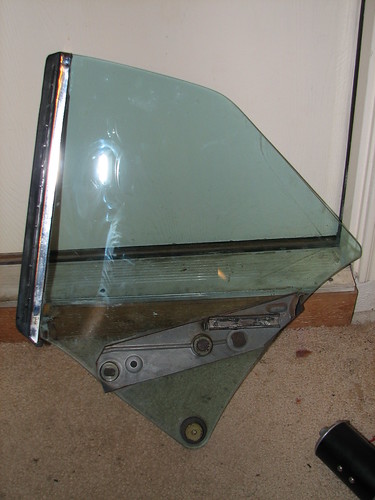
It seemed that only this front-top roller was sloppy, but where can it be obtained???

I have only seen the lower center roller at the parts suppliers and I even had one – they are very different.
I decided to just repair this one until I can find a correct replacement; it can be easily changed again with access through the quarter vent hole.
Using a plastic strip cut from a bottle, I heated it, greased it, wrapped it around the metal stud and fit it comfortably inside the roller’s worn out hole. A thin metal washer in the inboard side fixed the side-side slop. Good as new, for now…
So now the glass was reinstalled and the regulator was installed like the left side – great!
Now, the next problem reared its ugly head… The top of the regulator arm hit the top glass guide bracket before the glass was in the full up position. At this point I was almost to the point of returning this kit. But after looking how far I have gone, I decided an extra hour with a dremel would take less time…
-- Of course, this was the point of no return – there is no turning back after this mod… I went for it…
SO, after using up two “high speed cutters”, one grinding stone, and one abrasive wheel, I found that the diamond cutters were the best for this hard steel. After one and a half hours, I finally notched the arm to clear the glass support.
All worked fine afterwards. I later found I had to notch just a little from the left side, too.
The cut areas on the arm will be dabbed with POR15 later to prevent rust.
So at this point, BOTH quarters are electrically functional and movement was silky smooth! I secured the wiring in the quarters and then wired the window harness to the supplied 20amp breaker and then to the relay I installed earlier.
Success! The quarter windows race down in one second and up in one and a half – pretty fast!
I was thrilled to see that all my effort resulted in a good result – this is why I love this hobby!
As I know now, if this just bolted in, what fun would it be?? There would be no car “crafting”!
Arctic front # 3 had just come in, so the next day was used to rest up; the low was an icy 19*. Being the coldest day of the year, my old Ford’s choke heater gave up the ghost the next day on the way home from a church service. It ran, but horribly. A simple fix thank goodness…
The front door regulators will be installed this coming spring.
The spring tab stuck out to far and the reg would not mount flat. And even if it did, the arm roller was about �” away from the glass channel! The manufacturer of the kit, Auto City Classics, looked at some pictures and verified the kit “was” for my year and body style… I wonder if my car was built with the wrong quarters?? I think they are selling a one-size-and-style-fits-all” kit.
Here is the new electric quarter regulator and my old crank unit…
I pondered on my current choices: Return this kit and “try” a different kit with late style wiring, or just buy replacement electric regs and make my own wiring harness, or hunt aimlessly for months through select, distant junkyards that abide by the ”new” rules, or go back to the old cranks?
I did like the wiring harness of this kit and the fact it works with the old factory-type switches. I already had it installed except for in the front doors. I had the switches already…
A few days later, I decided it would take less time and effort to just make this ACC kit work for me.
On a 65* Saturday in between some 20* days, I spent a good 8 hours installing the rear quarter regulators.
I found that using spacers between the reg and the sheet metal would be the easiest; I did not want to do arm bending. So using some scrap �” and 3/8” aluminum bar stock, I made up eight 1” square spacers and drilled them with �” holes for the bolts…
For the left regulator, I ended up using three �” spacers and one 3/8” spacer. The latter was used at the top front position.
For test power, I connected a 6amp battery charger to the window harness to limit current through the motors during installation. This helped to prevent severe injury, should my fingers get in the wrong place, AND it helped to point out binding spots easier. I installed the switches into the hanging wiring but had to cover the exposed terminals. During installation, I checked for binding each step of the way and this spacer setup seemed to work well. The only other thing to do was to adjust the down-stops to accommodate the different sized reg arms.
When I got to the right side, I noticed the window rollers were sloppy. Since the regulator was pulled, I just removed the upper glass stop and yanked the whole glass ***’y out to replace some rollers…
It seemed that only this front-top roller was sloppy, but where can it be obtained???
I have only seen the lower center roller at the parts suppliers and I even had one – they are very different.
I decided to just repair this one until I can find a correct replacement; it can be easily changed again with access through the quarter vent hole.
Using a plastic strip cut from a bottle, I heated it, greased it, wrapped it around the metal stud and fit it comfortably inside the roller’s worn out hole. A thin metal washer in the inboard side fixed the side-side slop. Good as new, for now…
So now the glass was reinstalled and the regulator was installed like the left side – great!
Now, the next problem reared its ugly head…
The top of the regulator arm hit the top glass guide bracket before the glass was in the full up position. At this point I was almost to the point of returning this kit. But after looking how far I have gone, I decided an extra hour with a dremel would take less time… -- Of course, this was the point of no return – there is no turning back after this mod… I went for it…
SO, after using up two “high speed cutters”, one grinding stone, and one abrasive wheel, I found that the diamond cutters were the best for this hard steel. After one and a half hours, I finally notched the arm to clear the glass support.
All worked fine afterwards. I later found I had to notch just a little from the left side, too.
The cut areas on the arm will be dabbed with POR15 later to prevent rust.
So at this point, BOTH quarters are electrically functional and movement was silky smooth!
I secured the wiring in the quarters and then wired the window harness to the supplied 20amp breaker and then to the relay I installed earlier. Success! The quarter windows race down in one second and up in one and a half – pretty fast!
I was thrilled to see that all my effort resulted in a good result – this is why I love this hobby!
As I know now, if this just bolted in, what fun would it be?? There would be no car “crafting”!
Arctic front # 3 had just come in, so the next day was used to rest up; the low was an icy 19*. Being the coldest day of the year, my old Ford’s choke heater gave up the ghost the next day on the way home from a church service. It ran, but horribly. A simple fix thank goodness…
The front door regulators will be installed this coming spring.
Last edited by Lady72nRob71; December 22nd, 2008 at 09:22 AM.
January 8th, 2009, 09:56 AM
#58
Registered User
Thread Starter
Join Date: Feb 2008
Location: Plano, TX
Posts: 11,798
I had won it and received it last week. Perfect condition...
It saved me only 15 bucks compared to the repro (then) but it is NOS, which is much more desirable, imho!
It will be installed this spring when I do the doors. (I can't wait!)
January 8th, 2009, 10:02 AM
#59
Registered User
Join Date: Oct 2008
Location: North East PA
Posts: 766
Hey Rob, cool I'm glad you won it, with the work going into your car it deserves nos parts when you can find them, I was actally suprised to see that switch you see the single ones now and again but never the gang switch, I'm looking forward to seeing your interior back together myself it's gonna be a sharp ride .
.
.
March 24th, 2010, 07:43 AM
#60
Registered User
Thread Starter
Join Date: Feb 2008
Location: Plano, TX
Posts: 11,798
Well Eric, I decided to store away that perfect NOS switch and use this one first:
https://classicoldsmobile.com/forums...tml#post143599
The NOS one will be my cherry spare!
https://classicoldsmobile.com/forums...tml#post143599
The NOS one will be my cherry spare!
March 24th, 2010, 07:46 AM
#61
Registered User
Thread Starter
Join Date: Feb 2008
Location: Plano, TX
Posts: 11,798
It's finally time to put this power window thread to rest...
When the door was pulled and hinges were being restored, the wiring boots for the doors were added.
Kick panels and door sills were removed.
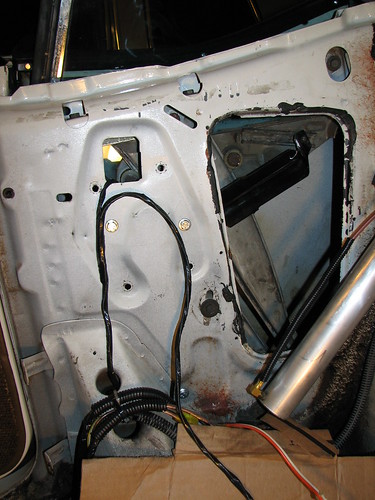
I was unfortunate to have to use a $3 chinesium hole saw set from Harbor Freight. The biggest issue is that the center drill bit was not straight. Therefore it wobbled and made the hole almost another 1/8” bigger than it was supposed to be.
I learned this on the bigger 2.5” hole on the frame side. The hole is almost too big, so some sealant / weatherstrip adhesive will be necessary. A 2.25” hole saw would be ideal to start with.
Below is the cutting process there (Left side). Note the magnets I used to help capture the metal shavings. Bigger ones would have been better. I ran the drill at about 100RPM and kept the saw lubed with clean motor oil.
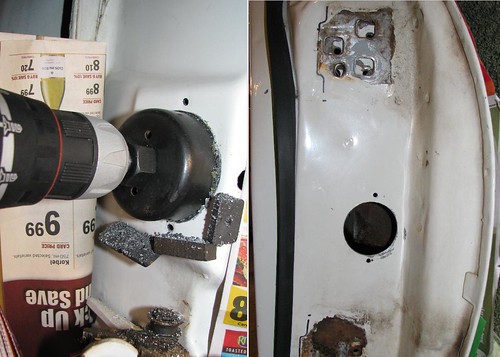
When drilling the door, I used a smaller blade (2"), so even with the added wobble factor, the hole size was perfect - 2 1/8" (right side of above picture).
I drilled for the boots’ mounting holes last.
After the door was back on and adjusted, the window was supported with wood blocks at 1/2 way down in two places and the manual regulator removed and disengaged from the roller guide. Window was pulled all the way up and supported by wood blocks again in two places (in case one was accidentally bumped out.)
The regulator was extracted roller first through the big hole in the door (yes, it DOES fit!) Door locking rod did not need to be removed as said in the body manual. Nothing else needed to be removed or loosened – imagine that!
Dynamat was added in the door (see interior makeover thread for that fun part) and the wiring (installed earlier) was pulled through the boot into the door. The window switch connectors were stowed away behind the kick panels earlier. Trying to get that chunky left-hand connector through that boot was a challenge. See pic way below...
I eventually coaxed it through by squeezing the door side of the boot to make it taller, and pulled & pushed it through.
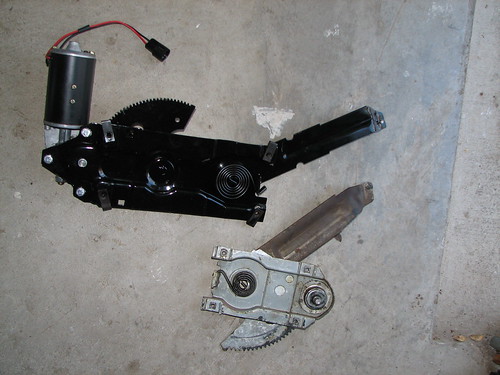
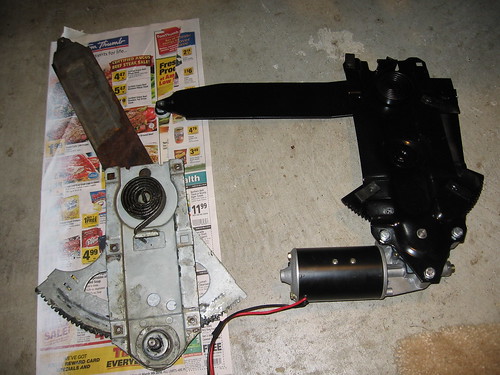
Here is the old manual regulator and the new power unit. The U-nuts on the power unit were moved to the 4”x8” rectangular bolt pattern holes.
The body manual said to install the regulator with the window half way down. So, the power reg in the picture above is in the 9:00 position for about 1/2 down. Well I found 1/4 down to be better for getting the regulator into the door. I found the 10:30 position to be ideal for approximately 1/4 down, so I moved it by hooking a battery charger to the motor. A few drops of oil in the friction areas were added and I also ran it up and down a few times to verified it worked. Watch your fingers when running it!!
With the window still in the full up position, the power reg was gently forced in through the big access hole in the door, motor first, contrary to the body manual’s suggestion. This is where the 10:30 position helps you! The inner metal was pulled in by hand to gain more clearance, and the regulator dropped inside the door.
It was rotated and moved to the front side of the door and window was lowered about 5” or so.
Amazingly, the regulator roller fit perfectly into the guide (which was previously cleared of old grease).
The power regulator uses different bolt locations than the manual reg; see picture below. The front bottom bolt was put in finger tight to hold it and the wood blocks removed, while still holding the window supports by hand. Window can be raised or lowered by hand so that the regulator will rotate, allowing rest of the bolts to be inserted. If you get to full up and that is not enough, the battery charger can be reconnected to the motor to allow it to rotate into position. Keep fingers out of the mechanisms when applying power!
To my disbelief, the power regulator bolted right in with NO mods!!! This was much better than the back ones…
The battery charger was used to power the window up and down slowly and controllably for testing. I found that the bolts must be 5/8” long – NO MORE! A standard 3/4” bolt protrudes too much and the moving arm caught on it and stalled the motor at about 3/4 down. Using the battery allows too much power, and in this case, could have caused some damage when that bolt was hit. When installing bolts, check inside for clearance when fully tightened, adding washers where needed to keep proper clearance. I actually took 3/4" long bolts and cut off an 1/8" of each with a dremel cutoff wheel. I hate having too many washers.
Here is how things looked after installation:

Note the four shiny bolts in the power window regulator holes.
I applied locktite to them and the inside door handle mechanism bolts as well.
Also note the upper glass stop through the speaker opening. This can easily catch on the wiring harness, so the wiring must be secured out of the way with tie-wraps. Secure loosely enough to prevent damage to wiring. Use split loom tubing and wrapping tape to protect the wires from rubbing on metal surfaces.
While it looks like the speaker would no longer fit, it will, as the door panel thickness gains me just enough clearance.
The motor connector and other wiring were secured and the 4-gang switch temporarily installed for testing.
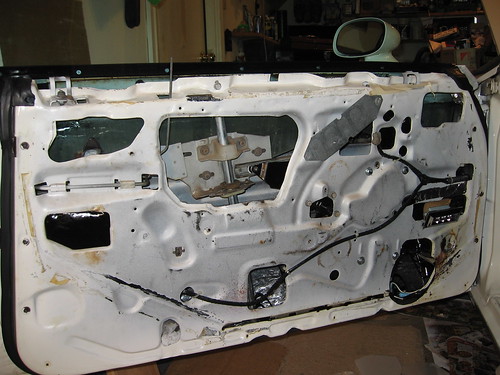
Battery was connected and to my amazement, all the windows worked so far! Extra Dynamat was applied to inside the door and over the window switch opening.
The new front window closed a bit tight and caused some motor juddering when opening, but some grease behind the guide pole stopped that. Some extra grease was applied to the regulator gear and door release mechanism also.
Lastly, window glass alignment was verified and was right on.
Watershield was later reattached with 3M strip caulk, which is very sticky but reusable. I cleaned the surfaces with alcohol first.
Now to repeat this for the right door!
Kick panels and door sills were removed.
I was unfortunate to have to use a $3 chinesium hole saw set from Harbor Freight. The biggest issue is that the center drill bit was not straight. Therefore it wobbled and made the hole almost another 1/8” bigger than it was supposed to be.
I learned this on the bigger 2.5” hole on the frame side. The hole is almost too big, so some sealant / weatherstrip adhesive will be necessary. A 2.25” hole saw would be ideal to start with.
Below is the cutting process there (Left side). Note the magnets I used to help capture the metal shavings. Bigger ones would have been better. I ran the drill at about 100RPM and kept the saw lubed with clean motor oil.
When drilling the door, I used a smaller blade (2"), so even with the added wobble factor, the hole size was perfect - 2 1/8" (right side of above picture).
I drilled for the boots’ mounting holes last.
After the door was back on and adjusted, the window was supported with wood blocks at 1/2 way down in two places and the manual regulator removed and disengaged from the roller guide. Window was pulled all the way up and supported by wood blocks again in two places (in case one was accidentally bumped out.)
The regulator was extracted roller first through the big hole in the door (yes, it DOES fit!) Door locking rod did not need to be removed as said in the body manual. Nothing else needed to be removed or loosened – imagine that!
Dynamat was added in the door (see interior makeover thread for that fun part) and the wiring (installed earlier) was pulled through the boot into the door. The window switch connectors were stowed away behind the kick panels earlier. Trying to get that chunky left-hand connector through that boot was a challenge. See pic way below...
I eventually coaxed it through by squeezing the door side of the boot to make it taller, and pulled & pushed it through.
Here is the old manual regulator and the new power unit. The U-nuts on the power unit were moved to the 4”x8” rectangular bolt pattern holes.
The body manual said to install the regulator with the window half way down. So, the power reg in the picture above is in the 9:00 position for about 1/2 down. Well I found 1/4 down to be better for getting the regulator into the door. I found the 10:30 position to be ideal for approximately 1/4 down, so I moved it by hooking a battery charger to the motor. A few drops of oil in the friction areas were added and I also ran it up and down a few times to verified it worked. Watch your fingers when running it!!
With the window still in the full up position, the power reg was gently forced in through the big access hole in the door, motor first, contrary to the body manual’s suggestion. This is where the 10:30 position helps you! The inner metal was pulled in by hand to gain more clearance, and the regulator dropped inside the door.
It was rotated and moved to the front side of the door and window was lowered about 5” or so.
Amazingly, the regulator roller fit perfectly into the guide (which was previously cleared of old grease).
The power regulator uses different bolt locations than the manual reg; see picture below. The front bottom bolt was put in finger tight to hold it and the wood blocks removed, while still holding the window supports by hand. Window can be raised or lowered by hand so that the regulator will rotate, allowing rest of the bolts to be inserted. If you get to full up and that is not enough, the battery charger can be reconnected to the motor to allow it to rotate into position. Keep fingers out of the mechanisms when applying power!
To my disbelief, the power regulator bolted right in with NO mods!!! This was much better than the back ones…
The battery charger was used to power the window up and down slowly and controllably for testing. I found that the bolts must be 5/8” long – NO MORE! A standard 3/4” bolt protrudes too much and the moving arm caught on it and stalled the motor at about 3/4 down. Using the battery allows too much power, and in this case, could have caused some damage when that bolt was hit. When installing bolts, check inside for clearance when fully tightened, adding washers where needed to keep proper clearance. I actually took 3/4" long bolts and cut off an 1/8" of each with a dremel cutoff wheel. I hate having too many washers.
Here is how things looked after installation:
Note the four shiny bolts in the power window regulator holes.
I applied locktite to them and the inside door handle mechanism bolts as well.
Also note the upper glass stop through the speaker opening. This can easily catch on the wiring harness, so the wiring must be secured out of the way with tie-wraps. Secure loosely enough to prevent damage to wiring. Use split loom tubing and wrapping tape to protect the wires from rubbing on metal surfaces.
While it looks like the speaker would no longer fit, it will, as the door panel thickness gains me just enough clearance.
The motor connector and other wiring were secured and the 4-gang switch temporarily installed for testing.
Battery was connected and to my amazement, all the windows worked so far! Extra Dynamat was applied to inside the door and over the window switch opening.
The new front window closed a bit tight and caused some motor juddering when opening, but some grease behind the guide pole stopped that. Some extra grease was applied to the regulator gear and door release mechanism also.
Lastly, window glass alignment was verified and was right on.
Watershield was later reattached with 3M strip caulk, which is very sticky but reusable. I cleaned the surfaces with alcohol first.
Now to repeat this for the right door!
March 24th, 2010, 09:15 AM
#62
Registered
Join Date: Jul 2006
Location: Northeast Ohio
Posts: 4,430
Very nice Rob, between you and me and powerful windows that actually work when they're finished you have now proven conclusively that even two blind squirrells can find a nut once in awhile.
That switch won't go bad in a million years as long as you have a spare.
Did you run a circuit in for heated mirrors to match your seats? How about those cool directional signals in the mirrors behind the glass?
The funny thing is that I'm not kidding.
That switch won't go bad in a million years as long as you have a spare.
Did you run a circuit in for heated mirrors to match your seats?
How about those cool directional signals in the mirrors behind the glass?The funny thing is that I'm not kidding.
March 24th, 2010, 09:38 AM
#63
Registered User
Thread Starter
Join Date: Feb 2008
Location: Plano, TX
Posts: 11,798
Nope, never even thought of it.
The caddy has those heated mirrors and I never found them to be useful where I live. They come on with the rear defroster, which is something else I found not to be useful in my area also. I try it out every 2 or 3 years to see if my mind would change - not yet...
The garage door opener I added was something much more useful.
Turn indicators in the mirrors weren't needed, since they did not stick out 2 feet past the door like those new truck mirrors do.
 March 28th, 2010, 03:19 PM
#67
Registered
Join Date: Jul 2006
Location: Northeast Ohio
Posts: 4,430

I'll have to ask Sigmund Redgoat.
I thought the truck mirrors, full width mudflap/Tennessee air brakes and retread tires were going to be okay on my Vista Cruiser.
We all can't afford new correct mirrors, real working brakes and first owner tires Rob.
May 17th, 2010, 12:31 PM
#68
Registered User
Join Date: Feb 2010
Location: Raleigh, NC
Posts: 90
Rob,
Looking at putting PW's in my 71 Cutty and reading though your post. Looks great and nice job. However, knowing what you know now, what "kit" would you suggest getting if you were to install this in another one?
Thanks,
Looking at putting PW's in my 71 Cutty and reading though your post. Looks great and nice job. However, knowing what you know now, what "kit" would you suggest getting if you were to install this in another one?
Thanks,
May 18th, 2010, 05:56 AM
#69
Registered User
Thread Starter
Join Date: Feb 2008
Location: Plano, TX
Posts: 11,798
No kits for me anymore.
The one I got from parts place is not recommended.
Furthermore, I had the teeth on one rear regulator strip out at the UP position already - they do not appear to be heat treated steel. I still need to report that in detail when I cool off about it.
Here is what happened to the right reg after only 1 year of occasional, gentle use:

The kit MFGR replaced it under warranty but the other back one is fixing to strip out also - its teeth feel thin and deformed, and this picture taken through the quarter vent proves it (note the 5th tooth):

Four hours is needed to remove and replace, as the whole back trim must be removed. I had to regrind in the mods, too - another hour.
The only thing I liked about my kit is the correct wiring at the switches and the front regs did not need mods to fit. When will they strip out though? Geez...
Order good used or NOS or repro power window regulators, switches and wiring harness for a power window equipped car. (Use replacement repro at last resorts for the regulators - you do not know what you are getting.)
Keep in mind good looking used regs with bad motors are good scores, as the motors are replaceable.
If you want very correct styling, avoid the kits at all costs - I did not find any that were correct for 71 & 72.
The one I got from parts place is not recommended.
Furthermore, I had the teeth on one rear regulator strip out at the UP position already - they do not appear to be heat treated steel. I still need to report that in detail when I cool off about it.
Here is what happened to the right reg after only 1 year of occasional, gentle use:
The kit MFGR replaced it under warranty but the other back one is fixing to strip out also - its teeth feel thin and deformed, and this picture taken through the quarter vent proves it (note the 5th tooth):
Four hours is needed to remove and replace, as the whole back trim must be removed.
I had to regrind in the mods, too - another hour.The only thing I liked about my kit is the correct wiring at the switches and the front regs did not need mods to fit. When will they strip out though? Geez...
Order good used or NOS or repro power window regulators, switches and wiring harness for a power window equipped car. (Use replacement repro at last resorts for the regulators - you do not know what you are getting.)
Keep in mind good looking used regs with bad motors are good scores, as the motors are replaceable.
If you want very correct styling, avoid the kits at all costs - I did not find any that were correct for 71 & 72.
Last edited by Lady72nRob71; July 9th, 2010 at 10:52 AM. Reason: Added picture and more details.
July 9th, 2010, 11:06 AM
#70
Registered User
Thread Starter
Join Date: Feb 2008
Location: Plano, TX
Posts: 11,798
Power window update:
In late May, I had to say this PW kit I got was 50% junk. Not only did I have the defects and fit issues as already mentioned, but I have had BOTH regulators in the rear fail after only a year of very little use.
The right rear regulator’s main gear stripped out, as seen in post above.
Luckily, when I contacted the kit vendor (NOT the parts place, who would most likely not want to help me), they offered to replace it under warranty. So I had to take most of the back seat and trim out to pull the reg. (about 1.5 hours).
I got a new reg back in about 9 days – not bad. I was smart enough to trace the outline of the cut-out area (the infamamous modify-to-fit cutout) on a piece of paper, so all I had to do was trace the cutout onto the new reg and start grinding!

This took awhile – I am surprised to think I last cut that out with a dremel with the reg in the car! Seems almost like heat-treated steel to me!
I dabbed some POR15 on the cutout’s edge and lubed it and reinstalled it.
The reinstallation process was pretty straightforward.
The only difference is that this regulator moves more slowly. It is more like a ‘normal’ power window. Not sure if the new one is geared differently or it has a stiffer spring, but I wish they all moved like that.
During the next drive a few weeks later, the left rear regulator failed! The window went all the way up, then I heard a loud POP, CLUNK, RATTLE RATTLE… The motor turned freely and the window could be moved up and down by hand. I thought the roller broke, but actually it turned out to be one of the big rivets in the linkage!
Note the two holes that are supposed to have the rivet joining them:

I NEVER thought THAT would come apart!
I emailed the vendor about it and they said they could repair it if I sent it in.
So before pulling anything apart, I did my best to check the drive gear though the quarter vent – sure enough it was getting ready to strip out!! Only about half of the 5th tooth is left (see picture in post above)...
When I called the vendor the next day, I told them about the gear, too. They said they would send another replacement reg and told me to trash the old one. Nice idea, but still hate the fact that it failed. Since the gear is still kinda okay for now, I made up a custom temporary repair part so I can rejoin the linkage through the door jam vent. I do not want to tear the interior out again.
I used a short �” screw (with short head), nut, washer, and a hand-fabbed aluminum bushing (to go inside the larger hole) as seen here:

Due to tight clearances, getting the screw in the hole through the vent was impossible for adult hands.
SO, I had to stick the bolt to a custom-shaped aluminum ‘tool’ with some gum…

...and use the tool to insert the screw while prying the upper linkage out some with a screwdriver.
Success! I put on the bushing, washer, and the nut, secured with loctite.

It works again and I will leave it till the gear strips. Then I will install the new reg and I should at least have another trouble-free year.
Next year, all four may crap at once... These things suck, just like replacing them, but I am glad the vendor is at least taking care of the issues.
The right rear regulator’s main gear stripped out, as seen in post above.
Luckily, when I contacted the kit vendor (NOT the parts place, who would most likely not want to help me), they offered to replace it under warranty. So I had to take most of the back seat and trim out to pull the reg. (about 1.5 hours).
I got a new reg back in about 9 days – not bad. I was smart enough to trace the outline of the cut-out area (the infamamous modify-to-fit cutout) on a piece of paper, so all I had to do was trace the cutout onto the new reg and start grinding!
This took awhile – I am surprised to think I last cut that out with a dremel with the reg in the car! Seems almost like heat-treated steel to me!
I dabbed some POR15 on the cutout’s edge and lubed it and reinstalled it.
The reinstallation process was pretty straightforward.
The only difference is that this regulator moves more slowly. It is more like a ‘normal’ power window. Not sure if the new one is geared differently or it has a stiffer spring, but I wish they all moved like that.
During the next drive a few weeks later, the left rear regulator failed! The window went all the way up, then I heard a loud POP, CLUNK, RATTLE RATTLE… The motor turned freely and the window could be moved up and down by hand. I thought the roller broke, but actually it turned out to be one of the big rivets in the linkage!
Note the two holes that are supposed to have the rivet joining them:
I NEVER thought THAT would come apart!
I emailed the vendor about it and they said they could repair it if I sent it in.
So before pulling anything apart, I did my best to check the drive gear though the quarter vent – sure enough it was getting ready to strip out!! Only about half of the 5th tooth is left (see picture in post above)...
When I called the vendor the next day, I told them about the gear, too. They said they would send another replacement reg and told me to trash the old one. Nice idea, but still hate the fact that it failed. Since the gear is still kinda okay for now, I made up a custom temporary repair part so I can rejoin the linkage through the door jam vent. I do not want to tear the interior out again.
I used a short �” screw (with short head), nut, washer, and a hand-fabbed aluminum bushing (to go inside the larger hole) as seen here:
Due to tight clearances, getting the screw in the hole through the vent was impossible for adult hands.
SO, I had to stick the bolt to a custom-shaped aluminum ‘tool’ with some gum…
...and use the tool to insert the screw while prying the upper linkage out some with a screwdriver.
Success! I put on the bushing, washer, and the nut, secured with loctite.
It works again and I will leave it till the gear strips. Then I will install the new reg and I should at least have another trouble-free year.
Next year, all four may crap at once... These things suck, just like replacing them, but I am glad the vendor is at least taking care of the issues.
July 10th, 2010, 06:53 AM
#72
Registered User
Thread Starter
Join Date: Feb 2008
Location: Plano, TX
Posts: 11,798
I am thinking the main issue with mine is that the motors are too powerful and too fast. The windows move way too fast. A one second blip on the switch has the window down, two seconds up.
When the window reaches the top, the gear teeth are overstressed when the motor naturally stalls. Once one tooth shears, the others next to it follow.
When the window reaches the top, the gear teeth are overstressed when the motor naturally stalls. Once one tooth shears, the others next to it follow.

Thread
Thread Starter
Forum
Replies
Last Post
Bitburger
Parts For Sale
1
February 3rd, 2013 05:07 PM
f-85
Parts Wanted
1
January 16th, 2012 06:10 AM


