When you click on links to various merchants on this site and make a purchase, this can result in this site earning a commission. Affiliate programs and affiliations include, but are not limited to, the eBay Partner Network.
I looked for a good step by step thread on installing a trunk release, but didn't find one! Maybe this will help someone like me who has the pieces but isn't sure what to do!
First you need the proper switch and wiring. Removing the glove box and door makes things much easier and only takes a few minutes. I found an NOS release button, and I bought a power wire and jumper from Motor City - don't get me started. Both connector ends fell off the power wire and I had to strip and solder to make the wire work. Anyway, drill the hole in the dash where the dimple is, just above the glove box light switch (or the second dimple if you don't have a glove box light). Get a step drill that ends at 3/4", that way you won't drill the hole too big. Factory manual says drill a .750" hole, so I did.
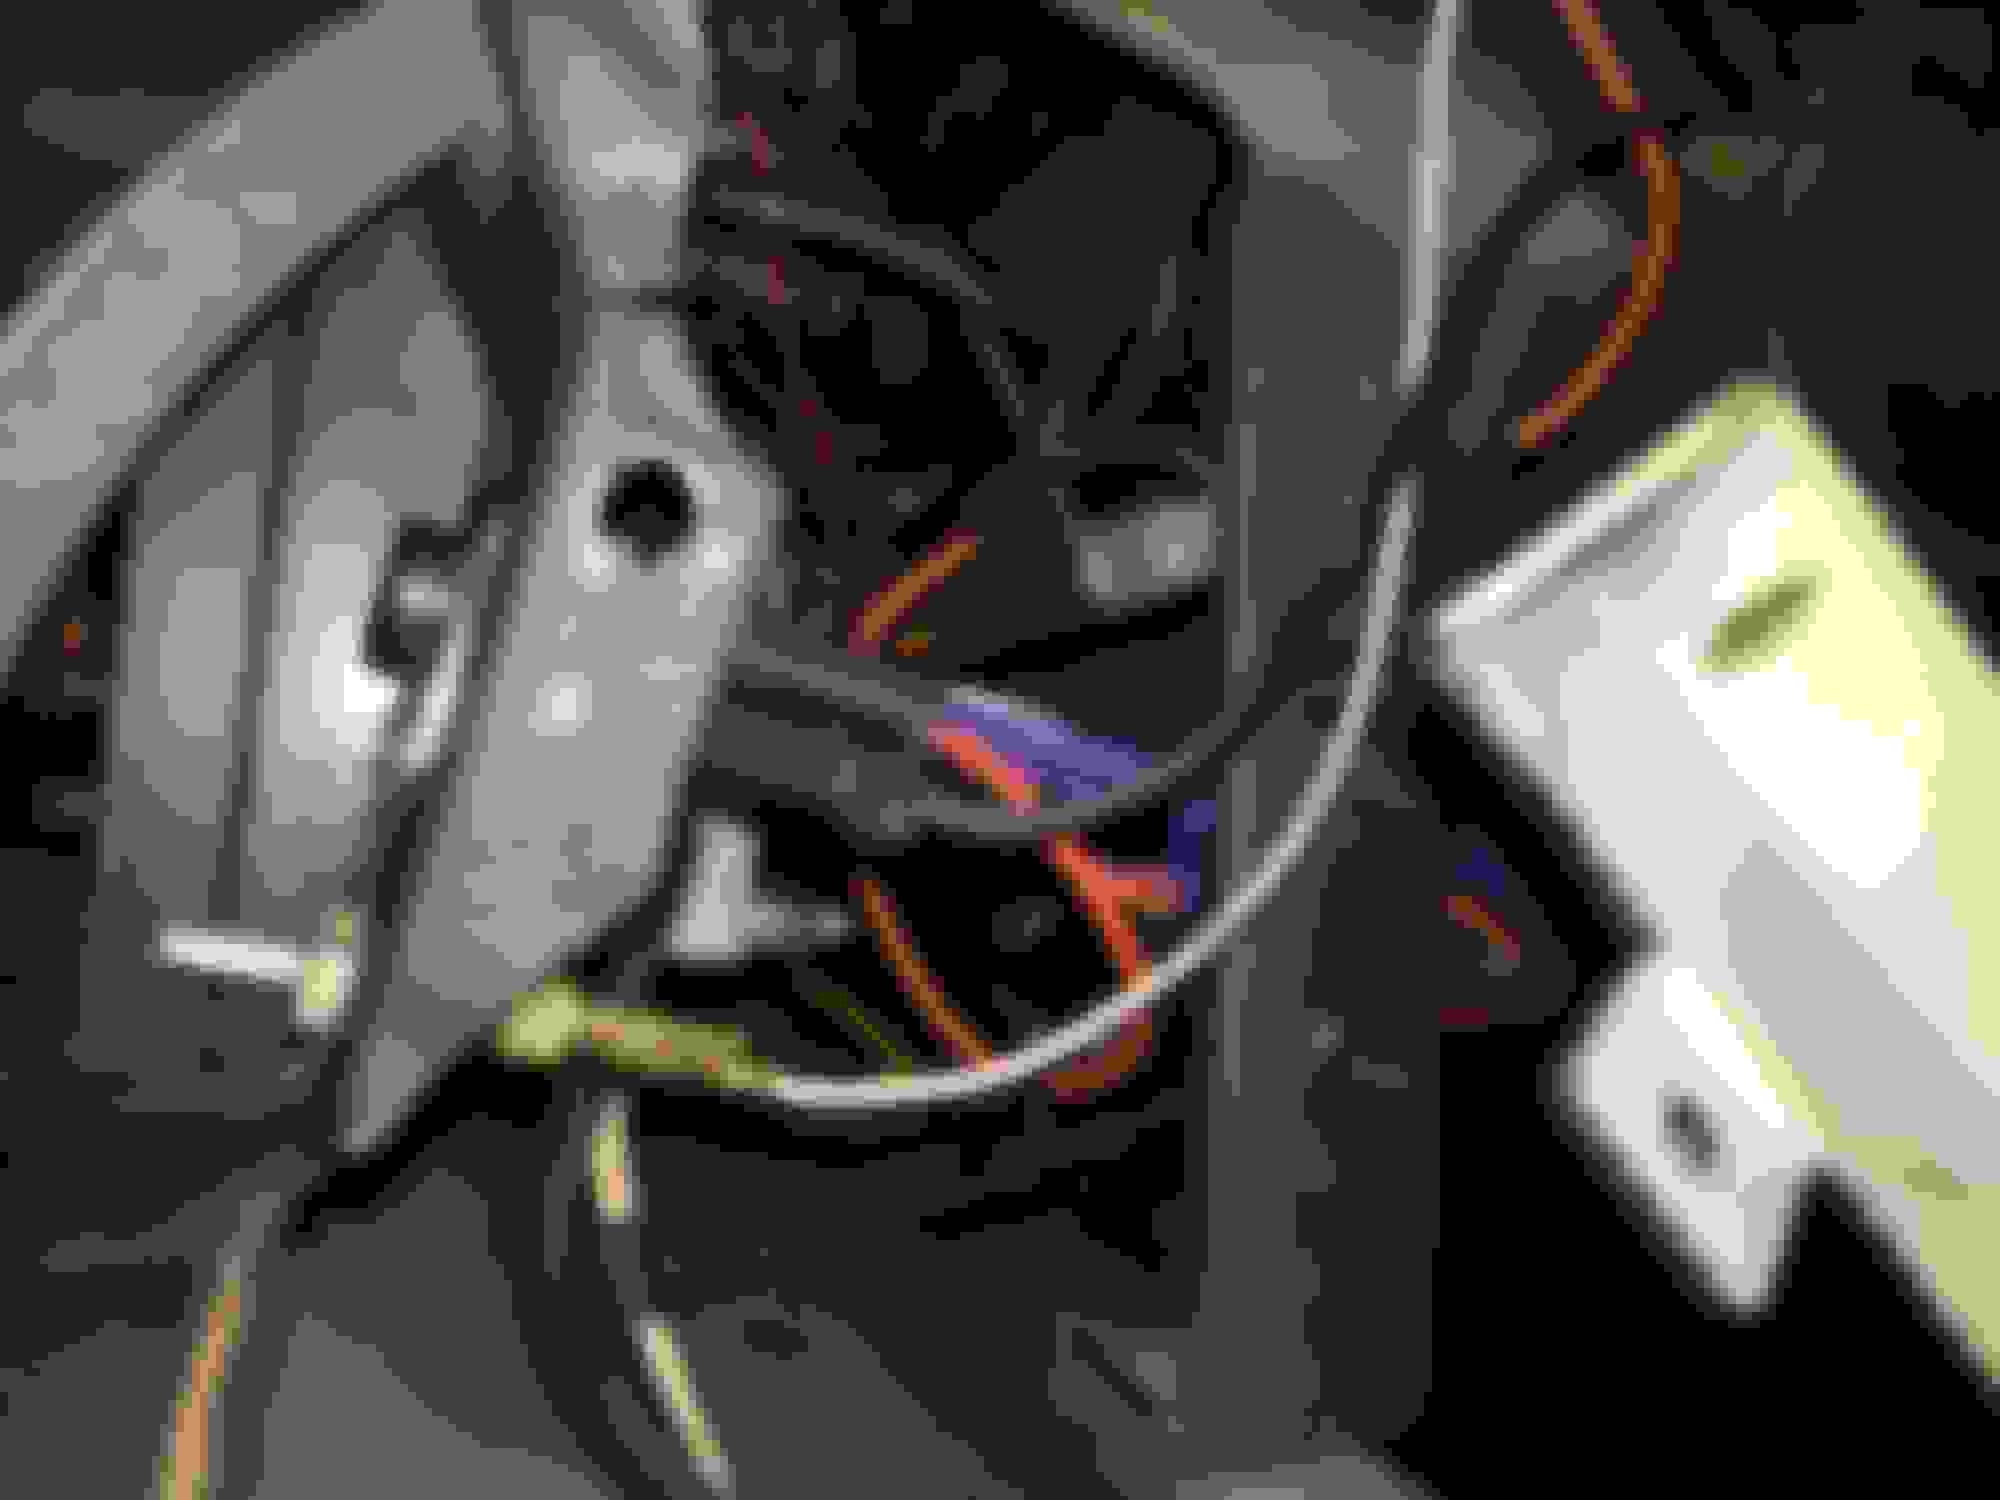
It's easy to slide the new switch into place and install the jumper wire onto the factory orange harness wire. Mine was currently connected to the glove box light orange wire, so I unplugged it, reconnected the glove box light to the other side of the jumper, then ran the longer end of the jumper wire to the top of the new trunk switch.
Here you can see the trunk switch, the orange jumper wire running back to the harness, the white/clear connector from the glove box attached to the jumper, and the wire going to the trunk attached to the bottom of the switch. I connected everything prior to full installation for a test - and good thing, or I would have had a non-functioning release. The wire ends were both bad and needed repair.
Once I repaired the wire to the trunk, I needed to run it down the passenger side to the trunk. I didn't care to remove the front seat, but you can, and I had to remove the back seat. I ran the wire under the carpet pad and under the sound deadener mat using an unfolded coat hanger and masking tape to thread it under the seat. I ran the end up under the firewall insulation near the center console and up over the heater box to meet up with the wiring from the glove box light. Here you can see me pulling the wire up to the right of the defroster duct using the coat hanger.
I ran the wire on the left side of the rear seat belt and up through the larger hole into the trunk as the factory had done.
Then using the trusty coat hanger, I snaked through the trunk lid from the trunk release to the opening in the trunk lid. I ran the wire through the trunk hinge and up and through the trunk lid until I could connect it with the actuator.
I connected the wires and attached the loose wire in the trunk using standard bent connectors similar to what GM used - I ran the wire to the far right to get it out of the way of anything in the trunk.
Push the button and the trunk opens!!! All in all with the soldering of the wires and removal of the seats, plus a couple cold ones to make me take my time and do it right, the entire process from glove box door/box removal to opening the trunk remotely took about 5 hours.
Nice! Where do you order these parts? I'm thinking of doing the same.
The TRUNK button I found here from another member, and the trunk release actuator I found on eBay. The wiring I found on eBay as well, but if you go there, get it from someone other than Motor City. There are several vendors online who sell the wiring and the short orange jumper wire.
Post in Parts Wanted and I'm sure you'll get replies from members who have what you need!
Last edited by BSiegPaint; Apr 22, 2018 at 02:17 PM.
BSiegPaint - Great pictures and explanations!! (If you are no longer active on this forum, I welcome comments from any other readers.) I'm installing the trunk release set-up in my '72 Supreme, using parts I pulled from a salvage yard in the early 1980s. Been stored in my garage since then, but I'm now reupholstering and replacing the carpet, so convenient time to do it. Unfortunately, the release button has wandered off sometime over the last 40 years.
Your pictures answered one of my questions, which was whether the reinforced end of the wire goes on the trunk end or the under dash end. I had thought it would go under the dash to protect from the sharp edges there. I've been searching the TeamChevelle Forum also, and DZAuto there posted a picture of his (not factory installed) wiring for his '70 Chevelle. That showed me that he had the reinforced area in the trunk (first attached picture).
My next question was into which opening in the trunk the wire should go. Again, your picture showed me that the wire goes into the odd-shaped opening about 6 inches above the end of passenger side hinge. I hope that is where the factory placed the wire. If it is, that's where I want mine to go. DZ's Chevelle does not have a similar opening.
Two days ago I spent about an hour and a half trying to route the wire into the trunk and up to the location of the solenoid. Unfortunately, I inserted it into an opening at the bottom edge of the trunk near the hinge, because I had not noticed that odd-shaped opening that looks like it was designed to accommodate a wire. My second mistake was to put the unreinforced end of the wire in the trunk. So I will be pulling it out and re-doing the routing, as I would like it to be "factory correct".
The second picture shows the path of my first routing, and the third shows my proposed routing. In that third pic, I would ideally like to route the wire underneath the right side lip of the hinge, but I don't think the reinforced section will fit there. Do you know if your routing of that section is the way the factory did it?
By the way, mine is a convertible, so I plan to run the wire over the top of the wheel well into the passenger compartment. I do have an original (dealer installed) rear speaker, so I will have the black trunk wire follow the path of the blue speaker wire.
When I salvaged my wire, it had 3 clips attached to the reinforced section, as shown in the 4th picture. Do you possibly know where those clips should be attached? DZAuto has one attached to the left side of the passenger side hinge. I would attach mine to the right side of that hinge. One of your pictures shows your wire running right through the hinge channel. I was afraid that might cause the wire to interfere with the hinge, or possibly be damaged by it. Accordingly, I was planning to run my wire directly from the wheel housing up alongside the right side of the hinge, rather than through the center channel. Is your routing the way the factory did it?
Hey Bill - I followed the exact wire routing seen in the 1970 assembly manual. The added wiring clips go onto the back of the seat support/trunk divider panel and onto a lip of the body steel on top of the wheel well to guide the wire where it won't get caught on anything tossed into the trunk or catch on the hood hinge as it moves. Routing the wire differently probably won't make that much difference, but you want to avoid having unwrapped wiring running over a sharp metal edge, since it moves and would wear a hole into the wire casing. I thought it was odd that the wiring ran through the hinge, but that provides a straight line right to the entry hole in the trunk and situates the wiring where it won't be pinched, and is completely protected from outside snags and pulls. Maybe not the greatest design, but creates the most direct and protected route to the release latch. I'm having a devil of a time relocating the ASM diagram showing this routing, but if I do, I'll post it here.
That sounds good, and the button looks good. Before I pull the trigger though, I'd like to ask if any readers know the correct original colors of the buttons for years 1970 through1972. DZAuto in the Chevelle forum wrote the following colors for Chevelles. I would have thought that GM would have used the same colors for all of its A-bodies in those years. I must admit though that I've never heard of or seen a brown button either. Of course my primary concern is for a '72. According to DZ it was yellow. Also, I feel pretty sure that the button I removed from the salvage yard, from a '72 I think, was in fact yellow. I know that the service replacements for the buttons, regardless of year, was yellow.
Being on Social Security requires me to ask: would it be less expensive to ship it to zip code 30540 or 33470? If I learn that yellow was the correct button for the originals in '72, I would ask you to ship it to the least expensive of those, if you haven't already sold it by then. And, if you get an offer from another reader, don't hesitate to sell it to that reader.
Since that wiring is from the '70 Assembly Manual (I don't have an assembly manual) I'll try to follow it. I doubt if it changed for '72. That wire through the hinge looks a little precarious though, right in the area of the hinge movement. I'll see how it sits there, and do that if it doesn't appear to pose a problem. to take it straight back from the hinge I will have to route it under the boot well for the top, which is why I was going to route it over the wheel well., but I will take a look at how it loos under the boot well.
What do you think about my routing in the trunk though? Do you think that my planned routing (3rd picture in my post) has it in the right channels of the trunk lid?
Do you have the wire clipped under the dash anywhere? I didn't notice any clips in your under dash pics, but could easily have missed it.
Don't waste your time looking for the ASM diagram - it would be nice to have, but not worth your spending time on it. I know how tough it is to find pictures take in the distant past!
Factory Installed '72 Cutlass Power Trunk Release Button
Can anyone confirm the color of factory installed power trunk release buttons in the '72 Cutlass? I know that the service replacements were yellow, but not sure if the factory installs that year were yellow, black, green, or some other color.
The comment in the attached picture was posted in a Chevelle forum, but I'm not sure of its accuracy, or whether it would have been true for Olds A-bodies as well.
Chevelle and Cutlass do not use the same button. Cutlass used a rectangular bezel that was chrome or black depending on the year. Chevelle used a round bezel and the button color changed depending on the year (as seen in the comments of the discussion you posted above). The 70 Cutlass switch is one year only and has a chrome bezel with a black switch. 71 and 72 Cutlass used a black bezel and switch. The photo below shows a 70 switch on the left and a 71-72 switch on the right. If you care about it being correct, the switch below is what you need to find. I pulled the photo from a for sale add on this site. It looks like the 71-72 switch is still available. https://classicoldsmobile.com/forums...t-olds-159475/
Last edited by Loaded68W34; Jun 10, 2025 at 05:28 AM.
I don�t recall ever seeing anything but yellow or white trunk release buttons.
Thanks Matt! Appreciate your comment. I tend to think though, based on my recollection from the distant past, that Loaded68W34 is likely correct about the correct button for '71 and '72 Cutlasses being a black button on a black bezel.
I had sent (or tried to send) an e-mail to you indicating that I am now back to work, after being away for a while, on installing a trunk release setup on my '72 Supreme. I indicated in the e-mail that I have now reversed my wire, to have the reinforced section in the trunk rather than in the underdash area. I have also threaded it through the trunk divider as you had shown in your picture. However, I was not able to find a way to send pictures using the e-mail function of this forum, so I am sending them here.
As I mentioned in the e-mail, the place where I am stumped now is how to thread the wire into and through the hinge area. There seem to be a number of different ways to thread it through, and I am worried that if I do it incorrectly I might have the wire in a position where it will be damaged by the movement of the hinge.
My first picture shows the passenger compartment side of the trunk divider. The pink / white wires are for the courtesy lamps. Blue wire is for the dealer installed rear speaker. Black wire is the power trunk release wire. I have threaded the wire through the rectangular opening at the bottom, and then under my convertible top well and through the triangular opening shown in the second picture which is one that you had posted.
Third picture shows the hinge area, and there are at least three different ways to thread the wire into the hinge area: (1) the circular hole at the bottom of the bracket, (2) the large opening through which I have currently threaded the wire, and (3) there is an opening behind and at the top of the bracket, which I have tried to identify by drawing a line with an arrow. I don't know if your '70 Assembly Manual showed how the wire should be threaded in this area. If it did, I would greatly appreciate your letting me know. If it did not, then I would be glad to know which way you had threaded your wire.
The fourth picture shows the backside of the hinge bracket, and I have highlighted in magenta the path of where I have currently placed the wire, and shows the possible third entry area point for the wire. The fifth picture is another of the back area of the hinge.
Greatly appreciate your original post. It was very helpful, and just what I had been looking for. Hoping that you will also be able to help me with this last wiring issue.
Hi Bill - I wish I could run out and take a pic for you, but the car isn't in my possession any longer. From where the wire exits the seat back, I know there was a wire clip to the upper right of the seat back frame, then I ran a direct path into the hinge "box" under the moving hinge, and up through the trunk lid from there. The loose wiring between the seat back and the hinge mount was I believe held by an additional clip mounted to the wheel well pinch weld. I think there is supposed to be a clip that holds the wire to the side of the hinge mount, but you don't want the wire tight to where it wouldn't be able to move should the hinge make contact. It's not a very scientific or engineered path of wire travel... I know at one time I had a schematic of the wiring path, but I'm unable to track that down. I'm hoping someone else can chime in or add a photo of their wiring for reference.


 The trunk release project was done on my Rallye 350! The W-30 should be finished and at MCACN this November!


