
pinon bearing pre-load and backlash


Thread Starter
Registered User
Joined: Sep 2009
Posts: 1,620
From: suburbs of Chicago
pinon bearing pre-load and backlash
so I set up the ring and pinon as noted here
https://classicoldsmobile.com/forums/drivetrain-differentials/68249-ring-pinon-pattern.html
finally getting back to finishing up the final assembly. got the new pinon nut installed and pinon bearing pre-load set. I then installed the carrier and carrier shims and decided to double check the backlash setting. When I was going through the set up to get the gear pattern, I was just snugging up the pinon nut so there was no play with the pinon, using a hollowed out bearing and backlash was .008. Now that the pinon bearing pre-load is set to 20 in lbs and carrier installed with caps torqued I'm getting backlash of .006. I'm using the same carrier shims from set up, the same carrier, carrier bearings and such from setting it up to get the gear pattern. Is it common for the backlash to change like this? Or do I need to re do something? Thanks.
Registered User
Joined: Oct 2010
Posts: 1,213
From: Dover, Ohio
its not uncommon for the backlash to change if you didnt originally check it with both pinion nut tight and carrier bearing caps tight. It makes sense for it to get tighter if you had checked it befor you had it in final torque. Just to set your mind at eaze -- .006 is great for your rear. If your patter is correct you have a fine setup and will run great with no noise!!
Registered User
Joined: Jul 2006
Posts: 1,826
From: Richfield, Oh
checking backlash
I forgot to mention ---- you MUST check your backlast at at least three different locations around the ring gear -- I check it at 4 points. Thats the only way you will know if you have any "runout" on your ring gear. Its very easy to have it check .006 at one spot, then turn it a qtr turn and maybe only have .003 -- or even maybe .010 -- and then get a different reading at at third spot. If you experience this, you must pull it back apart and get the ring gear mounted square. Ideally you should get less than .0005 -- (no more than .001)variation in your readings. Most times it is dirt or something foreign getting between the ring gear and the carrier flange. Make sure you clean both surfaces well and i always use an oil stone on both surfaces before installing the ring gear. And be very careful to torque all of the ring bolts tto the same spec!! Good luck!!
Yes you want to check all around the ring to see the run out.
Another thing could be the pinion bearing if old could have .001 .002 wear from the NEW bearing pressed on. Another thing is the bearing caps. Really the best way to check your backlash is having the caps on when setting up the pattern too. Jim
Thread Starter
Registered User
Joined: Sep 2009
Posts: 1,620
From: suburbs of Chicago
bearing caps were on and torqued to 60 ft lbs while checking pattern. pinon nut was tight while checking pattern also. the only bearing I changed from checking pattern to final assembly was the inner pinon bearing (all other bearing were brand new timken and smeared with new gear oil during pattern checking). For final assembly, a brand new timken inner pinon bearing was pressed on with a 20 ton press and the special tool which contacts the inner part of the bearing race.
while setting up, I actually checked the backlash in at least 4-6 different spots, sometimes 8-10. And best as I can tell, the ring gear was bolted to this 4 pinon carrier 43 years ago. All the "guts" just changed from one housing to another one.
Thanks guys. Considering this was my first attempt at setting up a gear set, I wasn't sure if the backlash change was common or not.

Registered User
Joined: Oct 2009
Posts: 3,814
From: Erie,PA
Check the pattern again,the way it is now,and see if it changed from your last & final setting.I say you are good,but check the pattern just to make sure.we are depending on each bearing to be machined exactly the same,and there might be the ever so slight variance,to cause a change like what you mention.

Thread Starter
Registered User
Joined: Sep 2009
Posts: 1,620
From: suburbs of Chicago
Brian, I was thinking that exact same thing. was planning to check the pattern again. better safe than sorry.
Jim, I figured that out early in the process, measuring all those carrier shims, measuring and installing the pinon shims and then changing that shim. getting the hamburger hands as you called it.
Thanks again.
Jim, I figured that out early in the process, measuring all those carrier shims, measuring and installing the pinon shims and then changing that shim. getting the hamburger hands as you called it.
Thanks again.
Thread Starter
Registered User
Joined: Sep 2009
Posts: 1,620
From: suburbs of Chicago
ok, quick refresher. from my other thread here's the pattern that was generally agreed upon while mocking things up and checking
.008 backlash and the .027 pinon shim
100_3871_zpsae2cae9c.jpg
100_3872_zps07513ee5.jpg
so final assembly, put on a new inner pinon bearing, new pinon nut and got pinon bearing preload at 20 in lb.
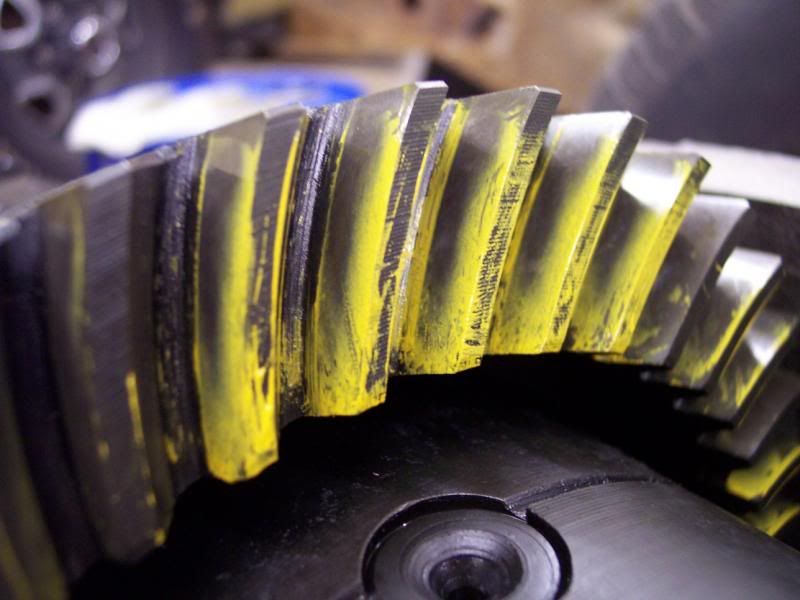
got the ring gear teeth deburred, installed the carrier and shims, torqued down the caps. checked backlash again as I was curious, it's coming up .006 as a I mentioned in the original post of this thread. so I checked the pattern again as suggested and here's what I got.
100_3902_zps8f819ca8.jpg
100_3901_zpsfaf859a0.jpg
am I ok? is it going to make some noise on the coast side? should I adjust the carrier shims to get it back to .008 backlash?
Thanks
.008 backlash and the .027 pinon shim
100_3871_zpsae2cae9c.jpg
100_3872_zps07513ee5.jpg
so final assembly, put on a new inner pinon bearing, new pinon nut and got pinon bearing preload at 20 in lb.
got the ring gear teeth deburred, installed the carrier and shims, torqued down the caps. checked backlash again as I was curious, it's coming up .006 as a I mentioned in the original post of this thread. so I checked the pattern again as suggested and here's what I got.
100_3902_zps8f819ca8.jpg
100_3901_zpsfaf859a0.jpg
am I ok? is it going to make some noise on the coast side? should I adjust the carrier shims to get it back to .008 backlash?
Thanks
Registered User
Joined: Jul 2006
Posts: 1,826
From: Richfield, Oh
shims
ok, quick refresher. from my other thread here's the pattern that was generally agreed upon while mocking things up and checking
.008 backlash and the .027 pinon shim

so final assembly, put on a new inner pinon bearing, new pinon nut and got pinon bearing preload at 20 in lb.
got the ring gear teeth deburred, installed the carrier and shims, torqued down the caps. checked backlash again as I was curious, it's coming up .006 as a I mentioned in the original post of this thread. so I checked the pattern again as suggested and here's what I got.
am I ok? is it going to make some noise on the coast side? should I adjust the carrier shims to get it back to .008 backlash?
Thanks
.008 backlash and the .027 pinon shim


so final assembly, put on a new inner pinon bearing, new pinon nut and got pinon bearing preload at 20 in lb.
got the ring gear teeth deburred, installed the carrier and shims, torqued down the caps. checked backlash again as I was curious, it's coming up .006 as a I mentioned in the original post of this thread. so I checked the pattern again as suggested and here's what I got.


am I ok? is it going to make some noise on the coast side? should I adjust the carrier shims to get it back to .008 backlash?
Thanks
YES you need to widen that backlash try it a .010 even JUST to see the pattern. Jim
Registered User
Joined: Jul 2013
Posts: 60
I'd be real curious as to why the change.
I'd never heard of anyone honing and using old bearings to set up a diff until I landed on this forum. I have to say, it really surprised me that a group of hobbiests and high performance enthusiasts would advocate following a procedure that is less precise in exchange for saving the few minutes it takes to press the brg that will actually be put in service off and on for the shim changes. You have the variables of the wear and manufacture tolerances of the old bearing plus the manufacture tolerance on the new bearing. If the old brg were manufactured on the small side of nominal, then wears and you replace it with a new bearing on the high side of nominal, you can get a significant change. I could see it if you were on the clock and time being money, but in a performance axle by the owner on his own time, why risk it. Even if I were on the clock and doing lots I might hone a new bearing at least.
Personally, I would look at what the 25 pinion shim would do to it. It should add some backlash and will move the drive side out of the root.
Watching with great interest.
Steve g
Registered User
Joined: Oct 2009
Posts: 3,814
From: Erie,PA
So,you'd rather ruin a few bearings trying to achieve the proper pinion depth.Honing the inside of the bearing does NOT change the pinion depth.It simply makes it easier to get off.I don't mean to hone it so it falls on there.It is still snug. You would actually be surprised by how many professional outfits will take the pinion and turn it in a lathe with emery cloth,to ease the bearing installation.Now the pinion is permanently resized,and they use red lock tite under the bearing for final assembly. I think having a honed bearing is the better way. Now again,I have a new Timken bearing that I honed,and the the other bearings I install for final assembly are also Timken,so it helps eliminate the differences of tolerances between manufacturers.Sure,you could have two Timkens that might not be identical,but it's better than going from a Timken to a Koyo,or some other brand.
It is interesting as to why the settings changed when all of the same shims were reinstalled.The drive side looks great,but how you got .002" tighter on the backlash is a good question. It would take more than .002" difference in pinion shim or bearing height,to change that. It is not 1 to 1.
Leave the pinion in there for now,and reshim the carrier to .008" and see what you get for the coast pattern.
Last edited by 507OLDS; Oct 4, 2013 at 08:06 AM.
Registered User
Joined: Jul 2013
Posts: 60
I've never ruined a bearing taking it off a pinion. Never. Not a single one out of I can't count how many. I don't know what you're doing to ruin them, but a bearing splitter (of proper size with a proper edge on it) properly oriented on the press plates (splitter halves, not bolts spanning the opening) and rattled down tight with my air gun so the splitter is doing what it's supposed to, splitting the bearing from the shoulder it's up against. Never failed me.
I don't doubt there are people out there cutting down pinions and gluing things together, but it wouldn't fall into my description of best practices.
In addition to the unknowns of discrepancies between setup bearings and the actual in use bearings, when the bearing is pressed on it is seated with several tons of force applied against the inner race, which will seat it tightly and flatten any irregularities in the shim. When done your way you are not applying anywhere near that amount of force to seat the race. Nor should you because all that force is going through the rollers (in the test setup without a crush sleeve) which in all likeliehood would leave a flat on the roller. When you install the crush sleeve it probably takes over 300 lb ft to crush it, which equates to about 8 tons of clamping force from the nut, to the frt inner race to the crush sleeve to the rear inner race.
Couple that to the brg differences and you've got a lot of space for error.
I'd sure like to know why you guys like that drive side running into the root of the gear, now that we know it's not burs causing it. I might be able to get on side with that if someone could tell me why that's better than the way the gear and car manufacturers want it.
Steve g
Registered User
Joined: Oct 2009
Posts: 3,814
From: Erie,PA
It was explained in the 1st page of this book/topic.Put the 3900lb car in front of those gears,and the pattern will move over some,to the very slight amount,but it will be good,judging by what the pattern is right now.
No,I do not turn the pinion stems,but yes,there are plenty that do,and there are even instructional videos out there,from reputable companies,that suggest doing so.
Do I ruin the bearings?No.I can get them off correctly,but the average one-timer might not have these tools.I haven't had any differences in patterns from the test bearing to the permanent bearing.Everything is rechecked after final assembly,and before the fluid goes in.Same way I've done it over a thousand times.If I found that I was have an inconsistency with my methods,I would change my methods,but I have no reason to do so.It also saves me some time,which saves the customer some money,without going cheap.I could pull/press the bearing on & off,and just add the cost to the customer's bill.They won't mind.Another $50.00-$100.00 won't hurt.
Registered User
Joined: Jul 2013
Posts: 60
The engineers for the gear manufacturer and the car manufacturer also anticipated the effects of the load on the gears yet still have always advised, illustrated, taught that you centre the pattern top to bottom, not end to end. They anticipated that in the L88's and the Hemis, the trucks and tractors, not just the grocery getter passenger cars. They've done that for about 100 years. What changed?
I guess reputable is a relative term. I find GM, Ford, Chrysler, Dana/Spicer to be reputable as well. I've never seen a recomendation from them to reduce the interference fit. I agree, the way you've done it with a new bearing of the same manufacture reduces the chances of error, but I still think a newcomer should eliminate all those variables. Case in point.
Given the specific circumstances in this particular case, the rear pinion bearing replaced and now pressed on being the only changes from his earlier setup situation, I think it most likely his change to the pattern and backlash is pinion related. Because he lost backlash, I'd say the pinion is deeper now than his last checks. The drive pattern is running into the bottom. That, to me says the pinion is too deep. That's how I came to the suggestion that he reduce his pinion shim.
We'll have to wait and see.
Steve g
Registered User
Joined: Oct 2010
Posts: 1,213
From: Dover, Ohio
507 Olds and Monzaz are two of the best rearend men out there! My stern advise is to LISTEN TO WHAT THEY SAY --- YOU WONT BE STEERED WRONG --
Take it from a guy who has done his own and who had used both of these guys.
An also I am a retired TIMKEN Bearing man that made and tested countless numbers of these bearings --- and what 507 said is perfectly true. If you use a honed out NEW TIMKEN bearing for test -- when you final assemble with a NEW TIMKEN bearing your pattern and setup will repeat almost exactly EVERY time!!
My guess is that you used two different brand bearings ? or a reasonably worn one and then a new one? Either way -- doe what brian said and change side shims back to .008 and recheck -- you may be right there!
Registered User
Joined: Jul 2013
Posts: 60
507 Olds and Monzaz are two of the best rearend men out there! My stern advise is to LISTEN TO WHAT THEY SAY --- YOU WONT BE STEERED WRONG --
Take it from a guy who has done his own and who had used both of these guys.
An also I am a retired TIMKEN Bearing man that made and tested countless numbers of these bearings --- and what 507 said is perfectly true. If you use a honed out NEW TIMKEN bearing for test -- when you final assemble with a NEW TIMKEN bearing your pattern and setup will repeat almost exactly EVERY time!!
My guess is that you used two different brand bearings ? or a reasonably worn one and then a new one? Either way -- doe what brian said and change side shims back to .008 and recheck -- you may be right there!
Take it from a guy who has done his own and who had used both of these guys.
An also I am a retired TIMKEN Bearing man that made and tested countless numbers of these bearings --- and what 507 said is perfectly true. If you use a honed out NEW TIMKEN bearing for test -- when you final assemble with a NEW TIMKEN bearing your pattern and setup will repeat almost exactly EVERY time!!
My guess is that you used two different brand bearings ? or a reasonably worn one and then a new one? Either way -- doe what brian said and change side shims back to .008 and recheck -- you may be right there!
When someone tells me my schooling done me dirt and things have changed from what is still being told by the gear manufacturers, as evidenced by the text and illustrations I backed up my view with, I need to hear about it. Don't tell me how good these guys are, give me the science. What's changed?
A honed Timkens bearing replaced by a new Timken bearing and your pattern will repeat almost every time. Do it with the bearing you intend to use and it will repeat every time. Compare the time and money you spend buying and honing a new bearing to do this once (the case here), and you are miles ahead testing with the brg you are going to use. Spend your money instead on a bearing splitter that will serve many jobs, not just the one your new honed brg will do.
Steve g
Registered User
Joined: Oct 2009
Posts: 3,814
From: Erie,PA
I have used the same honed Timken M802048 pinion bearing for about 17 years,on all of my 8.5's,12-Chevy,12-Olds,and other rears that use that bearing.I still consider it new,as it has never been run down the road,only rotated for mock-ups. I have never had a problem,nor has it let me down by giving me a different reading,compared to the final bearing that gets pressed on. If it did,I would not do it this way.This is how I do it.I can make shim changes in a matter of minutes,and quicker than pulling & pressing the bearing on each time.
Tweed,
Do you still have the pic of your pattern when you freshened it up? I have the one when it was new.I got a little aggressive with yours,due to the purpose,but the pattern has proven good.
Tweed,
Do you still have the pic of your pattern when you freshened it up? I have the one when it was new.I got a little aggressive with yours,due to the purpose,but the pattern has proven good.
Thread Starter
Registered User
Joined: Sep 2009
Posts: 1,620
From: suburbs of Chicago
wow, amazing what I've learned through this whole process.
mock up bearing is a Timken of unknown wear/miles. It was on the pinion when I got the internals from my buddy. I used the bearing splitter and a press to remove it. The outer cage was compromised slightly, but rotating it in my hands, I didn't feel any drag or anything out of the ordinary. Probably not the best or most scientific test/approach, but it's what I did. Then I honed it out so it went on and off the pinion much easier for mock up. The new bearing I used is also a Timken, same number as the mock up one. Given this, I'm wonder if the old bearing was really worn that much. Or could it be the "snugging the pinion nut so there is no up and down movement of the pinion" since obviously it wouldn't be the same torque each time.
I actually checked that. Initial press on, it didn't look bottomed out. So back in the press and further down it went. I felt much better the second time it came out of the press. fwiw, I never mocked up the gears until after the second time off the press.
Thread Starter
Registered User
Joined: Sep 2009
Posts: 1,620
From: suburbs of Chicago
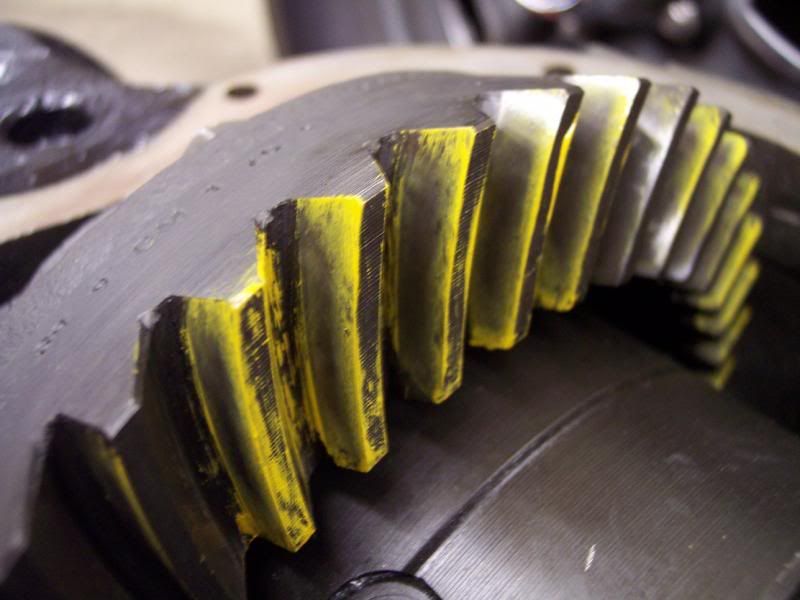
added a shim on the right side of the carrier, rechecked backlash and it's .009, coming up a little less (close to .008) in some spots.
and here's the pattern I'm getting now
100_3904_zps7c3527af.jpg
100_3903_zps117e497a.jpg
what are the thoughts?
and here's the pattern I'm getting now
100_3904_zps7c3527af.jpg
100_3903_zps117e497a.jpg
what are the thoughts?
Registered User
Joined: Jul 2013
Posts: 60
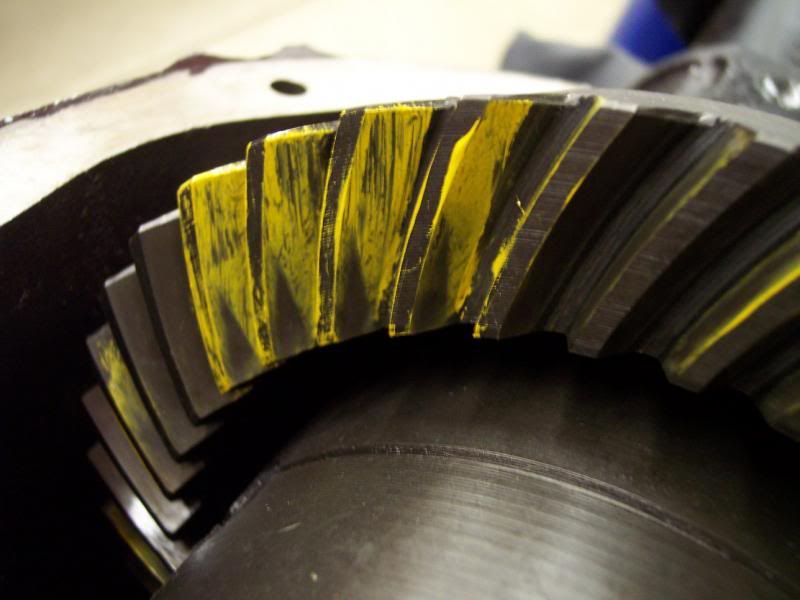
Not weird at all. The drive and coast sides of the teeth wear disproportionately. Almost no wear on the coast side compared to the side that's driving the car 99% of the time. And very few people do hard drag strip launches in reverse. That's why in your first thread I recommended that you ignore the drive side reading and focus on the side with little to no wear, the coast side. And in spite of what you may have been told earlier, you can not adjust out the wear. They are 2 sides of the same tooth. Move one side and you move the other.
I know you were sternly advised to not talk to strangers about your rear end, so do what you will with this.
We, the heavy weights in the forum and I, have a fundamental disagreement. There can be, and are, many different methods of setting up a diff. We can agree or not agree on what is the best method, but as long as you achieve the correct result how you got there is irrelevant. That's not what has been debated here. Where we differ is on one of the specs.
There are only 4 adjustments here. 2 are reading a needle pointing at a number, one is reading the numbers on a feeler gauge and the fourth is the Sesame Street "one of these things is not like the other" comparison to a known good sample. Basic arithmetic is all that's required. The pictures are all pretty self explanatory. Look at all the acceptable patterns. The common denominator is the centering root to crown. That is a spec. Not subject to interpretation or a different methodology. If it's not in the slot, it's a wrong setting.
Don't trust me or the images I posted. Or anything any one else told you. Google patterns and compare them to yours. Trust your own eyes. I previously posted a link to a manual I came across looking for a pattern to post. If you are only going to read one page of it, make it page 8. Under the heading "Important Pattern Information"
"The pattern's position to the tooth face (ridge) and flank (valley) notes the pinion depth. Disregard the pattern's position to the tooth's heel or toe"
Further
"Trying to obtain a pattern centered exactly between heel and toe usually leads to frustration and a noisy gear set, if the face to flank pattern is not correct"
In my opinion, that's as good as it's going to get. It's damn near the same as the .025 you posted early in your original thread when I said the same thing. You've chased it around and by way of process of elimination, discounted every other possibility. That pattern has nice spacing between the pattern and the bottom (root) and the top (crown). That's what you are looking for.
Steve g
I know you were sternly advised to not talk to strangers about your rear end
, so do what you will with this.We, the heavy weights in the forum and I, have a fundamental disagreement. There can be, and are, many different methods of setting up a diff. We can agree or not agree on what is the best method, but as long as you achieve the correct result how you got there is irrelevant. That's not what has been debated here. Where we differ is on one of the specs.
There are only 4 adjustments here. 2 are reading a needle pointing at a number, one is reading the numbers on a feeler gauge and the fourth is the Sesame Street "one of these things is not like the other" comparison to a known good sample. Basic arithmetic is all that's required. The pictures are all pretty self explanatory. Look at all the acceptable patterns. The common denominator is the centering root to crown. That is a spec. Not subject to interpretation or a different methodology. If it's not in the slot, it's a wrong setting.
Don't trust me or the images I posted. Or anything any one else told you. Google patterns and compare them to yours. Trust your own eyes. I previously posted a link to a manual I came across looking for a pattern to post. If you are only going to read one page of it, make it page 8. Under the heading "Important Pattern Information"
"The pattern's position to the tooth face (ridge) and flank (valley) notes the pinion depth. Disregard the pattern's position to the tooth's heel or toe"
Further
"Trying to obtain a pattern centered exactly between heel and toe usually leads to frustration and a noisy gear set, if the face to flank pattern is not correct"
In my opinion, that's as good as it's going to get. It's damn near the same as the .025 you posted early in your original thread when I said the same thing. You've chased it around and by way of process of elimination, discounted every other possibility. That pattern has nice spacing between the pattern and the bottom (root) and the top (crown). That's what you are looking for.
Steve g
Thread Starter
Registered User
Joined: Sep 2009
Posts: 1,620
From: suburbs of Chicago
Thanks Steve. You are right, I basically took the long way and got back just about to where I started, or close to where I started. But I wanted to learn this whole process as my preference is not to just throw money at this car restoration and figure out how to do some of the things myself.
Registered User
Joined: Jul 2006
Posts: 1,826
From: Richfield, Oh
Rear Diff set-up
Not weird at all. The drive and coast sides of the teeth wear disproportionately. Almost no wear on the coast side compared to the side that's driving the car 99% of the time. And very few people do hard drag strip launches in reverse. That's why in your first thread I recommended that you ignore the drive side reading and focus on the side with little to no wear, the coast side. And in spite of what you may have been told earlier, you can not adjust out the wear. They are 2 sides of the same tooth. Move one side and you move the other.
I know you were sternly advised to not talk to strangers about your rear end, so do what you will with this.
We, the heavy weights in the forum and I, have a fundamental disagreement. There can be, and are, many different methods of setting up a diff. We can agree or not agree on what is the best method, but as long as you achieve the correct result how you got there is irrelevant. That's not what has been debated here. Where we differ is on one of the specs.
There are only 4 adjustments here. 2 are reading a needle pointing at a number, one is reading the numbers on a feeler gauge and the fourth is the Sesame Street "one of these things is not like the other" comparison to a known good sample. Basic arithmetic is all that's required. The pictures are all pretty self explanatory. Look at all the acceptable patterns. The common denominator is the centering root to crown. That is a spec. Not subject to interpretation or a different methodology. If it's not in the slot, it's a wrong setting.
Don't trust me or the images I posted. Or anything any one else told you. Google patterns and compare them to yours. Trust your own eyes. I previously posted a link to a manual I came across looking for a pattern to post. If you are only going to read one page of it, make it page 8. Under the heading "Important Pattern Information"
"The pattern's position to the tooth face (ridge) and flank (valley) notes the pinion depth. Disregard the pattern's position to the tooth's heel or toe"
Further
"Trying to obtain a pattern centered exactly between heel and toe usually leads to frustration and a noisy gear set, if the face to flank pattern is not correct"
In my opinion, that's as good as it's going to get. It's damn near the same as the .025 you posted early in your original thread when I said the same thing. You've chased it around and by way of process of elimination, discounted every other possibility. That pattern has nice spacing between the pattern and the bottom (root) and the top (crown). That's what you are looking for.
Steve g
I know you were sternly advised to not talk to strangers about your rear end
, so do what you will with this.We, the heavy weights in the forum and I, have a fundamental disagreement. There can be, and are, many different methods of setting up a diff. We can agree or not agree on what is the best method, but as long as you achieve the correct result how you got there is irrelevant. That's not what has been debated here. Where we differ is on one of the specs.
There are only 4 adjustments here. 2 are reading a needle pointing at a number, one is reading the numbers on a feeler gauge and the fourth is the Sesame Street "one of these things is not like the other" comparison to a known good sample. Basic arithmetic is all that's required. The pictures are all pretty self explanatory. Look at all the acceptable patterns. The common denominator is the centering root to crown. That is a spec. Not subject to interpretation or a different methodology. If it's not in the slot, it's a wrong setting.
Don't trust me or the images I posted. Or anything any one else told you. Google patterns and compare them to yours. Trust your own eyes. I previously posted a link to a manual I came across looking for a pattern to post. If you are only going to read one page of it, make it page 8. Under the heading "Important Pattern Information"
"The pattern's position to the tooth face (ridge) and flank (valley) notes the pinion depth. Disregard the pattern's position to the tooth's heel or toe"
Further
"Trying to obtain a pattern centered exactly between heel and toe usually leads to frustration and a noisy gear set, if the face to flank pattern is not correct"
In my opinion, that's as good as it's going to get. It's damn near the same as the .025 you posted early in your original thread when I said the same thing. You've chased it around and by way of process of elimination, discounted every other possibility. That pattern has nice spacing between the pattern and the bottom (root) and the top (crown). That's what you are looking for.
Steve g
I think what we have learned is USED gears are a heck of a lot harder and more time consuming to set up than NEW gears. It does take experience to get these gears set back to what and where they are suppose to be.
There have been plenty of times where we installed used gears and even NEW gears where we have had to go back in and adjust depth pattern to get the gear in a better running position.
Take care, Jim Mitschke
J D
Registered User
Joined: Jul 2013
Posts: 60
Thanks Steve. You are right, I basically took the long way and got back just about to where I started, or close to where I started. But I wanted to learn this whole process as my preference is not to just throw money at this car restoration and figure out how to do some of the things myself.
This
Sept91.jpg
to this
100_0655.jpg
Steve g
Thread Starter
Registered User
Joined: Sep 2009
Posts: 1,620
From: suburbs of Chicago
UPDATE
finally got the rear buttoned up and installed in the car. Took it for a test drive around the block last night and all seems good. The car can be loud as it is, so was a little hard to hear if there was any rear end noises.
If the weather cooperates, I'll be racing this Sat at US131 in Martin, MI. Should be rather interesting trying to launch on the repro poly glas now, given that I've went from 3.90s to 4.33s. And it's a stick car too in case we are wondering.
If the weather doesn't cooperate I plan to do a little Test N Tune at US41 in Morroco, IN sometime next month.

Thread
Thread Starter
Forum
Replies
Last Post


