
ring and pinon pattern


Thread Starter
Registered User
Joined: Sep 2009
Posts: 1,620
From: suburbs of Chicago
ring and pinon pattern
So after reading some info and some threads and even printing this thread out https://classicoldsmobile.com/forums...5-10-bolt.html for reference I'm going to tackle the set up of the ring and pinon.
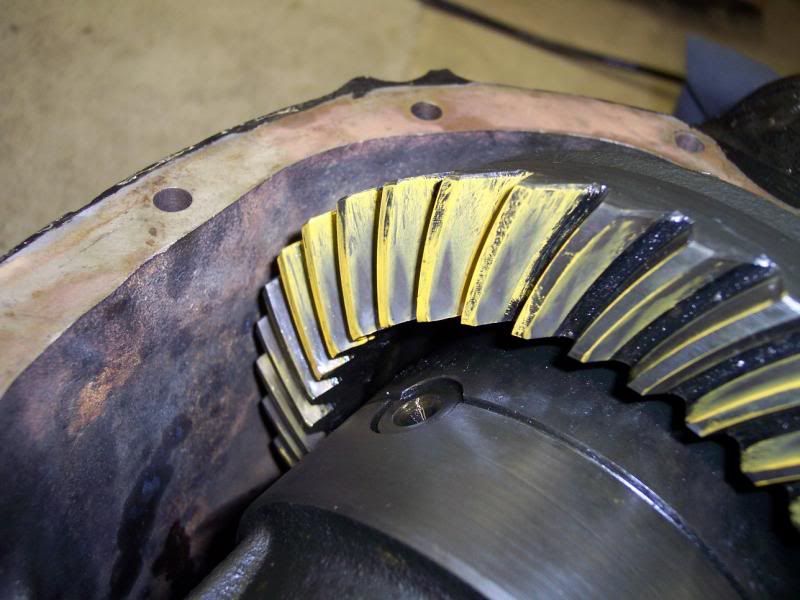
I ended up with .009 backlash. used the factory .040 pinon shim that was on the pinon from the other housing I gutted (actually a buddys housing for his resto), so used it as a starting point for my housing. Here's the pattern I got initially. too close to the toe, correct?
100_3838_zps658d2aa7.jpg
so tore it apart and went with a .0295 pinon shim. put it all back together. reset the backlash to .009 and ran the pattern again. seems it's still close to the valley, at least on the coast side. Here's how she looks now
100_3842_zps073bfe2a.jpg
recommendations on where I should go with the pinon shim now? Thanks.
I ended up with .009 backlash. used the factory .040 pinon shim that was on the pinon from the other housing I gutted (actually a buddys housing for his resto), so used it as a starting point for my housing. Here's the pattern I got initially. too close to the toe, correct?
100_3838_zps658d2aa7.jpg
so tore it apart and went with a .0295 pinon shim. put it all back together. reset the backlash to .009 and ran the pattern again. seems it's still close to the valley, at least on the coast side. Here's how she looks now

100_3842_zps073bfe2a.jpg
recommendations on where I should go with the pinon shim now? Thanks.
Thread Starter
Registered User
Joined: Sep 2009
Posts: 1,620
From: suburbs of Chicago
used gears (in fact you can see the date on the ring gear in the 2nd pic below). 4.33 and a 70 8.2 BOP for those scoring at home.
I was able to get some other stuff done so thought I'd give it one more shot before calling it a night. Changed the pinon shim to .025. checked backlash again, it's now .010
coast side looks close
100_3844_zps7994a551.jpg
drive side, a bit towards the heel.
100_3843_zps5de4ff6c.jpg
Gonna try a .027 pinon shim next
Last edited by junior supercar; Aug 31, 2013 at 08:58 PM.

Registered User
Joined: Mar 2008
Posts: 4,024
You want the drive side pattern toward the toe but not running off the edge of it, with the very light load you can achieve on the bench. The first photo isn't clear and you don't show the coast pattern with the .040" shim but you will end up somewhere near that thickness. It is easier to change the pinion shim if you hone the inside mounting surface of a used pinion bearing so it is a slip fit. Bearings are made to very close tolerances so you can get the pattern you want and then press on the new bearing. An auto machine shop should be able to hone it for you; the steel is hard and it takes a long time to do by hand.

Registered User
Joined: Oct 2009
Posts: 3,814
From: Erie,PA
You can get a good pattern on used gears,as long as they are not damaged or abnormally worn.
Put a .035" pinion shim in it,and set the backlash to .008"-.009"
Then show us what it looks like.
Your last picture,with the contact pattern on the heel side of the drive teeth,says that the pinion is too far away,so a thicker shim is needed.
Put a .035" pinion shim in it,and set the backlash to .008"-.009"
Then show us what it looks like.
Your last picture,with the contact pattern on the heel side of the drive teeth,says that the pinion is too far away,so a thicker shim is needed.
Registered User
Joined: Jul 2013
Posts: 60
Not trying to start any kind of match, just sharing what I was taught in trade school and have seen through the years. Don't know how many times I've chased patterns back and forth on used gear sets.
The real issue is are you wanting to restore the setup as it originally ran in or to try and improve on it. I was taught that restoring the original setup will result in the lowest probability of noise and accelerated wear. So if you set it up according to the coast side that will will best replicate the original setup, assuming it was done right the first time. If the coast side is bang on and you were able to replace the worn off material on the drive side it too would be correct. So this likely represents it's original setup.
The reason I was given for reusing the original setup instead of trying to improve on it is that just like when we keep valve train components always in the relationship they were originally in, there is a microscopic level wear pattern that has developed through use. Changing pinion depth from it's original setting will change that. Just like moving the lifter onto another cam lobe. When you use pinion depth gauges they use one spec. New gear or old. Suggests they all go to one setting, that where the original was set.
On the backlash as long as it still falls within spec I wouldn't try to tighten it up either. If it's out of spec you don't have a choice. But if it's 8 don't bother trying to get it to 6.
As I said in the beginning, I chased patterns back and forth trying to find a good compromise, figuring that's how I would get it back to it's original position. Then I came across that USStandard gear write up about concentrating on the coast side. It all made sense then.
I know you guys in the race world see things differently. It may be different thinking when you are concerned in how many passes rather than how many 100,000 miles.
As I said, just sharing what I was taught/learned. Each to his own and even from what I've said, I have no information on how much it would actually alter life expectancy.
Steve g
I should add that we may also have different interpretations of what constitutes a used gear. to me, a gear with 60,000 miles on it is a used gear and unless it's been run out of oil and is badly damaged is a reuseable gear set. You will be hard pressed to get ideal readings on both sides with that gear set. If your used gear set is one that has 10 passes on it, you should still be able to see pretty close to the new gear pattern. Still a used gear set.
Last edited by Steve g; Sep 1, 2013 at 10:36 AM.
Registered User
Joined: Oct 2009
Posts: 3,814
From: Erie,PA
Yes,it is more important to concentrate on the coast side,and you do not want to try and rewear the gears.
IF the used gears have a good pattern,then it can be duplicated in any other housing that you put it in.The reason that you might not use the same pinion shim is that each housing is machined slightly different.All it takes is the boring bar to go a hair deeper or shallower for the bearing bore/seat,to change the thickness of shim needed.The original shim IS a good place to start for initial setup.
If a gearset has a bad pattern due to improper set-up,or something went bad,like a bearing or loosened pinion but,you will not be able to right again. A simple look at the teeth should tell if they are good or not.I could take pictures of bad teeth,from visual inspection,but I don't think they would turn out clear enough for an illustration.
Junior,
From what I have seen of your patterns,you can nail it with a shim in the 30's.
Thread Starter
Registered User
Joined: Sep 2009
Posts: 1,620
From: suburbs of Chicago
other than used gears, I have no idea on the miles or passes with these. a buddy just wanted the correct code housing for his resto and I needed the gears, so he gave me everything inside. the housing it came out of, GM put a .040 pinon shim and carrier shims were like .224 on the left and .258 on the right. I tried to put those carrier shims in the housing I have and it was incredibly tight. really could barely put the other carrier shim in, so I didn't force it. Worked on getting carrier shims that would work to get between .008 and .010 backlash. When I got the right backlash, I'd check the pattern. I've replaced all the bearings and honed out the original inner pinon bearing so it goes on and off by hand.
I'll tear it apart and try another pinon shim. stay tuned and thanks for the feedback.
I'll tear it apart and try another pinon shim. stay tuned and thanks for the feedback.
Registered User
Joined: Jul 2013
Posts: 60
Yes,it is more important to concentrate on the coast side,and you do not want to try and rewear the gears.
IF the used gears have a good pattern,then it can be duplicated in any other housing that you put it in.The reason that you might not use the same pinion shim is that each housing is machined slightly different.All it takes is the boring bar to go a hair deeper or shallower for the bearing bore/seat,to change the thickness of shim needed.The original shim IS a good place to start for initial setup.
If a gearset has a bad pattern due to improper set-up,or something went bad,like a bearing or loosened pinion but,you will not be able to right again. A simple look at the teeth should tell if they are good or not.I could take pictures of bad teeth,from visual inspection,but I don't think they would turn out clear enough for an illustration.
Junior,
From what I have seen of your patterns,you can nail it with a shim in the 30's.
IF the used gears have a good pattern,then it can be duplicated in any other housing that you put it in.The reason that you might not use the same pinion shim is that each housing is machined slightly different.All it takes is the boring bar to go a hair deeper or shallower for the bearing bore/seat,to change the thickness of shim needed.The original shim IS a good place to start for initial setup.
If a gearset has a bad pattern due to improper set-up,or something went bad,like a bearing or loosened pinion but,you will not be able to right again. A simple look at the teeth should tell if they are good or not.I could take pictures of bad teeth,from visual inspection,but I don't think they would turn out clear enough for an illustration.
Junior,
From what I have seen of your patterns,you can nail it with a shim in the 30's.
Yes, I should have been clearer. I'm not talking about reusing the shims when changing housing. Just referring to locating the original setup by concentrating on the coast side rather than trying to fine tune/average the pattern with the drive side.
Steve g
Thread Starter
Registered User
Joined: Sep 2009
Posts: 1,620
From: suburbs of Chicago
Registered User
Joined: Jul 2013
Posts: 60
I liked it better in your post #3, but either would be acceptable.
This illustrates what I was attempting to point out. Because there is so very little wear on the coast side of a used gear set, when you have a nice pattern on the coast side it is the closest representation to how it would have been originally set up. The drive side pattern is off by the amount that has worn off that side. As long as the drive side still falls into the acceptable range, you're fine. If you had taken a pattern on the gears before they removing them from their old housing, this is probably what it would have looked like. This is what would be considered concentrating on the coast side.
Where you moved it to in your last post is what I used to attempt to do, splitting the difference. Your coast pattern is not as nice as it was previously, but you improved your drive side. This might be closer to what the ideal pattern might be in a new gear set, but it is probably not as close to the original wear pattern as the other setup.
That's my take on it. I'm sure others will have a different opinion, but I can pretty much guarantee you that neither will result in a noisy diff.
Steve g
Registered User
Joined: Jul 2006
Posts: 1,826
From: Richfield, Oh
4.33 gears
You need to remember that these are 4.33 gears...lol. I am SURE they were beat on. With this steep of gear there is no other way to drive it. SO coast and drive side will have a slight compromise after being used in this age of gear.
I think your in the right spot with the high .020 It seemed 29.5 was a bit too deep. 25 a tad shallow so you think .027 is right on According to the pattern and backlash given you should get as quiet and strong a set -up as you can with this USED gears set. The swipe is very nice drive and coast.
DO not worry about the pattern to the toe or heel. Worry about the valley to peak more. The swipe needs to be across as much of the gears face with out sharply running off the peak or sharp line in the valley. So do .027 and about .008 and see how it looks.
Jim
J D
Registered User
Joined: Oct 2009
Posts: 3,814
From: Erie,PA
From what I understood from one if the previous pictures,the one with the pattern running off the end of the heel,was a .02975" shim,so a thinner shim would make it worse.The picture with the .034" shim looks real close,but a tad deep.
Again,maybe I am confusing the pictures,but his latest setting is real close to the point where is increments of change can be smaller.
Again,maybe I am confusing the pictures,but his latest setting is real close to the point where is increments of change can be smaller.
Registered User
Joined: Jul 2013
Posts: 60
From what I understood from one if the previous pictures,the one with the pattern running off the end of the heel,was a .02975" shim,so a thinner shim would make it worse.The picture with the .034" shim looks real close,but a tad deep.
Again,maybe I am confusing the pictures,but his latest setting is real close to the point where is increments of change can be smaller.
Again,maybe I am confusing the pictures,but his latest setting is real close to the point where is increments of change can be smaller.
As Monzaz points out, when you get the pattern(in used gears particularly on the coast side) as close to centred top to bottom the amount of wear will determine where it sits heel to tow. You can't change that, it's the wear. Trying to chase that out becomes an exercise in frustration.
Steve g
Thread Starter
Registered User
Joined: Sep 2009
Posts: 1,620
From: suburbs of Chicago
illustration #4 also has two pics.
#1 .040
#2 .0295 (could be 0.29 as several times measuring it several places on the shim pack it came up both)
#3 .025 after this I said I was gonna try a .027, but never did as the feedback said try something in the .03x range
#4 .034
so I guess should I try the .032 or the .027 or something else?
This is my first time setting this stuff up, so I appreciate the feedback. I also realize this is rather tedious work. obviously the more one does it the more comfortable and familiar one becomes.
Registered User
Joined: Oct 2009
Posts: 3,814
From: Erie,PA
Ok. I think I see where I got confused. I was under the impression that a .027" shim was tried,and a .025" shim was being suggested,which would make it worse than it is in picture #3.
A .032" still might tweak it enough,based in what I are with the .034" pattern.
A .032" still might tweak it enough,based in what I are with the .034" pattern.
Thread Starter
Registered User
Joined: Sep 2009
Posts: 1,620
From: suburbs of Chicago
ok, once more, with feeling 
#5
.032 pinon shim. .008 backlash
100_3852_zps305c0163.jpg
100_3853_zpsd97468d9.jpg
when compared to #4 (.034 shim) it looks like the drive side moved more centered heel to toe, while the coast side stayed the same.
#5
.032 pinon shim. .008 backlash
100_3852_zps305c0163.jpg
100_3853_zpsd97468d9.jpg
when compared to #4 (.034 shim) it looks like the drive side moved more centered heel to toe, while the coast side stayed the same.
Registered User
Joined: Oct 2009
Posts: 3,814
From: Erie,PA
Is there a burr or debris on the coast side if the pinion tooth? Judging by that line in the middle,something might be keeping it from wiping or contacting.
Looking good.Just goes to show how much .002" of movement can do.
Looking good.Just goes to show how much .002" of movement can do.
Thread Starter
Registered User
Joined: Sep 2009
Posts: 1,620
From: suburbs of Chicago
wouldn't surprise me if some debris got in there. I'll check it when I take it apart tomorrow. I'll start on final assembly then too, unless someone thinks I'm off enough to cause issues.
I guess the next major thing is trying to figure out how to crush that crush sleeve.
I guess the next major thing is trying to figure out how to crush that crush sleeve.
Registered User
Joined: Jul 2006
Posts: 1,826
From: Richfield, Oh
Singer
In my opinion it is a singer. Too deep. Look how sharp the pattern is at the valley of the drive side. The top of the gear is going to whine as the pinion bites into the ring. -- Your rear your call. Worse case you tear it down again after the test drive.
These 4.33 gears got hammered YOU will not find a good normal pattern Pontiac shims never when above .030... Every one I have pulled apart were .025-.030 ANY GEAR RATIO.
Look at the 29.5 pattern Close but slightly too deep...on the driver side tooth face. Then look at the .027 slightly to shallow to the peak of the tooth face on the drive side. Your going to have to ignore the coast side cause this looks like it was a drag raced stick shift geared car. So it got hammered just as back on the decel as it did on the accel drive side.
If you do decide to do another pattern squirt some gear oil on after you get a few spins around with just the compound. This will really help see what will happen to the pattern.
Flip a coin and go for it.
Take care, Jim Mitschke
J D
Last edited by monzaz; Sep 3, 2013 at 08:34 PM.
Registered User
Joined: Jul 2013
Posts: 60
In my opinion, you are still way too deep in the valley on the coast side.As we seem to all agree on, concentrating on the coast side is the ticket in a used gear set. Look at the coast side in your last pics, .032. You are cutting a hard line at the bottom of the tooth. Look at your coast side in your pics in post #3, .025. Your pattern fades away nicely top and bottom and is pretty much in the centre top to bottom. Heel to toe on the drive side would be nice to see it closer to centre, and it's a little deep, but that's how it's worn. Look again at that PDF link I posted. They are quite happy with it running to either end. If you have the unworn coast side pretty much bang on, the worn side will have to be where it's going to be.
I still think that is your best bet.
Steve g
I still think that is your best bet.
Steve g
Registered User
Joined: Oct 2009
Posts: 3,814
From: Erie,PA
I'm sure those gears were intended for racing,but there's always the chance they never made it there.There's a good chance that they were behind. 4-spd,as most of the real steep geared cars were sticks.I can't tell from here if there is any abnormal wear,but the better patterns are telling me no,otherwise the patterns would be wack,no matter what.
I'm sure you will be using it for some spirited driving.
Would you like to try a .030"? This should be helpful for those do-it-yourselfers learning and understanding the process.People can understand what will give you what,which way to correct it.
Another thing is that I am sure that when the gears were pulled from the original rear,they had more than .008" backlash,due to normal wear.I like to nail everything around .008",no matter what,new or used.I will take the new gears and polish off the coatings,to help keep my settings once in use.I've done plenty of personal trials on my own car,that sees plenty of street driving,as well as enough blunt force when launching the wheels up at the track. With your used 4:33's,you can keep the settings/pattern exactly where you leave it,as long as the pattern is good from the install.
Registered User
Joined: Jul 2013
Posts: 60
While we could speculate on how the gears were used to try and figure out how much the wear is affecting our patterns, my experience has been that if you have the pattern centred top to bottom (peak to valley) and your backlash adjusted properly, the position relative to heel or toe indicates how much it's worn. So with that .025 shim that pattern on the coast side is centred top to bottom and it is also centered heal to toe. To me that says that the coast side is pretty much as it would have been when new. Ie, if it were worn it would not centre heel to toe when centered top to bottom.
Where that puts the drive side is the amount of wear. But that drive side, tho not centered like a new gear set, is perfectly acceptable and is in all probability exactly as it ran in the last setup.
Steve g
Where that puts the drive side is the amount of wear. But that drive side, tho not centered like a new gear set, is perfectly acceptable and is in all probability exactly as it ran in the last setup.
Steve g
Registered User
Joined: Oct 2009
Posts: 3,814
From: Erie,PA
It's too far away with the .025" shim,and both sides show that. It's going right off the end of the heel,on the drive side,and once it is actually pushing the car,it can move it off even more.That is not how it would have looked in the previous rear.This could end up re-cutting the teeth,and then they can't be corrected.
If you are planning in using this for the pure stocks or FAST drags,this is not how you want it.
If you are planning in using this for the pure stocks or FAST drags,this is not how you want it.
Registered User
Joined: Mar 2008
Posts: 4,024
In my opinion, you will run off the heel (outer edge) of the drive side with any real load, and not get to the toe end with the shim you now have. I would try about a .035" or .036" shim to see if things get better or worse. Performance gears often, under very light load like your hand on the ring gear, give a drive pattern on only the inner (toe) half of the drive side, but the coast side will be more or less centered, or a bit toward the toe end.
go to www.richmondgear.com and download the installation manual under sales literature. Tooth patterns are on p. 82:
http://www.richmondgear.com/pdf/Rich...n2.pdf#page=31
go to www.richmondgear.com and download the installation manual under sales literature. Tooth patterns are on p. 82:
http://www.richmondgear.com/pdf/Rich...n2.pdf#page=31
Last edited by Run to Rund; Sep 4, 2013 at 06:34 AM.
Registered User
Joined: Jul 2013
Posts: 60
It's too far away with the .025" shim,and both sides show that. It's going right off the end of the heel,on the drive side,and once it is actually pushing the car,it can move it off even more.That is not how it would have looked in the previous rear.This could end up re-cutting the teeth,and then they can't be corrected.
If you are planning in using this for the pure stocks or FAST drags,this is not how you want it.
If you are planning in using this for the pure stocks or FAST drags,this is not how you want it.
Steve g
Registered User
Joined: Oct 2009
Posts: 3,814
From: Erie,PA
We are looking at the same picture. It is too far away. The drive side wipes off the end if the heel,and with the load of the car,it will be worse. The coast side shows it fairly centered,toe to heel,but is favoring the top,making a half-circle down,also indicating too far away.
Registered User
Joined: Jul 2013
Posts: 60
In my opinion, you will run off the heel (outer edge) of the drive side with any real load, and not get to the toe end with the shim you now have. I would try about a .035" or .036" shim to see if things get better or worse. Performance gears often, under very light load like your hand on the ring gear, give a drive pattern on only the inner (toe) half of the drive side, but the coast side will be more or less centered, or a bit toward the toe end.
go to www.richmondgear.com and download the installation manual under sales literature. Tooth patterns are on p. 82:
http://www.richmondgear.com/pdf/Rich...n2.pdf#page=31
go to www.richmondgear.com and download the installation manual under sales literature. Tooth patterns are on p. 82:
http://www.richmondgear.com/pdf/Rich...n2.pdf#page=31
Steve g
Registered User
Joined: Jul 2013
Posts: 60
We are looking at the same picture. It is too far away. The drive side wipes off the end if the heel,and with the load of the car,it will be worse. The coast side shows it fairly centered,toe to heel,but is favoring the top,making a half-circle down,also indicating too far away.
Steve g
Registered User
Joined: Jul 2013
Posts: 60
Yes, depending on the degree of use/wear. But when you run into a pattern like this, where when you get it centred top to bottom the heel to toe is off, there is not an adjustment that you can make to change one without changing the other.
This is why it's recommended to focus on the coast side. And likewise, you can't change the drive side without changing the coast side. And that coast side on the .025 is the best of all that have been posted.
Steve g
This is why it's recommended to focus on the coast side. And likewise, you can't change the drive side without changing the coast side. And that coast side on the .025 is the best of all that have been posted.
Steve g
Registered User
Joined: Oct 2009
Posts: 3,814
From: Erie,PA
I have the US Gear pamphlet,with all of the illustrations.It's the same one that Yukon and a bunch of other brands puts their name on. The .025 is not very acceptable.It is too far away in both sides.Not by a mile,but I would not run it like that.If it was perfectly good,running,and quiet before,it would not that pattern.
Registered User
Joined: Jul 2013
Posts: 60
If you look at all those Standard illustrations, at a glance the acceptable patterns seem to to be all over the place. But if you look only at the distance from the top of the pattern to the top of the tooth and the bottom of the pattern to the bottom of the tooth, that is identical in all the acceptable patterns, with heel to toe all over the place (even the Richmond new gear shows heel to toe variance acceptable with identical top to bottoms). In all the illustrations of a gear too deep the pattern cuts a sharp line at the bottom and a good margin at the top.
I might tru a .026 or .027 to see what it looks like, but I doubt you can centre the pattern top to bottom much better than the .025 does.
Spoke my piece, I'll let it go before I tick someone off.
Steve g
I might tru a .026 or .027 to see what it looks like, but I doubt you can centre the pattern top to bottom much better than the .025 does.
Spoke my piece, I'll let it go before I tick someone off.
Steve g
Thread Starter
Registered User
Joined: Sep 2009
Posts: 1,620
From: suburbs of Chicago
(crap, I typed up a reply and it got lost. so I'm retyping from memory @#$%^$ I knew better, but didn't save it before, oh well)
wow. OK, here is what I do know. This setup will be for Pure Stock Drag Racing (on reproduction polyglas, no slicks) in case its not obvious. While I currently don't intend to drive this car around on the street with 4.33s that often if at all, I don't really know at this point. My W-31 has 4.33s and I don't mind driving that around on the street occassionally.
This will be a new axle containing the 4.33s. If I don't get this thing set up in time since I'm racing the car next week, then I'll just take the car as it sits with the 3.90s. So tearing it apart after a test drive of the 4.33s really isn't an option at this point. At least not planned as I hate thrashing at the last minute since I always seem to f something up in the rush.
I have no clue on the history of the 4.33 axle assembly prior to my buddy receiving it. I just know when I took it apart there was a 40 shim on the pinon. GM shim? Not sure as I've never seen GM shims before. It was stamped 40 on a tab on the inner circle of the shim.
so given everything I just read above from my initial creation of the thread it seems there are two prevailing camps, one to increase one to decrease. I have no problem tearing it apart and trying another shim or two to get more familiar with things. it appears something between a .027 and .030 would be ideal, even though I tried a .029 (or .0295). I'll tear it apart in a couple hours and try another one and post for feedback.
Registered User
Joined: Jul 2006
Posts: 1,826
From: Richfield, Oh
>)@& >)@& >)@&
.027 GO by the pattern ...
You guys are making this too hard. Brian I have to say your not getting this one right. You must be looking at the wrong pictures than Steve g and me.
Jim
You guys are making this too hard. Brian I have to say your not getting this one right. You must be looking at the wrong pictures than Steve g and me.
Jim


