
Vinyl Top Help

Thread Starter
Registered User
Joined: Oct 2009
Posts: 209
From: Idaho
Vinyl Top Help
(Copied this from my Cutlass forum)
Thanks for the comment Dan, I'm now planning ahead after the final paint dries for my next step. I'm wanting to go back to the original vinyl top... looking around our area I just can't find someone local that does that for a reasonable price and in a timely manner...
How hard is it to accomplish for a first timer? several web sites show how to get it smooth but can't seem to find one that shows how to finish the project--the edges... or triming down a universal top
I found a very reasonable order site, not sure of quality tomcotops.com. Right now my windshield is out as part of my restoration project and I had planned to leave it out until the vinyl was put on to help with installation. (not sure this is necessary??)
Anyone have any thoughts and tips on installing a vinyle tops??
Richey
PS Understand most restorations don't go with the vinyl top....
Thread Starter
Registered User
Joined: Oct 2009
Posts: 209
From: Idaho
1st Attempt at Vinvl Top
Laying out Vinyl Top
My vinyl top arrived and I'm committed to have patiience and let it lay out flat for a week before I give it a try at putting it on..(hard to wait )
)
I've cranked up the heat to about 90 degrees to help smooth out the top.. I also added a couple large "C" clamps on each side to add some weight to help it smoothout.
After searching the internet for different techniques I think I'll try the techniques from the MOPAR Mucle car article http://www.moparmusclemagazine.com/t.../photo_01.html
It suggest using brush on contact cement versus spraying... Has anyone tried this? It would seem a little easier to control where the contact cement is, but I'll need to keep it thin and smooth. I would assume any big globs would show through? Is thin and smooth possible with brush?
Any thoughts?
I'll probably be committed next weekend when I can round up a couple freinds to help hold it up and spread it out..... etc.....
That will make for a Happy New Year!!
Richey
My vinyl top arrived and I'm committed to have patiience and let it lay out flat for a week before I give it a try at putting it on..(hard to wait
)I've cranked up the heat to about 90 degrees to help smooth out the top.. I also added a couple large "C" clamps on each side to add some weight to help it smoothout.
After searching the internet for different techniques I think I'll try the techniques from the MOPAR
Mucle car article http://www.moparmusclemagazine.com/t.../photo_01.htmlIt suggest using brush on contact cement versus spraying... Has anyone tried this?
It would seem a little easier to control where the contact cement is, but I'll need to keep it thin and smooth. I would assume any big globs would show through? Is thin and smooth possible with brush?Any thoughts?
I'll probably be committed next weekend when I can round up a couple freinds to help hold it up and spread it out..... etc.....
That will make for a Happy New Year!!
Richey
Registered
Joined: Jul 2006
Posts: 4,430
From: Northeast Ohio
I like vinyl tops myself, let the next guy worry about rust in 40 years.")

Some Vista Cruisers had them.
A lot of formica guys use a foam brush or a small short nap paint roller to apply the contact cement on jobs, the brush marks will show through some of those thin laminates and I've seen them on vinyl tops, the balled up cement showing through from brushing it out when it's drying shows too.
Sometimes the roller covers are hard as a rock from old cement but I guess it makes it smoother, most dump the stuff on the surface and then use the brush or roller to spread it and you have to go fast and no thick or thin spots, has to be dry to the touch before doing anything and don't light a match near it, plenty of ventilation.
I worked with a formica nut and that's all I did, he would formica a toilet if you wanted him to, the dog....
Are those creases from shipping?
Probably folded it up and put it in a box just after they made it really.
I would be more than happy to pay extra for what it would cost to have a vinyl top or a headliner that's not folded and creased.
It's a bear to get them out, with headliners at least.
They should be rolled up and put in a tube after they're made, most are made to order anyway, have the option.
It makes no sense to crease them all up for no reason to me but who am I to say?
I learned a little too late but I read about putting the headliner in a clothes dryer on low heat to get the fold creases out.
A vinyl top may be a little too big and not sure if it would work, maybe a big laundromat dryer if it would work?
Gary
Joined: Jul 2007
Posts: 1,245
From: Houston,Tx
Laying out Vinyl Top
My vinyl top arrived and I'm committed to have patiience and let it lay out flat for a week before I give it a try at putting it on..(hard to wait)
I've cranked up the heat to about 90 degrees to help smooth out the top.. I also added a couple large "C" clamps on each side to add some weight to help it smoothout.
After searching the internet for different techniques I think I'll try the techniques from the MOPAR Mucle car article http://www.moparmusclemagazine.com/t.../photo_01.html
It suggest using brush on contact cement versus spraying... Has anyone tried this? It would seem a little easier to control where the contact cement is, but I'll need to keep it thin and smooth. I would assume any big globs would show through? Is thin and smooth possible with brush?
Any thoughts?
I'll probably be committed next weekend when I can round up a couple freinds to help hold it up and spread it out..... etc.....
That will make for a Happy New Year!!
Richey
My vinyl top arrived and I'm committed to have patiience and let it lay out flat for a week before I give it a try at putting it on..(hard to wait
)I've cranked up the heat to about 90 degrees to help smooth out the top.. I also added a couple large "C" clamps on each side to add some weight to help it smoothout.
After searching the internet for different techniques I think I'll try the techniques from the MOPAR
Mucle car article http://www.moparmusclemagazine.com/t.../photo_01.htmlIt suggest using brush on contact cement versus spraying... Has anyone tried this?
It would seem a little easier to control where the contact cement is, but I'll need to keep it thin and smooth. I would assume any big globs would show through? Is thin and smooth possible with brush?Any thoughts?
I'll probably be committed next weekend when I can round up a couple freinds to help hold it up and spread it out..... etc.....
That will make for a Happy New Year!!
Richey
Registered User
Joined: Nov 2009
Posts: 411
From: NW Arkansas
"A good man always know his limitations"
~Harry Callahan, Magnum Force~
I removed the moldings, and old top material, sanded the top to bare metal and primed, and neutralized the rust behind the back glass....... then thought better of trying to glue the vinyl down myself.
A local upholstery shop installed it in one day at a reasonable price.
GM Enthusiast
Joined: Jan 2007
Posts: 3,982
From: Long Island, New York
I had done this on another car a few years ago with a friend. Definitely need at least one other person to help you. I looked at your link you sent along and that's pretty much the way we did it. We originally tried using the spray adhesive in a can from 3M but it came out lumpy and we were afraid that it would show so we cleaned it off and got the stuff you brush on. If I remember correctly, I think it took us a couple of hours, a few beers, and a lot of patience but it came out great.
, and a lot of patience but it came out great.
Thread Starter
Registered User
Joined: Oct 2009
Posts: 209
From: Idaho
Thanks everyone, I have a few more days before I finish letting it smooth out and gather up the gang and give it a try. I'll post some pictures and let everyone know how it went on.... from everyone's comments patience is the key word... and maybe a six pack
Thread Starter
Registered User
Joined: Oct 2009
Posts: 209
From: Idaho
creases and post
I have just about got all the creases out laying it flat ontop of car with some weight pulling it down and keeping the heat up. Tom of tomcotops suggest using a hairdryer to help smooth out the creases
Gary GH5168 I'm not sure what you talking about having the post material pre sewed... my front windshield post material comes as a seperate strip that I will have to form a seam and glue where the top meets the post..... from my picture you can see that the top in the front is an extra 6-8 inchs of material that hanges across front...
Richey
Gary GH5168 I'm not sure what you talking about having the post material pre sewed...
my front windshield post material comes as a seperate strip that I will have to form a seam and glue where the top meets the post..... from my picture you can see that the top in the front is an extra 6-8 inchs of material that hanges across front... Richey
Gary
Joined: Jul 2007
Posts: 1,245
From: Houston,Tx
I have just about got all the creases out laying it flat ontop of car with some weight pulling it down and keeping the heat up. Tom of tomcotops suggest using a hairdryer to help smooth out the creases
Gary GH5168 I'm not sure what you talking about having the post material pre sewed... my front windshield post material comes as a seperate strip that I will have to form a seam and glue where the top meets the post..... from my picture you can see that the top in the front is an extra 6-8 inchs of material that hanges across front...
Richey
Gary GH5168 I'm not sure what you talking about having the post material pre sewed...
my front windshield post material comes as a seperate strip that I will have to form a seam and glue where the top meets the post..... from my picture you can see that the top in the front is an extra 6-8 inchs of material that hanges across front... Richey


Thread Starter
Registered User
Joined: Oct 2009
Posts: 209
From: Idaho
windshield molding Clip help
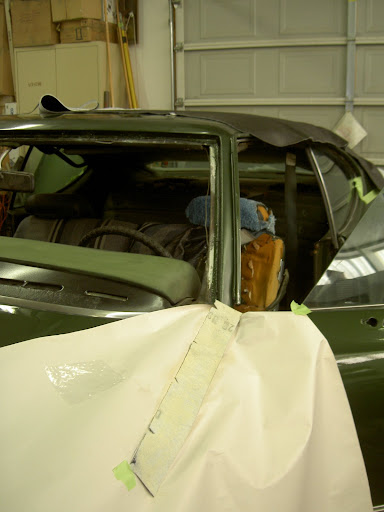
I'm just about ready to apply my vinyle top but found that the molding clips for the front and back windshields don't just pull off. They both have a lower portion that is designed in to hold on to the metal stud on the car. Anyone have a technique to pull the molding clips off. Is there a special tool. I have read if you can't get them out just use a thin spatula to push the vinyl in behind them. Just seems like it would be easier and better to remove the clips and replace them once I have the top on. I have the front windshield out but the back window is still installed.....
Richey
Richey
Thread Starter
Registered User
Joined: Oct 2009
Posts: 209
From: Idaho
Hmmmm looks like your top might be more custom fit with the front post vinyl sewed on.... not sure if it would be harder to get it lined up and set for and aft. Since haven't done it yet not sure how hard it will be to get that front seam glued down tight but I do have a little more material to play with. I'll let you know how it goes..
Richey
Richey
Registered User
Joined: Jan 2009
Posts: 4,086
From: Too close to Toronto!!
The window clips usually slide off sideways off the stud; the factory vinyl top material on my wife's '68 442 went down the windshield pillar and underneath the fender attaching point so that now that there is no longer a vinyl roof on it, some of the material still shows under the fender shims...I took a vinyl roof (factory) off another '68 442 and the drip valleys were filled with soft body filler to make the transition curve for the material less sharp than if it had to go to the bottom of the valley and turn back up and over the drip rail...
Thread Starter
Registered User
Joined: Oct 2009
Posts: 209
From: Idaho
Stud
The window clips usually slide off sideways off the stud; the factory vinyl top material on my wife's '68 442 went down the windshield pillar and underneath the fender attaching point so that now that there is no longer a vinyl roof on it, some of the material still shows under the fender shims...I took a vinyl roof (factory) off another '68 442 and the drip valleys were filled with soft body filler to make the transition curve for the material less sharp than if it had to go to the bottom of the valley and turn back up and over the drip rail...
I'll look to see if the vinyl for the pillar can go between the pillar and the fender. That woudl certianly anchor it.
Thanks
Richey
Thread Starter
Registered User
Joined: Oct 2009
Posts: 209
From: Idaho
vinyl success
Thanks but all my winsdshield clips are all push down similar to #3369 in Fusick catalog page 87. None are the slide variety..? I assume there is a good technique to remove them, other than brute force..
I'll look to see if the vinyl for the pillar can go between the pillar and the fender. That woudl certianly anchor it.
Thanks
Richey
I'll look to see if the vinyl for the pillar can go between the pillar and the fender. That woudl certianly anchor it.
Thanks
Richey
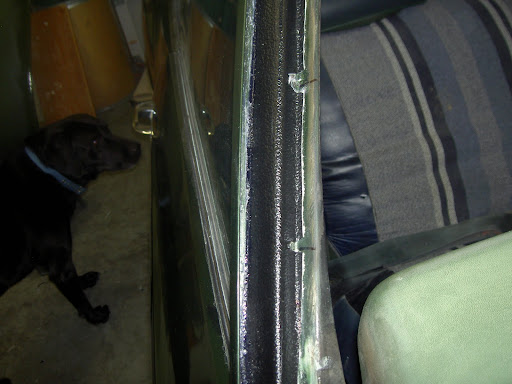
finished pillar
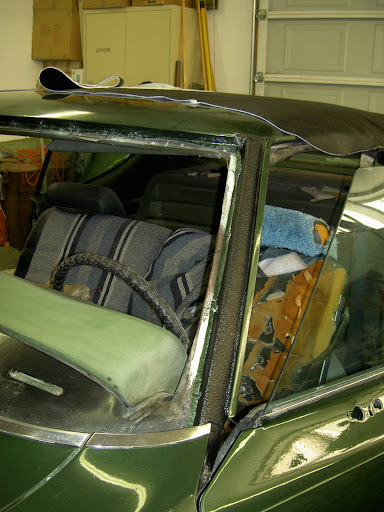
Having this go on so smooth really gave me confidnece getting ready to do the top! More details to come on my 72 Olds Cutlass thread.
Richey
Thread Starter
Registered User
Joined: Oct 2009
Posts: 209
From: Idaho
Drip Rail problem
Now that I have the top on sucessfully, I need some help on finishing the drip rail. All the articles I read said to seal the edge in the drip rail with a sealer to prevent water from getting under the edge. I found a good all purpose sealer by Liquid Nails, water proof, indoor, outdoor, non srinking, non fading, etc meet all my needs. Only problem now it has set for a week and it still feels tacky. Hopefully this will pass and it will dry out. my concern it will just catch dust and dirt and not clean up over time.
Any thoughts???
richey
Any thoughts???
richey
Thread Starter
Registered User
Joined: Oct 2009
Posts: 209
From: Idaho
I got a reply from Liquid Nails chemist and he said that they say on thier literature and on the product that thier clear seal is not for auto use. He also said to wait another week at 75 degree to see if it dried. If not to put a thin coat of a clear sealer over it. He did not say what. Did not care for answer....
Thread Starter
Registered User
Joined: Oct 2009
Posts: 209
From: Idaho
Tacky Sealer
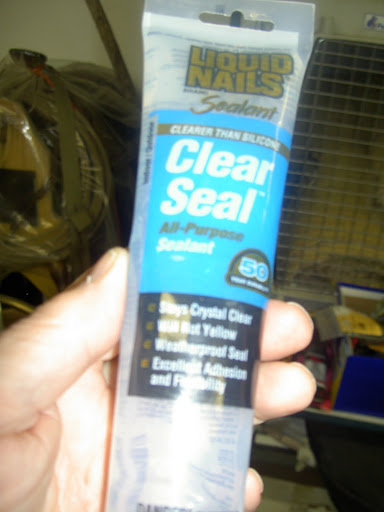
what I missed ws the very very fine print on the back that said not for automobile use. Guess that ment not for outside sealer use, since it remained tacky.
Here are some shots of the troubled area. I have picked out all the adhesive I could with a screw driver.
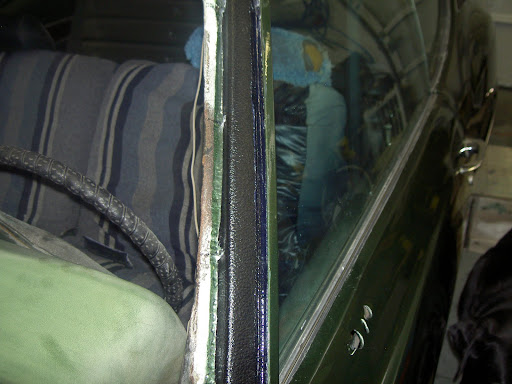
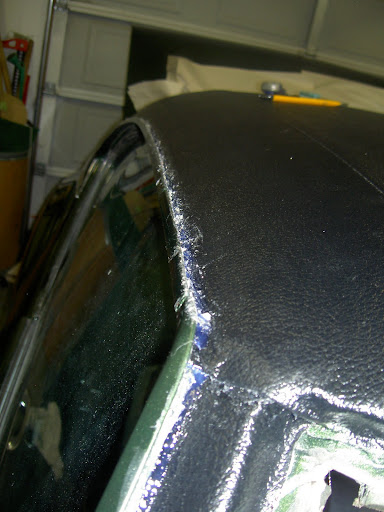
You can see I have some glue on the outer rail, I don't think thats a problem since my molding with fit over that and cover it up. In fact the glue will help hold onthe molding I'm guessing. Also some still on the vinyl
 (could be long term problem??)
The sealer can be disolved with Minerail Spirits, but don't want the vinyl to become unglued at the edge... I did test Mineral Spirits on my vinyl and it did not appear to react, but I'm afraid it might get under the edge...
I finally did what I should have done to start with and that is to go back to the Auto paint and body store experts and ask the question. Is there a special sealer for the drip rail? His answer was YES. It will be in Tuesday. He said it is a sealer that will when applied spread out and fill all the holes and seams, etc... Guess I should have ask first, but it seemed so easy to put some sealer in the rail and fill it in like caulking a bathtube. (Not so!)
Any suggestions on cleaning up my mess? I'm hoping after getting all or most of the old Liquid Nail out the other sealer will cover it to prevent catching dust and dirt
When I get the real sealer I'll post that for all to see......
Richey
Thread Starter
Registered User
Joined: Oct 2009
Posts: 209
From: Idaho
Tacky Sealer
what I missed ws the very very fine print on the back that said not for automobile use. Guess that ment not for outside sealer use, since it remained tacky.
Here are some shots of the troubled area. I have picked out all the adhesive I could with a screw driver.
You can see I have some glue on the outer rail, I don't think thats a problem since my molding with fit over that and cover it up. In fact the glue will help hold onthe molding I'm guessing. Also some still on the vinyl
(could be long term problem??)The sealer can be disolved with Minerail Spirits, but don't want the vinyl to become unglued at the edge... I did test Mineral Spirits on my vinyl and it did not appear to react, but I'm afraid it might get under the edge...
I finally did what I should have done to start with and that is to go back to the Auto paint and body store experts and ask the question. Is there a special sealer for the drip rail? His answer was YES. It will be in Tuesday. He said it is a sealer that will when applied spread out and fill all the holes and seams, etc... Guess I should have ask first, but it seemed so easy to put some sealer in the rail and fill it in like caulking a bathtube. (Not so!)
Any suggestions on cleaning up my mess? I'm hoping after getting all or most of the old Liquid Nail out the other sealer will cover it to prevent catching dust and dirt
When I get the real sealer I'll post that for all to see......
Richey
Thread Starter
Registered User
Joined: Oct 2009
Posts: 209
From: Idaho
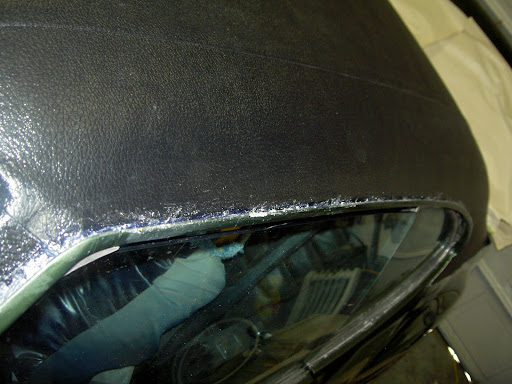
The final touch to seal the edge I ended up using the urethene Adhesive that I used to install the front windshield. It was blacka dn cured in a flexible water proof finish... It also covered up the mess I had..

The end result once adding the molding it all looks good!!!
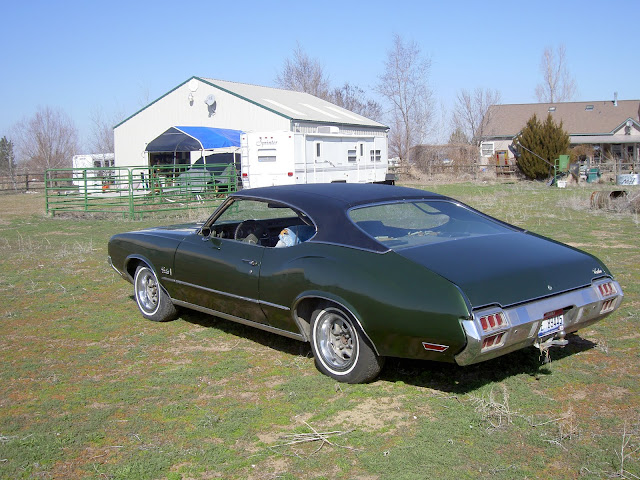
You can find more on my restoration at my thread "72 Olds Cutlass" https://classicoldsmobile.com/forums...s-cutlass.html
The end result once adding the molding it all looks good!!!
You can find more on my restoration at my thread "72 Olds Cutlass" https://classicoldsmobile.com/forums...s-cutlass.html


Thread Starter
Registered User
Joined: Oct 2009
Posts: 209
From: Idaho
molding
Does the body of you cutlass still have the tabs that the modling is originally fastned to? or were they removed during the body work and paint job? I found Fusick.com and yearone.com a good source of classic Olds parts...
good luck


Registered User
Joined: Oct 2009
Posts: 236
I was wondering is there anything I should put under a vinyl top to make sure it doesn't rust out anymore? As my back window did have some rust issues on the side and on the inside of the rear window from moister. Is there something that will stop it from rusting for good? As I don't have a garage to park my car in. I plan on using a car cover and what not. Thanks
Gary
Joined: Jul 2007
Posts: 1,245
From: Houston,Tx
I don't know how you repaired the rust around the windows but the best thing to do for rust is to completely cut it out and weld new metal in. I would then use an epoxy primer. Now if you did not cut the rust out and patched it I don't think that even if you used POR 15, that the rust still might come back from thru a filler. I am getting ready to soon put my vinyl on very shortly because just about finished painting the car. I guess I was very lucky because when I took the old vinyl off which was a chore there was no rust under it. I just stripped the top and the car down to bare metal. I did not paint the top but just left the epoxy primer on and plan on putting the vinyl over it. I thought that it made no sense to cover paint with a vinyl.
Thread Starter
Registered User
Joined: Oct 2009
Posts: 209
From: Idaho
rust
I'm no body man but I did try to document what my friend did as he attaked the rust in my Cutlass... The one thing he attempted to do was to remove and replace, grind down and eliminate the rust then repair, etch, prime and paint. For areas he could not totally get the rust out or area that would probably rust again, i.e., wheel wells he sprayed in what he call fish oil or an anit rust agent.... There was lots of rust and damge around the front windshield and required some creative work to get it repaired. This is documented in another tread of mine https://classicoldsmobile.com/forums...s-cutlass.html
You might check that out and see if anything in there will help. Good luck!!
Richey
You might check that out and see if anything in there will help. Good luck!!
Richey
Last edited by richeyb; Nov 28, 2010 at 10:22 AM. Reason: spelling correction

Registered User
Joined: Jul 2010
Posts: 233
I did upholstery work for about 10 years, another thing you want to make sure of is that the glue is dry before you lay the top down. Do half of it at a time. The contact cement while drying pulls moisture out of the air, and you dont want any of this under the top when you lay it down.

Registered User
Joined: Aug 2010
Posts: 419
From: MidWest
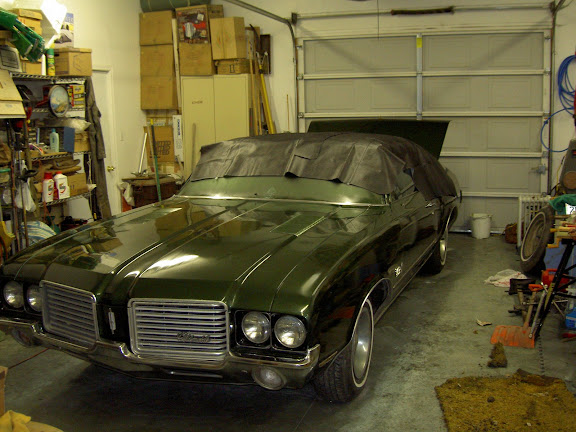
GLAD to hear it Richey! Happy Motoring! That Black Pebble Vinyl top sets your car off GREAT!! Very SHARP looking Ride!!

Thread
Thread Starter
Forum
Replies
Last Post
70Post
Parts For Sale
17
Mar 29, 2026 01:12 PM


