
Replacing a 455 Water Pump - step by step

Thread Starter
JC
Joined: Feb 2012
Posts: 1,069
From: So Florida
Replacing a 455 Water Pump - step by step
Going to try and document replacing a 455 water pump for the novice, from a amateur pov.
Thread will develop over next couple weeks. I am doing my timing cover at the same time.
Will be listing all the threads Ive found, and info during my research to hopefully make this a one stop shop for 455 water pump jobs...and a little bit about Timing covers, all for the novice.
Im a rookie, so I have no problem in being corrected when wrong!
Still researching which pump to get, which is tricky enough. Going to list all the options I can for you in choosing the pump-allot of options. I will only be doing A\C cars, focusing on my year 71-72':
(will be adding to this list each day)
GMB -
Cast Iron - Standard flow - A\C
http://www.summitracing.com/parts/GMB-130-1260/
Cast Iron - Hi flow - A\C
http://www.summitracing.com/parts/GMB-130-1260P/
Aluminum - Standard Flow
http://www.summitracing.com/parts/GMB-130-1360/
Aluminum - Hi Flow
http://www.summitracing.com/parts/GMB-130-1360P/
Some of these above can be had for less at Advance Auto as some have posted on C.O. and Ive verified.
TUFF STUFF -
Cast Iron - Standard Flow - A\C
http://www.summitracing.com/parts/TFF-1504NB/
CARDONE
Cast Iron - High Flow...?? - A\C
http://www.summitracing.com/parts/AAZ-58-295/
Note the difference in impellers!

Cast Iron - Standard Flow - No A\C
http://www.summitracing.com/parts/AAZ-58-294/

FLOWKOOLER
Aluminum - High Flow - A\C 6.0 inch
http://www.summitracing.com/parts/BRA-1775/
Aluminum - High Flow - A\C 5.6 inch
http://www.summitracing.com/parts/BRA-1776/
MILODON
Aluminum - High Flow - A\C 6.0 inch
http://www.race-mart.com/Milodon-MIL-16285.html
https://www.yearone.com/Product/DisplayProduct/350638


Thread will develop over next couple weeks. I am doing my timing cover at the same time.
Will be listing all the threads Ive found, and info during my research to hopefully make this a one stop shop for 455 water pump jobs...and a little bit about Timing covers, all for the novice.
Im a rookie, so I have no problem in being corrected when wrong!
Still researching which pump to get, which is tricky enough. Going to list all the options I can for you in choosing the pump-allot of options. I will only be doing A\C cars, focusing on my year 71-72':
(will be adding to this list each day)
GMB -
Cast Iron - Standard flow - A\C
http://www.summitracing.com/parts/GMB-130-1260/
Cast Iron - Hi flow - A\C
http://www.summitracing.com/parts/GMB-130-1260P/
Aluminum - Standard Flow
http://www.summitracing.com/parts/GMB-130-1360/
Aluminum - Hi Flow
http://www.summitracing.com/parts/GMB-130-1360P/
Some of these above can be had for less at Advance Auto as some have posted on C.O. and Ive verified.
TUFF STUFF -
Cast Iron - Standard Flow - A\C
http://www.summitracing.com/parts/TFF-1504NB/
CARDONE
Cast Iron - High Flow...?? - A\C
http://www.summitracing.com/parts/AAZ-58-295/
Note the difference in impellers!
Cast Iron - Standard Flow - No A\C
http://www.summitracing.com/parts/AAZ-58-294/
FLOWKOOLER
Aluminum - High Flow - A\C 6.0 inch
http://www.summitracing.com/parts/BRA-1775/
Aluminum - High Flow - A\C 5.6 inch
http://www.summitracing.com/parts/BRA-1776/
MILODON
Aluminum - High Flow - A\C 6.0 inch
http://www.race-mart.com/Milodon-MIL-16285.html
https://www.yearone.com/Product/DisplayProduct/350638
Last edited by JCMC64; Aug 1, 2012 at 08:28 AM.
Registered User
Joined: Mar 2007
Posts: 1,735
From: Tracy Ca
Make sur if you have AC,you get one for Ac, as the leanght is different on non AC. Also, I would try to find one that has a cast impeller, not stamped steal. Most cheap ones are stamped steal. I would go to a good parts store and see what they sell, and then you can see it before you buy it,stamped steal loos like a fan, and the cast is a wheel type with cups.
Thread Starter
JC
Joined: Feb 2012
Posts: 1,069
From: So Florida
Thx...I got a thread to post on topic of pump lengths. Its a famous thread referred to often around here.
The threads around here I have read calls them closed impellers vs open impellers
The whole topic of open vs closed impellars will be a good investigation project. I got a ton of photos Im going to post of different water pumps, including some impellers Ive collected.
Thx for input.
The threads around here I have read calls them closed impellers vs open impellers
The whole topic of open vs closed impellars will be a good investigation project. I got a ton of photos Im going to post of different water pumps, including some impellers Ive collected.
Thx for input.
Last edited by JCMC64; Jul 31, 2012 at 06:32 PM.

Registered User
Joined: Dec 2011
Posts: 7,286
In addition to the overall distance from gasket surface to pulley mtg flange, check the OD of the inlet nipple.... ESPECIALLY on 71-2 cars, as they were in a transition period...and both 1.75" and 2" inlets were used. Wrong one, and your radiator hose won't fit right.
Thread Starter
JC
Joined: Feb 2012
Posts: 1,069
From: So Florida
Water pump pics
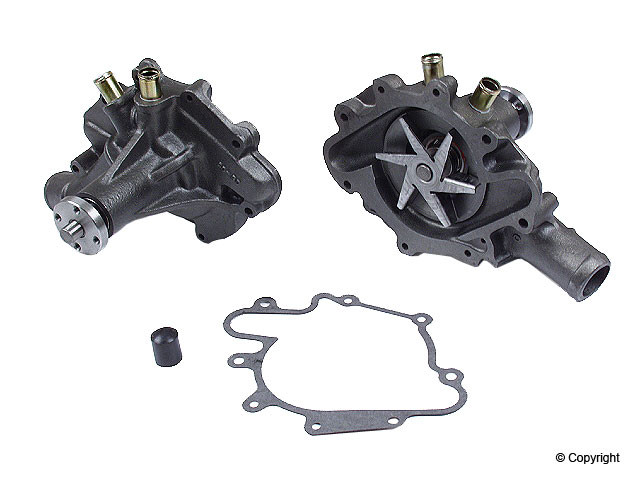
Open Impellar - Standard Flow


Closed Impellers - High Flow
(Not a 455 pump here)

Note the closed impeller design on this one. It seems all one cast here vs the Milodon design. It seems this design here is much more sturdy.

Here is the Milodon version from what ive read on this site is just a GMB pump with the Impellar change and shield welded onto it, at more than twice the cost.

The Milodon version above has more impeller blades than most out there.
Here is one of the GMB version 455 pump impellers.
Open Impellar - Standard Flow
Closed Impellers - High Flow
(Not a 455 pump here)
Note the closed impeller design on this one. It seems all one cast here vs the Milodon design. It seems this design here is much more sturdy.
Here is the Milodon version from what ive read on this site is just a GMB pump with the Impellar change and shield welded onto it, at more than twice the cost.
The Milodon version above has more impeller blades than most out there.
Here is one of the GMB version 455 pump impellers.
Last edited by JCMC64; Sep 9, 2012 at 03:58 AM.

Thread Starter
JC
Joined: Feb 2012
Posts: 1,069
From: So Florida
I just bought all new hoses, so I will have to make sure of diameter, though a hose is pretty easy to swap out.
Another issue to consider is the inlet angle....some are straight and some are bent like originals.
I think one of the threads I have saved goes into this too. Like to know the skinny behind that too.
Last edited by JCMC64; Aug 1, 2012 at 09:39 AM.


Runner
Joined: Jun 2010
Posts: 1,713
From: Ballwin, MO
I had to do this on my AC 70 SX a while ago and also typed up a "step-by-step" if it helps:
http://www.oldsmobilecentral.com/201...70-cutlass.php
http://www.oldsmobilecentral.com/201...70-cutlass.php

Registered User
Joined: Dec 2011
Posts: 7,286
http://www.ebay.com/itm/261074469442...84.m1439.l2649
AL body
"G" Logo?
5.6 x 1.75" unit
Note the CAST IRON 6-blade impeller!
Seller says it has been on his shelf for many years.


Thread Starter
JC
Joined: Feb 2012
Posts: 1,069
From: So Florida
Originally Posted by ;Joffroi
I had to do this on my AC 70 SX a while ago and also typed up a "step-by-step" if it helps:
http://www.oldsmobilecentral.com/201...70-cutlass.php
http://www.oldsmobilecentral.com/201...70-cutlass.php
This is funny as I have your thread as one of the ones I was going to post!
Good job there. Thanks for posting it.
I will just add more photos for the weekend warrior.
I got all the gaskets now, New timing cover, new bolt kit, etc.
I havent gotten the pump yet, been very busy. Ive been considering the Milodon 16285 as its Aluminum, Hi flow, has closed 8 impellar setup.
It has straight inlet tube, which is not like my original...will need to look into that.
The timing cover\water pump gasket kit I got is Felpro - FEL-PRO TCS 45270
Oil Pan - VICTOR REINZ OS30534TC (Steel mesh Diesal 350 gasket)
Will be getting into this next week or two.
Last edited by JCMC64; Aug 15, 2012 at 11:06 PM.
Thread Starter
JC
Joined: Feb 2012
Posts: 1,069
From: So Florida
Well, hows that for timing! Just as I say I havent seen newer style pump with Cast closed impellar one shows up! 12 years new though...
Any numbers on it? Be interesting to track down what brand it is.
Any numbers on it? Be interesting to track down what brand it is.
Registered User
Joined: Dec 2011
Posts: 7,286
Registered User
Joined: Aug 2009
Posts: 1,021
From: St. Louis, Missouri
Thread Starter
JC
Joined: Feb 2012
Posts: 1,069
From: So Florida
Im doing the Timing Cover and oil pan this w\e.
Some notes I found from Joe P:
"You DO NOT need to remove the oil pan to R&R the front cover. It is possible to simply loosen the oil pan bolts (more towards the front than the back) and work the cover back into place. There are a couple of tricks, as described in the Chassis Service Manual. First, the rubber seal that fits into the bottom of the front cover has ears that are clamped under the oil pan. These ears must be cut off on the replacement seal to facilitate cover installation. Second, the seal should be gooped up with RTV, particularly at the corners where the seal was trimmed. Now, place the bottom of the cover into place with the top held away from the block. Angle it into place on the two dowel pins on the block. You may need to gently pry down on the oil pan. I use two of the front cover bolts to actually pull the cover into place. Once seated, you can install the bolts and water pump normally."
___________
In my case the entire pan is lowered as Im replacing oil pan gasket too at same time, due to some leaks.
Timimg gear cover...included are pics of the proper bolts in their proper places. Can get confusing.
New and old Cover, New seal installed

Did a mock up first with old TC and pump just to get all the bolts right, make sure everything lines up.


Once I got everything right, took it apart to take pics of proper bolt setup.
There is a strange arrangement of bolts here, with 5 different bolt types. Here are plenty of pics to get accurate setup

Some notes I found from Joe P:
"You DO NOT need to remove the oil pan to R&R the front cover. It is possible to simply loosen the oil pan bolts (more towards the front than the back) and work the cover back into place. There are a couple of tricks, as described in the Chassis Service Manual. First, the rubber seal that fits into the bottom of the front cover has ears that are clamped under the oil pan. These ears must be cut off on the replacement seal to facilitate cover installation. Second, the seal should be gooped up with RTV, particularly at the corners where the seal was trimmed. Now, place the bottom of the cover into place with the top held away from the block. Angle it into place on the two dowel pins on the block. You may need to gently pry down on the oil pan. I use two of the front cover bolts to actually pull the cover into place. Once seated, you can install the bolts and water pump normally."
___________
In my case the entire pan is lowered as Im replacing oil pan gasket too at same time, due to some leaks.
Timimg gear cover...included are pics of the proper bolts in their proper places. Can get confusing.
New and old Cover, New seal installed
Did a mock up first with old TC and pump just to get all the bolts right, make sure everything lines up.
Once I got everything right, took it apart to take pics of proper bolt setup.
There is a strange arrangement of bolts here, with 5 different bolt types. Here are plenty of pics to get accurate setup
Last edited by JCMC64; Sep 10, 2012 at 02:22 AM.
Thread Starter
JC
Joined: Feb 2012
Posts: 1,069
From: So Florida
4New set of bolts from ILT on Left, Old mismatched and rusty bolts on Right

Various angles of correct bolts


Then I took old TC off, and installed new one using black sealant, and water sealant around water ports. I used various shorter bolts
as needed because Im not installing Water pump at same time as TC because Ive still not totally made up my mind on which water pump
to get. Not happy with any of these parts store mass produced chinese pumps. So I button up engine till I decide, then install pump later.

Various angles of correct bolts
Then I took old TC off, and installed new one using black sealant, and water sealant around water ports. I used various shorter bolts
as needed because Im not installing Water pump at same time as TC because Ive still not totally made up my mind on which water pump
to get. Not happy with any of these parts store mass produced chinese pumps. So I button up engine till I decide, then install pump later.
Last edited by JCMC64; Sep 10, 2012 at 02:31 AM.
Registered User
Joined: Dec 2010
Posts: 236
From: Newmarket, Ontario
Hey JC any reason you removed your last post on difficulty of oil pan gasket removal. Got an email notification but no post...would have liked to see those links to the before and after. Good thread.
Thread Starter
JC
Joined: Feb 2012
Posts: 1,069
From: So Florida
Sorry man I had post the whole thing in the wrong section. I was working on 3 different threads last night updating them. I put the oil pan update in the timing cover/ water pump thread. I moved it. I'll post the correct link for you. It's in my restoration thread now .
https://classicoldsmobile.com/forums...s-s-455-a.html
Back to TC install:
I used 400 grit to clean up crankshaft end, and then oil up New Harmonic balancer and crankshaft, and installed with Harmonic Balancer install tool


Torqued HB to specs
Make sure you have your research laptop setup with Billabong ASP Surf contest live from Teahupoo Tahiti running in background

https://classicoldsmobile.com/forums...s-s-455-a.html
Back to TC install:
I used 400 grit to clean up crankshaft end, and then oil up New Harmonic balancer and crankshaft, and installed with Harmonic Balancer install tool
Torqued HB to specs
Make sure you have your research laptop setup with Billabong ASP Surf contest live from Teahupoo Tahiti running in background
Last edited by JCMC64; Sep 10, 2012 at 02:39 AM.
Thread Starter
JC
Joined: Feb 2012
Posts: 1,069
From: So Florida
As I already mentioned, Im not too happy with the selection of current water pumps out there. The Parts stores carry allot of lower end stuff. And the newer construction is no where near the old designs - cast vs stamped steel as described above.
I went with the Milodon 16285 mostly because though its stamp, its Hi Vol and more impellars than others. It seems to have the best of the modern features, although its still wanting in my eyes.
Its pricy, but I will try it out and post what I think.
I went with the Milodon 16285 mostly because though its stamp, its Hi Vol and more impellars than others. It seems to have the best of the modern features, although its still wanting in my eyes.
Its pricy, but I will try it out and post what I think.
Last edited by JCMC64; Sep 14, 2012 at 03:43 AM.


Thread Starter
JC
Joined: Feb 2012
Posts: 1,069
From: So Florida

Here is another pic \ layout of the proper special bolts you need. 4a is noted due to option of one shown or the special double sided threaded bolt like #5, depending on power steering bracket setup, etc:

Last edited by JCMC64; Mar 1, 2013 at 12:17 AM.
Thread Starter
JC
Joined: Feb 2012
Posts: 1,069
From: So Florida
Finally got around to fixing all the errors in this thread due to pic formatting crash back in Sept.
I got the special privilege of redoing the water pump because one of the ILT bolts in the set (double sided bolt) snapped at only half the torque spec! I quickly fixed it back then, but damage was done. It sprung a tiny leak right at that bolt spot. So beware with those ILT or similar repop bolt sets sometimes. I ended up using the original double sided thread bolt, which was one of only two originals the car came with.
I got the special privilege of redoing the water pump because one of the ILT bolts in the set (double sided bolt) snapped at only half the torque spec! I quickly fixed it back then, but damage was done. It sprung a tiny leak right at that bolt spot. So beware with those ILT or similar repop bolt sets sometimes. I ended up using the original double sided thread bolt, which was one of only two originals the car came with.

Thread Starter
JC
Joined: Feb 2012
Posts: 1,069
From: So Florida
Didnt have much chose as all except two bolts were shade tree, stripped, unusable (to me anyways). The other bolts in the In Line Tube set are all good Grade 5 or better. So its jus the double threaded bolts that are questionable in the set. IT was the thinner one by the way that snapped...the thicker lower one on timing tab worked fine.
Last edited by JCMC64; Mar 4, 2013 at 10:02 AM.

Registered User
Joined: May 2010
Posts: 542
From: Mich.
I am looking for a water pump. Looked at two new pumps , the heater hose nipples are now cast with the bump body. What happed to the pumps with pressed in tubes for the hoses (as I have now). Were the factory pumps made with pressed in tubes for the hoses., I though they were. Has anyone bought a pump in the last month that has the pressed in tubes for the header hose, if so who sells it? Thanks..

Thread
Thread Starter
Forum
Replies
Last Post
Nor Cal Andy
Parts For Sale
0
Mar 29, 2012 07:27 PM


