LOG IN
REGISTER
Forums
New User Forums
The Newbie Forum
Site Related
General
General Discussion
The Clubhouse
Repair & Restoration
Technical & Reference
Major Builds & Projects
Racing and High Performance
Engine
Transmission and Driveline
Chassis, Tires/Wheels, Brakes, & Related
Body & Paint
Electrical
Interior and Trim
Other
Vehicle Lineup
Cutlass, 442, and Hurst/Olds
Large Oldsmobiles
Final Years Oldsmobiles
Vintage Oldsmobiles
Toronado
Other Oldsmobiles
Classifieds
Buyer & Seller Feedback
Oldsmobile Cars
Oldsmobile Parts
Non-Oldsmobile Classified
Miscellaneous Classifieds
Marketplace
Vendor Directory
Become a Vendor
New Posts
Tools
Car Payment Calculator
Tire Rim Calculator
Recalls
Technical Service Bulletins (TSBs)
Members List
Live Feed
Gallery
View Dark Mode
Please register or login to enable Dark Mode.
Log In
Register
Threads
Google
Threads
Posts
Advanced
Dark Mode
Please register or login to enable Dark Mode.
Log In
Forgot your Password?
By logging into your account, you agree to our
Terms of Use
and
Privacy Policy
, and to the use of cookies as described therein.
Recent
Commented
Albums
My Pictures
My Post Pictures
cfair
December 6, 2017
297
0
Sort:
Default
Default
Most Recent
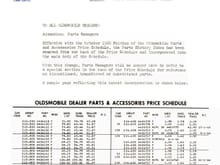
I haven't calculated the margins, but I'm guessing the dealers weren't losing money...
0
2023/09/26 21:55:43
cfair
The cover is a bit rough, but its genuine Olds
0
2023/09/27 09:45:49
cfair
Getting information out to the dealer network in the analog days
0
2023/09/27 09:46:45
cfair
Chevy clips, but they'll retain your Olds belt buckles too.
0
2023/09/30 08:25:36
cfair
Looks factory to me
0
2023/09/30 08:29:33
cfair
0
2023/09/30 08:30:06
cfair
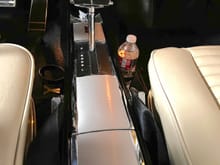
Now maybe my console won't get dinged...
0
2023/09/30 08:31:00
cfair
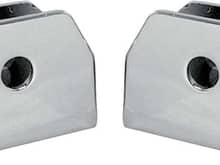
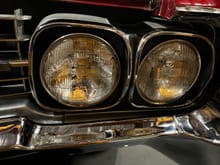
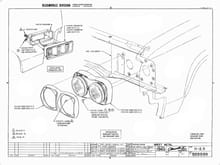
66 big car headlight bezel. 2 screws at the top, 2 slots at the bottom riveted to the trim on the back.
0
2023/10/15 10:09:40
cfair
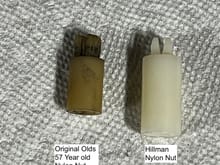
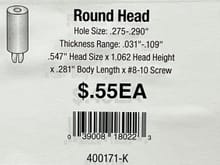
Turns out the Hillman parts work with just 30 seconds or so of Dremel cutting to the correct length.
0
2023/10/15 10:11:36
cfair
Hillman nylon nuts in place of original Olds parts after a bit of trimming.
0
2023/10/15 10:15:06
cfair
66 Assembly Manual drawing of headlight bezels
0
2023/10/15 10:27:04
cfair
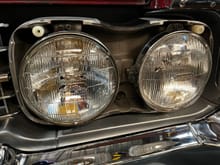
Cut to fit and it works
0
2023/10/17 07:48:15
cfair
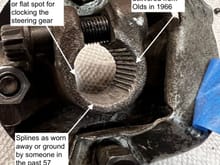
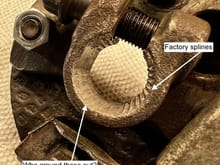
Previous Owner Syndrome, or a terrible mechanic. "All we have to do to make it fit is grind off some splines!" Dumbsh*t.
0
2023/11/03 20:53:46
cfair
Oh hell - just grind off all the splines and torque it to 100 ft-lbs!. It'll be fine!
0
2023/11/03 20:57:27
cfair
0
2023/11/05 09:06:20
cfair
Ha, ha? or Nah, nah?
0
2024/07/08 19:24:51
cfair
Dunno why I saw it this way, but it looked like a planted garden to me.
0
2024/07/08 19:30:44
cfair
We were joking about this as the exhaust manifold vineyard. From a distance it looks just like grapes on the vine...
0
2024/07/08 19:32:24
cfair
Fix a hogged out / oversize hole with a plastic anchor to restore it.
0
2024/07/16 22:33:17
cfair
Sure you can pay big $$ to have a custom shroud made, but why not try a cheap ziptie first?
0
2024/07/30 19:07:53
cfair
Ziptie some extra width on the driver's side of your '65-'66 big car shroud for better cooling.
0
2024/07/30 19:10:37
cfair
side stamped "Front" aimed at front of car
0
2024/08/29 17:06:26
cfair
Door hinge bolt shaped wrenches. Use blue tape on your fender and door if you use these to protect paint...
0
2025/02/13 09:08:44
cfair
Use the curve and ratcheting feature. Not much room to work
0
2025/02/13 09:09:54
cfair
Use the shape!
0
2025/02/13 09:10:34
cfair
Use blue tape to establish temporary alignment marks
0
2025/02/24 13:24:23
cfair
Seal retains the alignment marks so you know how stretched or squished to put it in.
0
2025/02/24 13:24:26
cfair
New on left, used on right. The bend on the right is hard to see, as is the wear & tear.
0
2025/02/25 15:00:24
cfair
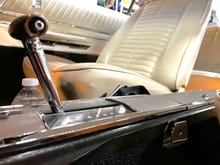
Complex shifter with some parts that will never be made again.
0
2025/02/25 15:02:06
cfair
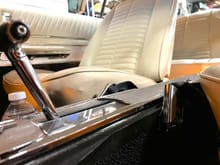
Before removing console, put the shifter in neutral to save your plastic lenses
0
2025/02/25 15:04:16
cfair
Cotter pin 1st, then electrical, then sheet metal screws
0
2025/02/25 15:05:19
cfair
Original Olds Diagram. I've added a few custom part names which instructions below refer to.
0
2025/02/25 15:06:13
cfair
Loosen the nuts, slip the spring clip back and it will pretty much come apart. This is a rear view.
0
2025/02/25 15:07:49
cfair
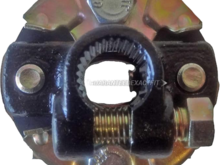
This is a good one, it rotates and has 3 teeth to separate the roller wheel pins
0
2025/02/25 15:09:58
cfair
Here's a side view of a good one
0
2025/02/25 15:09:59
cfair
Here's a bad one missing it's middle separating tooth
0
2025/02/25 15:10:00
cfair
This is my good used spacer I put back in the car
0
2025/02/25 15:10:02
cfair
This is one idea as to how to replace the spacer - Hillman #4 screw nylon washers. Not tested
0
2025/02/25 15:10:03
cfair
Preinstall shims and cotter pins so they are where you need them on reassembly
0
2025/02/25 15:13:07
cfair
Clean, polished and greased means smoother action
0
2025/02/25 15:13:55
cfair
First
Page
6 of 8
Last
Go To
Page
1
2
3
4
5
6
7
8
6 of 8
Go To
GO
Go to page
of 8
pages
1
2
3
4
5
6
7
8