LOG IN
REGISTER
Forums
New User Forums
The Newbie Forum
Site Related
General
General Discussion
The Clubhouse
Repair & Restoration
Technical & Reference
Major Builds & Projects
Racing and High Performance
Engine
Transmission and Driveline
Chassis, Tires/Wheels, Brakes, & Related
Body & Paint
Electrical
Interior and Trim
Other
Vehicle Lineup
Cutlass, 442, and Hurst/Olds
Large Oldsmobiles
Final Years Oldsmobiles
Vintage Oldsmobiles
Toronado
Other Oldsmobiles
Classifieds
Buyer & Seller Feedback
Oldsmobile Cars
Oldsmobile Parts
Non-Oldsmobile Classified
Miscellaneous Classifieds
Marketplace
Vendor Directory
Become a Vendor
New Posts
Tools
Car Payment Calculator
Tire Rim Calculator
Recalls
Technical Service Bulletins (TSBs)
Members List
Live Feed
Gallery
View Dark Mode
Please register or login to enable Dark Mode.
Log In
Register
Threads
Google
Threads
Posts
Advanced
Dark Mode
Please register or login to enable Dark Mode.
Log In
Forgot your Password?
By logging into your account, you agree to our
Terms of Use
and
Privacy Policy
, and to the use of cookies as described therein.
Recent
Commented
Albums
My Pictures
My Post Pictures
cfair
December 6, 2017
297
0
Sort:
Default
Default
Most Recent
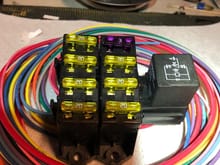
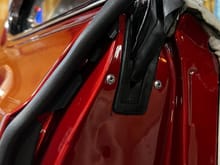
I mounted mine with the realy on the right and flipped the fuses. The ground mount is hidden in upper right corner here.
0
2021/09/16 08:28:51
cfair
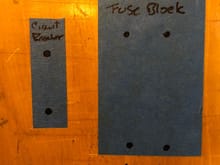
Make your own mounting templates with blue tape & a sharpie.
0
2021/09/16 08:31:43
cfair
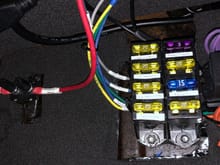
Circuit isolater labeled to make maintenance down the road much easier.
0
2021/09/16 08:36:15
cfair
Modern accessories powered by modern relay. Isolated, easier to maintain, and safer than lots of amps through 55 year old wires.
0
2021/09/16 08:44:35
cfair
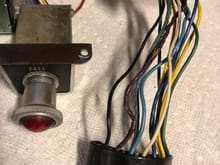
The death of a fairly rare and cool option. I may rewire it someday, but luckily I had a spare in my stash...
0
2021/09/16 09:21:50
cfair
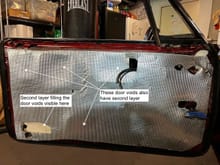
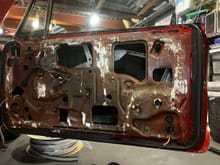
Cut it to fit and enjoy a quieter car. It can make door panels a bit harder to fit.
0
2022/05/03 11:53:36
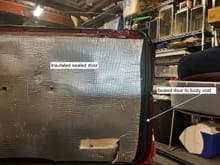
cfair
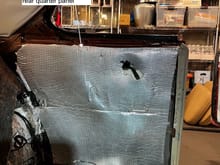
Aluminum backed, 1/4" thick, closed cell foam works much better than GM's tarpaper water barriers from the 60's to eliminate noise, heat & water from the cabin.
0
2022/05/03 11:57:34
cfair
Tips & tricks to quiet a Big Olds. Not factory, but I think it helps. And they're fun projects.
0
2022/05/03 12:07:03
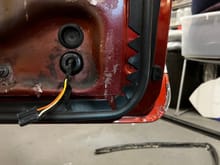
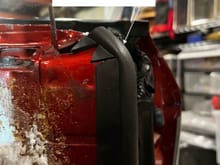
cfair
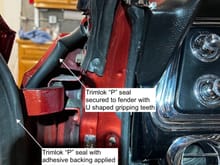
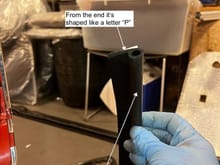
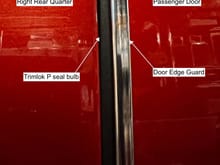
Trimlok adhesive P seal. It can make your doors a bit harder to close in the early going.
0
2022/05/03 12:14:50
cfair
'66 Starfire door with Trimlok P seal edging. I retained the factory seals, but this helps reduce noise.
0
2022/05/03 12:18:44
cfair
Upholsterer's trick to turn a corner neatly.
0
2022/05/03 12:20:18
cfair
Why not make it look clean?
0
2022/05/03 12:24:36
cfair
Just before putting the door panel back on
0
2022/05/03 12:28:20
cfair
While you're filling voids, why not?
0
2022/05/03 12:32:23
cfair
Early experiment, will need to figure out an end solution and how to make it look cleaner.
0
2022/05/03 12:33:30
cfair
0
2022/05/09 09:06:55
cfair
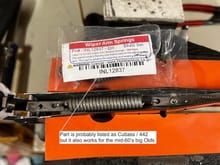
Fresh wiper arm springs help your wipers stay against the windshield at higher speeds.
0
2022/05/09 09:08:09
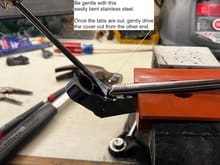
cfair
Use a small flatblade to gently nudge the cover off the wiper arm. There a are 2 retention tangs to release. After this end is up, tap out the cover from the other end.
0
2022/05/09 09:12:00
cfair
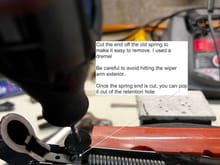
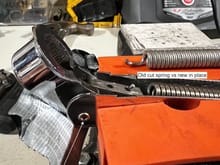
Grind off the end of the old spring. Don't hit the retention clip with the 2 holes.
0
2022/05/09 09:14:43
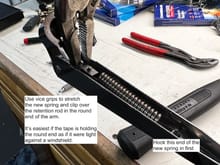
cfair
Duct tape makes for a pretty good third hand when stretching springs.
0
2022/05/09 09:18:36
cfair
Use your small vice grips to stretch the spring and hook the clip over the bar in the mounting end of the wiper blade.
0
2022/05/09 09:19:34
cfair
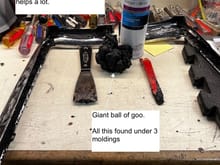
Heat and solvent help remove the 3M mastic sealant. Heat also helps liquify it for reinstallation. Heat the parts on the bench, not your windshield.
0
2022/05/09 12:19:18
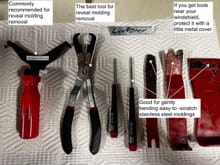
cfair
Tools to pop GM windsheild (and rear window) molding clips. Use a bending tool on the right to create a gap for the pliers or Y hook on the left and pull the clip toward the center of the windshield.
0
2022/05/09 12:29:01
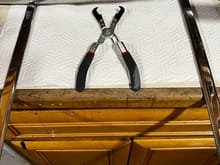
cfair
Windshield reveal moldings and pliers. These work, but be careful of scratching / chipping glass.
0
2022/05/09 13:12:14
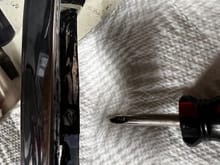
cfair
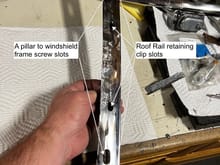
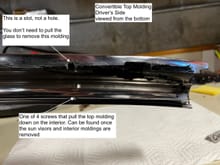
Once the reveal moldings are off, you'll see 3 screws securing the A-pillar molding to the windshield frame on the front.
0
2022/05/09 13:13:30
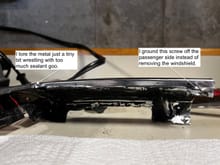
cfair
Passenger side A-pillar. Grind this screw off or remove the windshield to get at all of them.
0
2022/05/09 13:19:03
cfair
Screw slot locations, symmetric on each side of the car. This is the passenger side as viewed from the rear.
0
2022/05/09 13:24:14
cfair
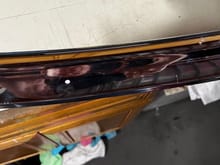
Convertible top molding. Passenger side on the left. Buffing this up makes them look almost new.
0
2022/05/09 13:31:08
cfair
The 4 or 5 slots on the molding allow correct right-left adjustment. I didn't remove the locating screws. Luckily...
0
2022/05/09 13:36:53
cfair
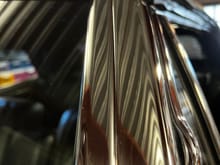
A few hours with the buffer & your stainless can look like a mirror.
0
2022/05/09 14:07:43
cfair
Lots of hours just to get a few shiny moldings in place. But fun.
0
2022/05/09 14:08:41
cfair
Hacked Factory diagram for mid-60's Big Olds vacuum power door locks. This may help you install, repair or understand yours.
0
2022/05/10 16:08:32
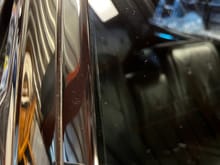
cfair
Left is what you see in the glove box of a Trico trunk release equipped '66 Big Olds. Right is a side view, so you can see the business end.
0
2022/05/12 21:17:29
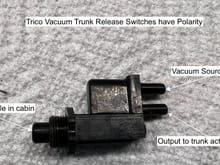
cfair
Typical Mid-60's Trico vacuum trunk release. Observe port assignments or be prepared for a vacuum hiss...
0
2022/05/12 21:19:52
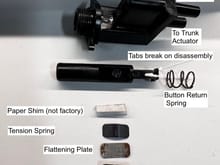
cfair
Trico vacuum trunk release sandwich with paper shim hack to increase vacuum seal tension against switch housing.
0
2022/05/12 21:37:16
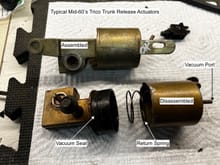
cfair
Here's what's inside your Trico vacuum trunk release.
0
2022/05/12 21:57:00
cfair
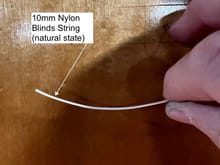
Nylon blinds string can hold your Olds seat buttons in place.
0
2022/05/18 21:44:04
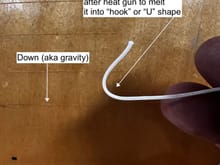
cfair
Use your heat gun to melt the nylon cord into a U shape so you can press it through PinBack button holes.
0
2022/05/18 21:47:09
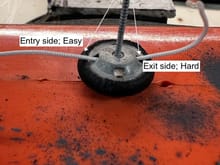
cfair
Cut your strings extra-long (16-20"). Mildly melting nylon cord allows you to route the string through pinback button holes.
0
2022/05/18 21:49:53
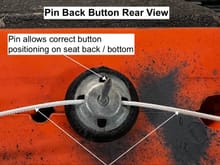
cfair
Use the center pin to place the button correctly in your upholstery, looking at it from the front (aka visible) side. Use the strings to tie it in place if the pin isn't long enough.
0
2022/05/18 21:51:41
cfair
First
Page
4 of 8
Last
Go To
Page
1
2
3
4
5
6
7
8
4 of 8
Go To
GO
Go to page
of 8
pages
1
2
3
4
5
6
7
8