


70 442 Pilot Bushing Problem

Thread Starter
Registered User
Joined: Nov 2014
Posts: 1,554
From: Cincinnati, Ohio
70 442 Pilot Bushing Problem
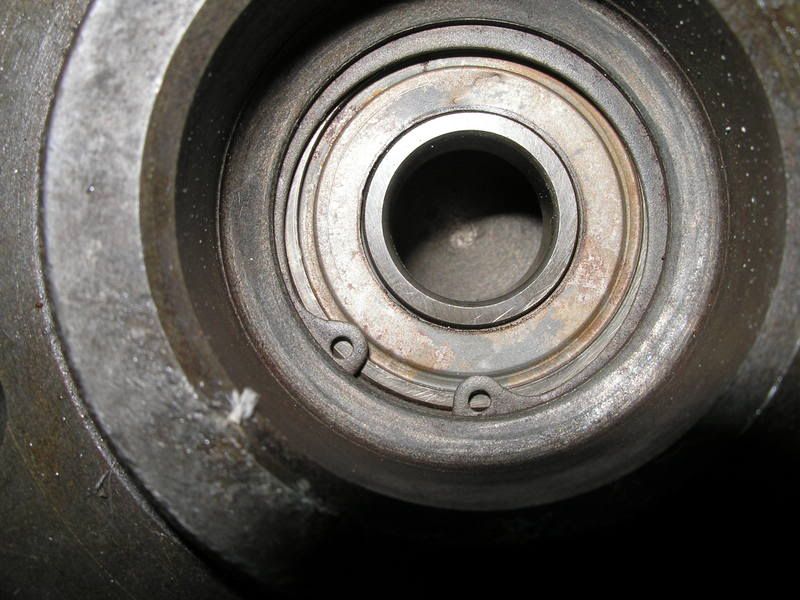
So, once again I get into something and run into a problem.Take a look at the pics. This is what I found when I pulled the 4 speed Muncie out of my car. I believe this crank is for an automatic trans. Looks as though someone drilled it out. There's a void in behind it, so there is some clearance. Besides replacing the crank, what are my options?
Can it be drilled out larger and have a bushing pressed in without pulling it apart?
I can't really tell but I'm assuming the first ring is just a machined groove and that what I'm looking at is not a bushing.
Any advise would surely be appreciated.
Rick
Can it be drilled out larger and have a bushing pressed in without pulling it apart?
I can't really tell but I'm assuming the first ring is just a machined groove and that what I'm looking at is not a bushing.
Any advise would surely be appreciated.
Rick

Registered User
Joined: May 2009
Posts: 1,614
From: S.E. Louisiana, so far still in U.S.A.
Oldsmobile used a ball bearing rather than a bushing to support the front of the main drive gear on the transmission. I can't tell from the photos exactly what is there. What was providing the support for the shaft?
Thread Starter
Registered User
Joined: Nov 2014
Posts: 1,554
From: Cincinnati, Ohio
Rick

Old(s) Fart
Joined: Mar 2007
Posts: 50,802
From: Northern VA
The brass-colored thing in the middle is a replacement pilot bushing instead of the factory ball bearing. You need to pull it out, using either a pilot bushing puller or by packing wheel bearing grease into the hole and hammering on it using an appropriately-sized dowel. Once it's out, that will look like a normal MT crank.
Thread Starter
Registered User
Joined: Nov 2014
Posts: 1,554
From: Cincinnati, Ohio
The brass-colored thing in the middle is a replacement pilot bushing instead of the factory ball bearing. You need to pull it out, using either a pilot bushing puller or by packing wheel bearing grease into the hole and hammering on it using an appropriately-sized dowel. Once it's out, that will look like a normal MT crank.
The new brass bushing I ordered measures 1.094 in. outside diameter and 0.592 in. inside diameter. If what is in the picture is indeed the bushing, then I guess I would need to find a different one. The center hole in the picture is 0.592. but the distance to across the "ring" area is much larger than 1.094. Summit Racing said the one they sent is the one for the set up I have.
So you're saying what I called the groove is actually the outside of a replacement bushing?
BTW it really doesn't appear to me that it is brass.
Not trying to doubt your wisdom, as I've read your some of your post , but I just don't want to be pulling on something that isn't intended to come out.
This car is somewhat of a Frankenstein so it's not like I know exactly what I have when I order parts.
Thanks,
Rick
Old(s) Fart
Joined: Mar 2007
Posts: 50,802
From: Northern VA
You might want to take a knife and scrape on the crank and that inner ring and see if the material underneath is the same color. Also, some degreaser and better lighting will help you a lot.
Thread Starter
Registered User
Joined: Nov 2014
Posts: 1,554
From: Cincinnati, Ohio
Thanks,
Rick
Registered User
Joined: May 2009
Posts: 1,614
From: S.E. Louisiana, so far still in U.S.A.
What you have may be a bushing that was used as a substitute for the original bearing. I'd do as Joe suggested; get a pilot bushing puller and try to remove what's there. After it's out you'll be able to tell exactly what you have and then look for a replacement with the proper dimensions or go back to a bearing. 
Old(s) Fart
Joined: Mar 2007
Posts: 50,802
From: Northern VA
I suspect that when you get that pilot bushing cleaned up and pulled out, it will look a lot like this:
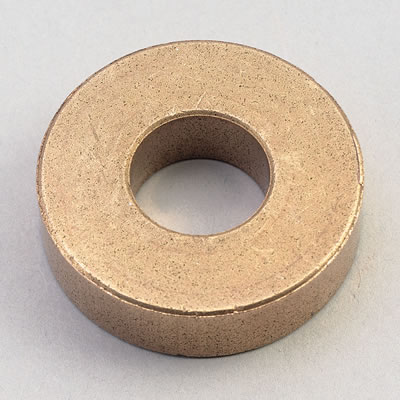
That's a RAM Clutches P/N BU75, which is the brass aftermarket replacement for the original Olds ball bearing pilot bearing. It's 1.383" O.D. You can get one from Summit for $7.
http://www.summitracing.com/parts/ram-bu75
By the way, this is what the original factory ball bearing pilot bearing looks like. Note the snap ring retainer.
That's a RAM Clutches P/N BU75, which is the brass aftermarket replacement for the original Olds ball bearing pilot bearing. It's 1.383" O.D. You can get one from Summit for $7.
http://www.summitracing.com/parts/ram-bu75
By the way, this is what the original factory ball bearing pilot bearing looks like. Note the snap ring retainer.
Registered User
Joined: Dec 2012
Posts: 1,589
From: Texas
I read somewhere to use a thread tap to remove it. Sounded like a good idea to me. Just get a size that will catch and thread into the old bushing, screw it into the end of the crank, which will force the bushing out.
Steve
Steve
Registered User
Joined: Oct 2005
Posts: 7,318
From: NJ
Thread Starter
Registered User
Joined: Nov 2014
Posts: 1,554
From: Cincinnati, Ohio
Thanks to all for your help. I would be in a world of hurt without CO and members like you guys.
I've searched other threads about bushings vs. bearings. Seems like it's split down the middle. Any final thoughts on this? Is there any other information about the motor or drive train needed to pick the best one?
thanks,
Rick
I've searched other threads about bushings vs. bearings. Seems like it's split down the middle. Any final thoughts on this? Is there any other information about the motor or drive train needed to pick the best one?
thanks,
Rick
Thread Starter
Registered User
Joined: Nov 2014
Posts: 1,554
From: Cincinnati, Ohio
Registered User
Joined: May 2009
Posts: 1,614
From: S.E. Louisiana, so far still in U.S.A.
Old(s) Fart
Joined: Mar 2007
Posts: 50,802
From: Northern VA
Figures 6B-191 and 6B-192 on page 6B-34 of the 1970 Olds Chassis Service Manual shows the snap ring retainer. It also says that the bearing should be 1.3774 - 1.3780" and the hole for it should be 1.378 - 1.380". The recess observed is intended for a lubricant. The color variation observed may be due to the use of bronze or brass for the bushing. Brass is copper + zinc producing a yellowish color. Bronze is copper + tin producing a bit more "reddish" tint.


Registered User
Joined: Mar 2008
Posts: 4,025
Dorman 690-023 is another source for the replacement bushing. If alignment is perfect and no dirt. etc. gets in there, then the bearing lasts longer. If it seizes, it will eat the nose of the transmission input shaft. The bushing holds the advantage there, because it is easier on the input and tolerates misalignment. I still recommend using a dial indicator and offset dowels to get perfect alignment of the bell housing to the crank.
Thread Starter
Registered User
Joined: Nov 2014
Posts: 1,554
From: Cincinnati, Ohio
Small Victory
Well, something finally went right. Packed grease in the hole and drove a 5/8"wooden dowel in. Couple of taps later and the bushing came right out.
Thanks for the help guys.
Rick
Thanks for the help guys.
Rick
Thread Starter
Registered User
Joined: Nov 2014
Posts: 1,554
From: Cincinnati, Ohio
Dorman 690-023 is another source for the replacement bushing. If alignment is perfect and no dirt. etc. gets in there, then the bearing lasts longer. If it seizes, it will eat the nose of the transmission input shaft. The bushing holds the advantage there, because it is easier on the input and tolerates misalignment. I still recommend using a dial indicator and offset dowels to get perfect alignment of the bell housing to the crank.
I do not have the tools to do as you suggested. I'm going to put this back together and run it for a short time this summer. Hopefully when I tear it apart for the "real" build I'll either have the right tools or know someone that does.
Thanks,
Rick
Old(s) Fart
Joined: Mar 2007
Posts: 50,802
From: Northern VA

Thread
Thread Starter
Forum
Replies
Last Post


