When you click on links to various merchants on this site and make a purchase, this can result in this site earning a commission. Affiliate programs and affiliations include, but are not limited to, the eBay Partner Network.
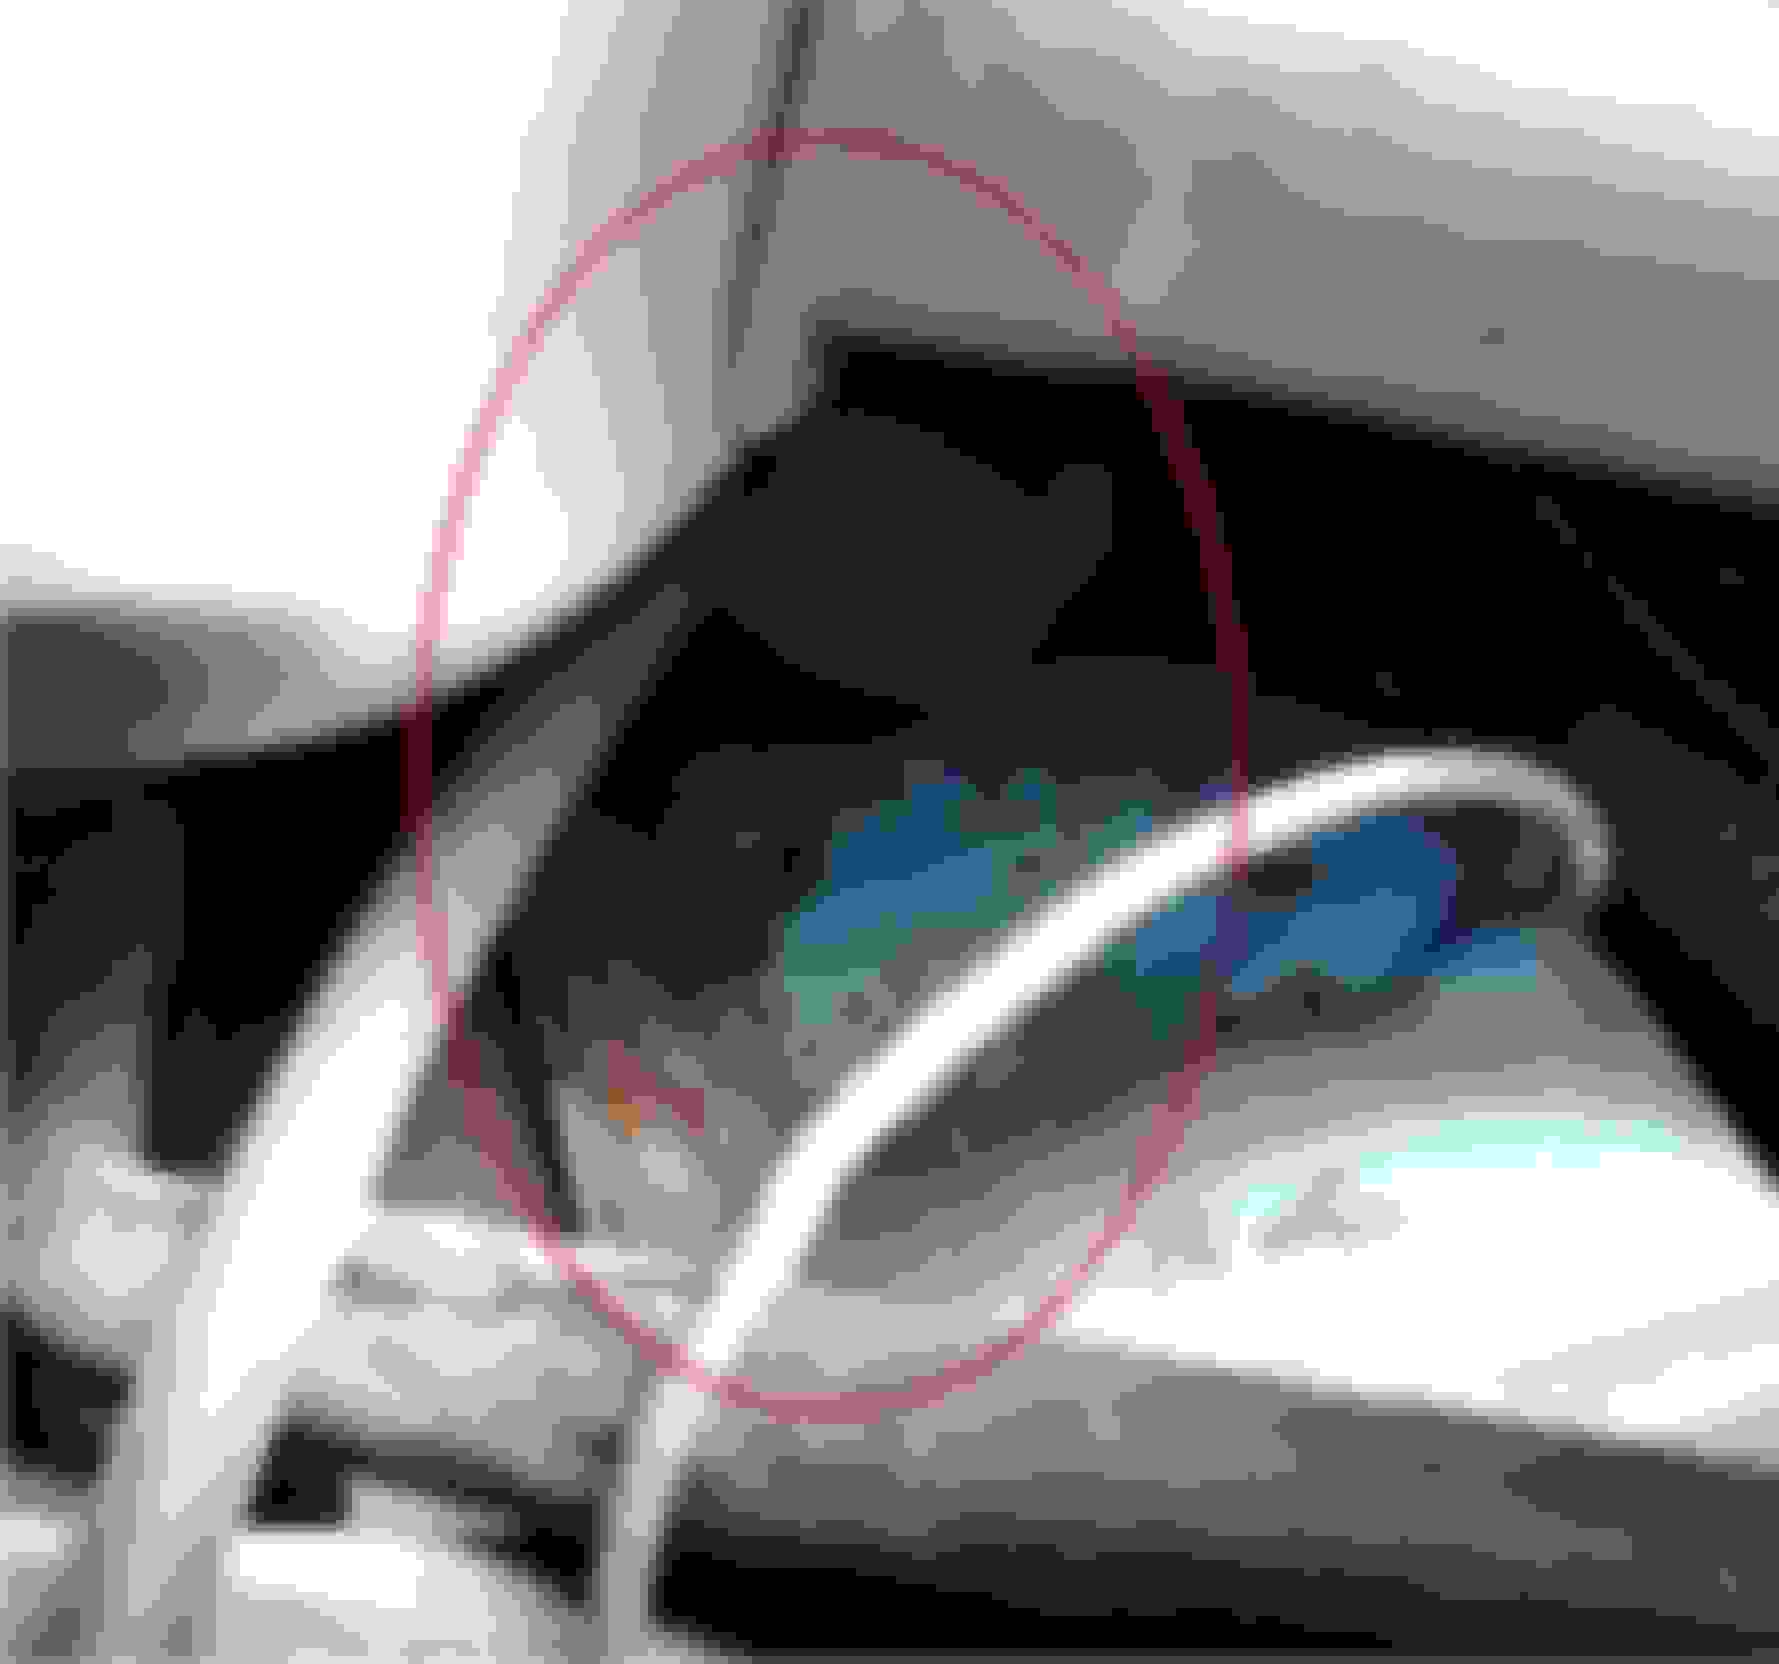
So I was looking under the hood again in order to adopt Joe's suggestion to replace the temp sensor with a single wire unit and wire it into the line off the controller. While I am looking at it trying to decide how to remove the old unit I spot a second sensor just below the sensor used by the misar system. It also is single wire and judging by its location I am wondering if it is also a temp sensor? The manual does not tell anything about it or at least I cant find anything. So Joe and Jaunty any ideas on what this other unit is for. Here are some pictures and hopefully you can see the second unit near the bottom. Top unit is misar sender and looks like a threaded fitting. Lower unit is a single wire unit. No idea what it does but based on location would seem to be temp related.
I think that's just the oil pressure sending unit. It's also a one-wire device, and here's what one looks like new. It's also located on the top of the engine towards the front.
The yellow arrow is pointing to the oil sensor on my car's engine.
I think you just pull it off. That's the only way I've ever seen them. You might examine it closely before pulling too hard as it might be necessary to squeeze the connector cap at a certain point to release the snap-in part. But it would likely be obvious where to squeeze.
Last edited by jaunty75; Oct 19, 2018 at 08:00 PM.
Thanks again.
Am sitting here a little disappointed because my new distributor did not come in this morning. Screwed up my whole weekend. Now I will have to work on the "honey-do" list.
Here's a figure from the '78 manual showing the location of the temp sensor next to the distributor, and it also shows how to release the wire connector by squeezing on opposite sides. You probably have a similar diagram in your manual.
Thanks again Jaunty. I do not have that drawing in my 77 manual. I will look for squeeze points on mine.
Managed to escape most of the "honey do list" today be taking my wife out for breakfast.
Got home and started mucking under the hood again. Started in again on the ongoing task of replacing vacuum lines one piece at a time. Discovered a couple of interesting things.
1. The vacuum line to the rear of the carb had come off the metal tube from the manifold and was kind of dry and brittle so I replaced it.
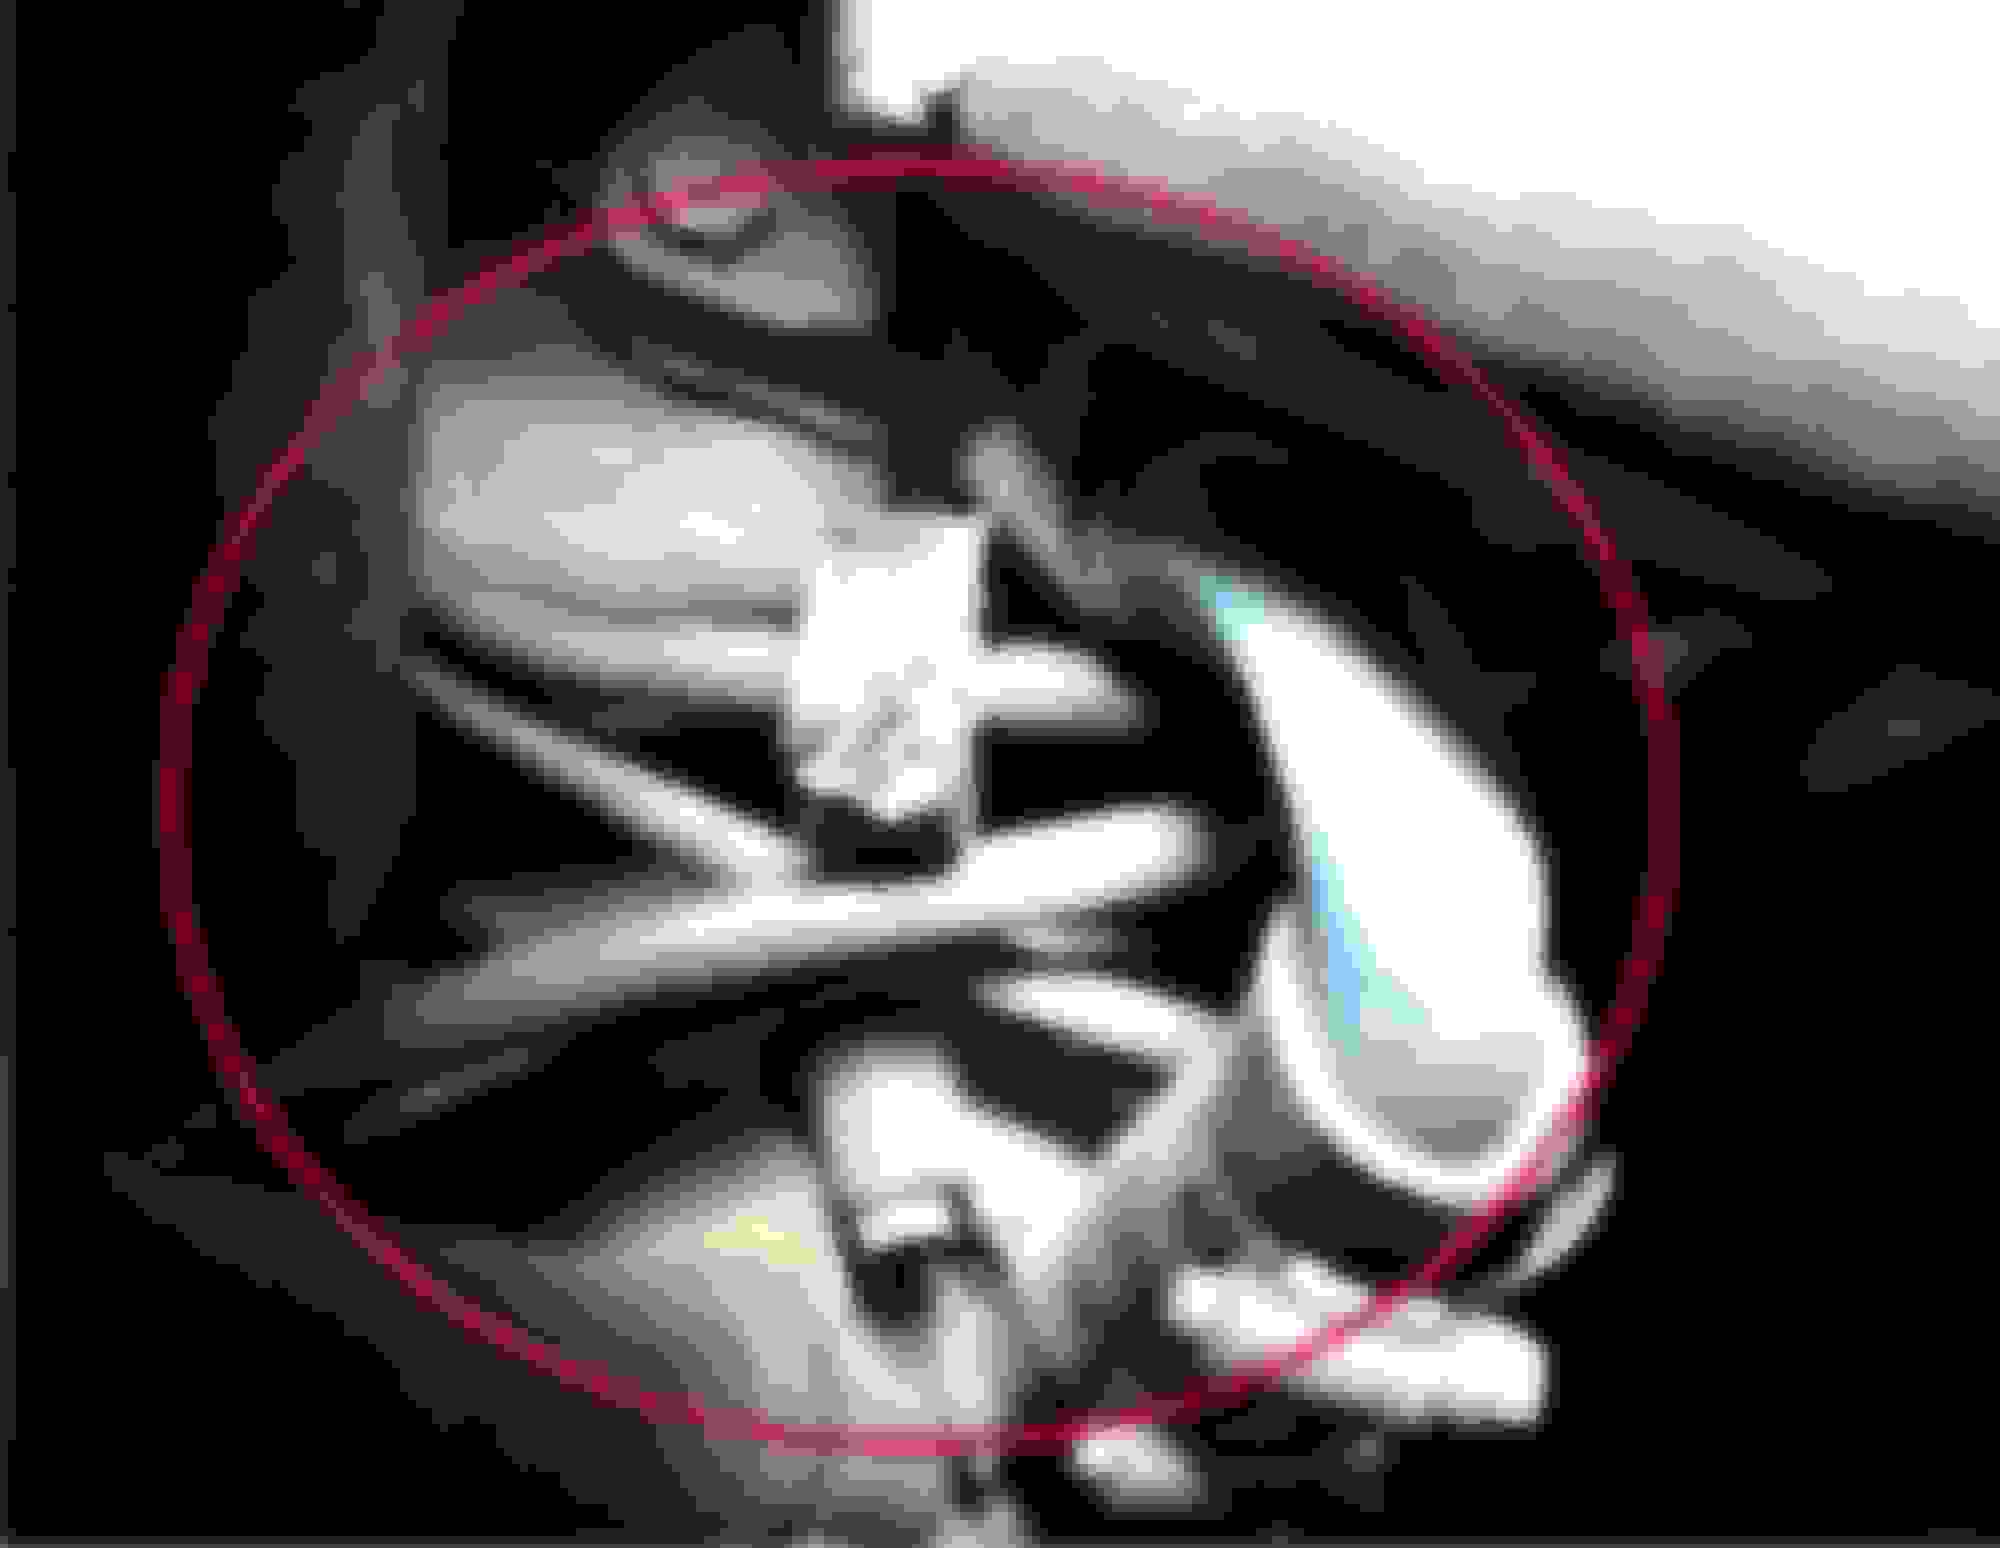
2. Replaced the vacuum line from the EGR to the carb and discovered that someone had plugged the old line with a sawed off screw - have no idea who or why. The other funny thing I found was that there are 2 switches on the egr vacuum line. I compared this with photos posted by Toronado77 in an earlier post. Here is his post where the line from the egr goes right to the carb.
This was posted by Toronado 77 and shows direct line from egr to carb
I could not get a nice single shot to show what I have but here are 2 photos. The first shows the white switch under the air breather just like on Toronado77 photo. This is the first switch just under the breather. The line then runs to a second switch.
Here is the second switch on the same vacuum line that routes by the thermostat outlet and then returns to the carb port. This does not seem right and makes no sense to me. Will probably pull the second one out and just route direct to the carb as per Toronado77
After making these little modifications took the vehicle for 2 runs just to test things out and make sure I had not screwed anything up. Wanted to do 2 runs just to test what was happening once vehicles was well warmed up and under different conditions.
Car started fine and choke came on big time. Maybe a little too fast so might have to dial it back a bit. At this point just cruised around the neighborhood testing stop and go from stops signs did this for about 20 minutes and the car did not miss or sputter once. But did quit at idle one time as I sat at a stop sign waiting for a car to pass.
Shut car off, waited about 10 minutes and then went out on the back country roads and put my foot in it on straightaways to mimic passing, and then up some hills to see what happened under load. If questioned I will never admit to having gotten the speed up to 80mph. Good news is no miss or sputter at any time. But at 2 stops signs the car would idle down and quit. So may need to tweak the idle speed up a bit.
So the next test is try it out again with the second switch removed and then try it on the nearby major highway to see if it performs safely and reliably. Want to be sure that I can enter the highway from the on ramp, get up to speed and merge with traffic with no issues. That would not be a good spot to have a glitch.
I have not changed the distributor yet as it has not arrived at my parts supplier. But if these little changes and some more tweaking of the carb does the job great. When the distributor does arrive I will keep it for the day when I probably will need it. But we will see what happens when testing over the next few days.
1. The vacuum line to the rear of the carb had come off the metal tube from the manifold and was kind of dry and brittle so I replaced it.
Is this rubber tube the one pointed at in this photo? That's the only vacuum connection on the rear of the carb other than the connection for the vacuum booster, but that's usually a metal pipe. The small rubber tube is for the choke stove. Air is drawn from the carburetor (at the top, just under the air cleaner, so the air is free of particulates) through that tube into the intake manifold, and then back out of the manifold and into the choke. It's where the choke gets the warm air that expands the coiled spring and slowly opens the choke as the engine warms up. I doubt there would any effect on engine performance if that rubber tube were leaking or missing altogether. All it would mean is that the choke is getting un-cleaned air directly from under the hood, and the choke innards would dirty up a little more quickly than they otherwise would. But it being missing or leaking would not affect choke performance unless the choke spring has gotten covered in dirt or is rusty.
Originally Posted by ByronF
2. Replaced the vacuum line from the EGR to the carb and discovered that someone had plugged the old line with a sawed off screw - have no idea who or why. The other funny thing I found was that there are 2 switches on the egr vacuum line. I compared this with photos posted by Toronado77 in an earlier post. Here is his post where the line from the egr goes right to the carb.
This is the way it should be. That white fitting in the line between the EGR and the carb (circled in yellow) is a check valve that allows the flow of air in only one direction, from the EGR to the carb. You want to make sure it's working. If you want to test it, I think you should be able to suck air through it in one direction but not the other. Clean it off before you put one end in your mouth! The one on my car looks a little different, but it says "EGR" on one side, and I assume that means that that is the side that faces toward the EGR. That's the way I have it installed. The second photo below shows the check valve on my car.
Originally Posted by ByronF
This is the first switch just under the breather. The line then runs to a second switch.
Here is the second switch on the same vacuum line that routes by the thermostat outlet and then returns to the carb port. This does not seem right and makes no sense to me. Will probably pull the second one out and just route direct to the carb as per Toronado77
That looks to me like another check valve. Not sure what it's for as I don't have one on my car.
Originally Posted by ByronF
So the next test is try it out again with the second switch removed and then try it on the nearby major highway to see if it performs safely and reliably. Want to be sure that I can enter the highway from the on ramp, get up to speed and merge with traffic with no issues. That would not be a good spot to have a glitch.
It sounds like you might on the way to curing your driveability problem just by cleaning up the vacuum lines and connections, which doesn't surprise as these cars, as you noted, have enough vacuum lines to reach from New York to Los Angeles, and bad vacuum connections can easily affect how well the engine runs. Wouldn't it be nice if you could get your car running well without have to change your distributor? I wouldn't assume, by the way, that changing the distributor will fix the problem. I don't think your problem is ignition-related. I think it's vacuum related, as you now seem to be finding out.
By the way, Byron, have you ever done a simple vacuum test on your car? Put everything together, put a tee in the one of the manifold vacuum lines, connect a gauge, and see what it reads when the engine is fully warmed up and idling in Park? You can tell a great deal from a gauge reading.
You can find guides like this one with a simple google search. I keep a capped tee in one of my vacuum lines just to use for diagnostic purposes, and I have a vacuum gauge with a length of rubber hose attached. I keep it handy the way doctors keep a stethoscope around their necks all the time. You never know when you'll need it.
Jaunty, you have indicated the correct rubber hose piece at the rear of the carb that slides on to the metal tube. This had become detached and the old piece of hose was dry and brittle so maybe that is why it became detached.
I am going to remove that second (black) check valve and just use the white one after giving it the suck and blow test - lol! Should probably test the black one as well just in case the original white one does not pass the test.
I don't have a vacuum gauge at the moment but seems like a good idea to get one. Am also looking for a digital timing light with tach as doing this by ear and feel isn't working so well. Oh boy I get to go shopping for toys.. i mean tools! Really hoping I don't need to change the distributor but will feel better having one in stock for the day when I just might. Based on how long it has taken to find one that would fit and that was apparently in stock, I doubt that future availability will get any easier.
Well I changed the routing of the vacuum lines for the EGR this morning to get rid of one of the check valves. I tested both check valves by using the suck and blow method suggested by Jaunty. The results were surprising. The newer aftermarket black check valve was completely blocked up, could not get air thru in either direction.
Then tested the white one which I assume is original equipment and it seemed to be working fine. When I blew thru the egr side I got air. when blowing from the carb side no air. Gues that means it is functioning. So now the question is why (and when) would someone put in a secondary egr valve on the same line and install one that was not working, secondly then why would they go to the trouble of blocking the line at the egr connection point with a piece of metal screw.
After replacing a few more of the vacuum lines I fired the car up in the garage and let it run for a few minutes to warm up. Then put my foot on the brake and tested it in park and reverse and let it idle for a couple of minutes in gear to see if it would die out and it did not. Idled very nicely and steady. Realize that is not much of a test as usually the problem occurs when the car is really good and warm and under normal driving conditions when I come to a stop sign or stop light, release the accelerator coast to the stop and then wait till it is safe to proceed. That is when the problem occurs when it does happen but it does not happen all the time. Later today will take it out for another good run and see what happens.
What I did notice is the pile of carbon on my garage floor after this little engine run. Check out the picture. Can't decide if that is just a sign that by replacing the lines and getting rid of the bad egr the car is finally blowing out all the carbon that has built up or if the carb is set a bit too rich. Anyone have any thoughts on the matter.
One other thing to do before the old girl goes into storage is the get rid of those ugly tailpipes sticking out the back. The shop that did that poor quality work should get out of exhaust business. Am hoping that I can remove the extension pieces, cut them down and install some chrome extensions that end right at the bumper line. Would prefer the rectangular shape extensions but will take whatever I can get that is inexpensive. Don't want to spend a bundle on them just want it to look better.
So now the question is why (and when) would someone put in a secondary egr valve on the same line and install one that was not working, secondly then why would they go to the trouble of blocking the line at the egr connection point with a piece of metal screw.
Who knows why people do what they do. They think they're solving a problem when in fact they're doing the exact opposite. I can't think of any reason why you'd want TWO check valves in the same line. But it's good that you got the EGR hose situation straightened out. This could go a long way toward solving your driveability problems.
Originally Posted by ByronF
Later today will take it out for another good run and see what happens.
We'll be very interested to know how it goes.
Originally Posted by ByronF
What I did notice is the pile of carbon on my garage floor after this little engine run. Check out the picture. Can't decide if that is just a sign that by replacing the lines and getting rid of the bad egr the car is finally blowing out all the carbon that has built up or if the carb is set a bit too rich. Anyone have any thoughts on the matter.
Let me ask you this. Is this the first time you have started the car but just left it in the garage running for 10 or 15 minutes? Do you normally start it up and get moving as soon as it's running? It may be that this is nothing new and that it would have done this before if you had just let the car sit in one place warming up for several minutes before moving off. I have not seen this to any great extent on my '78, but I DO see this with my '67 Delta. I have not tried to adjust the idle on the Delta.
Remember that some of what you're seeing is the normal water drip out of the exhaust pipe as the engine and exhaust system are heating up. Water is one of the products of combustion, but once the engine and exhaust system warm up, it leaves the exhaust as a vapor rather than a liquid. But for those first few minutes after a cold start, it's coming out as a liquid and washing out whatever crud has built up in the exhaust system while doing so.
The idle mixture screws on the carb can be adjusted, although they left the factory capped because they're not supposed to be adjusted as part of a tune-up and for emission control reasons. Adjusting them is easy, BUT, doing so requires a vacuum gauge! (Another reason to go buy one!) You get the engine warmed up, and then, with a vacuum gauge attached to a manifold vacuum port (air cleaner is removed so you can get at the screws), turn each screw in and out until the vacuum reading is the highest. There will be a middle point between not screwed in enough and screwed in too far. Go back and forth between the two screws until you have maximum vacuum. When I did this on my car, I did not notice a dramatic difference in the vacuum reading as I adjusted each screw, but I did adjust them until the reading was maximized. When you rebuild a carb, the procedure regarding the idle mixture screws is to count the number of turns it takes to fully unscrew and remove them, and then put them back in the same number of turns when reinstalling them. If you don't know how many turns it was, a good rule of thumb as a starting point is about 4.5 turns in once the screw catches the thread.
Hi Jaunty, this is not the first time I have started the car in the garage and let it run for a while. Did this a number after installing the carb and then doing the tune-up. Have gotten moisture out in the past with a little bit of soot but nothing like this time. As you can see from the photo there are some major soot deposits this time. So I am going to assume that it is finally starting blow some of the crap out which I will take as a good sign.
Gotta get me a vacuum gauge.
Not sure you can paint your exhaust tip as I suspect it is either galvanized or stainless and doubt that paint will adhere or the heat may just cause it to flake off. But nothing venture, nothing gained. Worst case get a new piece of pipe from the last connection point and bolt on a chrome tip.
Will let you know how the test run goes.
When you rebuild a carb, the procedure regarding the idle mixture screws is to count the number of turns it takes to fully unscrew and remove them, and then put them back in the same number of turns when reinstalling them. If you don't know how many turns it was, a good rule of thumb as a starting point is about 4.5 turns in once the screw catches the thread.
I have to correct this. The rule of thumb, when reinstalling the idle mixture screws, is to screw them in all the way until they just bottom out, and then back them OUT 4.5 turns as a good starting point for their settings.
Can of paint is cheap enough and if you don't like it you can sand it off and go with a chrome tip.
It can't look any less than it does now. You can hardly see the thing as it is, so if it's more silver-looking, it can't hurt, even if it isn't see-yourself shiny.
EUREKA!!! Took the car out for another test run today after replacing a few more vacuum hoses, correcting the egr connection and testing the PCV which surprisingly seemed to be sucking properly based on my simple thumb test.
The purpose of today's test was to actually get it on the highway to see how it performed when accelerating to merge with traffic and would it hold at highway speed both without missing or sputtering or dying on me. The total round trip was about 20 miles.
It ran just great! When I merged onto the highway there was a big semi barreling along gaining speed for the upcoming grade. So I put my foot into it and the old girl picked up speed very nicely and with no hesitation or hiccups and climbed to 70mph. I drove a few miles at this speed to the next exit with no problem. Turned around at the exit and repeated the same test on the return leg of the test run. Again no issues.
Then made my way home via a small town and using back roads to test out stop and go driveabilty and it ran fine except for one occasion when it quit while making a right turn at idle speed. It started right up again instantly and carried on just fine.
Picked a vacuum gauge this evening and will play with it and test the car in the next few days. But at the moment I am still thinking of tweaking the idle speed a touch in the hopes that it will cure this problem.
Also picked a can of Seafoam. Planning on adding this to the fuel tank and running it thru the system before the cars upcoming 50 mile trip to the storage facility. I have been told it will help clean out the fuel tank and fuel system and blow some of the crap out of the engine. Maybe that will help improve my idle problem and I won't have to tweak anything.
Does anyone have any experience with this product? Does it work?
Spent the day tweaking the low speed idle screw in 1/4 turn increments and then going for a test drive concentrating on stops signs and stop lights to be sure it would hold an idle. On the 3rd go seem to have found the right spot. So 3/4 total turn seems to have done the trick. It does not die at idle any longer and the idle does not seem overly fast.
So tomorrow is the next big test as it is a 50 mile highway run to the storage facility and another 10 or so miles of stop and go driving getting to the highway and from the highway to the storage facility. Based on today's last test run I am feeling pretty good about how the car will perform.
I must say you have to see my garage floor. I have 2 huge black streaks of carbon blowing out of the exhaust. I like to believe that this is a good sign that the tune up and fixing vacuum lines and a fresh tank of fuel has the car running well enough to blow all the crud out of the system. So the highway run tomorrow should help blow out more crud.
I will report back in tomorrow to let you know how it went.
Made the highway run to the storage facility today and the Toronado performed flawlessly. She cruised the highway at 70-75 mph with no problem whatsoever. Even better was the low speed idle at stop signs and stop lights getting to the highway and off the highway going to the storage place. Never skipped a beat once.
And the best part was the expression on the Porsche drivers face when the big blue ocean liner passed him on the highway at 75 mph - lol!
So I think the problem has been solved. It would seem that it was a number of issues that all contributed to the problem. The carb was in serious need of a rebuild. It was also in serious need of a tuneup. And the vacuum lines and egr hookup were a real mess.
I want to thank everyone for all your help, advice and photos which were a huge help in sorting out all the problems, especially Jaunty and Toronado77. Many Thanks Guys.
The new distributor is a real kerfuffle. It still has not arrived at my parts supply house. Apparently this is a hard to find beast and they claimed they found one and ordered it up from somewhere in Arkansas but apparently it went missing and never shipped. So I don't have an issue of what to do with it. The issue is what to do if at some point down the road I need it to replace a dead misar system. It may be wise to continue to track one down and get it in and have it in my stock just in case. Seems to me the fellow in the article that Jaunty posted had a couple of spare distributors in the trunk for when he broke down. After spending 000's $ on carb rebuild, major tuneup, fuel tank repair and body and paint work it would be a real shame to lose the use of the vehicle over a $200 distributor.
Can't you just order the distributor directly from Summit and have it shipped right to your residence? The Summit website shows it in stock. Maybe shipping to your parts supply house is cheaper?
Most definitely having the local parts supply house bring in the parts is cheaper. Summit, Rock Auto, OPG and others when shipping to Canada do not offer free shipping even if the order is sizeable. The UPS or Fedex charges with brokerage fees are absolutely ridiculous and then with exchange the price is almost double what is posted on the web site. My local supply house is somehow able to most of the time get me the parts at close to the quoted price from places like Summit and in Cdn $. Would rather go that way but in the end will do what I have to do to get what I need.
I figured the shipping would be annoying. But presumably now you're not in immediate need of the distributor and can wait until it eventually arrives as it will just be a backup.
I made a short video of my '78's engine idling in park. I was motivated to do this because the engine is, finally, running quietly. I don't know if I mentioned, but I had the right-side exhaust manifold removed and resurfaced to take care of the last exhaust leak and source of a louder sound, so now the engine finally sounds like it should.
I also finally got up the nerve to remove the temperature sensor plug that wouldn't let me insert a temp sensor in the block where it's supposed to go. Remember, I had inserted a sensor in the upper radiator hose. I finally had to drill out the screwed-in plug, and that's that's why, in the video, you see some small shiny things around the sensor. Those are metal shavings from the drilling that I hadn't cleaned up yet. Call me lazy. They're cleaned up now.
Yes, there is supposed to be a metal tube connecting the grommet on the left-side valve cover to a grommet on the air clear. I don't have that tube, so I've left it open.
Great video Jaunty. Car sounds great! Like your shiny new a/c components. Looks like a new egr valve as well. You have obviously been having fun under the hood. Now you just need to vacuum up all those nasty little metal shavings. My car does have the return tube from the valve cover to the air cleaner but the rubber boots are all dried out and cracked. If I find a source for the parts I will let you know and if you find a source please let me know.
Byron
GMy car does have the return tube from the valve cover to the air cleaner but the rubber boots are all dried out and cracked. If I find a source for the parts I will let you know and if you find a source please let me know.
Yes, that is a new EGR valve. I don't know if you were around when I went through the trauma with that. It turns out that Toronados, apparently because of the shape of the air cleaner, have an adapter that mounts on the engine, and then the EGR valve mounts to that. The adapter on my engine broke at one of the attachment holes. I had to take it to a local shop to have it welded back together as there is no way that anyone reproduces this unique-to-the-Toronado bracket.
Here the adapter with the mounting ear on one side broken off.
Here it is with the broken piece welded back on and the mounting surface machined smooth.
Getting back to that tube on the air cleaner, It turns out I actually do have the metal tube that runs between the valve cover grommet and the air cleaner, but I don't have the correct rubber piece for the air cleaner. The only thing I can find is this L-shaped piece, and I need one where the opening for the metal tube sticks pretty much straight out the side of the air cleaner.
This is all I can find.
Here's a photo of what I actually need (as I'm sure you know). As I say, I do have the metal tube that goes between them.
Last edited by jaunty75; Oct 28, 2018 at 02:33 PM.
Jaunty, think I found a place for the air cleaner grommet we need for the pipe from the valve cover. USA Parts Supply claims they can supply these grommets. I just ordered one from them and the price is $7.82.
Their phone number is 1-800-872-2013. I talked to Jay who seemed to be very familiar with this item.
USA Parts Supply does all sorts of parts for vintage Cadillacs and Oldsmobiles. Maybe you can give them a call and see if you think it is the right item.
Byron, I looked through the USA catalog, and I have questions.
Here's a snapshot of the USA catalog showing the valve cover grommets. Remember, we're not exactly looking for a valve cover grommet, we're looking for an air cleaner grommet that connects to a pipe that connects to the valve cover.
You said the cost of the grommet is $7.82. That's an awfully precise number, and there is a part that sells for that. It's number S21.400M, "Angled D-shaped grommet."
Now here's the air cleaner grommet section out of the latest Fusick catalog. I like the Fusick catalog because they show photos of most items. There are two D-shaped grommets, VC104 and VC83. I've seen and used both. VC104 goes in the valve cover, and then you stick one of those metal filters into it. I have one on my '67 Delta 88. VC83 is for a PCV valve.. I have one of those on both by '67 Delta and my '78 Toro. I don't think either is what we need, and I'm guessing that USA part S21.400M is the same as Fusick V83. I'm guessing that USA part S21.400J, the "flat" D-shaped grommet, is the same as Fusick VC104.
What I have in my air cleaner right now looks like Fusick part VC73. (Frankly, I don't see a difference, except for the price, between Fusick parts VC73 and VC17. They even overlap each other in the "used on all" comment, '73 to '77 in one case, '69 to '75 in the other.) It even says for VC73 that it's for connecting to the vent pipe. The problem with this grommet is that it is angled 90 degrees as it comes out of the air cleaner, and what we need is something that's more straight out, like Fusick VC97. But in looking at that part, I'm guess that the inside diameter on that fitting is too small. I'm guessing that Fusick VC97 and USA S21.400L are the same part.
The other problem with part VC73 is that the inside diameter of the rubber outlet is too small to accept the metal vent pipe. The metal pipe has an OD of about 3/4". It looks like part VC95 is the right diameter (says 3/4"), but, again, it's angled 90 degrees and thus suffers from the same problem as VC73. I'm guessing that Fusick VC95 is the same as USA SD21.400K.
If you've already ordered the USA part, let me know what it actually is when you get it and whether or not it works.
In the meantime, I'm going to email USA and send them the photo above where I've circled in yellow the grommet we need and see what they say.
Last edited by jaunty75; Oct 29, 2018 at 02:28 PM.
Boy are you just a gold mine of information!
Jaunty the part number they gave me was S21400M and it appears from all your research that it is not what we want. I specifically stated the air cleaner grommet - twice - and he assured me this was it. No harm done yet. They are waiting for their order to come in and it won't ship until next week, they also said they would email a photo of the part before shipping to confirm it was the right one. Based on the Fusick material you posted I am wondering if the Fusick part VC97 would do the job. It looks like right, the question is diameter.
Unfortunately I don't have my car here to go out and check size and shape as it went into storage last week and I have very restricted access to it. Guess that is the benefit of living in the warmer climate that you enjoy, you get to keep your car with you year round.
I sent an email to USA, and here's the photo I sent with it. I found this image online (I added the arrow), and it gives a pretty good indication of what is needed. My guess is that this piece is unique to the Toros that had the EGR valve mounted on an adapter. This caused it to poke out a little more and required the bent pipe to go around it as shown in the photo.
It seems pretty clear that it's a straight-through connector, and the Fusick V97 looks like the closest match. I'd be willing to risk the $11 and order it, but with Fusick, it's $11 for the part and about $1 million for the shipping and handling.
Maybe when you hear back from USA about the part you ordered, assuming it is not the right one, you could ask them about their part S21.400L, which I'm guessing is the same thing as Fusick's V97 as I said earlier. We'd want to know the inside diameter of the opening as it needs to accept a 3/4" OD pipe.
I'll report back on the response I get, assuming I get one, from USA. I did tell them that it has to be a straight-through connector and accept that size pipe.
Here's a '76 Toro engine, a 455, showing the exact same thing with regard to this air cleaner grommet.
Hey Jaunty, I will be off the air for the next week or so as I am moving in the next few days. Hopefully my new service provider will have me back on line by the end of next week. Happy wrenching!