When you click on links to various merchants on this site and make a purchase, this can result in this site earning a commission. Affiliate programs and affiliations include, but are not limited to, the eBay Partner Network.
Please help with this strange electrical issue I'm having - I tried to install a bulb in the footwell area and now I lost my dash lights, interior lights and rear brake/stop lights. Headlights and turn signals work ok, and the rear lights flash with the turn signals, just not with the brake or parking lights.
The fuses appear to be ok. Is there anything that links all 3 of these together? I had also unscrewed the light socket from under the dash to get better access to the socket, and now it's screwed back on.
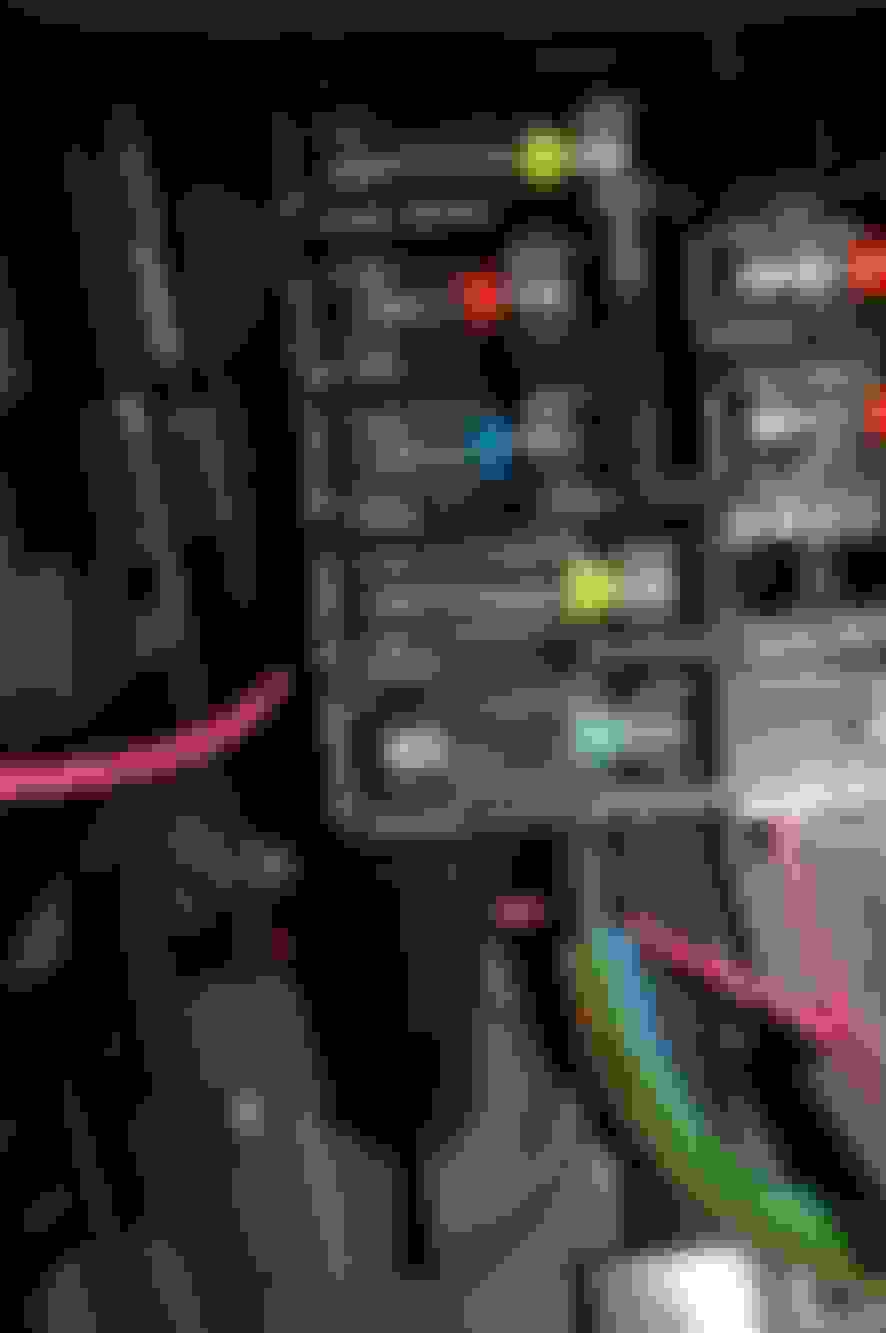
Double check the "stop/ dome light" fuse. Be sure to use a test light and actually see if you have power on both metal terminals. Sometimes the terminals will get some corrosion and even though the fuse ends have power the "output" terminal does not. I am not sure of the exact fuse layout on a 66, but the fuse I am talking about is the bottom one in these pics of my 68 fuse block.
Make sure the bulb is correct, if the fuse is blown it may be the wrong base on the bulb causing a short.
Good luck!!!
I think that is most likely what happened, but I can't figure out why I lost 3 different circuits and the fuses all look intact. It does have some corrosion on the terminals but it was working before
Don't rely on a fuse looking intact...been down that road. Use either a test light or a voltmeter to confirm voltage to one side of the fuse and then through the fuse to its' other side. As far as losing more than one circuit, one fuse often protects more than one item/circuit. Think of a circuit breaker in your house, when one trips multiple things don't work except on the dedicated circuits e.g., microwave, AC etc.
Double check the "stop/ dome light" fuse. Be sure to use a test light and actually see if you have power on both metal terminals. Sometimes the terminals will get some corrosion and even though the fuse ends have power the "output" terminal does not. I am not sure of the exact fuse layout on a 66, but the fuse I am talking about is the bottom one in these pics of my 68 fuse block.
Looks like Stop and Dome Light are 2 different fuses?
Double check the "stop/ dome light" fuse. Be sure to use a test light and actually see if you have power on both metal terminals. Sometimes the terminals will get some corrosion and even though the fuse ends have power the "output" terminal does not. I am not sure of the exact fuse layout on a 66, but the fuse I am talking about is the bottom one in these pics of my 68 fuse block.
Looks like one that says "INST BU" and another that says "Panel lights"? I wonder what those are for
On the A bodies three fuses are powered by a red wire that feeds through the bulkhead connector from the horn relay stud. Stop light, courtesy lights/clock/lighter, and tail lights. Make sure you have battery power there with the key off.
On the A bodies three fuses are powered by a red wire that feeds through the bulkhead connector from the horn relay stud. Stop light, courtesy lights/clock/lighter, and tail lights. Make sure you have battery power there with the key off.
Since it all seems to have started with the under dash courtesy socket, is there anything that grounds through that socket other than the bulb, or any connection to the other light circuits?
The tail, stop and dome circuits all feed direct from the battery. You should have 12v on the feed side of those fuses at all times, and if the fuses are good also on the load side.
Use your 66 CSM's Toronado wiring diagram to trace the power source for those fuses back to the junction block underhood. I'm not 100% sure 66 had any fusible links but there are main splices in several circuits.
I wasn't sure either which is why I asked for the OP to post a picture of the wiring diagram. I just don't know how much the Toro has in common with an A body.
I wasn't sure either which is why I asked for the OP to post a picture of the wiring diagram. I just don't know how much the Toro has in common with an A body.
My service manual seems to have gone missing still looking for it
How can I find that wire that goes to this circuit? Is it under the hood?
First determine if you have power on both sides of those three fuses. If not, look at the horn relay power stud for a red wire that goes to the bulk head connector, there may be a fusible link on that wire close to the horn relay connection.
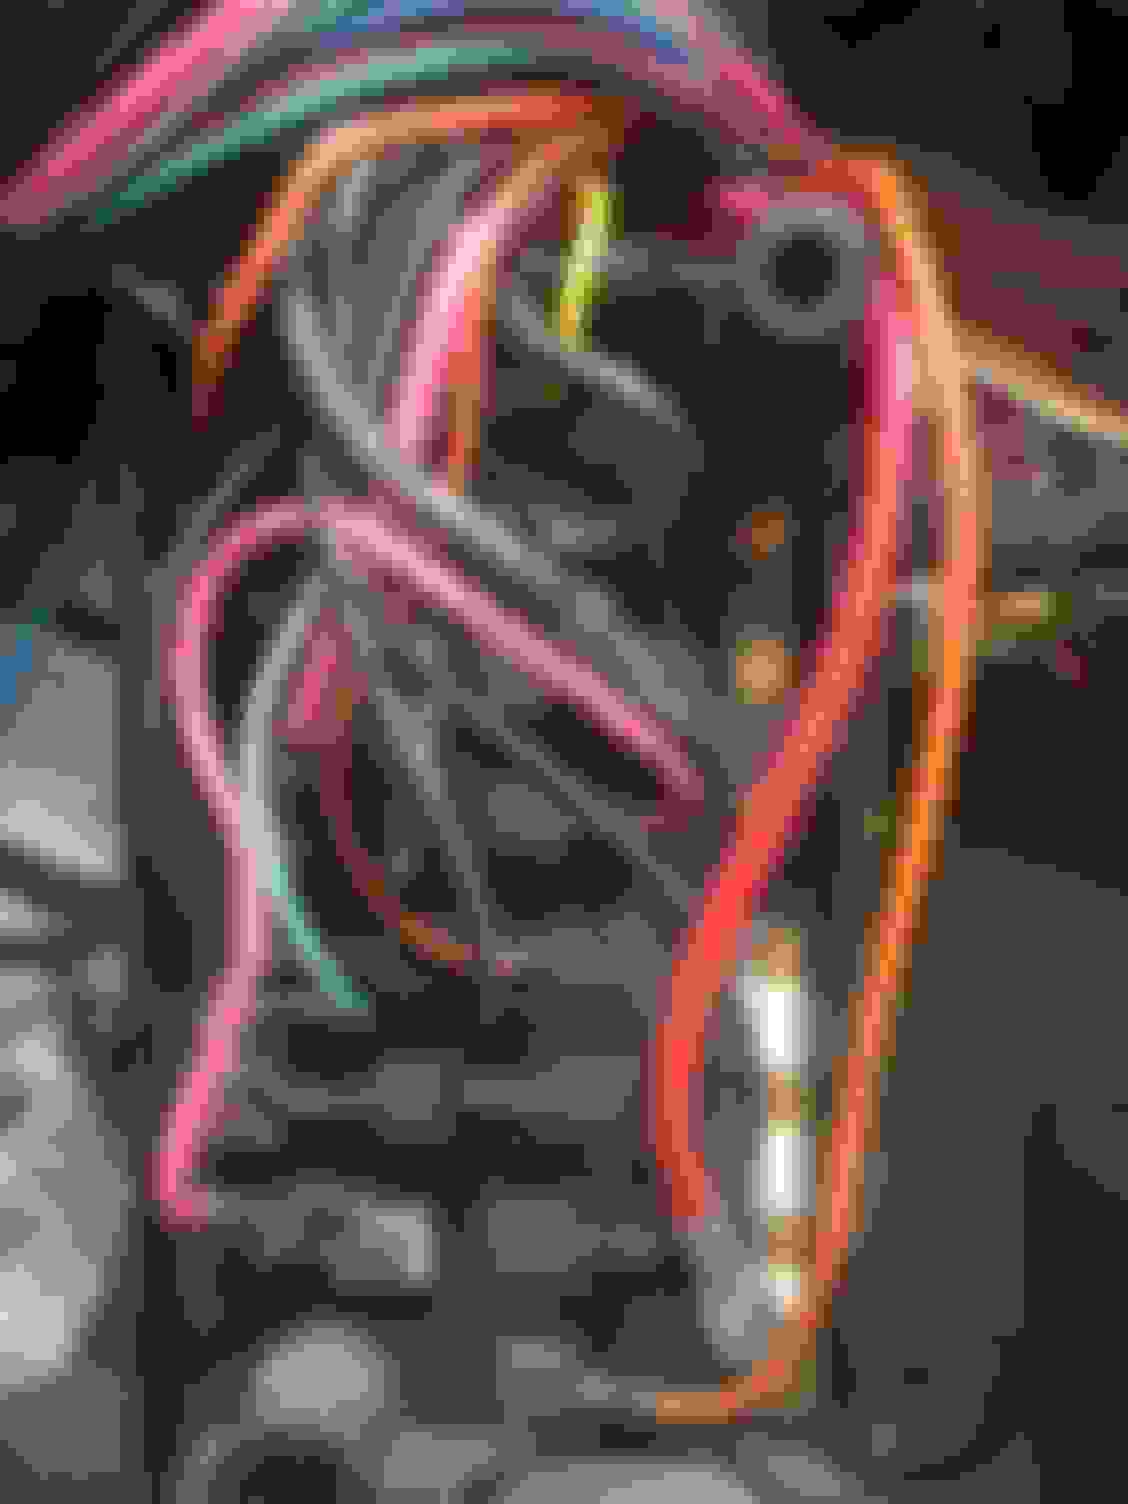
For some strange reason, Toronados do not have a bulkhead connector. The dash harness, engine harness and most of the front light harness are all one single piece with no connections to split it apart. The three fuses in question are fed by a power wire coming from the horn relay on the passenger side of the car. Here are some pics:
In these pics you can see the continuous harness (about 20 feet long when fully spread out):
This is a repeat of the second shot above with the area where the fuse box goes highlighted:
In the "before" shots I took (so I knew where to put all the wires back in) you can see the large red power wire feeding the fuses from the back side of the fuse box:
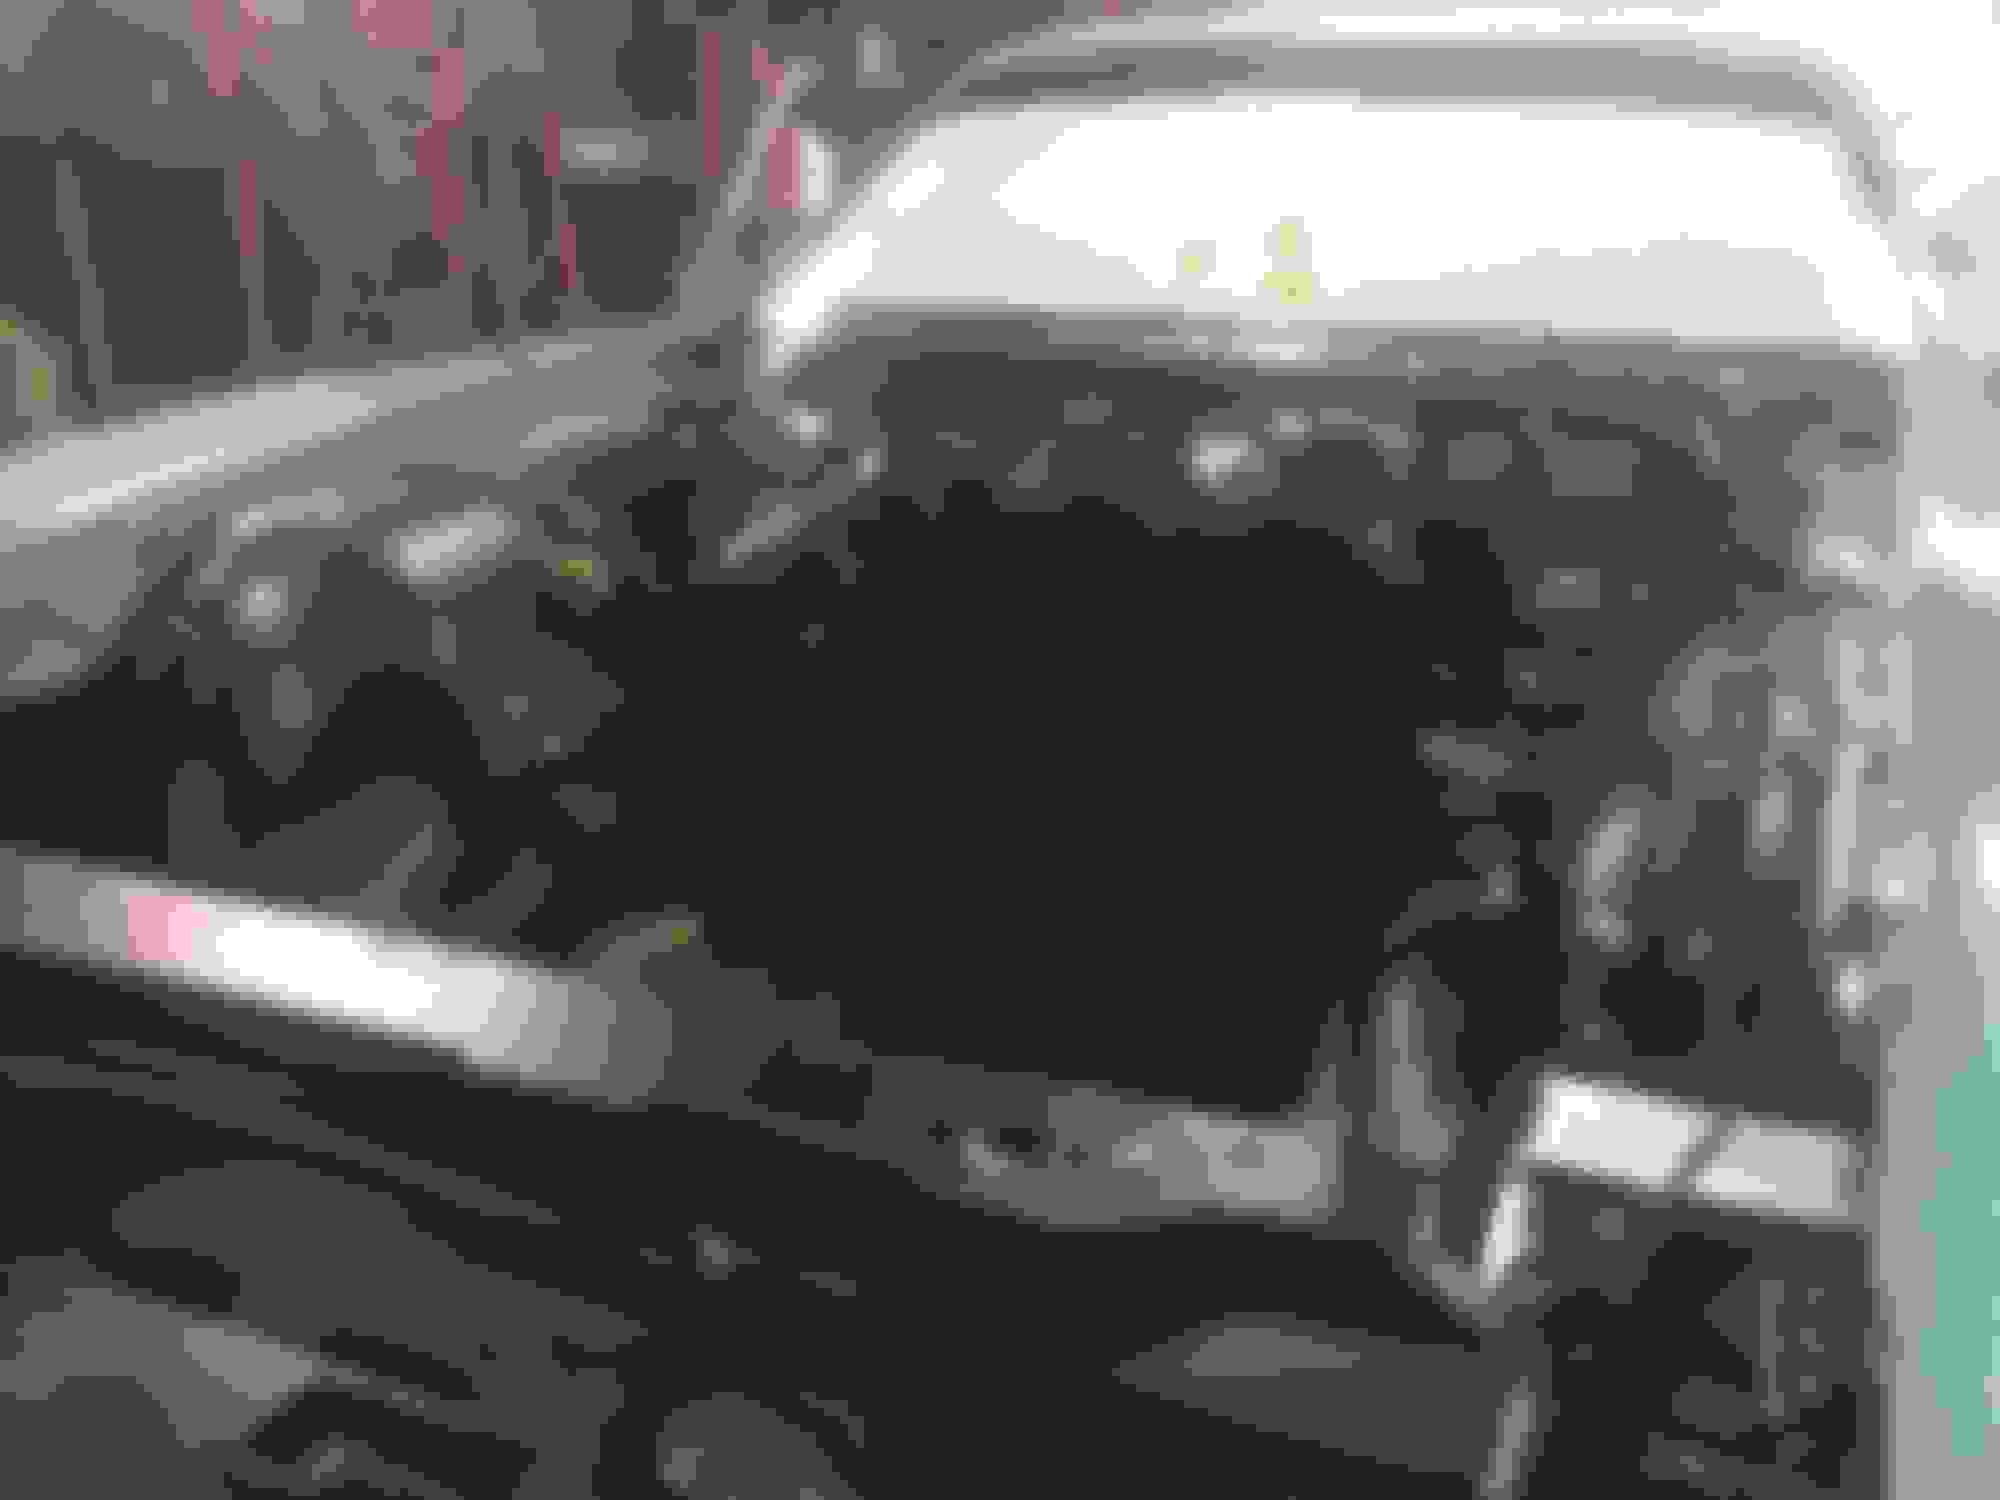
Here is the best pic I have showing where the harness connects to the horn relay on the passenger side wheel well. I believe this is the same as 66.
For some strange reason, Toronados do not have a bulkhead connector. The dash harness, engine harness and most of the front light harness are all one single piece with no connections to split it apart. The three fuses in question are fed by a power wire coming from the horn relay on the passenger side of the car. Here are some pics:
In these pics you can see the continuous harness (about 20 feet long when fully spread out):
This is a repeat of the second shot above with the area where the fuse box goes highlighted:
In the "before" shots I took (so I knew where to put all the wires back in) you can see the large red power wire feeding the fuses from the back side of the fuse box:
Here is the best pic I have showing where the harness connects to the horn relay on the passenger side wheel well. I believe this is the same as 66.
Thanks for the pics, that's a heck of a lot of wires! 😮
Can't see that well in the last pic, is the gold rectangular piece the horn relay?
Yes. there is a large stud where the battery cable, starter cable, main hot for the harness, accessory main hot circuit breaker (power windows, seat, etc), and A/C high speed fan hot fuse all get bolted down together.
Last edited by Loaded68W34; October 15th, 2021 at 06:32 PM.
On my 68, there is a fusible link on the red wire about 2-3 inches from the large post on the horn relay. That fusible link would have no effect on the operation of the horn, as the threaded post gets its power directly from the battery + cable and that is what powers the horn. From there, it is simply a ground connection to the steering wheel to activate the relay. If you are still having trouble, you really need to get a test light as stated and make sure you have power on both terminals of the lower three fuses. Just to be clear, do not just touch the test light to both sides of the fuse, make sure you are touching it to the metal terminals only. This will ensure that you are getting a good connection between the fuse and the terminal if the fuses are good.
Have you found your shop book yet, and have you checked for voltage at the three fuses affecting the equipment that's not working? Until you've done that it's gonna be tough for us to figure it out and guide you in a good direction.
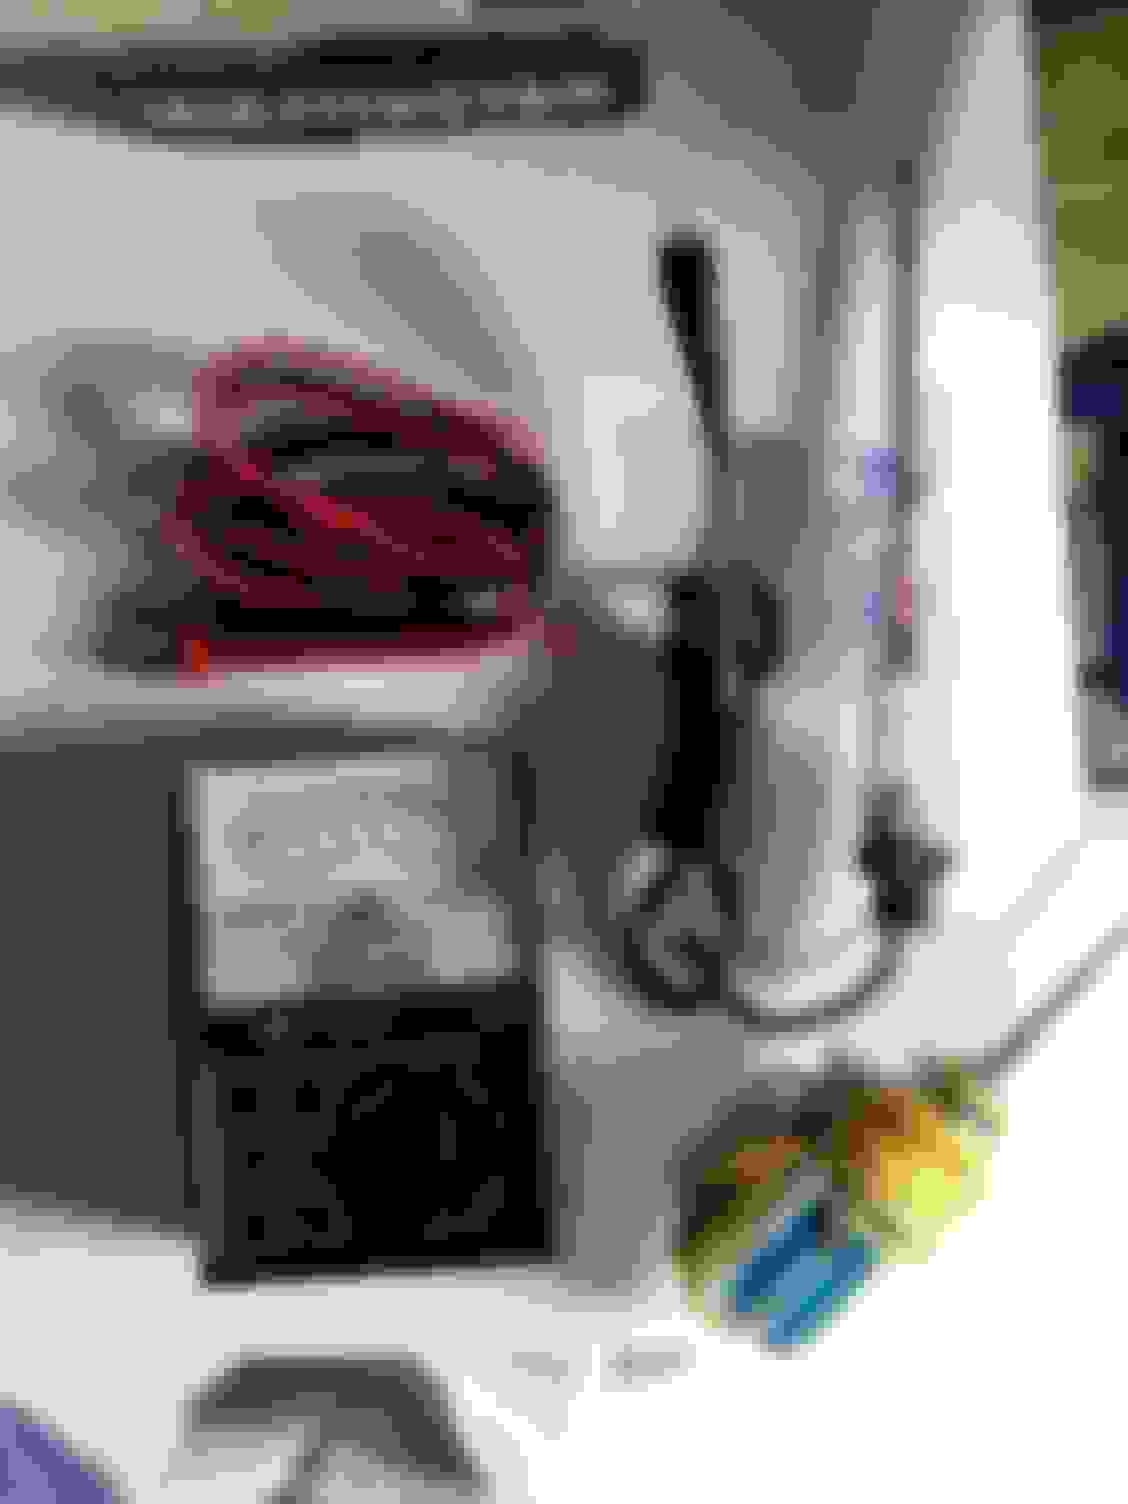
Do you have these tools, and are you comfortable using them? If not make friends with someone who is.
Left is a multimeter. Can check voltage, amps and resistance. You can get a decent digital one at HF for 20 bucks.
Black wire is a self powered test light. Use it to test continuity on a wire or fuse WITH BATTERY DISCONNECTED.
Yellow wire is a test light. Use it to check for voltage at fuses, sockets or other connections.
Last edited by rocketraider; October 16th, 2021 at 11:33 AM.
Have you found your shop book yet, and have you checked for voltage at the three fuses affecting the equipment that's not working? Until you've done that it's gonna be tough for us to figure it out and guide you in a good direction.
Do you have these tools, and are you comfortable using them? If not make friends with someone who is.
Left is a multimeter. Can check voltage, amps and resistance. You can get a decent digital one at HF for 20 bucks.
Black wire is a self powered test light. Use it to test continuity on a wire or fuse WITH BATTERY DISCONNECTED.
Yellow wire is a test light. Use it to check for voltage at fuses, sockets or other connections.
I have the multimeter but not the other 2
If 1 of the 3 fuses should go out would that render the other 2 inoperable since they are linked together?
Only if the electrical fault is on the source side of the 12v buss feeding those three fuses.
Look at Loaded68W34's pic of the back of the fuse block. Find the large red wire and notice how it connects to a metal strip that feeds three fuse cavities.
Use the multimeter to check for 12v DC at:
1) Battery + terminal
2) Wiring post at the junction block
3) Source side clip of any of the three battery buss fuses
Wherever you lose voltage, the problem is between that point and last point you had voltage.
Look in Boamridge's thread about can't keep charged. VintageChief has a picture of fusible links at the junction block of a 70s A-body in that thread. It will give you an idea what to look for on your E-body, but again not 100% sure 66 has them.
I'm going to dig my 66 CSM out of storage tonight. It's the only way I'll know what I'm trying to troubleshoot here.
Last edited by rocketraider; October 16th, 2021 at 03:18 PM.
66 Toronado wiring chart does not show any fusible links on the car.
Main harness feed wire at the junction block goes to what is termed a "shunt splice". This is where the power wire splits to feed various components but CSM does not give its location. Feeds:
Main lamp switch
Main ignition switch
Alternator and voltage regulator
Ammeter shunt circuit
Dome Ctsy, Stop, and Tail Lts fuses
Dome Ctsy fuse feeds:
Dome, footwell and rear quarter courtesy lamps
Clock
Front and rear seat cigar lighters
Stop fuse feeds:
Brake lights and turn signals
Tail fuse feeds:
Park and tail lamps thru park/tail section of main lamp switch
Panel Lt fuse feeds:
Dash lighting thru the Tail section of the main lamp switch. This is why you lost your dash lighting.
What spec # bulb did you put in that courtesy light socket? Spec calls for a #90 which is a double contact bulb. Even if you put a single contact bulb in, it should have blown only the Dome Ctsy fuse. Look in the socket and make sure there's no damage or bridging across the contacts. Also take all lighters out of their sockets.
Think you said you still have brake and turn signals front and rear so the Stop fuse should be good, and leads me think the feed buss for those three fuses is intact.
Tell us what you find on voltage at the points I indicated earlier.
Not sure if I can add much here from ‘66 big car experience, but here goes:
1) The fuse terminals in the pictures look a bit corroded which will impede voltage, if you can clean up the fuse terminals with a light dremel grind that may help. I use Deoxit 5 as well to promote conductivity. It’s just a spray, but seems to help
2) To my knowledge there were no fusible links used in ‘66 and, like yours, my big cars have no bulkhead connectors. Just one big harness. Excepting ribbon cables to the rear of my cars and maybe Toro’s too.
3) If the courtesy light system is the problem, check the courtesy light switches in the door jambs. They have a white and orange wire which physically move every time a door is opened or closed. Eventually they wear and can break which will ground your bulb and can cause various parts of the Orange/White wires to melt. The dome/courtesy should pop way before this, but check the switches.
66 Toronado wiring chart does not show any fusible links on the car.
Main harness feed wire at the junction block goes to what is termed a "shunt splice". This is where the power wire splits to feed various components but CSM does not give its location. Feeds:
Main lamp switch
Main ignition switch
Alternator and voltage regulator
Ammeter shunt circuit
Dome Ctsy, Stop, and Tail Lts fuses
Dome Ctsy fuse feeds:
Dome, footwell and rear quarter courtesy lamps
Clock
Front and rear seat cigar lighters
Stop fuse feeds:
Brake lights and turn signals
Tail fuse feeds:
Park and tail lamps thru park/tail section of main lamp switch
Panel Lt fuse feeds:
Dash lighting thru the Tail section of the main lamp switch. This is why you lost your dash lighting.
What spec # bulb did you put in that courtesy light socket? Spec calls for a #90 which is a double contact bulb. Even if you put a single contact bulb in, it should have blown only the Dome Ctsy fuse. Look in the socket and make sure there's no damage or bridging across the contacts. Also take all lighters out of their sockets.
Think you said you still have brake and turn signals front and rear so the Stop fuse should be good, and leads me think the feed buss for those three fuses is intact.
Tell us what you find on voltage at the points I indicated earlier.
Thx for the info, but the only rear lights I have are the turn signals, no brake lights or rear parking lights. It was the single contact bulb, not sure if it was a 90 or not. Also, all the fuses seem to be intact so it doesn't look like any blown fuses
Last edited by sgolds; October 17th, 2021 at 08:42 AM.
You cannot rely on a fuse's appearance to determine if it's good. The link inside can break or burn where it attaches to the end caps.
Disconnect the battery. IMPORTANT for this test. You do not want any voltage present. Then take that single contact bulb you installed in the courtesy lamp OUT. It has a lot to do with the issue you're having.
Set your multimeter to "ohms" on the "x10" scale.
Probe both ends of each of the three fuses and see what the ohms reading is. Zero is perfect and means the fuse is intact. 1-3 means the fuse is iffy. "Infinite", "open" or "OL" means the fuse has blown. Replace any fuse that tests bad. Use a wire brush or fiberglass eraser to clean the fuse clips while the fuse is out.
Reconnect the battery with car doors closed so there's no load across the Dome Ctsy fuse. Then see what you have when the doors open.
Not sure if this has any affect on anything, but I just realized the fuses are all the wrong size.
the tail light was 50A and the dome was only 9A, cant remember the stop fuse but it was not 20A
Connect the clip on the test light's wire to a good metal ground, then touch the probe to the circuit. If it lights, you have power at that point.
In this case check the fuse clips at both ends of the fuse. If you have power on the load side of the DOME CTSY fuse, then touch the probe to the contact with the ORANGE wire in the courtesy light. If it lights and the contacts are not burned or bridged, you should be ok.
This is using a non-powered test light. Get one that does not have a battery in it.
I have never seen a 50 amp glass tube automotive fuse. That is scary.
Last edited by rocketraider; October 17th, 2021 at 06:16 PM.

 October 12th, 2021, 09:59 AM