


1970 Cutlass Tilt


Thread Starter
70 Cutlass SX
Joined: Apr 2011
Posts: 1,042
From: Bermuda
1970 Cutlass Tilt
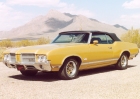
I have a noticeable tilt from side to side, see attached pdf file.
I was thinking of reinstalling the front springs and swapping them side to side to see if that makes a difference.
The rear springs look to be installed properly.
Can just the front springs effect the ride height in the rear also?
Any ideas on what may be causing this?
Thanks, Peter
I was thinking of reinstalling the front springs and swapping them side to side to see if that makes a difference.
The rear springs look to be installed properly.
Can just the front springs effect the ride height in the rear also?
Any ideas on what may be causing this?
Thanks, Peter

Just an Olds Guy
Joined: Jul 2008
Posts: 24,528
From: Edmonton, AB. And "I am Can 'eh' jun - eh"
Peter, I noted you used the original springs after the body off restoration. It would be really awkward that a pro shop would install one coil upside down, but check that out first. The only other thing that jumps to mind is that the OEM spring on one side has developed metal fatigue and hence, sag.
Thread Starter
70 Cutlass SX
Joined: Apr 2011
Posts: 1,042
From: Bermuda
Thanks Allan. I doubt that the guys doing the restoration installed the springs upside down, but I am hoping it is something like that, or even a spring spun around in its seat. If this is the cause I can still use the original springs, just fix the install.
I do have a squeak coming from the right front area. I never linked it to the tilt before but it could be related.
I used reproduction control arms so that may be causing the problem, but I do not see how. They were from Inline Tube and should be accurate.
In case tired original springs are the culprit I am going to have on hand:
Moog 5386: rated at 334#, and Moog 6319: rated at 120#.
I do have a squeak coming from the right front area. I never linked it to the tilt before but it could be related.
I used reproduction control arms so that may be causing the problem, but I do not see how. They were from Inline Tube and should be accurate.
In case tired original springs are the culprit I am going to have on hand:
Moog 5386: rated at 334#, and Moog 6319: rated at 120#.
Last edited by pcard; Jan 22, 2014 at 04:05 PM. Reason: Clarification
Just an Olds Guy
Joined: Jul 2008
Posts: 24,528
From: Edmonton, AB. And "I am Can 'eh' jun - eh"
I really doubt it's the control arms. If the springs are not upside down, check to see that the end of the lower coil is not sitting high. The spring pocket on the control arm is not the same height all the way around and if the spring is not positioned correctly it will be off by about the amount you have in your .pdf. That could also account for the squeak quite easily.
Registered User
Joined: Feb 2013
Posts: 15,409
From: Phoenix, AZ
Here's something to think about: with rubber bushings, the weight of the vehicle must be compressing the suspension prior to torquing the suspension bolts. The rubber bushings get pinched and locked into place when the bolts are tightened, which limits their arc of travel. If the bolts are tightened with the suspension unloaded, the vehicle can't settle to its natural ride height.

Registered User
Joined: Feb 2009
Posts: 11,898
From: Brazil Indiana
I would check to be sure it is in it's correct posistion in the frame. Other than that I would think the springs need replaced. For some reason, Most every 66-72 car i have ever had that had the original springs sits lower on the driver side. I am not sure why that side saggs more than the passenger side but I see it all the time.


Thread Starter
70 Cutlass SX
Joined: Apr 2011
Posts: 1,042
From: Bermuda
I finally made it up to Newport to try and fix the car tilt. I had ordered new front and rear coils just in case I found the originals to be sagging. I suspected the front coils, either to be sagging or to be misplaced in the lower control arm seat.
Before I go into the details about my adventures, I would like to ask some advice. I found taking the coils out to be very easy. However putting the new ones in was a bit of a nightmare. The new coils are 17 inches relaxed, the same as the originals. I found that with the LCA lowered all the way I could put the top of the coil in the spring pocket, but I could not get the lower end into the LCA seat. I could lever it in, but whenever I did the top would shift in the upper pocket. Because the spring retained its straight shape I could not angle it into the upper pocket and lower seat at the same time.
I ended up compressing the spring by about 2 inches using a compressor tool, then slotting in the upper pocket, rope tying it on the LCA as close to the seat as possible but still not seated properly, then raising the LCA with a jack about 6 inches. This kept the top of the spring in the upper pocket. I then used a pry bar to lever the lower end into the seat. It was not pretty, and even though I had the coil tied to the LCA I kept thinking it was going to pop out and whack me. In addition, I then had to get the compressor out of the coil, which is a PITA.
There must be a better way. Can anyone advise?
Also, how do you torque the rearward, driver side UCA bushing? I just could not get my torque wrench in there. I ended up just doing it by feel.
After replacing both front coils the car still sits high on the passenger side, or rather low on the driver side, by about 1/2 inch. Over all the new MOOG 5386 gives a slightly lower ride height compared to the 40 year old originals, perhaps a 1/4 inch lower, but that could be due to the incorrect positioning of the original springs (see below) during restoration. The new rides heights in the front are: passenger 10" (good), driver 9 1/2" (low by 1/2"). The rear ride heights did not change at all, driver 9 3/8", passenger 10" (good), or 1/2 inch low on the driver side.
After driving the car a bit the tilt did not go away!!! So I will do the rears tomorrow, which will not take too long. If it is the rear coils I will be pissed at myself for not doing them first!
Also, note my observations in part 1 below about the front passenger wheel hanging lower than the driver when car is on jacks.
Before I go into the details about my adventures, I would like to ask some advice. I found taking the coils out to be very easy. However putting the new ones in was a bit of a nightmare. The new coils are 17 inches relaxed, the same as the originals. I found that with the LCA lowered all the way I could put the top of the coil in the spring pocket, but I could not get the lower end into the LCA seat. I could lever it in, but whenever I did the top would shift in the upper pocket. Because the spring retained its straight shape I could not angle it into the upper pocket and lower seat at the same time.
I ended up compressing the spring by about 2 inches using a compressor tool, then slotting in the upper pocket, rope tying it on the LCA as close to the seat as possible but still not seated properly, then raising the LCA with a jack about 6 inches. This kept the top of the spring in the upper pocket. I then used a pry bar to lever the lower end into the seat. It was not pretty, and even though I had the coil tied to the LCA I kept thinking it was going to pop out and whack me. In addition, I then had to get the compressor out of the coil, which is a PITA.
There must be a better way. Can anyone advise?
Also, how do you torque the rearward, driver side UCA bushing? I just could not get my torque wrench in there. I ended up just doing it by feel.
After replacing both front coils the car still sits high on the passenger side, or rather low on the driver side, by about 1/2 inch. Over all the new MOOG 5386 gives a slightly lower ride height compared to the 40 year old originals, perhaps a 1/4 inch lower, but that could be due to the incorrect positioning of the original springs (see below) during restoration. The new rides heights in the front are: passenger 10" (good), driver 9 1/2" (low by 1/2"). The rear ride heights did not change at all, driver 9 3/8", passenger 10" (good), or 1/2 inch low on the driver side.
After driving the car a bit the tilt did not go away!!! So I will do the rears tomorrow, which will not take too long. If it is the rear coils I will be pissed at myself for not doing them first!
Also, note my observations in part 1 below about the front passenger wheel hanging lower than the driver when car is on jacks.
Last edited by pcard; Feb 16, 2014 at 07:55 AM.
Thread Starter
70 Cutlass SX
Joined: Apr 2011
Posts: 1,042
From: Bermuda
Anyway, here was my day, start to finish about 8 hours:
Replacing front Coils
Preparation:
Disconnect battery
Key to Ign to unlock steering wheel. This helps in turning the hubs to help with access to nuts and bolts.
Apply parking brake
Block back wheels
Part 1:
Loosen front wheel nuts
Place jack under front cross member, raise the car. I noticed that even though I had the jack right in the middle of the cross member, the driver side wheel came off the ground earlier than the right, by about 5/8 inch. This surprised me because I would have thought the driver side would be heavier with the power steering, battery and brake booster. I placed the jacks at the lift points on frame front corners positioned so that the front clip and front corners of the frame were the same height off the ground left to right. I measured the frame rail heights in the rear and they were the same left to right, which led me to think the rear coils were providing the same amount of lift.
I noted that the passenger wheel hung down about 3/4 inch lower than the driver side.
Remove wheels
Disconnect Sway bar link, remove bolt, spacers and grommets and push sway bar out of the way
Remove lower bolts on shock absorbers
Support shock from below
Remove upper nut on shock absorber using box spanner on nut and hex driver on the shock spindle
Drop shock out of bottom.
Part 2:
Inspect position of spring in seat and note for records. It was immediately obvious that both springs were not positioned as per the Asm Manual. I was hoping that the passenger side only would be off, which could explain the car tilt, but they were both rotated about 90 degrees clockwise from nominal, so sitting in the same position in the LCA seat.
Put rope through the lower shock hole and through spring and tie off around LCA. Give it only enough slack for the spring to just come out of the seat.
Place jack under spring seat with thick pad
Remove cotter pin on lower ball joint and loosen nut, do not remove
Insert ball joint spreader tool and break lower ball joint loose. I did this with the Allstar Performance ALL11174 Ball Joint Spreader Tool. It worked perfectly. I did not even have to use a hammer. I highly recommend this tool.
Raise control arm with jack to relieve tension
Remove ball joint stud nut
Raise and block UCA with bit of wood between frame and UCA
Lower jack to release spring tension. At this point I lowered the LCA and removed the jack completely. The spring was still fairly secure in the LCA seat, and the upper pocket, bent like a banana. I treated it with the utmost respect. I put a long piece of 2x2 behind it and levered it out of the seat. It popped out of the LCA seat with quite a bit of force, but was contained by the rope.
Remove rope and remove spring
Replacing front Coils
Preparation:
Disconnect battery
Key to Ign to unlock steering wheel. This helps in turning the hubs to help with access to nuts and bolts.
Apply parking brake
Block back wheels
Part 1:
Loosen front wheel nuts
Place jack under front cross member, raise the car. I noticed that even though I had the jack right in the middle of the cross member, the driver side wheel came off the ground earlier than the right, by about 5/8 inch. This surprised me because I would have thought the driver side would be heavier with the power steering, battery and brake booster. I placed the jacks at the lift points on frame front corners positioned so that the front clip and front corners of the frame were the same height off the ground left to right. I measured the frame rail heights in the rear and they were the same left to right, which led me to think the rear coils were providing the same amount of lift.
I noted that the passenger wheel hung down about 3/4 inch lower than the driver side.
Remove wheels
Disconnect Sway bar link, remove bolt, spacers and grommets and push sway bar out of the way
Remove lower bolts on shock absorbers
Support shock from below
Remove upper nut on shock absorber using box spanner on nut and hex driver on the shock spindle
Drop shock out of bottom.
Part 2:
Inspect position of spring in seat and note for records. It was immediately obvious that both springs were not positioned as per the Asm Manual. I was hoping that the passenger side only would be off, which could explain the car tilt, but they were both rotated about 90 degrees clockwise from nominal, so sitting in the same position in the LCA seat.
Put rope through the lower shock hole and through spring and tie off around LCA. Give it only enough slack for the spring to just come out of the seat.
Place jack under spring seat with thick pad
Remove cotter pin on lower ball joint and loosen nut, do not remove
Insert ball joint spreader tool and break lower ball joint loose. I did this with the Allstar Performance ALL11174 Ball Joint Spreader Tool. It worked perfectly. I did not even have to use a hammer. I highly recommend this tool.
Raise control arm with jack to relieve tension
Remove ball joint stud nut
Raise and block UCA with bit of wood between frame and UCA
Lower jack to release spring tension. At this point I lowered the LCA and removed the jack completely. The spring was still fairly secure in the LCA seat, and the upper pocket, bent like a banana. I treated it with the utmost respect. I put a long piece of 2x2 behind it and levered it out of the seat. It popped out of the LCA seat with quite a bit of force, but was contained by the rope.
Remove rope and remove spring
Last edited by pcard; Feb 16, 2014 at 07:41 AM.
Thread Starter
70 Cutlass SX
Joined: Apr 2011
Posts: 1,042
From: Bermuda
Part 3:
Position new spring into upper spring pocket and onto LCA with lower tail in spec position. Tie off spring with rope through lower shock hole and around LCA. Make sure it is tied off tight to keep the lower part of the spring from slipping away from the seat. In the photo it is still loose. This is where my fun began (see above). Note that using the compressor tool I had it is important to have the lower fork at least two coils from the bottom or else you will never get it out later. Also, have the upper hooks at least two coils from the top and positioned so that they are in line across the long axis of the UCA, otherwise they interfere with positioning the top of the spring in the upper pocket. This means lining everything up with the expected position of the lower spring tail before you start to compress the spring.
Raise LCA with jack about 6 inches and using a long pry bar lever the lower end of the coil into the LCA seat, confirming it is positioned correctly as per the ASM Manual.
At this point the spring is compressed with the compressor and the LCA is also raised and so the spring is fairly straight. In order to get the compressor out I had to now lower the LCA and release the spring compressor. Getting that compressor fork out was a bugger. The first time I had to reverse the whole procedure to reposition the fork higher up on the spring. I would suggest the double-hook style compressor would be easier to work with. The hook parts do come out of the bottom with some fussing, just like a Japanese finger puzzle. All this was done with some considerable tension on the coil and the LCA lowered so that the coil was shaped like a banana. Scary.
Once the compressor is out raise the LCA until ball joint nut can be installed on spindle.
TORQUE ball joint nut to 60-70 lbs. Be sure not to back off on the nut after torque. If the cotter hole on the spindle does not line up with the castle nut then torque some more.
Insert cotter pin and bend to side
Raise jack to allow removal of wood block from under UCA.
Lower jack
Remove strap tie from LCA
Part 4:
Insert shock from below and support
Install nut on top of shock spindle, TORQUE nut to 10 lbs.
Install bolts to bottom of shock, TORQUE to 25 lbs.
Connect sway bar links, TORQUE nuts to 15 lbs. This was not as easy as it sounds. I could not get the link bushings to seat onto the sway bar end, and so the end of the link had no threads showing. I had to use a long piece of 1x1 to lever the sway bar down, while supporting the lower end of the link under the LCA with a jack. This exposed some threads but it was not an easy juggling act.
Replace wheels
Part 5:
Loosen UCA and LCA bushing nuts. I should probably have done this in part 1, making it easier to move the LCA up and down.
Raise and lower wheels using a jack under the LCA to free up bushings
Lower car off stands
Torque wheel nuts
Torque LCA bushings to 90lbs, UCA to 55lbs. Actually I was not able to torque the rearward LCA bushings because there was not enough clearance under the car for the torque wrench. I tightened them up as much as I could, but will have to torque them when I can get the car on a drive-on lift. I could not torque the rearward, driver side UCA bushing because I could not get my torque wrench in there. I ended up just doing it by feel.
Key Off, reconnect battery
Position new spring into upper spring pocket and onto LCA with lower tail in spec position. Tie off spring with rope through lower shock hole and around LCA. Make sure it is tied off tight to keep the lower part of the spring from slipping away from the seat. In the photo it is still loose. This is where my fun began (see above). Note that using the compressor tool I had it is important to have the lower fork at least two coils from the bottom or else you will never get it out later. Also, have the upper hooks at least two coils from the top and positioned so that they are in line across the long axis of the UCA, otherwise they interfere with positioning the top of the spring in the upper pocket. This means lining everything up with the expected position of the lower spring tail before you start to compress the spring.
Raise LCA with jack about 6 inches and using a long pry bar lever the lower end of the coil into the LCA seat, confirming it is positioned correctly as per the ASM Manual.
At this point the spring is compressed with the compressor and the LCA is also raised and so the spring is fairly straight. In order to get the compressor out I had to now lower the LCA and release the spring compressor. Getting that compressor fork out was a bugger. The first time I had to reverse the whole procedure to reposition the fork higher up on the spring. I would suggest the double-hook style compressor would be easier to work with. The hook parts do come out of the bottom with some fussing, just like a Japanese finger puzzle. All this was done with some considerable tension on the coil and the LCA lowered so that the coil was shaped like a banana. Scary.
Once the compressor is out raise the LCA until ball joint nut can be installed on spindle.
TORQUE ball joint nut to 60-70 lbs. Be sure not to back off on the nut after torque. If the cotter hole on the spindle does not line up with the castle nut then torque some more.
Insert cotter pin and bend to side
Raise jack to allow removal of wood block from under UCA.
Lower jack
Remove strap tie from LCA
Part 4:
Insert shock from below and support
Install nut on top of shock spindle, TORQUE nut to 10 lbs.
Install bolts to bottom of shock, TORQUE to 25 lbs.
Connect sway bar links, TORQUE nuts to 15 lbs. This was not as easy as it sounds. I could not get the link bushings to seat onto the sway bar end, and so the end of the link had no threads showing. I had to use a long piece of 1x1 to lever the sway bar down, while supporting the lower end of the link under the LCA with a jack. This exposed some threads but it was not an easy juggling act.
Replace wheels
Part 5:
Loosen UCA and LCA bushing nuts. I should probably have done this in part 1, making it easier to move the LCA up and down.
Raise and lower wheels using a jack under the LCA to free up bushings
Lower car off stands
Torque wheel nuts
Torque LCA bushings to 90lbs, UCA to 55lbs. Actually I was not able to torque the rearward LCA bushings because there was not enough clearance under the car for the torque wrench. I tightened them up as much as I could, but will have to torque them when I can get the car on a drive-on lift. I could not torque the rearward, driver side UCA bushing because I could not get my torque wrench in there. I ended up just doing it by feel.
Key Off, reconnect battery
Just an Olds Guy
Joined: Jul 2008
Posts: 24,528
From: Edmonton, AB. And "I am Can 'eh' jun - eh"
Peter, was this car ever in a front end collision?
Funny you had so much trouble installing the new springs. My OEM's were the same size as yours. They came out easily and since they were not sagging I just cleaned them well and re-shot them with black. Installing them all I needed was a 3' pry to jump the spring into the lower spring pocket. From there it rotated around very easily. I never had to use a compressor to make the spring fit back in.
The problem you have with the UCA torquing is the same I ran into. So I just did it by feel also.
Funny you had so much trouble installing the new springs. My OEM's were the same size as yours. They came out easily and since they were not sagging I just cleaned them well and re-shot them with black. Installing them all I needed was a 3' pry to jump the spring into the lower spring pocket. From there it rotated around very easily. I never had to use a compressor to make the spring fit back in.
The problem you have with the UCA torquing is the same I ran into. So I just did it by feel also.
Thread Starter
70 Cutlass SX
Joined: Apr 2011
Posts: 1,042
From: Bermuda
Hey Allan, I do not know if the car was damaged in the front, but I think the guys doing the restoration would have noticed something like that. With the front up on jacks and level, I measured from the front clip, where the bumper bolts on, to the ground and both sides gave identical results.
I wonder if the trouble I had with the new springs is because they do not have the taper on the top. I also wonder if they would have just slotted into the upper pocket if I had just raised the LCA all the way. I was being very cautious, not wanting to damage anything, this being the first time I did this.
I wonder if the trouble I had with the new springs is because they do not have the taper on the top. I also wonder if they would have just slotted into the upper pocket if I had just raised the LCA all the way. I was being very cautious, not wanting to damage anything, this being the first time I did this.
Just an Olds Guy
Joined: Jul 2008
Posts: 24,528
From: Edmonton, AB. And "I am Can 'eh' jun - eh"
The front springs are supposed to be flat on top - not tapered. Only the bottom part of the spring has that taper as you call it so it will match up with the lower pocket of the CA. Only thing I can suggest is take out the offending lower side spring and install a corresponding shim to see if that changes the ride height to your specs.
Thread Starter
70 Cutlass SX
Joined: Apr 2011
Posts: 1,042
From: Bermuda
Sorry - my misunderstanding of terminology. The old springs were flat on top, but not the new ones - see the photo above with the spring and spring compressor. The new springs just have the metal bar cut off, thus the flange in the upper spring pocket did not have much to hold onto.
In regard to putting a shim on one side - I did not know that was OK to do. Are they the same as an insulator used in the rear?
In regard to putting a shim on one side - I did not know that was OK to do. Are they the same as an insulator used in the rear?
Just an Olds Guy
Joined: Jul 2008
Posts: 24,528
From: Edmonton, AB. And "I am Can 'eh' jun - eh"
Are you sure you got the right springs?
re: insulators vs shim. The rear insulators were mostly just to eliminate squeaks from metal/metal. They may have provided 'some' cushion, but not much. I don't honestly know if it's ok to shim the spring as I mentioned, it was just a thought to see if it would have any effect on balancing the car. You mentioned that one side was slightly lower, and I wondered if perhaps one of the spring pockets in the frame may be slightly deeper than the other.
re: insulators vs shim. The rear insulators were mostly just to eliminate squeaks from metal/metal. They may have provided 'some' cushion, but not much. I don't honestly know if it's ok to shim the spring as I mentioned, it was just a thought to see if it would have any effect on balancing the car. You mentioned that one side was slightly lower, and I wondered if perhaps one of the spring pockets in the frame may be slightly deeper than the other.
Thread Starter
70 Cutlass SX
Joined: Apr 2011
Posts: 1,042
From: Bermuda
The springs looked like the picture on the Moog site, which calls them Square/Tangential. The tag in the box said MOOG 5386, they were the right height, so I think they are the springs I ordered.
I pose the question to the group - could I shim one front coil safely, and if so with what?
I pose the question to the group - could I shim one front coil safely, and if so with what?
Thread Starter
70 Cutlass SX
Joined: Apr 2011
Posts: 1,042
From: Bermuda
Here is an update, after letting the car sit all weekend it has settled a bit. Here are the new measurements before and after new springs:
....................Front......................... ........Rear
....................Before...After....Delta....... Before....After....Delta
Passenger..10 3/8.....10.......-3/8..........10..........9 3/4....-1/4
Driver...........9 5/8......9 3/8..-1/4............9 3/8.....9 3/8......0
Tilt................3/4........5/8........................5/8.........3/8
I am hoping that when I drive it around in the spring then it will settle more (to the good side!).
....................Front......................... ........Rear
....................Before...After....Delta....... Before....After....Delta
Passenger..10 3/8.....10.......-3/8..........10..........9 3/4....-1/4
Driver...........9 5/8......9 3/8..-1/4............9 3/8.....9 3/8......0
Tilt................3/4........5/8........................5/8.........3/8
I am hoping that when I drive it around in the spring then it will settle more (to the good side!).
Last edited by pcard; Feb 18, 2014 at 06:48 PM.
Thread Starter
70 Cutlass SX
Joined: Apr 2011
Posts: 1,042
From: Bermuda
Update
I came up to Newport last week to try and fix this. I bought an aluminium 3/8 inch spacer from Summit to put under the driver side coil. Having put the new coils in in February I was fairly familiar with the process, and it did not take me long to have the coil removed. A bit of drama I had was on raising the car the jack slipped off of the front cross member (mentioned in my other thread ), and put a big dent in my oil pan, and bent my roll bar.
I put in the spacer and slipped in the coil, compressed by my new compressor tool, and tried to bring the control arm up. After a few inches, the car started to raise up, and it was apparent that the spring was not sitting in the top pocket. It is hard to see up there, but after putting my head in the lion’s mouth I saw that the spring top was way off.
So l lowered it down, took the spring out, compressed it again and slipped it in, making sure that it went into the top pocket. I had to jimmy the bottom of the spring over into the lower seat, keeping the spacer in place. Delicate.
I got the spring in and the ball joint reattached, nut torqued down and lowered the car. I put it up on the drive-on lift and torqued the lower control arm bolts, and attached the sway bar. I noticed that one end of the sway bar is about 1” higher than the other, but am not sure if this was because of its getting bent when the jack slipped, or if it was like that all along. I seem to remember having to fight it in February too.
I took the car for an alignment, but they did not do a good job. The technician had a bit of a problem getting one of my upper control arms to come loose, and the boss kept coming over and bugging him, telling him to hurry up because he had another job to do in ten minutes. Well, he finally got the camber and toe-in right, but the caster was -2.5*, which is out of spec. The tech said he did not have time to make it better. I thought fine, but when I drive it if it is not right I am coming back again. Sure enough, when driving I notice a drift to the side, and the steering is a bit squirrely, with shudder at 75mph. Definitely too much caster – feels like a shopping cart. My mate who owns the place where I keep the car called the owner and he came over to check out the car. He is going to personally re-do the alignment next week.
The good news is that my lean is now gone.
The measurements below are in inches, done to the Service Manual Specification, to the lip of the rocker panel, 1 “ behind front door opening and 3” in front of rear well opening, error about 1/8”:
Driver Side: Front 10 3/8, Rear 10
Passenger: Front 10 ½, Rear 10
These are a bit high: 3/8 high in front 1/8 high in rear, but I attribute that to either my new front coil springs being a bit higher rate, or my tires, or both.
The best news is that there is now no visible lean at all. I am very happy with that.
I have sent my old coils in CoilSpring Specialty in Kansas for testing and they should be getting back to me a in few weeks with the spring rates. I am also thinking of restoring my original control arms and putting them on the car to see if I can eliminate the spacer. Whatever happens I know I can get the car to sit properly.
I came up to Newport last week to try and fix this. I bought an aluminium 3/8 inch spacer from Summit to put under the driver side coil. Having put the new coils in in February I was fairly familiar with the process, and it did not take me long to have the coil removed. A bit of drama I had was on raising the car the jack slipped off of the front cross member (mentioned in my other thread ), and put a big dent in my oil pan, and bent my roll bar.
I put in the spacer and slipped in the coil, compressed by my new compressor tool, and tried to bring the control arm up. After a few inches, the car started to raise up, and it was apparent that the spring was not sitting in the top pocket. It is hard to see up there, but after putting my head in the lion’s mouth I saw that the spring top was way off.
So l lowered it down, took the spring out, compressed it again and slipped it in, making sure that it went into the top pocket. I had to jimmy the bottom of the spring over into the lower seat, keeping the spacer in place. Delicate.
I got the spring in and the ball joint reattached, nut torqued down and lowered the car. I put it up on the drive-on lift and torqued the lower control arm bolts, and attached the sway bar. I noticed that one end of the sway bar is about 1” higher than the other, but am not sure if this was because of its getting bent when the jack slipped, or if it was like that all along. I seem to remember having to fight it in February too.
I took the car for an alignment, but they did not do a good job. The technician had a bit of a problem getting one of my upper control arms to come loose, and the boss kept coming over and bugging him, telling him to hurry up because he had another job to do in ten minutes. Well, he finally got the camber and toe-in right, but the caster was -2.5*, which is out of spec. The tech said he did not have time to make it better. I thought fine, but when I drive it if it is not right I am coming back again. Sure enough, when driving I notice a drift to the side, and the steering is a bit squirrely, with shudder at 75mph. Definitely too much caster – feels like a shopping cart. My mate who owns the place where I keep the car called the owner and he came over to check out the car. He is going to personally re-do the alignment next week.
The good news is that my lean is now gone.
The measurements below are in inches, done to the Service Manual Specification, to the lip of the rocker panel, 1 “ behind front door opening and 3” in front of rear well opening, error about 1/8”:
Driver Side: Front 10 3/8, Rear 10
Passenger: Front 10 ½, Rear 10
These are a bit high: 3/8 high in front 1/8 high in rear, but I attribute that to either my new front coil springs being a bit higher rate, or my tires, or both.
The best news is that there is now no visible lean at all. I am very happy with that.
I have sent my old coils in CoilSpring Specialty in Kansas for testing and they should be getting back to me a in few weeks with the spring rates. I am also thinking of restoring my original control arms and putting them on the car to see if I can eliminate the spacer. Whatever happens I know I can get the car to sit properly.

Thread
Thread Starter
Forum
Replies
Last Post
ELECMAN
General Discussion
13
Jan 22, 2012 01:49 PM


