When you click on links to various merchants on this site and make a purchase, this can result in this site earning a commission. Affiliate programs and affiliations include, but are not limited to, the eBay Partner Network.
The bounciness is due to the way the pump works, but the pressure should remain fairly constant. The measured 5.5 psi sounds about right to me as anything over 7-8 will cause flooding in the carburetor.
I see. Well, if that all checks out then I am going to change the ignition module when it gets here, and if that doesn't do it I will wait to see what droldsmorland's plan is.
It didn't do this last year and the only thing that I changed that I think could cause this issue would be the HEI upgrade and new plug wires. If the module or distributor it self, or wires are not the issue then I don't know what else it could be. For sure seems fuel or spark related...
Thanks for all the help and suggestions!
Last edited by 71OldsCut; Jun 1, 2019 at 04:19 PM.
Now that I am leaning back towards spark/ignition, I went and fired it back up. This time while it was still somewhat cool I tried unplugging the plug wires. Some made a very quick and noticeable difference to the point of almost stalling, and others made less to almost no difference at all. I think this must be the problem. I will try to find another 8mm plug wire(s) that I can swap on and off, or a whole new set entirely. The new wires were the cut to your length and make your own type. I bought the proper tool and they all passed the ohm test, and it seems odd that they would work very well for those few minutes then go back to running like crap.
I am very much looking forward to the new ignition module. Can the coil on the top of the distributor get weak or be faulty in this way? Other than those two pieces in the distributor I don't know what else could be to blame. I am not above changing the distributor entirely if need be, but would very much prefer not to. One of the reviews for this distributor did say it came with a bunch of loose wires and had to be replaced. I checked and the wires all seem fine, but maybe there is something wrong in there.
If it comes to that, any recommendations on a better brand distributor for a stock setup?
Last edited by 71OldsCut; Jun 1, 2019 at 04:22 PM.
HEI distributors are not optimal as the coils are epoxy encapsulated (poor heat dissipation) and they sit on top of the distributor and put heat into the module.
A good quality module and if necessary, a remote coil, are all the mods you should need. My HEI has a GM module and an Accel Super Coil and works fine even in the Phoenix 100 plus summer temps.
Awesome. I am going to go swap some plug wires and spark plugs around tomorrow to try and rule out an issue with either of those components. If that all goes well I will wait and see what the new module does.
I will look into the remote coil. It must be a fairly straight forward install and if it helps keep the heat out and away from the distributor it sounds like a good plan.
Plug your timing light into each plug wire, one at a time and run the motor. If it blinks, your plug wires are fine. Less messing around than switching plug wires. If it doesn't blink, then you can check that plug/wire.
Thanks for the tip. I moved the light around and it flashed on all 8 wires. Yesterday it was running rougher than usual and there were 4 plug wires that when removed made only a slight difference to almost no difference. Today it ran better, and there were really only a couple that made a difference. I had originally planed to swap the two front most plug wires on either side (1 and 2 I believe) because they are roughly the same length and would be easy, and yesterday 1 made a huge difference when removed but 2 made almost no difference so it would have been a good test. Problem with that was today they both made a big difference when unplugged.
I think this is all good news. It shows the wires appear to be fine which must mean the source is the problem. I am becoming hopeful that the modulator fixes it, and if not, I think it has to be something else in the distributor. I hear Summit is good at helping and making things right so hopefully they can send another or maybe even allow me to pay the difference to upgrade to a Pertronix brand or something better. It seems like MSD is preferred too but sounds like for what they cost it may be overkill for a stock setup.
No matter what happens I would like to change to the remote mounted coil as suggested above. I just need to find out if the distributor I have can do that, and if they are willing to let me pay the difference on a better one I will have to make sure that one can be remote mounted.
OK, plug wires are ok. Now check plugs on the cylinders that make no difference when the plug wires are pulled. You can put another plug in the hole and put the plug with wire on a contacting surface to see if its sparking. If they spark, you are back too the HEI as the problem.
Ya I was going to say the same. Move the plugs and see if the problem follows. The color of the plug should indicate this too.
Do you have the HEIs power source hooked directly to a KEYED 12-volt source with a 12ga stranded automotive grade wire? You are not using the OEM wire which fed the points distributor...right?
I have been running HEIs on my late 60s Olds engines since the 80s. Never had a coil problem. Never had the need to do a remote coil set-up
I have gone through a few modules yes. Make sure to put the white heat dissipation paste under the module.
Make sure the engine has a good clean ground(s) Bad grounds will take out the modules.
Have you ever checked the compression on all 8 cylinders?
I will check the plugs as suggested next time I am out there.
I ran a new stranded 12 gauge wire from the IGN terminal on the fuse box to the HEI so I should be fine there. I was going to hold off on the remote coil until after I have tried the new module with that heat paste under it and see what happens. If it runs good I at least know what the problem was. If I end up cooking modules on a regular basis and can't find a reason for it I may try it. One thing I wanted some opinions on was a voltage regulator. I think it was actually a post on this forum that I came across from years ago saying anything over 14.5 volts or so will kill modules and a solution is a solid state regulator to keep voltage at a constant 14V. Would this be something worth doing?
I will check the ground. I see that it is there but perhaps it is loose or dirty, or both.
I had it at a shop last year and the guy going through it did do a compression check I believe and was happy with the results. I will have to dig them up because I don't recall the numbers but they should be OK. Also with the problem seeming to change what cylinder(s) are weak I think that would mean compression would be ok.
Anyway, I am feeling good about this and think we are getting close. Ruling out fuel pressure issues was a huge step in the right direction.
One thing I wanted some opinions on was a voltage regulator. I think it was actually a post on this forum that I came across from years ago saying anything over 14.5 volts or so will kill modules and a solution is a solid state regulator to keep voltage at a constant 14V. Would this be something worth doing?
My car has had the mechanical voltage regulator and HEI since the 80s with no issues.
A bad ground is worse than slightly high alternator voltage. I run a solid state reg. Only because my mechanical stopped working and at the time I couldn't find a quality mechanical replacement 10-15 years ago.
The battery negative cable should be attached to the block with a good clean tight connection. The battery posts need to be clean n tight. The cables should be replaced as a service item at min Ohm them and inspect them. Exact replacements are available. Check the positive side while you're in there.
There is a flat braided cable which goes from the rear of one of the heads to the firewall.
Any vehicle 10+ years old needs to have its grounds check. 5 if its in the northeast.
There are secondary grounds throughout the car as well. All of the wire harnesses, core support, engine, dash interior and rear have grounds.
The distributor could have problems with the reluctor & pick up. An Oscilloscope would tell you if that's working correctly. You sure got a gremlin on your hands.
Thanks, I was only aware of the ground from the battery to front of the block in terms of larger main grounds. I will check for the one from the head to the firewall too. I have a new battery and the post connectors are nice and clean. Gremlin indeed. If the modulator and ground check doesn't fix it, it sounds like I have some good times ahead.... better stock up on beer.
The new module is here. My plan is to check the grounds, start and warm the car up with the old module, do that spark plug check, and if it is running ok or even well, I will take it for a short drive until it starts running bad like the last two times. I also want to take a note of where the voltage gauge is. Once it is running rough and has been restarted a few times to repeat the test that restarting is not changing how it runs I was then going to install the new module, with the thermal paste stuff. If it fires up and runs well, even just for a few minutes I should then have proved it was/is the module.
Hopefully it does run well after the new install and continues to run well meaning maybe just a defective module. If it runs well for a while then goes back to how it was, I will at least know what the problem is, then the fun begins of finding out why it is eating coils...
Well, the ground on the front was really grimmy and dirty so that got sanded down and cleaned up. Spark plugs seem to check out. The volt gauge read 14.3 when it started, looks to have quickly spiked close to 16 shortly after then settled in at about 14.1. I don't know how accurate these are or if I should be concerned with the spike.
After all that and a few restarts, I changed the module. I swear it ran nice and smooth for about 10 seconds, but by the time I got the air cleaner on and in it to try accelerating it was back to not being great. I think it was just wishful thinking on my part that it was running better because I really wanted it to work. I can't see the car killing a module that fast, and especially killing it in the exact same way as the last.
Is there anything else in the distributor assembly itself that could cause this?
I have been going over everything in my mind and one more thing came up - is it possible for the rotor to somehow come out of alignment in any way? I recall taking the rotor off for whatever reason, possibly to change the springs or look for loose wires, and I recall when loosening one of the screws on the rotor I didn't have my hand on it and it seemed like it turned and clicked but I wasn't sure and didn't even think it could once installed. I thought it must have just turned back and hit its limit but maybe it is now ahead or behind where it is supposed to be. Can these be messed up this way?
Remove the power plug/wire from the hei. Runa jumper wire from the battery+ terminal to the hei batt terminal. Start the engine with the key and see if it runs better. Note to turn the engine off, you need to remove the jumper and turn the key back off.
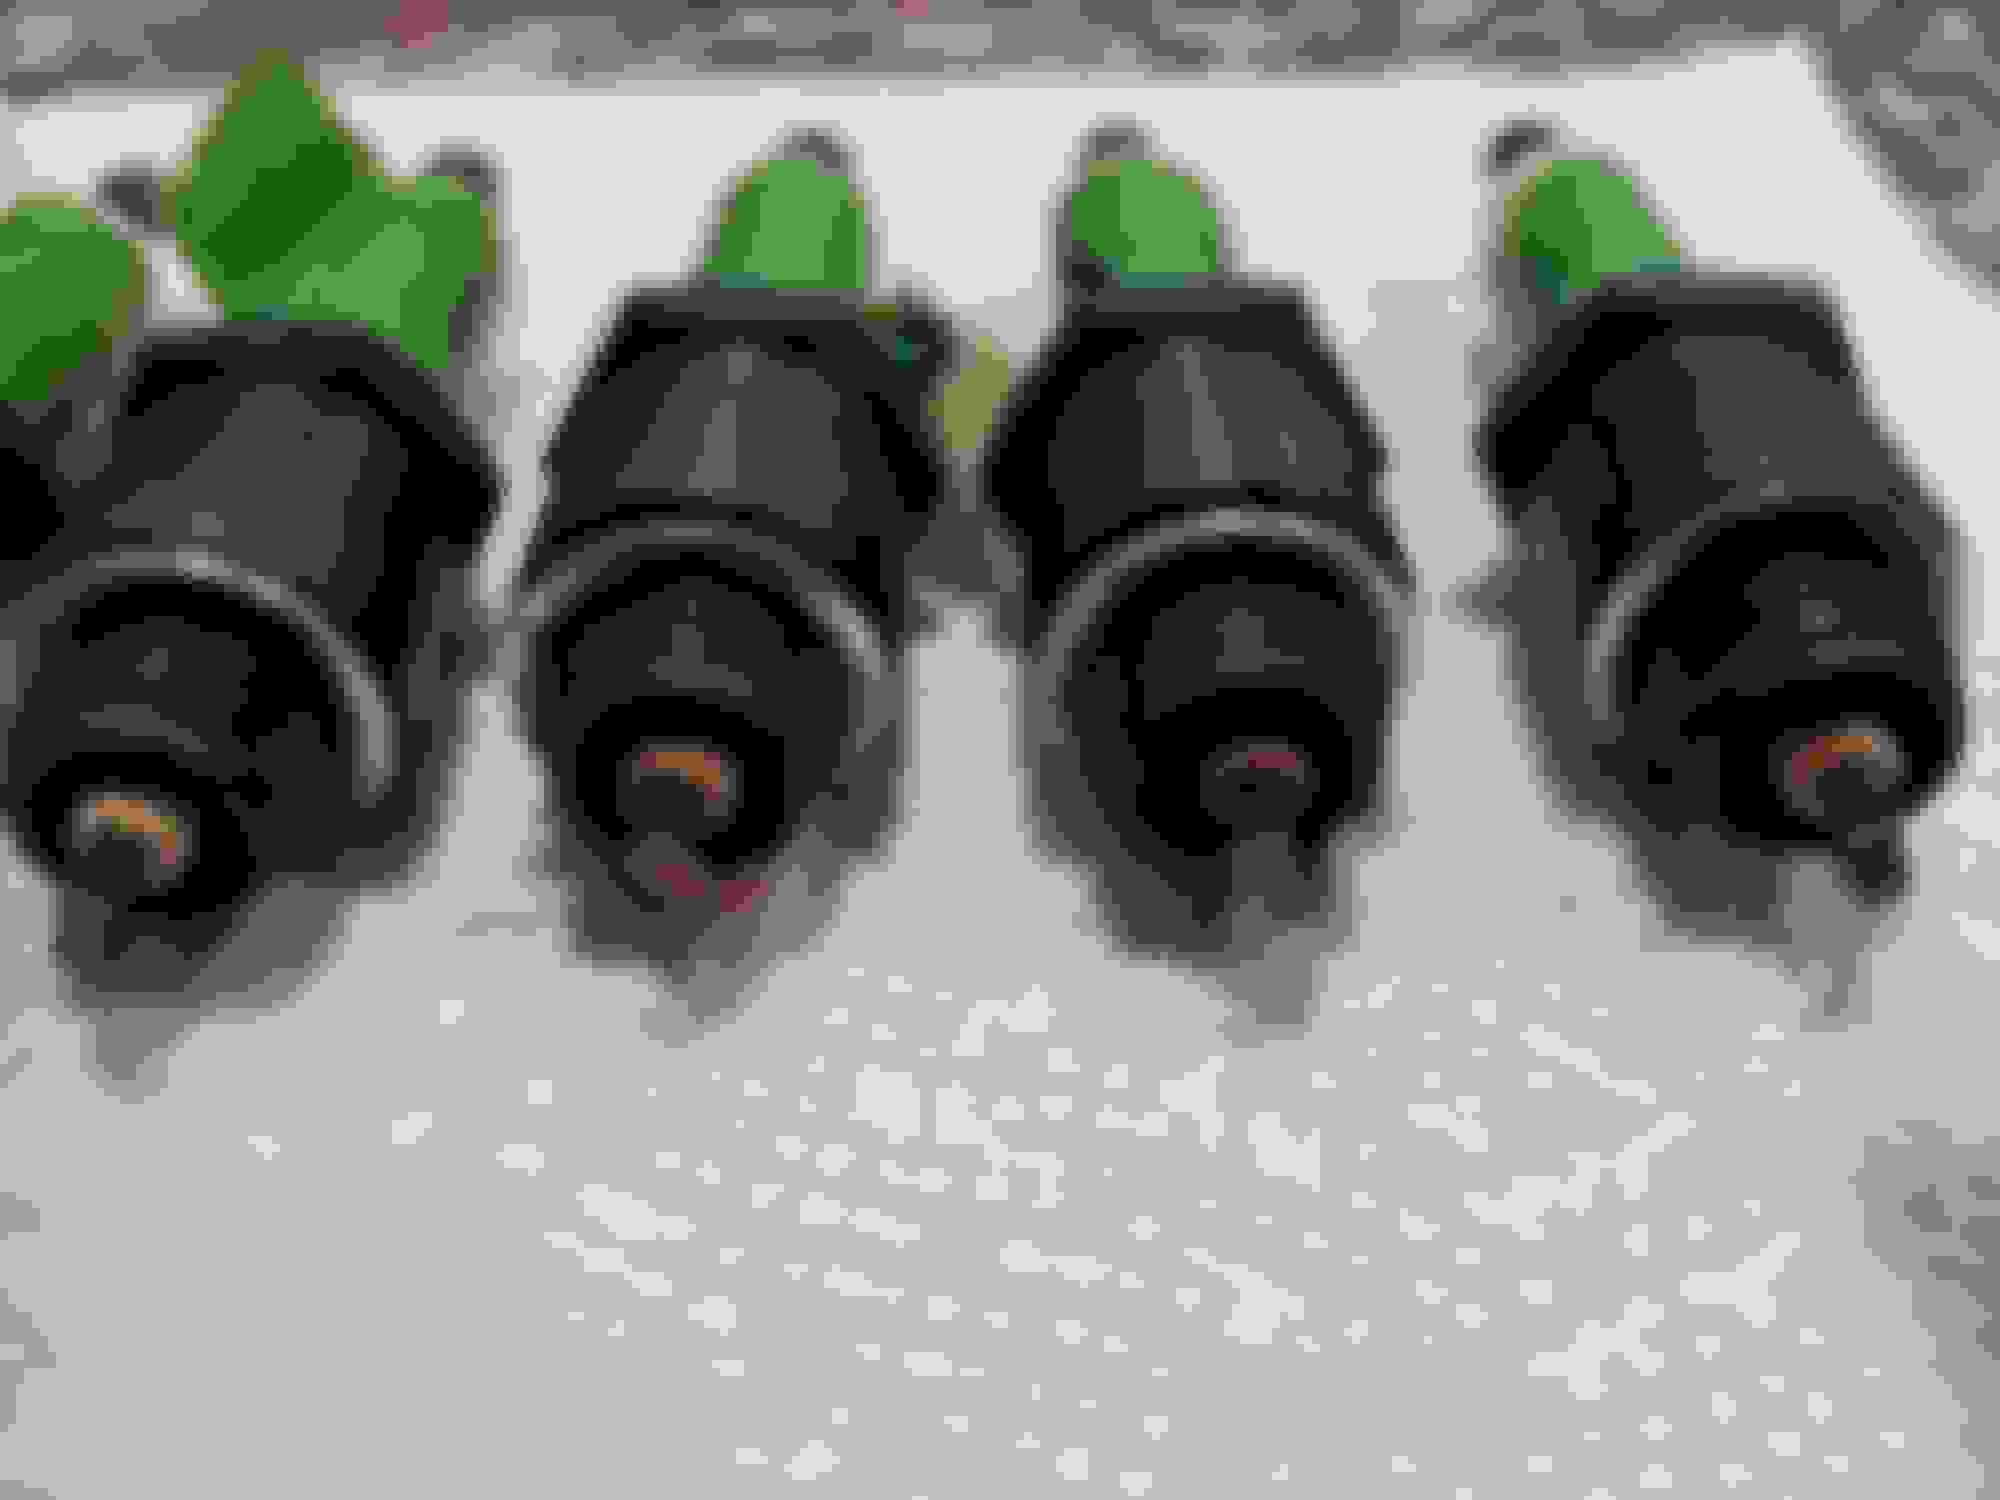
I found the old spark plugs and thought I would give them a try. No real difference, but the plugs that came out might point to something. They are at the least inconsistent anywhere from white, to very brown and anywhere in between including a few that are white on most but have slight brown on a small part. On the piece that goes over top that sets the gap on a few actually looks to have some burn or black marks on the back - not sure if that means anything. The old plugs had a much more consistent brownish color to them, well in my color blind eyes anyway, lol. To me that backs the theory that something is going on with the new ignition components since they didn't look like this but being put back in the engine make no difference in how it runs. Here are some pictures
Last edited by 71OldsCut; Jun 8, 2019 at 09:17 AM.
Those plugs look lean.
How many miles on each set?
14.1 VCD charge volts is good. The spec is generally 13.8 ish VDC to 14.2 ish VDC (Steady). You need a scope or recording VOM to see what the actual spike is. Instanious spikes are there. Its continuous high voltage that will cook the charge and ignition systems.Or bad grounds.
Look at the contact towers under the distributor cap. You're looking for any irregularity. The rotor is keyed and will only fit one way and fully seated. There should be back n forth rotary play in the distributor. Its the centrifugal advance mechanism doing its thing. If you pull the rotor and actuate it you will see how it works against the springs and stops. The system basically advances the position of the rotor in relation to the cap towers. to fire the cylinders off earlier(advanced). The springs shouldn't be light. They should be medium to heavy. And you can use a mix of tensions to dial in the advance. There should also be up/down play. There should be zero lateral play(loose side to side play due to worn shaft bushings).
Sounds to me like the ignition is working. Modules are good or bad they don't work half-assed. Bad grounds and cheap chineasium modules are the general rules of failure. Always carry a spare with heat paste.
Did you look at the timing chain slack? Has the chain and gears ever been changed? Do you know how to test? Spin engine by hand in the opposite direction of normal operation two full revs stopping at 0* on the timing tab/damper groove. If you miss it just go around another rev. With a clear view of the dist rotor turn the engine in the normal op direction until you see the rotor just start to move. Look where the damper groove is on the timing tab. Shouldn't be any more than 3* of slop. To much slop will cause erratic timing and rough running.
What are your three timing events set at again?
Do you have the points or another distributor you can do a comparison with?
Is your vacuum signal fairly steady at the 16Hg ish reading....if I recall? 16 is on the low side for a stock engine. 18-20 is better.
I dont want to make you chase your tail but Im still leaning towards something in the induction system. BUT let us run this ignition thing out before jumping back at induction.
The old plugs came with the car, so I am unsure of the miles on them. The new ones have maybe about 100 miles on them plus the idle time in the garage trying to figure out the problem. Most of those miles were last year when the car didn't run great, but was still very driveable other than not having third gear. That was when there was a definite vacuum leak which could explain why they look like they were running lean.
I took the cap and rotor off. Nothing obviously wrong there. I did find there are 3 screws under the weights that were all fairly loose. I don't know what these hold in or if they are supposed to be slightly loose. I have never heard of a screw that was supposed to be loose especially since these look to have lock washers under them. I snugged them up.
The rotor does move slightly up and down, about 1/8" or so, but has no side to side movement.
I did the timing chain check. Looks to be roughly 3-4*, it is hard to be exact, but I did the test twice and got that same number. Probably not great, but hopefully not so far out that it could be causing this.
I believe right now it is at 18* of base timing, 8* of vacuum advance connected to manifold vacuum and the distributor gives another 20*. It looked to be all in at about 38*40* around 2600RPM or so. I would like to work on those numbers but it is hard when the engine is running like it is. These are also the settings it had when that one morning it fired up good, and ran great for that short amount of time. I was reluctant to keep messing with timing and fuel mixture since it proved it could run very well with these settings, if I could just put this last piece of the puzzle together.
When idling rough like it is, the vacuum is a steady 16.2 or so. I can however cover the carb up and unlike last year the engine doesn't speed up and smooth out, it just basically stays the same so I think that is good news.
I do have a new fuel pump but haven't changed it yet because the fuel pressure test seemed to rule it out. I may still try it, but want to wait for the new fuel line to arrive first. I am also waiting on a new secondary clock spring to install on the old carb. I had to borrow that one to replace the one I think I messed up on the new carb. Once I have that and the new fuel line I will throw the old carb back on and see what that does. I don't currently have another distributor to try, but am waiting for summit to get back to me about that.
I did find there are 3 screws under the weights that were all fairly loose. I don't know what these hold in or if they are supposed to be slightly loose. I have never heard of a screw that was supposed to be loose especially since these look to have lock washers under them. I snugged them up.
Those are the screws that hold the reluctor in place. That is part of the magnetic trigger system for the HEI distributor, so if it was loose enough it could have been a contributor to your issue.
Interesting. I did start it back up after I cleaned the newer plugs up a bit and tightened those screws. No real difference, but I think it points to the quality of the distributor I have in there, lol. Hopefully summit will send another or allow me to pay the difference and get a Pertronix or DUI. They seem to be the two more common or preferred brands. Hopefully the new fuel line and that spring show up this week. I would be very interested to try the old carb and see what happens.
One other thing I wanted to ask is the way the distributor sits. It looks to be on a slight angle but when I got it in I looked and felt all around and it is fully seated. There are no leaks either so it must be in right. Is this normal? it looks to be higher on the driver's side.
I dont think so it should be unlevel. Are you sure the cap is on right? Might have a bad cap? Sounds to me like this distributor got dropped from 30K feet when it was being shipped and no quality control from china.
Bring the engine to TDC on #1 compression stroke, pull the dist and lay it on a table and take some good pics of it and of the plate.
If the reluctor screws were loose as fun said its likely the root cause. There is a tolerance there.
Your timing chain is at the limit but it should still run relatively good.
18* of base timing is quite a lot. Base should be 12ish. Another 10 on the vac can so 20-22* at ~650-750 rpm idle....the rest all in at 2600-2800 for a total of ~36-38*
Last edited by droldsmorland; Jun 11, 2019 at 11:30 AM.
Ok, that will not get done today but likely sometime during the week after summit hopefully agrees to send me another of some type. I did find a post in a different forum about the same concern with it having a slight tilt and they claimed it was normal. That was for a chevy engine which I understand are quite different but thought it might be OK. I was trying to get to some car shows to have a look at others but haven't made it there yet.
While I am posting here, I wanted to run the ohm test results for the plug wires by you guys. I thought now that I had a store bought plug to compare with my cut to fit ones I would see what I get. If I understand right I think mine are actually better. Both wires tested are about 26".
Store bought wire with multimeter at 200K = 8.8
Store bought wire with multimeter at 2K = reads 1. and doesn't change when wire connected.
Cut to fit wire with multimeter at 200K = 0.7
Cut to fit wire with multimeter at 2K = 0.765
From what I read a lower grade wire, which I suspect the store bought one is, should be somewhere between 10,000 and 12,000 per foot and higher grade ones like the ones I cut to fit could be more around 4000 and 5000 per foot. If I am reading the meter right mine is around the 4000-5000 per foot mark and the store bought one is much higher. I will be the first to say that my multimeter knowledge and electrical knowledge overall are not great, so please correct me if I am wrong.
Last edited by 71OldsCut; Jun 9, 2019 at 05:02 PM.
Summit has agreed to let me return the Summit brand distributor and pay the difference on a Pertronix or DUI... or any other one really that I want. So on that note, for my basically stock 1971 350, does anyone have any recommendations? In terms of Pertronix there is the Flame-thrower Magnetic Trigger Billet model that appears to need a remote coil so probably not that one. The others are the Flame-thrower HEI and Flame-thrower Street/strip HEI. Both are the same price, just wondering if anyone had any opinions on if one is better than the other for any reason.
I reference Pertronix simply because they seem to be the most commonly used and best bang for your buck, but if someone has had great experiences with others I am open to whatever at the moment.
**Update - turns out the Flame-thrower HEI and Flame-thrower Street/strip HEI are the same thing. They are all the same model number family of D1100 just the last digit changes cap color. Not sure why summit names the one with the black cap different but the pertronix website shows them all the same. So, I think the D1100 with the black cap is what I want unless anyone has had bad experiences with it. I was surprised at the cost of the DUI's and I don't really want to experiment with Taylor or ProForm. They might be fine, I just haven't really ever heard of them...
And, if Summit price matches Jegs, it will only cost me $6.
Last edited by 71OldsCut; Jun 10, 2019 at 02:31 PM.
Here are some pictures of the one that came out. Nothing too bad I dont think. All I can find is right on the bottom of the gear looks to have been riding on something, not sure if this is normal. I recall the first start I only had the tie down bolt snug to allow for adjustment and the distributor was wobbling. It seemed to go away after it was snugged up. I dont recall it doing it after that, certainly not as bad and never when tight. From what I read that is usually a bent shaft or bushing problem. There isn't any obvious bend, but from what I read it doesnt take much to cause irratic timing and running problem.
Either way, with it sitting at an angle, the wobble and the loose screws all just ruin any level of confidence I had in this thing. I am glad to have it out.
Did you have cap into the locator tab? I actually bought one of the really cheap Ebay HEI distributors, it was very well made. I swapped an Accel Brute Thunder coil and Pertronix Ignitor 3 module so I can't speak on those parts. But for $40 everything mechanical is very nice. I think you should have way more than 8 degrees vacuum advance on a stock 71 350, triple that would be ideal. I know a few have bought the Olds DUI and been very happy. They will even custom tune them to your motor. Good luck.
The cap was on properly and in the locator tab. The vacuum advance is adjustable I just had it wound down to about 8-10*. I don't know what its max is but I don't know that it could get to 24*, maybe it can I didn't try. Once it is back up and running, hopefully a lot better, I want to try settings more like what droldsmorland suggested above where I back my base timing down a bit and increase the vacuum a little bit and go from there. I still am unsure if ported or manifold vacuum is best. It seems like a trail and error thing where not all cars will like the same thing. Anyway, those are down the road issues. First thing is to get this new distributor in and see if it fixes it. If not, at least I have eliminated one area of concern. I should have that clock spring and fuel line by then so I can throw the old carb back on and see if that changes anything.
Let's reel this thread back in:
I feel like we're chasing our tails.
You started with a flat spot and a stall.
Then we looked at ignition then fuel then charging et al...
Need to organize this for yourself and us in a post (don't start a new thread). In other words simple 1. 2. 3. bullets capturing each system and what's been checked with its data.
We need to start fresh with everything known to date
(Really needs an 8D with an Ishagowa wishbone!)
Ok, here is what my memory can come up with. After winter work which involved new dual exhaust, rebuilt TH350 trans with cut open inspected and cleaned converter, intake manifold gasket and 180F thermostat, new HEI Summit brand distributor and new spark plug wires for HEI setup and a new rebuilt carb from Ken at Everyday Performance.
Car started and ran well enough considering that the timing and fuel had not been adjusted yet. But after adjusting, it seemed to have a dead spot around the 1000-1100 RPM range which was found while doing the timing. The problem is worse in gear - the slightest touch of the gas causes the car to choke and stumble. Various settings of base timing and vacuum advance, ported or manifold, really seemed to help. Car also typically requires a restart - after initial start it stalls out after a few seconds and needs to go again.
1. Choke operation checked out and is working correctly. Fully closed when gas pedal pushed and choke set, opens slightly when running cold, then gradually opens fully as it warms.
2. Thought it could be a bad fuel pump or fuel pressure related. Connected pressure tester and had 5.5 PSI at idle. Reving produced about 5.8 PSI. From what I gather these numbers are good so we moved on.
3. Unplugging plug wires while idling produced some strange results so it seemed like an ignition misfire. Some plug wires made a large difference, others made little to no difference. Oddly enough, the ones that seemed healthy and amount of ones that seemed healthy changed from day to day. Plug wires were resistance tested and tested with timing light and seem fine. I also bought a new plug wire to try and see if it made a difference, it did not. Plugs themselves were also tested and checked out. All this appeared to point to a distributor issue, especially since last year with the old points system it didn't have this issue, even though the old distributor was confirmed to be worn out.
4. Changed ignition module with the thermal paste. No difference.
5. Started looking around distributor for issues. The rotor had about 1/8" up/down movement and no side to side movement. Recall when first started and tie down bolt only snug to allow for adjustment, it had a wobble to it as it ran. After it was snugged up and loosened the next time it seemed to have disappeared, but still probably wasn't a good thing. Also noticed that the distributor when fully seated and secured sat at an angle where it was lower on the passenger side. Also found the three loose screws under the weights inside the distributor. All of this killed any confidence I had in the distributor so it has been sent back and a Pertronix Flame-Thrower model should be here Friday.
6. Timing chain slack was checked and has about 3-4* of slack. Not great, but shouldn't be causing these issues.
7. Checked secondary clock spring tension/adjustment. This made no noticeable difference, but I think that may be because I can't even touch the gas without problems. From what I understand this is for helping the car get into the secondaries which I am nowhere near doing yet.
8. Took off negative battery cable to engine block connection. Cleaned up and reinstalled. The mesh type grounding strap from cylinder head to fire wall looks old and ratty. Have bought a new one to replace it. It is a lot wider than the original but I don't know that you can over ground something so I think it should be fine.
Other notes:
-Can put hand over carb while idling and it doesn't speed the RPM up and smooth out like last year, so hopefully vacuum leak is gone. I have done the propane test and carb cleaner test, both seem to check out.
-Vacuum at idle depending on timing settings is steady between 16.2"-17.2". Another user here posted some useful info showing the typical vacuum for this year and engine is between 16"-17.5".
-Car has varying degrees of operation, in terms of how well it works. Typically it is not good, but there have been a couple of times it starts nice, and drives very nice for 10-15 minutes, then stumbles so bad it gets limped back home hesitating so bad it feels like it is going to backfire or something.
-Car does have gas from last year with fuel stabilizer in it. This is the first winter storing this car for me, but this same stabilizer has always been used in the other summer cars and I have never had any issues. This is the oldest car I have stored in a while, are they more sensitive to old gas?
I think that should about sum it up. I am hopeful this new distributor fixes it. If everything goes as planed I should know by Saturday morning.
Last edited by 71OldsCut; Jun 12, 2019 at 03:36 PM.
Ok, here is what my memory can come up with. After winter work which involved new dual exhaust, rebuilt TH350 trans with cut open inspected and cleaned converter, intake manifold gasket and 180F thermostat, new HEI Summit brand distributor and new spark plug wires for HEI setup and a new rebuilt carb from Ken at Everyday Performance.
Car started and ran well enough considering that the timing and fuel had not been adjusted yet. But after adjusting, it seemed to have a dead spot around the 1000-1100 RPM range which was found while doing the timing. The problem is worse in gear - the slightest touch of the gas causes the car to choke and stumble. Various settings of base timing and vacuum advance, ported or manifold, really seemed to help. Car also typically requires a restart - after initial start it stalls out after a few seconds and needs to go again. Sounds fuel related...Carb. May want to call carb guy to inquire.
1. Choke operation checked out and is working correctly. Fully closed when gas pedal pushed and choke set, opens slightly when running cold, then gradually opens fully as it warms. Good here.
2. Thought it could be a bad fuel pump or fuel pressure related. Connected pressure tester and had 5.5 PSI at idle. Reving produced about 5.8 PSI. From what I gather these numbers are good so we moved on. Good pressure.
3. Unplugging plug wires while idling produced some strange results so it seemed like an ignition misfire. Some plug wires made a large difference, others made little to no difference. Oddly enough, the ones that seemed healthy and amount of ones that seemed healthy changed from day to day. Plug wires were resistance tested and tested with timing light and seem fine. I also bought a new plug wire to try and see if it made a difference, it did not. Plugs themselves were also tested and checked out. Good here... All this appeared to point to a distributor issue, especially since last year with the old points system it didn't have this issue, even though the old distributor was confirmed to be worn out. Could temporarily install that system to split the dictionary, but the new HEI is coming.
4. Changed ignition module with the thermal paste. No difference. The module is good. Now you have a spare.
5. Started looking around distributor for issues. The rotor had about 1/8" up/down movement and no side to side movement. Normal Recall when first started and tie down bolt only snug to allow for adjustment, it had a wobble to it as it ran. Not Good wasn't fully seated into pump drive. Remove dist and inspect pump drive and gear on dist shaft. After it was snugged up and loosened the next time it seemed to have disappeared, but still probably wasn't a good thing. Inspect for damage? Also noticed that the distributor when fully seated and secured sat at an angle where it was lower on the passenger side. Also found the three loose screws under the weights inside the distributor. All of this killed any confidence I had in the distributor so it has been sent back and a Pertronix Flame-Thrower model should be here Friday.
6. Timing chain slack was checked and has about 3-4* of slack. Not great, but shouldn't be causing these issues. Right. Address in the future.
7. Checked secondary clock spring tension/adjustment. This made no noticeable difference, but I think that may be because I can't even touch the gas without problems. From what I understand this is for helping the car get into the secondaries which I am nowhere near doing yet. readdress once you get it running.
8. Took off negative battery cable to engine block connection. Cleaned up and reinstalled. Good practice. The mesh type grounding strap from cylinder head to firewall looks old and ratty. Have bought a new one to replace it. It is a lot wider than the original but I don't know that you can over ground something so I think it should be fine. More is not bad with grounds.
Other notes:
-Can put hand over carb while idling and it doesn't speed the RPM up and smooth out like last year, so hopefully, a vacuum leak is gone. Agreed. I have done the propane test and carb cleaner test, both seem to check out.
-Vacuum at idle depending on timing settings is steady between 16.2"-17.2". Another user here posted some useful info showing the typical vacuum for this year and engine is between 16"-17.5". 16 is a little low but the idle circuit has enough of a vac signal to work OK. Its when you dip into the 10, 9 Hgs then you have to tune the carb for a low signal.
-Car has varying degrees of operation, in terms of how well it works. Typically it is not good, but there have been a couple of times it starts nice, and drives very nice for 10-15 minutes, then stumbles so bad it gets limped back home hesitating so bad it feels like it is going to backfire or something. Humm this could go either way but Id say electrical first.
-Car does have gas from last year with fuel stabilizer in it. This is the first winter storing this car for me, but this same stabilizer has always been used in the other summer cars and I have never had any issues. This is the oldest car I have stored in a while, are they more sensitive to old gas? Don't do any major tuning until fresh fuel is in the tank. Id drain it and refill with fresh now before going any farther even before installing the new dist.
I think that should about sum it up. I am hopeful this new distributor fixes it. If everything goes as planned I should know by Saturday morning.
Good recap. This method will often ferret out items overlooked. At a minimum get us back into a logical direction.
Give the current HEI a good visual inspection. Spin it inspect the gear and the pump engagement etc...
Thanks for all the feedback. Doing the recap also helped jog my memory to things I had forgotten about. I have burned off about half a tank off the gas. I will get some fresh stuff in there. I am still hopeful that it was just a bad distributor. I am going to make sure that the area it sits is nice and clean (trying not to let any crap fall in the engine) and be absolutely sure it is fully seated before the initial start up. Being the first time I have changed one maybe it initially wasn't full seated and it did damage something. Hopefully the cam gear is OK. The distributors gear material says it was safe for the cam shaft in this car so hopefully all is good there.
Anyway, I will post an update once the new one is in and go from there.
Trying to get the new distributor in. It doesn't seem to want to line up exactly where the old one was. With the housing in and pointing to my mark, the rotor is always either just past or just before it's mark. Is this normal when switching brands? Is it really that big of a deal or can this just be adjusted with the timing once running? I thought it had to be exact because the rotor is basically connected to the cam so if it is off by a tooth won't in screw everything up?
If that is not the case, would it be better to have it be a little too far one way or the other (clockwise vs counter-clockwise)? I just want to be sure I get this right so it is either fixed, or distributor can be ruled out. Perhaps I screwed this up the first time....
My neighbor happened to stop by and I asked him. He said it wouldn't hurt anything if I was off a tooth one way or the other, it would just run bad. So, I hooked everything back up and fired it up. It ran rough at first, as expected, but after adjusting the timing it was running pretty good. I was also able to wind the fuel screws in. They used to have to be 5-6 turns out, now I am at about 3.5 turns out.
By the time I got all this done I wanted to just take my win and go eat so I took it for a 10 minute drive just to see how it works and it seems good. Well, after I pulled over to connect the trans vacuum line, lol. But to me that is even a good sign, that with a manifold port wide open it still ran half decent and wasn't hesitating like it did before. After I pulled over and hooked that back up it ran quite well. Stumble and hesitation is gone. I still think it is a little sluggish, but I think a good round of timing, fuel adjustment and ported VS manifold vacuum testing should get it right.
This distributor also came with its own different weight springs as well as a much more detailed set of instructions and numbers. The vacuum is factory set at 16* and every turn takes 2* out or adds 2*. I left it at 16* plugged into manifold vacuum, base timing is about 16* and the medium weight springs it came with are in right now. The mechanical advance says it adds 23* at varying RPM depending on springs.
Another very nice sign is that it no longer gasses me out of the garage. Before the exhaust seemed to burn the eyes and soak into the clothes really bad. Now it is not a strong smell at all.
Thanks to all for the great help and suggestions to get this problem figured out. I will let you know how the timing goes and possibly have a few more questions there, but I think the worst is over.