
balancer diameter

Thread Starter
Registered User
Joined: Aug 2013
Posts: 3,900
From: Central Illinois
I'd like to get a timing tape for the '71 350 but I can't measure the damper's diameter directly without unbolting the pulley. I used the wife's flexible sewing tape measure and I get 20.5" for the circumference. Divide that by 3.14159 and I get 6.5253". Does that sound right? I can't find a tape for a 6-1/2" damper, only a 6". Is the panty (that's what it says on the back of the tape  ) measuring tape inaccurate?
Thanks folks
) measuring tape inaccurate?Thanks folks
Registered User
Joined: Jun 2010
Posts: 3,613
From: Rogues Island, USA
I ran into this same problem years back. You can do a couple things.
1) Use the short tape and fudge it knowing that the reading you see is actually less than actually. (Not reall happy with that)
2) Take your 20.5 inches and divide it into 360 and remark the damper as needed. Each inch being 17.6 degrees and every half inch being 8.8 degrees, etc. I did this using a hacksaw blade. It takes some finesse. Obviously the more accurate you are with measuring the damper circumference and marking off the degrees the better.
Old(s) Fart
Joined: Mar 2007
Posts: 50,770
From: Northern VA
No, the world is Chevy-centric.
You can get MSD p/n 8985, which is a series of 0-90 deg tapes for different balancer diameters.
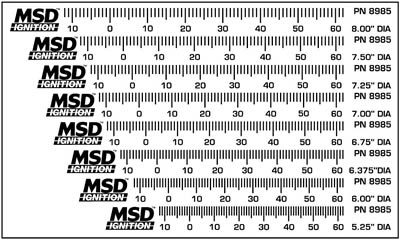
Unfortunately, you'll note that the set does not include 6.5". I ran some numbers. If you use the 6.375" tape, at 40 deg indicated, your Olds will actually be at 39.2 deg. At 80 deg indicated, it's 78.5 deg actual.
You can get MSD p/n 8985, which is a series of 0-90 deg tapes for different balancer diameters.
Unfortunately, you'll note that the set does not include 6.5". I ran some numbers. If you use the 6.375" tape, at 40 deg indicated, your Olds will actually be at 39.2 deg. At 80 deg indicated, it's 78.5 deg actual.
Registered User
Joined: Feb 2013
Posts: 15,395
From: Phoenix, AZ
2) Take your 20.5 inches and divide it into 360 and remark the damper as needed. Each inch being 17.6 degrees and every half inch being 8.8 degrees, etc. I did this using a hacksaw blade. It takes some finesse. Obviously the more accurate you are with measuring the damper circumference and marking off the degrees the better.
The good thing is those paint marks have survived over 20 years whereas that timing tape flew off on day 1.
Thread Starter
Registered User
Joined: Aug 2013
Posts: 3,900
From: Central Illinois
Yeah, I thought about using my fine point white marker on black tape but I was afraid it wouldn't stick. The MSD was under $5 on eBay with free shipping so that works. I think I can compensate. Thanks for the calculations Joe.
Thread Starter
Registered User
Joined: Aug 2013
Posts: 3,900
From: Central Illinois
I ran into this issue, too, but I didn't know then (pre-internet days) that the tape was the wrong size. Didn't really matter too much as the tape flew off on the first couple of 5500 RPM pulls.
I did a similar thing but used white paint to mark lines on the balancer at 10�, 20�, 30�, and 40�. Then I could use the 30� line along with the timing tab's 2� increments to get an accurate reading of the total advance.
The good thing is those paint marks have survived over 20 years whereas that timing tape flew off on day 1.
Connoisseur d'Junque
Joined: Sep 2010
Posts: 21,183
From: The Hudson Valley
Mac, e-mail me and I'll send you a pdf file I made up of a timing tape.
Just set your printer to print "actual size" and print it out.
The damper circumference is 20 7/16", for a distance of 0.0568" or 1.44mm per degree.
Therefore,
20� = 28.8mm
30� = 43.3mm
35� = 50.5mm
40� = 57.7mm, and
50� = 72.1mm

- Eric
Just set your printer to print "actual size" and print it out.
The damper circumference is 20 7/16", for a distance of 0.0568" or 1.44mm per degree.
Therefore,
20� = 28.8mm
30� = 43.3mm
35� = 50.5mm
40� = 57.7mm, and
50� = 72.1mm
- Eric


Thread
Thread Starter
Forum
Replies
Last Post


