
403 Olds timing chain cover
 November 26th, 2016, 05:28 PM
#1
Registered User
Thread Starter

Join Date: Nov 2013
Location: Michigan
Posts: 18
403 Olds timing chain cover
I could use some help. I'm trying to get the timing chain cover back on my 403 and having no luck. I've loosed the first 3 bolts on each side of the oil pan but just can't get the seal to go in. There is a rubber mallet sized hole in my drywall to prove how frustrated I am. The engine is in the car. Please post any tips you may have. Thanks
 November 26th, 2016, 06:04 PM
#2
Registered User

Join Date: Jun 2009
Location: Palm Bay, FL
Posts: 4,249
You might need to loosen more bolts down both sides of the oil pan to get it in. The last thing that you want to do is to force a seal in place. All you'll end up doing is to tear the seal and end up having to replace it again. That is the last thing you want to deal with on the timing cover.
November 26th, 2016, 09:43 PM
#4
Registered User
Join Date: Jun 2009
Location: Palm Bay, FL
Posts: 4,249
If you are getting a complete set you might want to get an oil pan set instead and just drop the pan. That would be a mild pain, but would make installing the cover much easier and at the same time make sure the pan doesn't leak.
November 27th, 2016, 05:40 AM
#5
Out of Line, Everytime😉
Join Date: Dec 2006
Location: Melville, Saskatchewan
Posts: 9,139
Quite often the bottom seal needs trimmed and use RTV on it, acts as a lubricant and helps seal. Joe P removed a dowel pin which helped the install, just getting it out is another story.
 November 27th, 2016, 07:35 AM
#6
Old(s) Fart
Join Date: Mar 2007
Location: Northern VA
Posts: 48,229
Joe P removed a dowel pin which helped the install, just getting it out is another story.
 The pin was stuck in the front cover and came out with it. This DID make reinstallation easier, though.
I've found that it can help to use long tapered alignment punches in a couple of the bolt holes to lever the seal down into the oil pan opening, allowing you to get the dowel pins into the holes in the cover. Once you get the bolts started, you can pull it in to place.
November 27th, 2016, 09:54 AM
#7
Out of Line, Everytime😉
Join Date: Dec 2006
Location: Melville, Saskatchewan
Posts: 9,139
Not just "quite often", but all the time.
Unfortunately, that wasn't intentional. The pin was stuck in the front cover and came out with it. This DID make reinstallation easier, though.
I've found that it can help to use long tapered alignment punches in a couple of the bolt holes to lever the seal down into the oil pan opening, allowing you to get the dowel pins into the holes in the cover. Once you get the bolts started, you can pull it in to place.
Unfortunately, that wasn't intentional.
The pin was stuck in the front cover and came out with it. This DID make reinstallation easier, though.I've found that it can help to use long tapered alignment punches in a couple of the bolt holes to lever the seal down into the oil pan opening, allowing you to get the dowel pins into the holes in the cover. Once you get the bolts started, you can pull it in to place.
November 28th, 2016, 10:39 PM
#8
Registered User
Thread Starter
Join Date: Nov 2013
Location: Michigan
Posts: 18
I plan to try to install the cover tomorrow. I have removed the first three pan bolts and loosened three more. Hopefully this is enough to get the pan to move far enough to get the cover in place. If not I will loosen more. The fourth ones were the hardest since they are above the axle and not easily accessed. We shall see. Wish me luck.
November 29th, 2016, 08:33 PM
#9
Registered User
Thread Starter
Join Date: Nov 2013
Location: Michigan
Posts: 18
Was able to get the cover on today. I was a little confused by the torque specs. Read that 35# for the cover bolts and 13# for the water pump. But some of the water pump bolts secure the cover. There are 4 water pump bolts that screw directly into the front cover only and some go into the block. I tightened the bottom 4 bolts that don't go through the water pump to 35 and all the ones that go through the water pump to 13. Does that seem right? I think it does but not 100%
November 29th, 2016, 08:39 PM
#10
Registered User

Join Date: Sep 2010
Location: Norfolk, Va
Posts: 1,445
Never tried this on an Olds , but it worked on a F**d 351M400. Trimming the ends of the seal retainer like in the picture below will make it a lot easier to put back in.
TimingCoverTrim-1.jpg
TimingCoverTrim-1.jpg
Last edited by cjsdad; November 29th, 2016 at 08:42 PM.
November 30th, 2016, 07:34 AM
#11
Old(s) Fart
Join Date: Mar 2007
Location: Northern VA
Posts: 48,229
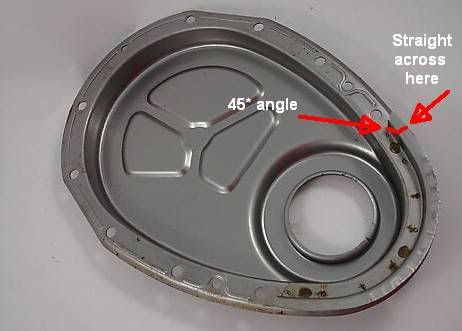
1) You MUST trim the wings of the rubber bottom seal that are supposed to be sandwiched between the block and the oil pan in a "normal" installation. Just goop those corners with RTV.
2) The rubber seal itself is normally compressed by the oil pan when the pan is installed second (as when assembling the engine on a stand). Unfortunately, the two dowel pins that align the front cover are very tight (otherwise they'd be worthless as dowel pins) and have square corners, not bevels. This forces you to somehow compress the rubber seal against the oil pan to align the dowel pins with the holes in the front cover. This is the big problem with cover reinstallation. This is why I suggested using tapered alignment punches to "lever the cover down to compress the seal while trying to align the dowel pins. Of course, doing this requires the cover to be at an angle due to the pins sticking out, which makes it even more difficult to get the pins started.
November 30th, 2016, 07:43 AM
#12
Old(s) Fart
Join Date: Mar 2007
Location: Northern VA
Posts: 48,229
Was able to get the cover on today. I was a little confused by the torque specs. Read that 35# for the cover bolts and 13# for the water pump. But some of the water pump bolts secure the cover. There are 4 water pump bolts that screw directly into the front cover only and some go into the block. I tightened the bottom 4 bolts that don't go through the water pump to 35 and all the ones that go through the water pump to 13. Does that seem right? I think it does but not 100%
The four 3/8" bolts at the bottom of the cover get torqued to 35 ft-lb.
The four 1/4" self tapping bolts that ONLY hold the water pump to the front cover get torqued to 13 ft-lbs. DO NOT OVER-TIGHTEN THESE!!!
The four 5/16" bolts that hold the water pump to the BLOCK get torqued to 25 ft-lbs.
As always, the info is right in your Chassis Service Manual:
 November 30th, 2016, 10:37 PM
#13
Registered User
Thread Starter
Join Date: Nov 2013
Location: Michigan
Posts: 18
Thanks Joe Padavano. That really helped. I have a copy of the service manual on CD. I have a hard time finding anything on there. I looked and was unable to find the picture you posted on my CD. I have a Haynes manual and that information is not in there.
Last edited by geeves; November 30th, 2016 at 11:04 PM.
December 1st, 2016, 05:43 AM
#14
Old(s) Fart
Join Date: Mar 2007
Location: Northern VA
Posts: 48,229
CSMs are year and sometimes model specific. You can easily find originals on ebay. Depending on the year, there may be a separate electrical manual also.

Thread
Thread Starter
Forum
Replies
Last Post
dallasite21
General Discussion
2
June 20th, 2010 05:37 AM


