
Gauge and Stereo Housings
 June 7th, 2015, 02:39 PM
#81
Registered User
Join Date: May 2015
Posts: 2
Ok, I just got done installing the housing, radio and the gauges. I think it came out great. The housing Randy makes is a first class piece, looks very nice and it's very well made. Thanks Randy.
[IMG]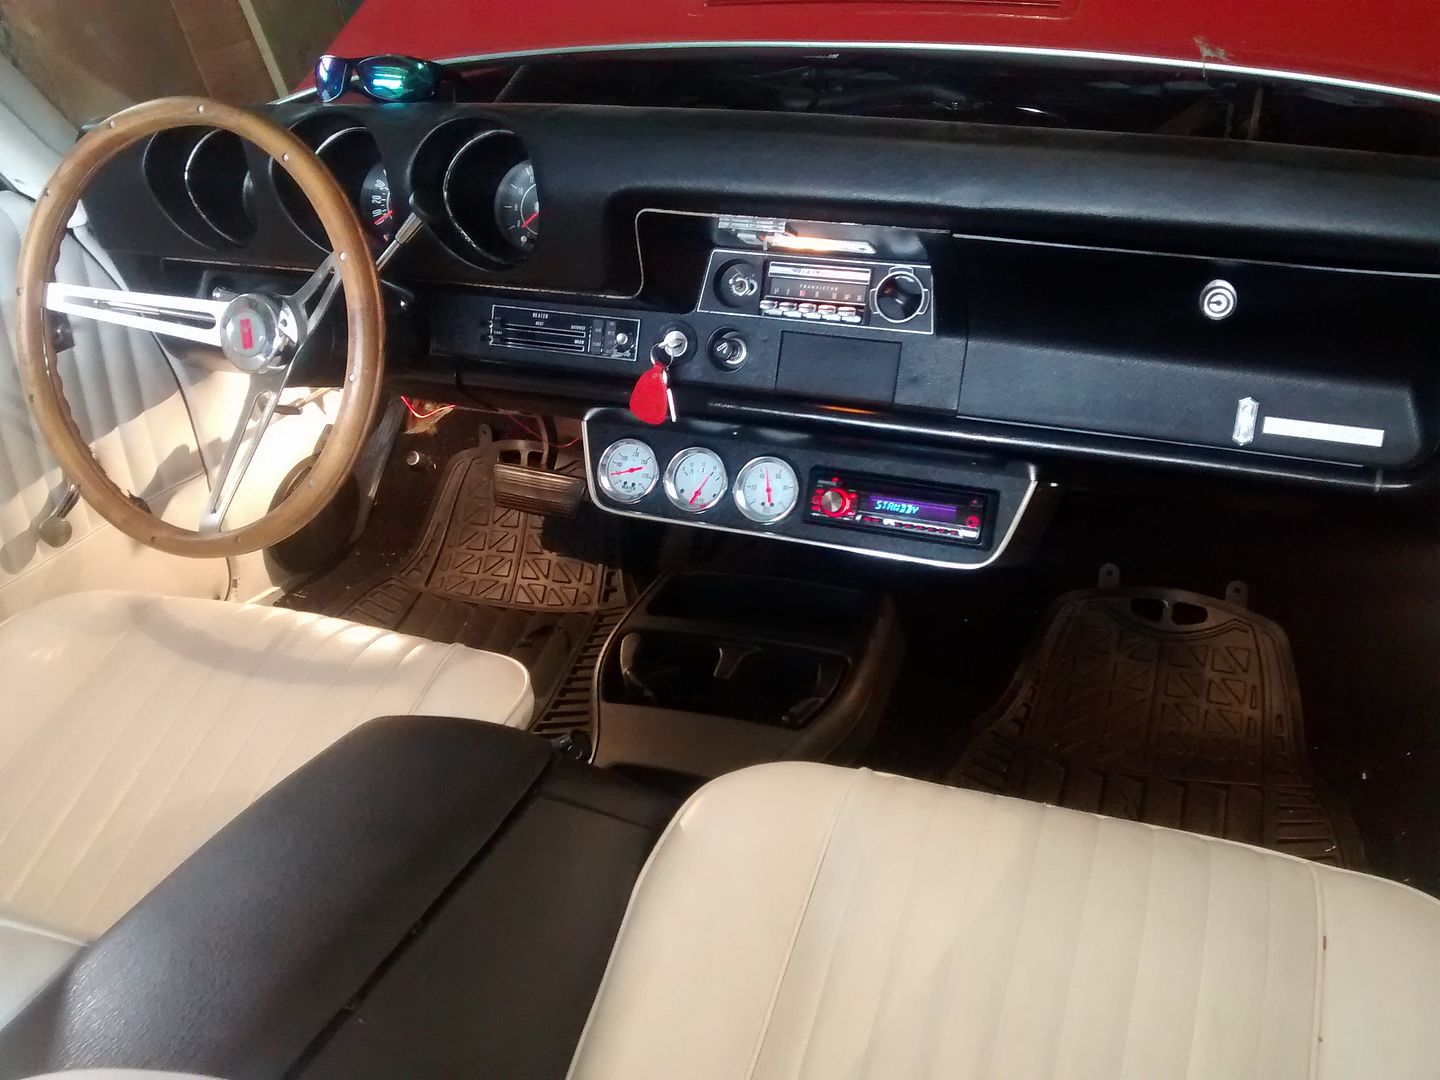 [/IMG]
[IMG]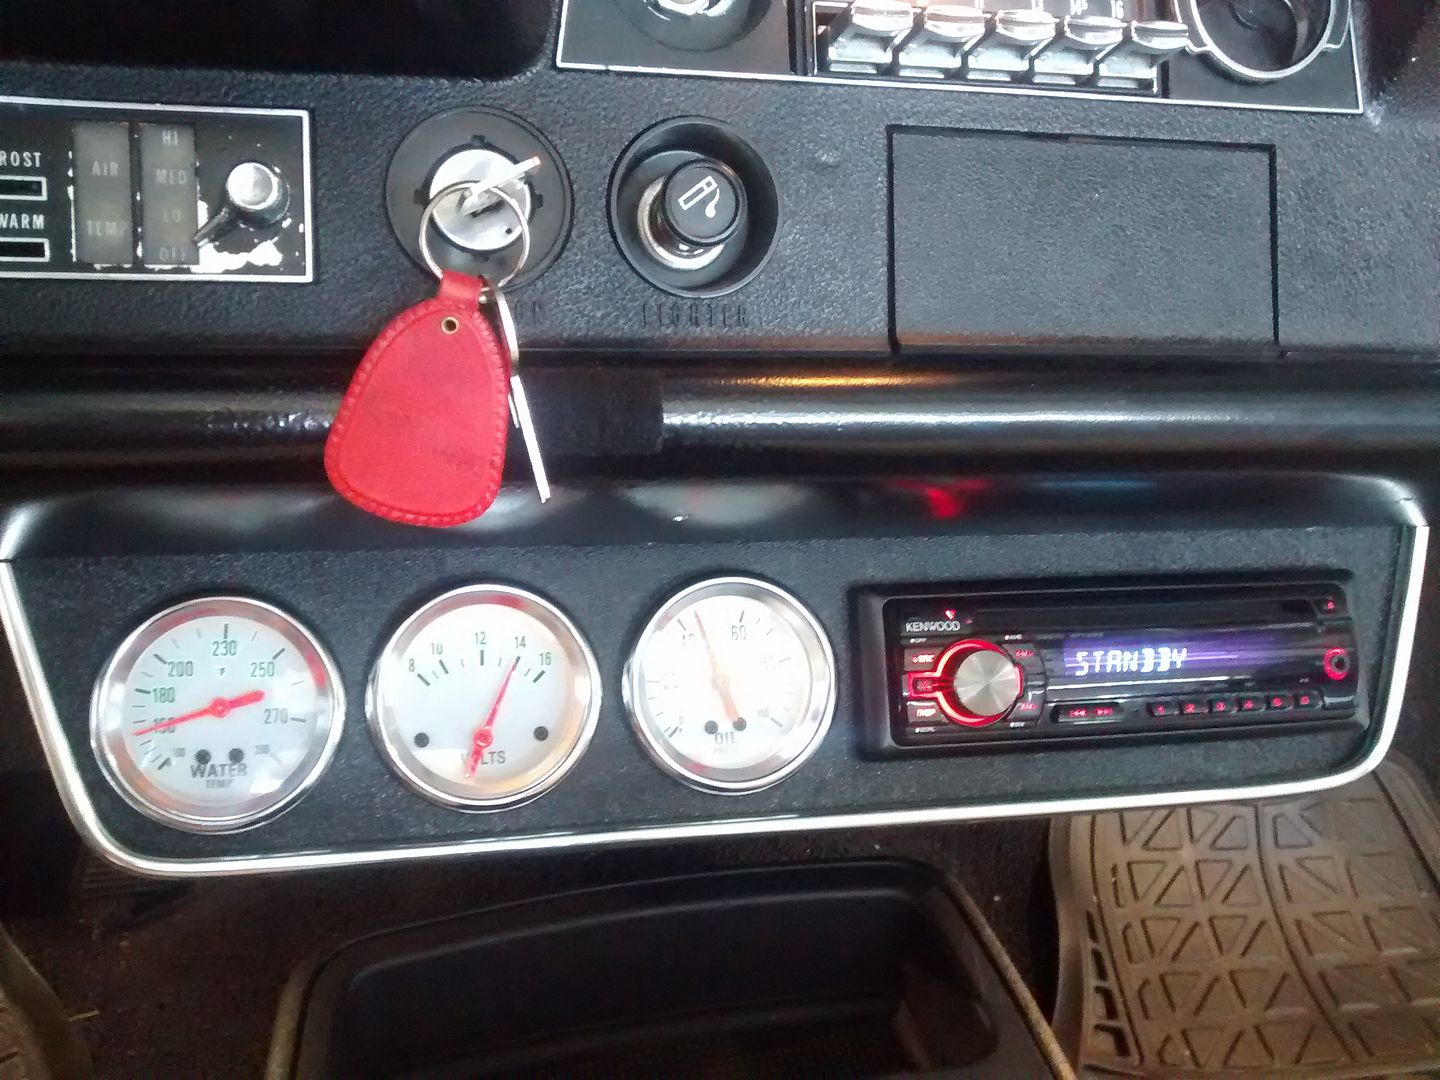 [/IMG]
Now I just have to tidy everything up under the dash and tie up some wires. All gauges work great too.
Picture below is the sloppy setup installed by the previous owner. The new center console in above pics is from a 2001 Dakota pickup, slight modification and now fits great. It has a 12V outlet inside too.
[IMG]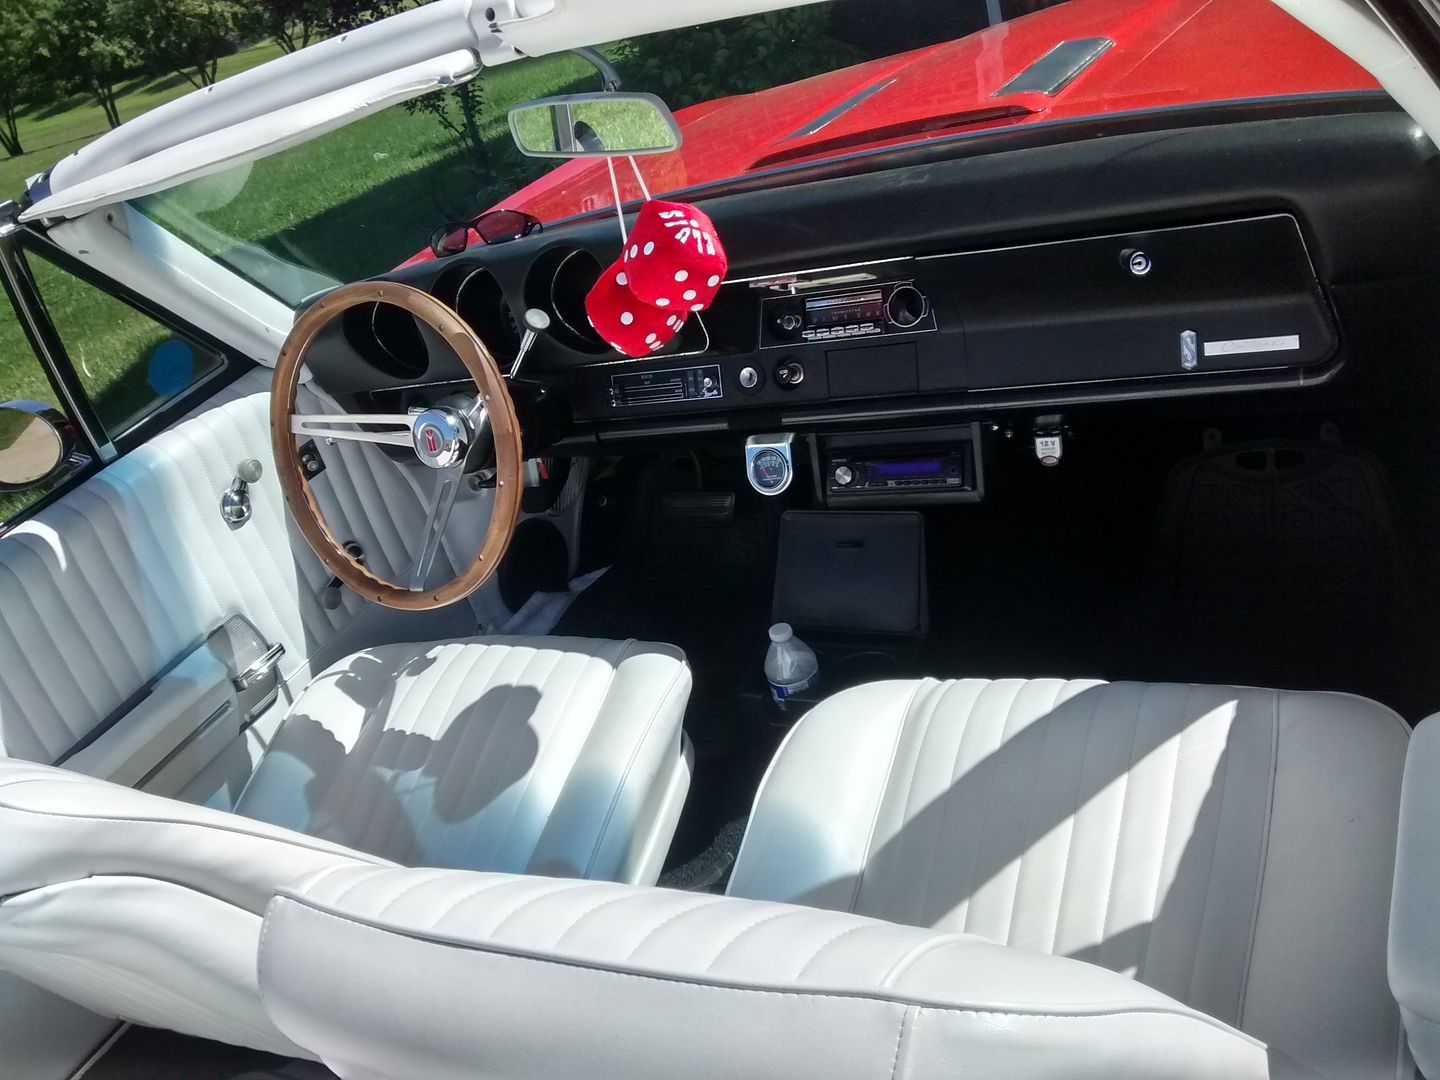 [/IMG]
[IMG]
 [/IMG]
[IMG]
 [/IMG]
Now I just have to tidy everything up under the dash and tie up some wires. All gauges work great too.
Picture below is the sloppy setup installed by the previous owner. The new center console in above pics is from a 2001 Dakota pickup, slight modification and now fits great. It has a 12V outlet inside too.
[IMG]
 [/IMG]
Last edited by Nojodas67; June 7th, 2015 at 02:49 PM.
 June 7th, 2015, 02:51 PM
#82
Registered User
Join Date: May 2015
Posts: 2
Oh...in case anyone is interested, I found the gauges on Ebay: http://www.ebay.com/itm/331111860589...%3AMEBIDX%3AIT
July 27th, 2015, 02:45 PM
#83
Registered User
Join Date: Jul 2014
Posts: 21
Just a quick shot out to Randy!!!! He made me a faceplate so i could mount my stereo inside of my glove box. He was great to work with and very reasonably priced. I finally had the chance to mount my stereo and I could be happier! I will try to post pics later.
THANKS AGAIN RANDY
THANKS AGAIN RANDY
August 22nd, 2015, 08:08 PM
#84
Registered User
Thread Starter

Join Date: Dec 2009
Location: KY
Posts: 390
custom gauge and stereo housing
Ok, I just got done installing the housing, radio and the gauges. I think it came out great. The housing Randy makes is a first class piece, looks very nice and it's very well made. Thanks Randy.
Now I just have to tidy everything up under the dash and tie up some wires. All gauges work great too.
Picture below is the sloppy setup installed by the previous owner. The new center console in above pics is from a 2001 Dakota pickup, slight modification and now fits great. It has a 12V outlet inside too.
Nojodas67,
Thank you for the kind words. Was happy to help. I'm proud to contribute to such a nice car. Look's like you've got it all buttoned up. Looks great!
Thanks again,
Randy
August 22nd, 2015, 08:16 PM
#85
Registered User
Thread Starter
Join Date: Dec 2009
Location: KY
Posts: 390
glove box stereo face plate
Just a quick shot out to Randy!!!! He made me a faceplate so i could mount my stereo inside of my glove box. He was great to work with and very reasonably priced. I finally had the chance to mount my stereo and I could be happier! I will try to post pics later.
THANKS AGAIN RANDY
THANKS AGAIN RANDY
Hey Scotty,
Glad to hear it fits your car well. I'm hoping you meant to say that you "couldn't" be happier.

Please do post up some pics of it installed. You know how the guys around here are about pics....
I uploaded a couple pics of the two versions I did installed in my car. One is like the one I did for scotty and one is the one I did for my car. I wanted to be able to still store my registration and 8 track tape etc in there. Instead of the face plate going straight up, it bends back to form a shelf.
20150621_040025.jpg
20150619_211852.jpg
Thanks again,
Randy
Last edited by W70442; August 22nd, 2015 at 09:12 PM.
 November 13th, 2015, 02:46 AM
#87
Registered User
Thread Starter
Join Date: Dec 2009
Location: KY
Posts: 390
Since I'm the person that made it, I was hoping someone else would chime in with an opinion or personal experience about this as I didn't want to sound biased. But since they haven't, I will say that I had my cd player in my glove box for years without any problem with the radio over heating. That was with it just sitting on a piece of foam. Since I made that plate for scottyr33, I made a version of one for myself where the face plate actually folds over the top of the stereo to make a shelf so I could still keep my registration etc in there. This would seem to further increase the chance of heat build up but I am happy to report that it has been in there for a couple months now with no issues. Granted, I don't drive mine daily but I haven't had any problems with it overheating.
If there were an issue, like somewhere it gets really hot like Texas or Arizona, you could simply install a small dc operated fan in the glove box or mount it on the back side of the box to move air/heat out. I'd run the power separately from a keyed source and be sure to use a quality fan so as not to induce electrical noise into the stereo circuit.
Last edited by W70442; November 13th, 2015 at 02:51 AM.
November 18th, 2015, 07:09 PM
#89
Registered User
Thread Starter
Join Date: Dec 2009
Location: KY
Posts: 390
8 track wiring
Yeah, they stuck the front speaker wire in between the power and ground!? I guess it makes sense not to have power and ground next to each other. Anyway, here ya go....get comfortable. Let me know if you have any questions.
I've had pretty good luck getting the ones I've come across going but I'm not a service repair shop.
I will be glad to share what I know though.
*****************BENCH TESTING***************
If your plugs are still intact, this will be easy.
(When referring to male or female plugs, I mean the plastic part. Not the electrical connector.)
The three wires in the three pin female plug, a couple ground wires and the dark blue wire w/red stripe are all you need to hook up in order to bench test the player. It can be played by itself with out the radio involved.
In the three pin plug on the 8 track, the yellow wire is 12vdc, the black wire is ground and the center light blue wire is the front speaker wire.
The dark blue wire w/red stripe (male plug) is the rear speaker wire.
You’ll need to run a ground wire from the battery/power supply to the 8 track player’s chassis and the speaker or speakers.
Unless you are using a fused or circuit breaker equipped power supply, ALWAYS put a 10 amp fuse inline with the power or ground wire when bench testing. I've gotten players that have had the contacts on the main rotary switch fried because it had a dead short and they apparently didn't have it fused.
****************Installationin the car*************
The 8 track gets installed in line with or in between the car and the radio. To install the 8 track, unplug the male three pin plug from the radio and plug that into the three pin female plug on the 8 track. Then plug the three pin male plug from the 8 track into the radio. If your radio is a stereo unit or has the rear seat speaker option, plug the wire coming from the side of your radio(dark blue wire w/female plug) into the dark blue w/red stripe wire (male plug) from the 8 track. Then plug the dark blue w/white stripe wire (female plug) from the 8 track into the male plug from the rear seat speaker.
***************SERVICINGTHE UNIT*************
1. Clean the heads with a_lint free_cloth saturated with alcohol.
2. Clean and relube the track changing cam. (The wheel or round thing with spikes sticking out of it that turns when you push the "program" button). You can rotate it by hand by pushing the solenoid plunger in by hand and releasing it. On the wheel that rotates when you release the solenoid, clean and lube the surface that the cam follower/head changing arm rides on. On some 8 tracks, the cam follower is on the top side of the wheel and in other years it is on the bottom of the wheel. Clean and relube the surface that has the steps/different levels.
3. Before you do this step, note the orientation of the clear plastic "tape stripper" that is located on the top side of the player where the capstan shaft(tape drive shaft) is held between the two brass bushings. It goes in either way but only one way is correct. Hopefully, it’s in correctly now. I believe the little wing should be sticking out to the right as you look at it from the front. Turn player up side down and remove the 3 screws from the flat triangular shaped plate that holds the flywheel in place. Remove the flywheel and clean the shaft with alcohol. Again, that clear plastic tape stripper piece goes in a certain way. Pay close attention to how it’s sitting before you take the flywheel out.
4. Once the flywheel is out, remove the tape stripper and clean it with alcohol. This is the clear half tube shaped plastic piece that fits around the drive shaft. Also remove any bits of old tape stuck down in the capstan shaft hole and clean the brass bushings with alcohol.
5. Look at the capstan shaft on the flywheel and you'll see the area on the shaft on which the tape has been riding. Lubricate ONLY the area of the shaft BELOW the area on which the tape rides and the flywheel itself with #20 machine oil (3in1 oil). Do NOT apply oil to the shaft above the area on which the tape rides. Reinstall flywheel and install the drive belts. Reinstall the plate over the flywheel. If you put any oil on the upper brass bushing, it could run down the shaft and cause the tape become contaminated and slip.
6. Hook the player up to a battery(power source) and speakers on the bench. Use a 10 amp fuse inline with the power source or use a power supply with a circuit breaker.
7. There are 2 adjustments for the heads, azimuth and channel cross talk.
8. The channel cross talk adjustment screw is on top of the program selecting cam(the wheel that turns when changing tracks). Turning the screw moves the heads up and down to center them on the track.The Azimuth adjusting screw is accessed through a hole in the chassis on the right hand side of the player even(front to rear) with the heads. Turning this screw changes the angle at which the heads are positioned.
9. Play a known good tape and turn the channel crosstalk screw in both directions until you feel it is centered on the song/track it was playing before you turned the screw. As you turn it, the sound will get weaker, stop and turn back the other direction until the sound is at it’s loudest. You’ll go back and forth across the sweet spot several times till you’re happy it’s at it’s loudest. If you turn it too far, you’ll start to hear songs from another channel/track.
10. Once you have the channel crosstalk adjusted, turn the azimuth adjusting screw(through the right side of the player) in both directions listening for the maximum output (best sound). I’ve found that the best indicator is when you hear the symbols or high pitched sounds come in their best. Same deal as before, go back and forth till it sounds best to you.
11. Now the tedious part. Find a known good tape that has the time for each track printed on the label. Using a stop watch or clock with a second hand, play a track(doesn't matter which one) and time it. Compare the actual playing time to what is printed on the label. If it's off by more than 20 seconds over a 10 minute track, you can adjust the motor speed. The adjustment for the motor speed is different depending on what year player you have. The early players had a hole in the side of the motor casing itself. You have to remove the outer metal shield that surrounds the motor and then remove the piece of tape covering the hole on the motor. Remember which way the opening of the shield went and put it back the same way when it's time. The shield is there to reduce motor hum and the orientation of the opening between the two ends of the shield makes a difference. Once you get the tape covering the hole in the motor off, use a flashlight and slowly turn the shaft of the motor until you see a tiny phillips head screw appear inside the motor. Turning this screw is how you adjust the speed on this style/year of player. Make small adjustments. The later ones have an adjustment screw or pot on a circuit board on the under side of the player. It usually has "motor speed" or something similar printed on the board next to it. I adjust the speed and re-time it until I getit to within about 10 seconds per 10 minutes. The factory spec was 20 secondsover a 10 minute period.
I can perform this service for you for $89 + return shipping. Radio repair shops will want anywhere from $300 - $400 for this service. Please keep in mind, as mentioned above, I am not a repair shop and don’t have access to new replacement parts so I can not guarantee that I will be able to get a player working if it doesn’t currently work. I have had pretty good luck with them but my service is mainly for those players that work but need to be refurbished.
Randy
w70442@hotmail.com
Last edited by W70442; April 26th, 2020 at 09:04 AM.
November 18th, 2015, 09:15 PM
#90
72 Olds CS
Join Date: Jun 2011
Posts: 6,657
Wow great info thank you.
i will get after my stuff as time permits and post back w results,
I took apart an old home 8 track apart a while back and found the post the head rides on to change tracks was gummed up after a good cleaning it was back in working order, prior to that it played but would either change tracks as it warmed up or would only play either track 1 or 4.
appreciate the info/
February 11th, 2017, 09:23 AM
#91
Registered User
Join Date: Nov 2014
Location: Cincinnati, Ohio
Posts: 1,469


 February 15th, 2017, 10:00 AM
#95
Registered User
Join Date: May 2008
Location: Connecticut
Posts: 62
January 18th, 2018, 07:49 AM
#97
Beer Connoisseur
Join Date: Aug 2008
Location: Daly City, California
Posts: 2,091
Randy, do you still make these? please email me at olds.cutlass@yahoo.com.
January 18th, 2018, 10:10 AM
#98
Registered User

Join Date: May 2011
Location: Delta BC Canada
Posts: 3,688
Mine
I used one in my 1970 Cutlass W-31. Very happy with the product.
This W-31 was not ordered with the factory gauge package. My experience with the factory tach is that it is so far from accurate that it is not worth having and thus the Sun tach. I could have installed the factory gauge pod but really prefer to have modern accurate gauges. These housings allow an owner to install whatever they want and still give it a factory look.
This W-31 was not ordered with the factory gauge package. My experience with the factory tach is that it is so far from accurate that it is not worth having and thus the Sun tach. I could have installed the factory gauge pod but really prefer to have modern accurate gauges. These housings allow an owner to install whatever they want and still give it a factory look.
Last edited by oldsmobiledave; January 18th, 2018 at 10:23 AM.

 February 7th, 2018, 09:20 AM
#102
Registered User
Thread Starter
Join Date: Dec 2009
Location: KY
Posts: 390
Gauge and stereo housings
Hi Harvey,
I don't have a web site. You can reach me at w70442@hotmail.Com if you would like one.
Be glad to help if I can,
Randy
I don't have a web site. You can reach me at w70442@hotmail.Com if you would like one.
Be glad to help if I can,
Randy
February 27th, 2018, 06:49 AM
#104
Registered User

Join Date: Dec 2015
Location: Guthrie OK
Posts: 78
Gerald Nickels, I want to copy your 8 track facad with modern radio behind. Can you IM with info. Do you still have an 8 track front that can be modified for this?
 December 24th, 2018, 07:11 AM
#107
Registered User
Thread Starter
Join Date: Dec 2009
Location: KY
Posts: 390
Stereo housing
Merry Christmas,
Randy
April 16th, 2020, 06:52 PM
#109
Registered User

Join Date: Feb 2012
Posts: 1
3 gauge and single DIN radio housing / Burlwood
HI, I just saw your under dash housings.
I like the one with the three gauges and single DIN radio with the Burl wood face.
I also would consider just the single DIN version in Burl wood.
Could you please send me some info on these?
My email to use is redrumtwo@hotmail.com
Thanks, Ken.
I like the one with the three gauges and single DIN radio with the Burl wood face.
I also would consider just the single DIN version in Burl wood.
Could you please send me some info on these?
My email to use is redrumtwo@hotmail.com
Thanks, Ken.
February 6th, 2021, 02:01 PM
#111
Registered User
Thread Starter
Join Date: Dec 2009
Location: KY
Posts: 390
Stereo/gauge housings
March 5th, 2021, 08:59 AM
#112
Registered User

Join Date: Jul 2020
Posts: 9


Thread
Thread Starter
Forum
Replies
Last Post
W70442
Parts For Sale
69
January 25th, 2023 11:19 AM


