
Rebuild evap/vapor canister

Thread Starter
Registered User
Joined: Mar 2025
Posts: 43
From: Minnesota
Rebuild evap/vapor canister
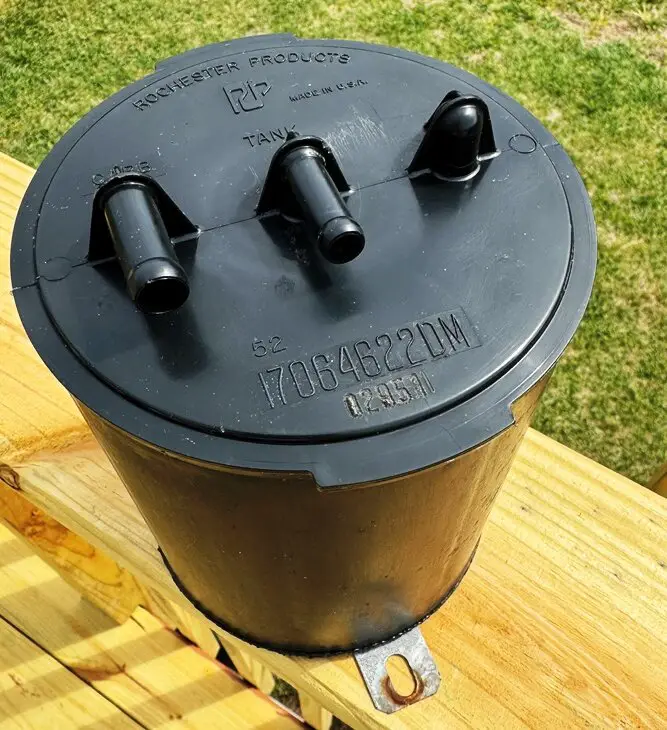
I purchased a '71 Cutlass convertible early this year and noticed that the vapor canister located at the passenger front part of the engine bay is disconnected. And, of course, the small garage always smells of fuel. There are no lines going to or from the unit and it is empty of charcoal. I'm assuming a line was once there from the gas tank somewhere, and the other port on the canister vented to the air, or perhaps into the intake or carb somehow. I just ordered a chassis manual as my assembly manual didn't show squat, so I assume I'll be able to figure out the plumbing.
My question is has anyone rebuilt one of these bad boys before? I saw some mention about folks simply cutting them open, putting in fish tank charcoal and cutting up various materials for filters. I'm getting tired of the smell, especially in winter when I want to work in the garage.
Thanks for reading...


Registered User
Joined: Jan 2010
Posts: 2,551
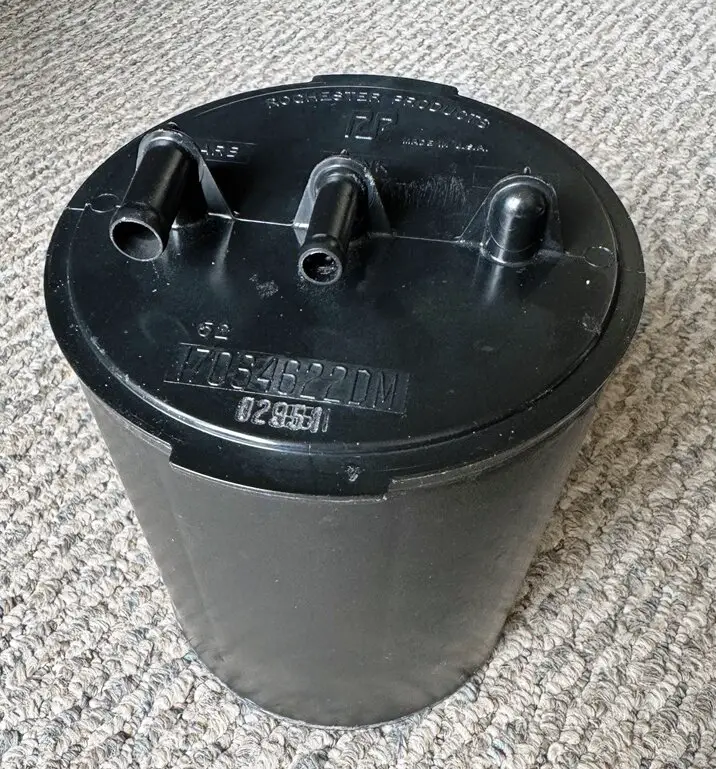
40 year old canister from an 85...I "restored" my original last year as the foam was breaking down and leaking carbon bits out the bottom. It's not HARD to do. Just tedious.
For the record, I went with the small granule carbon fish filter fill activated carbon. Was originally going to use the pellets. I think they wouldn't have as much surface area and GM chose small granules for a reason. Worked very well IMO.
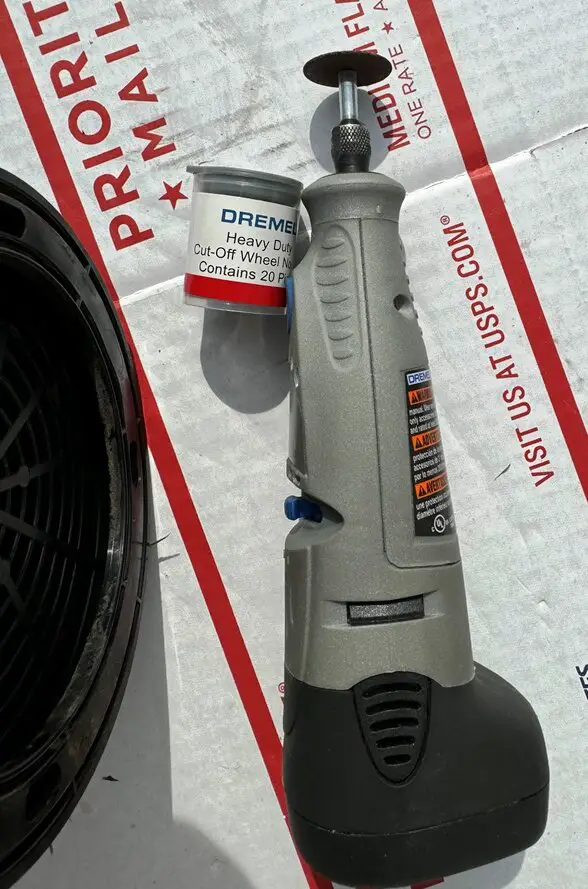
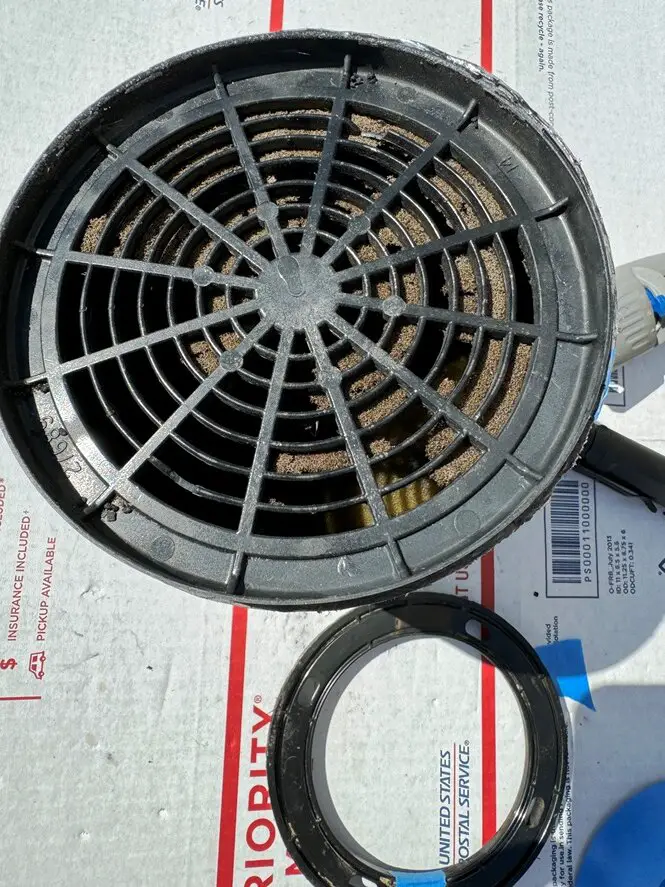
On the 85 version, it had a electric plastic welder seam on the bottom ring that holds the filter on the bottom. I started with a knife but it went MUCH quicker with a Dremel cut off wheel.
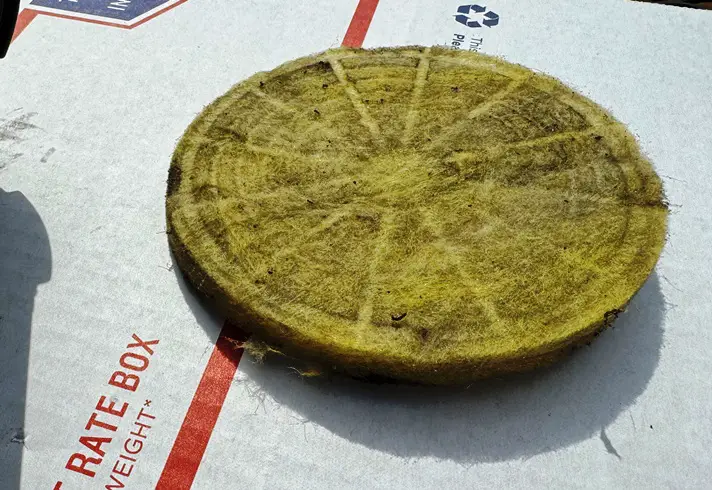
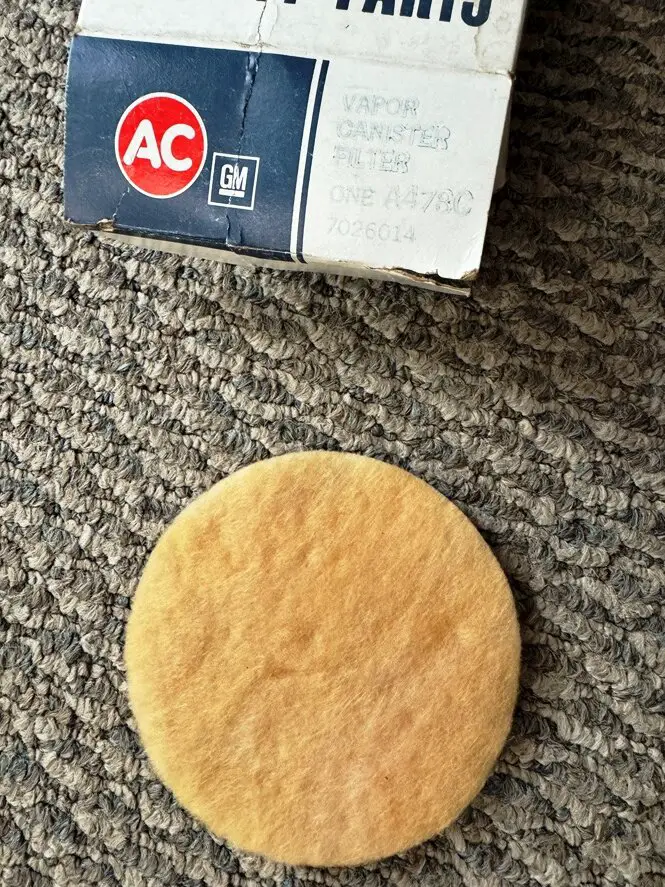
Bottom filter- original equipment.
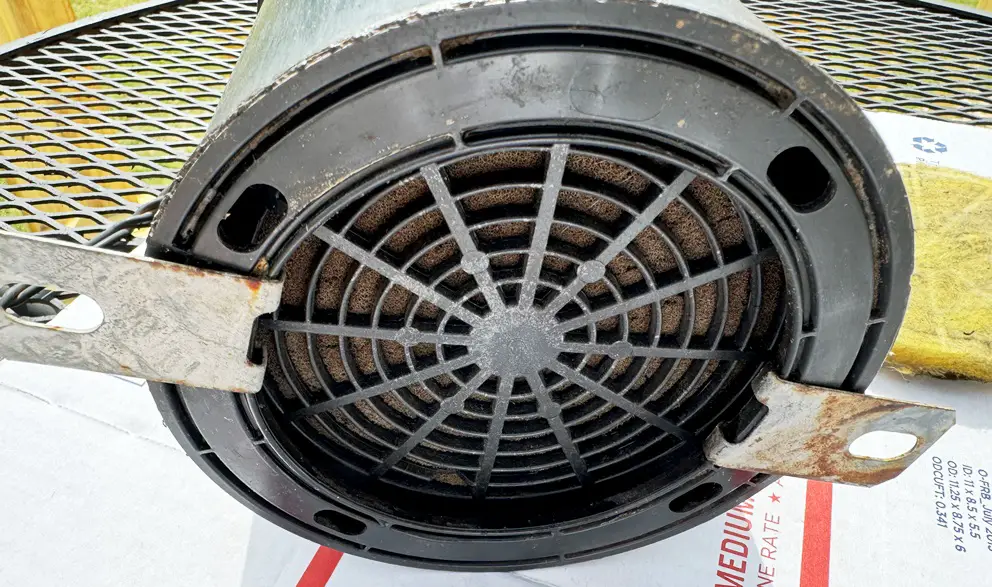
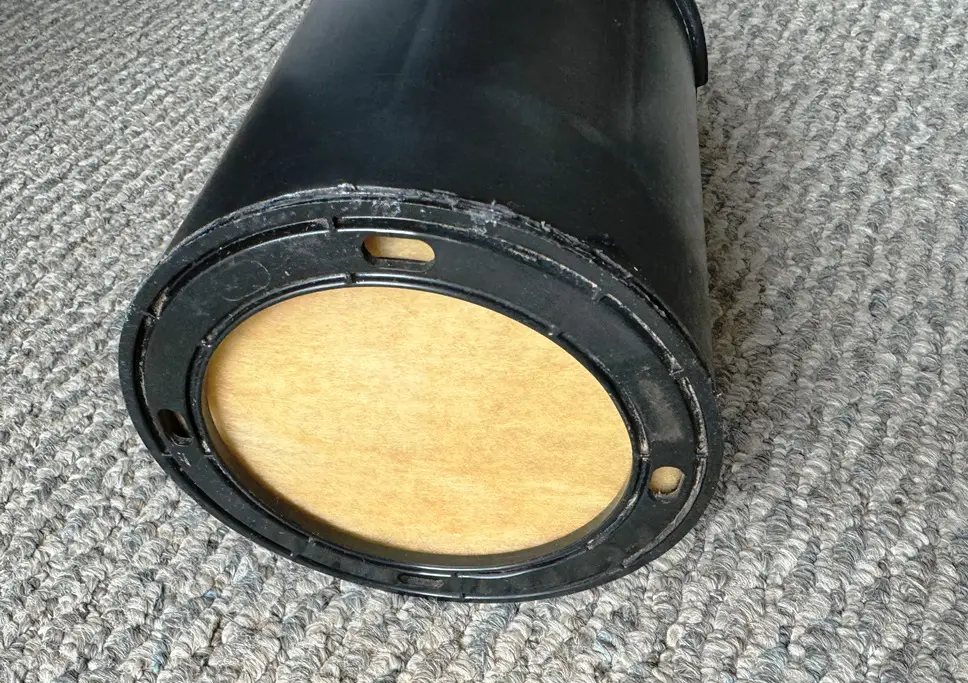
Bottom side with filter removed.
Use a Dremel cut off. It makes it much simpler. Don't hang around too long, it also heats up and melts the plastic if you stay in one spot forever. Quick passes, less melting. Ask me how I know.
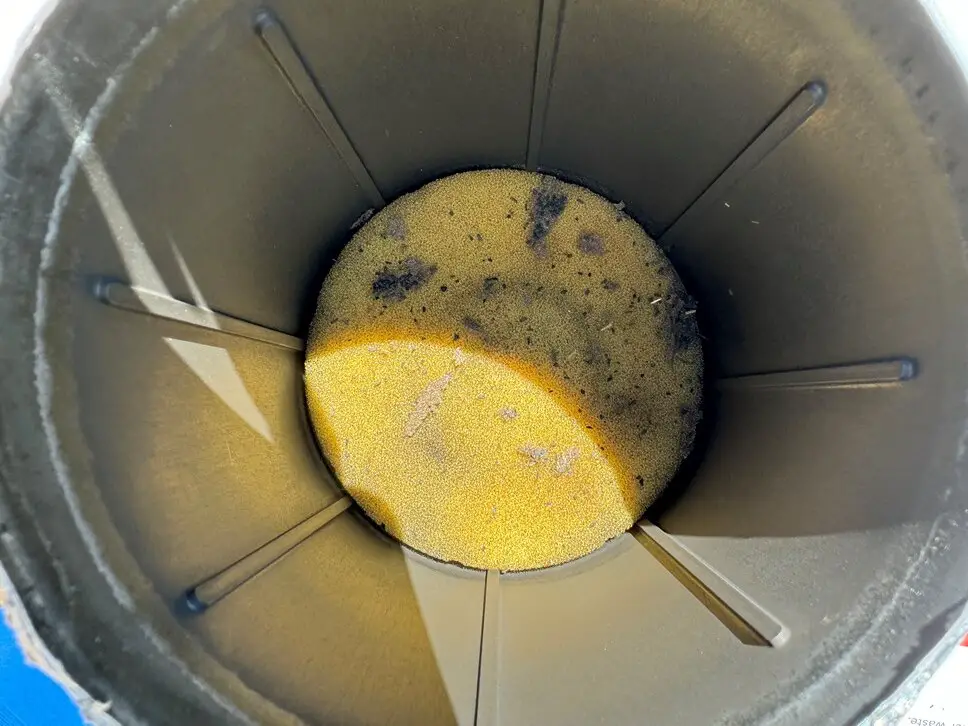
Once the filter ring was out of the way, the inner retainer wasn't bad to remove. I poked out the dried up foam retainer and poured out the carbon. I matched marked the canister and filter retainer that I cut off to ensure it went back together exactly as taken apart as the cuts may not be perfectly level.
What you're left with after removing the ring and carbon bits.
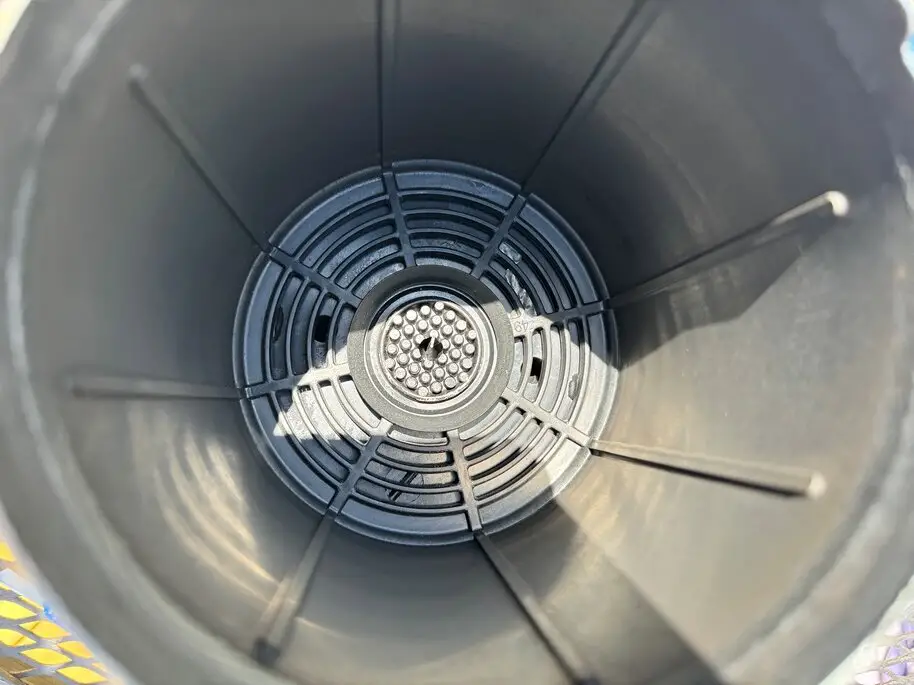
Remove the top foam and it leaves you empty....
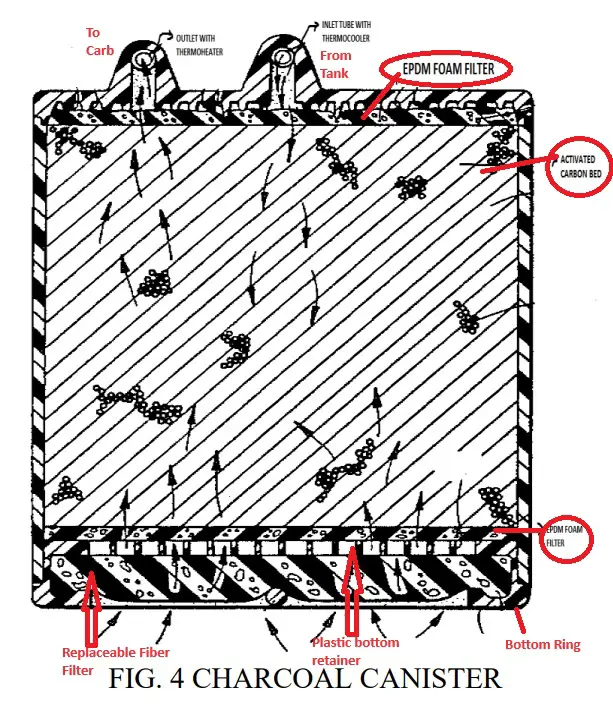
I got some EPDM foam from the Foam Factory. Any old foam may or may not work. 1/4" thick, 30ppi. (pores per inch). Plus some screens as backup in the event the foam ever fails. I got some screen door repair stuff for that. It did NOT affect air flow through the canister and it passed a gasoline soak test. I checked after taping the bottom back on temporarily after filling to ensure I could change things up in case it didn't pass the air puff testing. VERY light air pressure felt no issues. You do not want the upper foam to fail either, because if it does, it will suck that crap up into your carb. Again, ask me how I know. One screen goes in first, then the top foam retainer, the carbon fill, then the bottom foam retainer, and topped off by another screen disc. Then the gross plastic retainer disc can be slid into place. Need to add enough carbon to make the plastic foam retainer be in the same spot as it was to begin with. Then you can glue on the bottom ring. The screens are there for nothing more than a last resort backup.
The canister is either polypropylene or polypropylene or polyethylene. Which means epoxy may not work. So I got this, and it did a great job.
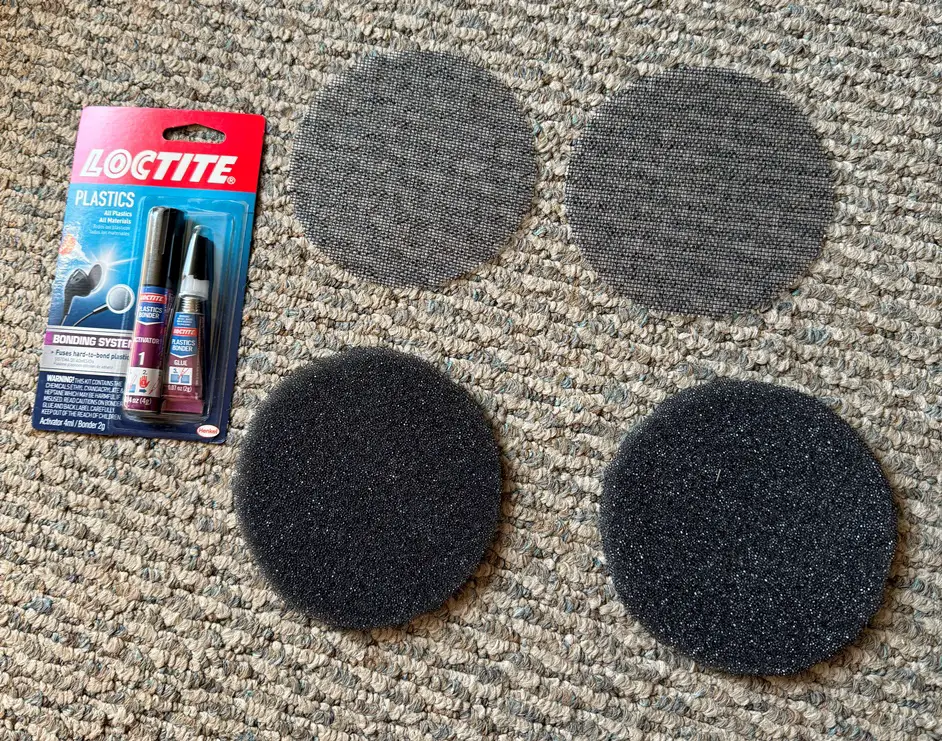
Filter for mine was ACDelco/GM part number A478C or 7026014. YMMV.
Aaaannnd.....we're done.
For the record, I went with the small granule carbon fish filter fill activated carbon. Was originally going to use the pellets. I think they wouldn't have as much surface area and GM chose small granules for a reason. Worked very well IMO.
On the 85 version, it had a electric plastic welder seam on the bottom ring that holds the filter on the bottom. I started with a knife but it went MUCH quicker with a Dremel cut off wheel.
Bottom filter- original equipment.
Bottom side with filter removed.
Use a Dremel cut off. It makes it much simpler. Don't hang around too long, it also heats up and melts the plastic if you stay in one spot forever. Quick passes, less melting. Ask me how I know.
Once the filter ring was out of the way, the inner retainer wasn't bad to remove. I poked out the dried up foam retainer and poured out the carbon. I matched marked the canister and filter retainer that I cut off to ensure it went back together exactly as taken apart as the cuts may not be perfectly level.
What you're left with after removing the ring and carbon bits.
Remove the top foam and it leaves you empty....
I got some EPDM foam from the Foam Factory. Any old foam may or may not work. 1/4" thick, 30ppi. (pores per inch). Plus some screens as backup in the event the foam ever fails. I got some screen door repair stuff for that. It did NOT affect air flow through the canister and it passed a gasoline soak test. I checked after taping the bottom back on temporarily after filling to ensure I could change things up in case it didn't pass the air puff testing. VERY light air pressure felt no issues. You do not want the upper foam to fail either, because if it does, it will suck that crap up into your carb. Again, ask me how I know. One screen goes in first, then the top foam retainer, the carbon fill, then the bottom foam retainer, and topped off by another screen disc. Then the gross plastic retainer disc can be slid into place. Need to add enough carbon to make the plastic foam retainer be in the same spot as it was to begin with. Then you can glue on the bottom ring. The screens are there for nothing more than a last resort backup.
The canister is either polypropylene or polypropylene or polyethylene. Which means epoxy may not work. So I got this, and it did a great job.
Filter for mine was ACDelco/GM part number A478C or 7026014. YMMV.
Aaaannnd.....we're done.
Registered User
Joined: Jan 2010
Posts: 2,551
Here's the basic construction below. It's important to ensure that there is no slop in the canister carbon. In other words, the canister must be full enough to ensure the vapors are forced to vent into the carbon bed through the upper filter and not bypass the carbon at the top. If not enough carbon is added, that's exactly what it would do. It doesn't have to be crunched in there, but the foam is there to absorb any potential liquid fuel that makes it to the canister, condensed or otherwise. Believe it or not, the canister gains a little weight (milligrams) as the fuel vapors vent to it, and when the engine is started, those vapors get sucked back into the engine, reducing the weight again.
Registered User
Joined: Jan 2010
Posts: 2,551
I THINK it was close to 3 lbs. But again, it's more by volume vs. weight. You need to pack enough in there to have a full, but not tightly packed charcoal bed. There's really not a fast and hard rule of weight, as it would depend on charcoal density and size of the granules. I have an NOS canister as a backup, so it was a no-brainer to attempt a refill. If things went south, a new one was waiting in the wings. Since it didn't, I get to keep my date-code and have a spare. 
It really comes down to if you want the look of originality or just something that functions. Some people don't want to mess with it. I wanted mine to look like it never left its spot. Go slow, be careful, and don't force stuff and you'll be ok.
It really comes down to if you want the look of originality or just something that functions. Some people don't want to mess with it. I wanted mine to look like it never left its spot. Go slow, be careful, and don't force stuff and you'll be ok.

'72 Cutlass ragtop
Joined: Jun 2016
Posts: 1,321
From: Tampa, FL
I bought a new GM canister just like yours back in 2017 soon after I got my ragtop - mine is GM p/n 17063013DA and the only visual difference from yours is the purge and tank ports are on opposite sides to yours.
Still on the car but I recently got a deal on another new identical one to keep in reserve if needed - I'm not as ambitious to cut mine up for a refresh. But that was a pretty cool rebuild you did on yours and I bookmarked this thread in case I want to attempt it sometime.
Still on the car but I recently got a deal on another new identical one to keep in reserve if needed - I'm not as ambitious to cut mine up for a refresh. But that was a pretty cool rebuild you did on yours and I bookmarked this thread in case I want to attempt it sometime.
Last edited by 70sgeek; Oct 4, 2025 at 04:40 PM.
Thread Starter
Registered User
Joined: Mar 2025
Posts: 43
From: Minnesota
Mine comes apart this weekend as I just got the Inline Tube hard steel line from the tank to the front engine bay. That ought to be just so much fun getting in. Then I'll get the Dremel tool out and have at the canister. My service manual set came last night but I couldn't fine where the vacuum line attaches to the carb. Any port will work? How about that multi-port "T" at the engine front? Note that I have a Edelbrock carb on there.,
Thread Starter
Registered User
Joined: Mar 2025
Posts: 43
From: Minnesota
Not so much fun
The replacement evap tube from the tank to the canister needed to be cut up. Absolutely no way to get that on with the body on the frame. So something of a cluster. But it's on. If I had to do it again I'd purchase some 5/16 straight tubing and I'd be done 3 times faster with a cleaner look. I also galled up the budget friendly double flare tool in my tool box. More fun. The biggest issue was up an over the control arm mounts which are perilously close to the exhaust manifold (with a tube full of gas fumes. Anyhow. Live and learn.
Barely Registered
Joined: Feb 2014
Posts: 2,629
From: Gillespie County, Republic of Texas

Thread
Thread Starter
Forum
Replies
Last Post
frozencaveman
Chassis/Body/Frame
4
Mar 10, 2011 10:32 PM


