
POA valve testing and calibration

Thread Starter
Registered User
Joined: Aug 2013
Posts: 3,900
From: Central Illinois
POA valve testing and calibration
A few of us were looking for this info a while back. Seems legit.
http://www.autoacforum.com/messagevi...threadid=16311
http://www.autoacforum.com/messagevi...threadid=16311
Connoisseur d'Junque
Joined: Sep 2010
Posts: 21,183
From: The Hudson Valley
Nope, that's the right one, the valve just looks different without its outer case.
Here's the other thread that I've found with significant information on this subject.
There are other bits of information out there, but these two threads seems to have everything important in one place (okay, two places).
- Eric
Here's the other thread that I've found with significant information on this subject.
There are other bits of information out there, but these two threads seems to have everything important in one place (okay, two places).
- Eric
Registered User
Joined: Dec 2007
Posts: 1,124
From: Fort Pierce, FL
So you connect everything and it reads 28-32 for R12. Then turn the screw 1/4 turn CCW. That's it? No reading for the new pressure? Seems there ought to be a target pressure when set for 134A, not just 1/4 turn.
Connoisseur d'Junque
Joined: Sep 2010
Posts: 21,183
From: The Hudson Valley
If you look at this picture, you can see he has a breaker bar and long extension sticking out of where the adjuster screw is:
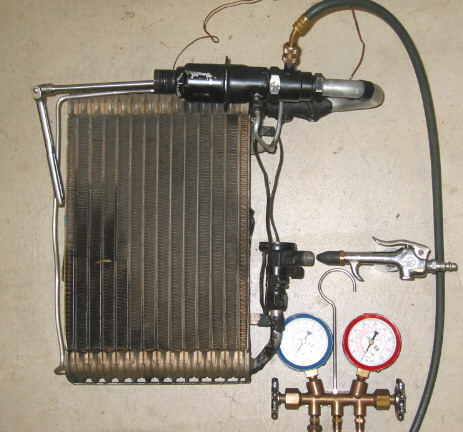
(Incidentally, this picture shows how to check the valve without removing it from the car).
- Eric
Thread Starter
Registered User
Joined: Aug 2013
Posts: 3,900
From: Central Illinois
This is what I see....
[IMG]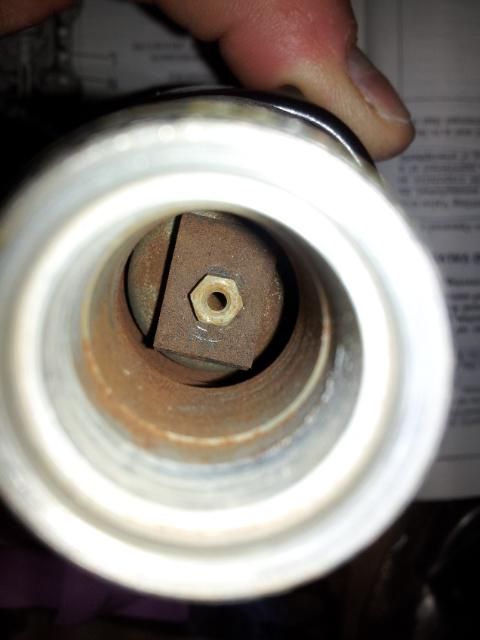 [/IMG]
And in the diagram I don't see anything that would be a screw. But it does look like if I turn that nut ccw it would release pressure on the bellows.
[IMG]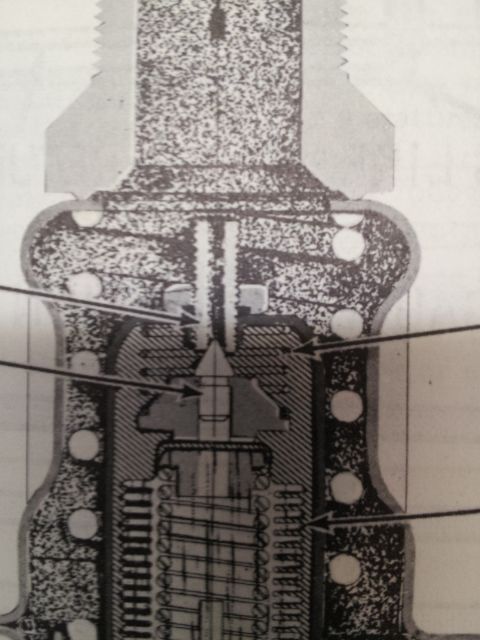 [/IMG]
[IMG]
 [/IMG]
And in the diagram I don't see anything that would be a screw. But it does look like if I turn that nut ccw it would release pressure on the bellows.
[IMG]
 [/IMG]
Thread Starter
Registered User
Joined: Aug 2013
Posts: 3,900
From: Central Illinois
The screw and locknut are inside the valve, deep in the hole.
If you look at this picture, you can see he has a breaker bar and long extension sticking out of where the adjuster screw is:
(Incidentally, this picture shows how to check the valve without removing it from the car).
- Eric
If you look at this picture, you can see he has a breaker bar and long extension sticking out of where the adjuster screw is:
(Incidentally, this picture shows how to check the valve without removing it from the car).
- Eric
Connoisseur d'Junque
Joined: Sep 2010
Posts: 21,183
From: The Hudson Valley
Open the high side and listen to the POA go "pop". the low side handwheel is closed and stays closed. Read the pressure on the low gauge. Should be 26 for 134a and 29 for r 12.
That's why I said that thread was the other useful one.

- Eric
Connoisseur d'Junque
Joined: Sep 2010
Posts: 21,183
From: The Hudson Valley

Thread Starter
Registered User
Joined: Aug 2013
Posts: 3,900
From: Central Illinois
Hmm, that might be why the CSM says the valve is non-repairable and non-adjustable.
Connoisseur d'Junque
Joined: Sep 2010
Posts: 21,183
From: The Hudson Valley
Chineseium gauge sets are cheap, and should be good enough for occasional use.
In your case, an old R12 set may be available very cheaply at a flea market or yard sale.
They're very good to have.
Cursed CSM!
- Eric
In your case, an old R12 set may be available very cheaply at a flea market or yard sale.
They're very good to have.
- Eric

Registered User
Joined: Mar 2014
Posts: 140
From: dfw
That valve is adjustable also. I would be more concerned about the rust you see down in there.
Last edited by banny; Jun 21, 2014 at 11:56 AM.
Thread Starter
Registered User
Joined: Aug 2013
Posts: 3,900
From: Central Illinois
Thread Starter
Registered User
Joined: Aug 2013
Posts: 3,900
From: Central Illinois

Registered User
Joined: Feb 2008
Posts: 11,798
From: Plano, TX
1/4 to 1/2 turn CCW for a guestimate.
It would be best if you could rig up a test set like in the picture.
More info on testing can be found here:
https://classicoldsmobile.com/forums...2-cutlass.html
It would be best if you could rig up a test set like in the picture.
More info on testing can be found here:
https://classicoldsmobile.com/forums...2-cutlass.html


Thread
Thread Starter
Forum
Replies
Last Post


