71' Cutlass S 455
 December 18th, 2012, 11:07 AM
#201
Just an Olds Guy
Join Date: Jul 2008
Location: Edmonton, AB. And "I am Can 'eh' jun - eh"
Posts: 24,525
Hey Jim!
I can see what you mean in the pics of the headers, especially with the difference in spacing. Bummer that you still have other clearance issues. I had originally thought about changing my duals to headers (in fact I bought a set of Flowtechs - still stored in the shed for now) that I'm having second thoughts about now. I did have a set on my first 72 and always had problems with the flange seal. Those new ones you got are a huge difference in thickness so you prolly won't have any issues with warping.
BTW, in your second pic there appears to be a really large dent in the #2 cylinder down tube close to the collector. Was it shipped like that?

Another one of our members (Eddie Hansen) is doing a resto on a 69 Cutlass vert. I think he has the same setup for SS brake lines and prop valve you do. Should have a look at what he did to reposition his lines ( he installed an adjustable prop valve on the frame and bent his own lines. The write up is pretty decent if you're handy with a bender and flare tool)
link 1 https://classicoldsmobile.com/forums...tml#post481963
link 2 https://classicoldsmobile.com/forums...tml#post482104
link 3 https://classicoldsmobile.com/forums...tml#post484330
Tank looks good. Is it a Spectra Premium? Any issues with the locking ring fitment? I bought one of the SP GM34R tanks for my car. I'm planning on leaving that waxoil coating on the tank and intalling it as is.
I can see what you mean in the pics of the headers, especially with the difference in spacing. Bummer that you still have other clearance issues. I had originally thought about changing my duals to headers (in fact I bought a set of Flowtechs - still stored in the shed for now) that I'm having second thoughts about now. I did have a set on my first 72 and always had problems with the flange seal. Those new ones you got are a huge difference in thickness so you prolly won't have any issues with warping.
BTW, in your second pic there appears to be a really large dent in the #2 cylinder down tube close to the collector. Was it shipped like that?
Another one of our members (Eddie Hansen) is doing a resto on a 69 Cutlass vert. I think he has the same setup for SS brake lines and prop valve you do. Should have a look at what he did to reposition his lines ( he installed an adjustable prop valve on the frame and bent his own lines. The write up is pretty decent if you're handy with a bender and flare tool)
link 1 https://classicoldsmobile.com/forums...tml#post481963
link 2 https://classicoldsmobile.com/forums...tml#post482104
link 3 https://classicoldsmobile.com/forums...tml#post484330
Tank looks good. Is it a Spectra Premium? Any issues with the locking ring fitment? I bought one of the SP GM34R tanks for my car. I'm planning on leaving that waxoil coating on the tank and intalling it as is.
 December 18th, 2012, 11:05 PM
#202
JC
Thread Starter
Join Date: Feb 2012
Location: So Florida
Posts: 1,069
Hey Guys, Thx for the props!
Thx for stopping by. Its nice to hear from you. It was getting a little lonely around here with just Alan and I.
Alan - That dimple in the pipe is from manufacuturer so you can get the bolt in at that spot. These pipes are nice man. Just the damn fitment.
Oldzzy - I hear you on the headers, Alan mention I get in touch with you on them. Im hoping these will work, but I might need to mock the 2nd set up again and then decide what to do. I wont have to install the new set again to know about the pass side LCA bracket issue. But now that the full front suspension is back on the car, I really should mock them up one more time.
Then decide if its just the one issue, what to do. It has always been something with this car. Vary rarely an easy project that goes smooth!
Time to post some pics.
For you **** resto freaks out there and I know a few of you...
I have been experimenting using a black oxiding coating process from Eastwood. Ive used it on every bolt that originally had it, if I reused
the original bolt, if bolts were salvagable etc.
Here are control arm bolt examples:

First step I use is to use Evaporust which chemically removes 100% of rust. You can reuse it too which helps on cost, but it gradually reduces its effectiveness as you reuse it. You hit them with EW "Pre" for cleaning. The bolts on the left (above pic) are after the Evaporust treatment, the ones on right are after the chemical oxiding which is the third step.
The final process is to coat with Eastwood Metal satin clear which really sets it off. (Forgot to take pics of clear coat on this set)


In honor of our once proud, but now defunct industrial Age here in thw USA, I decided to try and polish the intermediate steering shaft and leave as bare as the day it was made instead of painting it all nice and perfect. I know many have painted these to perfection, but I love the bare metal look, even if flaws are there. Just to be a little different. After hours and hours of work sanding, then final wet sanding, then hitting it with EW clear, this is how it came out.


Painted only the end and edges near the rag joint
(6 years later now, 2019....this steering arm was a total fail, lol. Clear coat did nothing to stop corrosion. I've had a bit of bad luck all around with rattle can clear coats, even with Eastwood level quality.)
Thx for stopping by. Its nice to hear from you. It was getting a little lonely around here with just Alan and I.
Alan - That dimple in the pipe is from manufacuturer so you can get the bolt in at that spot. These pipes are nice man. Just the damn fitment.
Oldzzy - I hear you on the headers, Alan mention I get in touch with you on them. Im hoping these will work, but I might need to mock the 2nd set up again and then decide what to do. I wont have to install the new set again to know about the pass side LCA bracket issue. But now that the full front suspension is back on the car, I really should mock them up one more time.
Then decide if its just the one issue, what to do. It has always been something with this car. Vary rarely an easy project that goes smooth!
Time to post some pics.
For you **** resto freaks out there and I know a few of you...
I have been experimenting using a black oxiding coating process from Eastwood. Ive used it on every bolt that originally had it, if I reused
the original bolt, if bolts were salvagable etc.
Here are control arm bolt examples:
First step I use is to use Evaporust which chemically removes 100% of rust. You can reuse it too which helps on cost, but it gradually reduces its effectiveness as you reuse it. You hit them with EW "Pre" for cleaning. The bolts on the left (above pic) are after the Evaporust treatment, the ones on right are after the chemical oxiding which is the third step.
The final process is to coat with Eastwood Metal satin clear which really sets it off. (Forgot to take pics of clear coat on this set)
In honor of our once proud, but now defunct industrial Age here in thw USA, I decided to try and polish the intermediate steering shaft and leave as bare as the day it was made instead of painting it all nice and perfect. I know many have painted these to perfection, but I love the bare metal look, even if flaws are there. Just to be a little different. After hours and hours of work sanding, then final wet sanding, then hitting it with EW clear, this is how it came out.
Painted only the end and edges near the rag joint
(6 years later now, 2019....this steering arm was a total fail, lol. Clear coat did nothing to stop corrosion. I've had a bit of bad luck all around with rattle can clear coats, even with Eastwood level quality.)
Last edited by JCMC64; May 29th, 2019 at 02:44 PM.
December 18th, 2012, 11:29 PM
#203
JC
Thread Starter
Join Date: Feb 2012
Location: So Florida
Posts: 1,069

(like that professional prop to hold the shaft?!)


I love the look of unpainted metal! Im ok with the results.
Here is my pathetic attempt at Gearbox restore. Never tried before, but Alan and Rob inspired me to give it a shot. No funds to send it out.
I deciced to save my $ for parts I need, and do most this kind of stuff myself.

You can see the Black oxide coating with clear coated bolts above. Huge differences from the rattle can black gearbox the
P.O. did with rusted gearbox and bolts under the paint. He did very minor prepping at that. Looks much better, but not as good
as others that painted them or sent them out for resto. I again love original meta lookl vs painted metal look. So that was what
I went for in allot of areas. Thanks again to Alan who is always quick to give advice, and answer questions.
New rag joint and Pwr steering lines. Others were pretty nasty.

I spent days on this. Then hit it with clear. Also I black Oxide the 4 bolts 2 at a time to keep the seal, and also the 3 frame mount bolts.
Last edited by JCMC64; December 19th, 2012 at 05:37 AM.


 December 19th, 2012, 12:11 AM
#205
JC
Thread Starter
Join Date: Feb 2012
Location: So Florida
Posts: 1,069
Unto the Control Arms- The first step was to adjust the frame brackets which were out wack. Lot of fun as usual.
Had to buy a giant crescent wrench after many semi falied McGyver attempts. Hulkian Crescent worked perfect. These LCAs DO NOT just go in!
Uppers:


Lowers:


Being non Rubber, Delrin bushings, you can torque them up in air or on the ground. Watched several Global West and Hotchkis videos to make sure. I got them super snugged, just need a little more to get to spec.
Had to buy a giant crescent wrench after many semi falied McGyver attempts. Hulkian Crescent worked perfect. These LCAs DO NOT just go in!
Uppers:
Lowers:
Being non Rubber, Delrin bushings, you can torque them up in air or on the ground. Watched several Global West and Hotchkis videos to make sure. I got them super snugged, just need a little more to get to spec.
Last edited by JCMC64; December 19th, 2012 at 04:18 AM.
December 19th, 2012, 01:52 AM
#206
JC
Thread Starter
Join Date: Feb 2012
Location: So Florida
Posts: 1,069
Springs:
Took me almost 3 days to figure out how to get these suckers into this CA pocket. This is no where near as easy as it looks done in a home garage. They are much different than stock CA pockets which have a nice slope to slide the springs into before jacking up LCA. These tall circular spring pockets do not give you luxury of just sliding them in like stock ones do. You got a extremely small window to shoot for without destroying the powder coating in the pocket area or worse. Took many attempts, different methods, sweat and mucho patience- which is being tested like never before!
"Genius is eternal patience." — Michelangelo.
I will tell you how I found a method that works...Im sure there others, but I learned a helluva lot here.
The mission-Get these big *** suckers into that little pocket:

"Genius is nothing else than a great aptitude for patience." - George-Louis de Buffon

I got a spring compressor and thought that would be enough. Well what I found is that not only is it how you compress the spring, but also the extreme special angle with these tall and deep spring pockets needed on these Tubular A-body CAs.

Considering the spring compressor tool arms placement in the end is totally the key as you will see. Right off the bat, do NOT use both of the tools arms, because it becomes to rigid to bend into an extreme position into the spring pockets, check it out. Where Im pointing to above is the apex of the frame pocket. In my first attempts, I learned quickly where not to put the tools arms. The center of the pocket seemed the ticket.
But once I started bending the spring towards the pocket and saw there is no way it is going to bend in there, I discovered you got to put the tools arm towards the rear side of spring to allow flex to reach the pocket
(remember you must only use one arm on the tool to give it ability to flex)

In this above pic you can see my placement of the one arm. The tool Arm in the foreground is loose, not attached to anything. The one in the rear is attached. This allowed me to get the spring bent all the way into the pocket. BUT it still would not go in as spring hit the rear wall of pocket and would not go in.(below pic, look at the left back corner) I could of forced it, but all the paint in that area would have come off. Many would of just did this. I decided - "Patience!"

You can also see my strap concoction I used. Worked great.Will show the rigging next. Could not of done this with brute strength or pry bar alone. These are Moog HD A\C springs. Shorter, but stiffer too. But well into day two...still FAIL.
Took me almost 3 days to figure out how to get these suckers into this CA pocket. This is no where near as easy as it looks done in a home garage. They are much different than stock CA pockets which have a nice slope to slide the springs into before jacking up LCA. These tall circular spring pockets do not give you luxury of just sliding them in like stock ones do. You got a extremely small window to shoot for without destroying the powder coating in the pocket area or worse. Took many attempts, different methods, sweat and mucho patience- which is being tested like never before!
"Genius is eternal patience." — Michelangelo.
I will tell you how I found a method that works...Im sure there others, but I learned a helluva lot here.
The mission-Get these big *** suckers into that little pocket:
"Genius is nothing else than a great aptitude for patience." - George-Louis de Buffon
I got a spring compressor and thought that would be enough. Well what I found is that not only is it how you compress the spring, but also the extreme special angle with these tall and deep spring pockets needed on these Tubular A-body CAs.
Considering the spring compressor tool arms placement in the end is totally the key as you will see. Right off the bat, do NOT use both of the tools arms, because it becomes to rigid to bend into an extreme position into the spring pockets, check it out. Where Im pointing to above is the apex of the frame pocket. In my first attempts, I learned quickly where not to put the tools arms. The center of the pocket seemed the ticket.
But once I started bending the spring towards the pocket and saw there is no way it is going to bend in there, I discovered you got to put the tools arm towards the rear side of spring to allow flex to reach the pocket
(remember you must only use one arm on the tool to give it ability to flex)
In this above pic you can see my placement of the one arm. The tool Arm in the foreground is loose, not attached to anything. The one in the rear is attached. This allowed me to get the spring bent all the way into the pocket. BUT it still would not go in as spring hit the rear wall of pocket and would not go in.(below pic, look at the left back corner) I could of forced it, but all the paint in that area would have come off. Many would of just did this. I decided - "Patience!"
You can also see my strap concoction I used. Worked great.Will show the rigging next. Could not of done this with brute strength or pry bar alone. These are Moog HD A\C springs. Shorter, but stiffer too. But well into day two...still FAIL.
Last edited by JCMC64; December 23rd, 2012 at 10:26 PM.
December 19th, 2012, 02:06 AM
#207
JC
Thread Starter
Join Date: Feb 2012
Location: So Florida
Posts: 1,069
Strap rigging I used to help bend the springs inward:


Note the new AC Delco Pro grade Center link
Thought Id throw a shot of the spring height difference. I know others have already posted pics like this.

Note the new AC Delco Pro grade Center link
Thought Id throw a shot of the spring height difference. I know others have already posted pics like this.
Last edited by JCMC64; December 19th, 2012 at 04:23 AM.
December 19th, 2012, 02:27 AM
#208
JC
Thread Starter
Join Date: Feb 2012
Location: So Florida
Posts: 1,069
"Patience is a necessary ingredient of genius." Benjamin Disraeli
Forgot to mention the spring placement itself. I was more concerned with the top of the spring, which in the end makes significant difference. I placed the springs exactly like the originals AT THE TOP ONLY. The placing the spring bottom at the rear hole thing is n\a here. It is very important at the top to have it aligned right. I just eyeballed old spring lining it up as it would be covering the hole in back of the original CA per CSM and made a note of where top of spring should be. Then duplicated that alignment with new spring. The reason this matters is that once the bending of the spring to get it into the pocket begins, the top of spring also starts to get cockeyed, and if you dont get this right, it will pop right off the top internal CA frame pocket causing more stop, redo, and gos. Once I got this right, when I bend the spring where it goes, having tool arm in the right spot, they aligned right up and just needed a gentle nudging in.

SUCCESS!!! End of 2nd day. Man, did I go to school on Hot Rod Homegrown Garage Spring Installation!
Good shot below of final spring tool arm location:


Ball Joints torqued to specs on Spindle:


Forgot to mention the spring placement itself. I was more concerned with the top of the spring, which in the end makes significant difference. I placed the springs exactly like the originals AT THE TOP ONLY. The placing the spring bottom at the rear hole thing is n\a here. It is very important at the top to have it aligned right. I just eyeballed old spring lining it up as it would be covering the hole in back of the original CA per CSM and made a note of where top of spring should be. Then duplicated that alignment with new spring. The reason this matters is that once the bending of the spring to get it into the pocket begins, the top of spring also starts to get cockeyed, and if you dont get this right, it will pop right off the top internal CA frame pocket causing more stop, redo, and gos. Once I got this right, when I bend the spring where it goes, having tool arm in the right spot, they aligned right up and just needed a gentle nudging in.
SUCCESS!!! End of 2nd day. Man, did I go to school on Hot Rod Homegrown Garage Spring Installation!
Good shot below of final spring tool arm location:
Ball Joints torqued to specs on Spindle:
December 19th, 2012, 02:53 AM
#209
JC
Thread Starter
Join Date: Feb 2012
Location: So Florida
Posts: 1,069
Now, you want a kick in the pants? Just go to the other side and redo everything right? Yeah right.
You got to be mentally straight here, as I had little sleep and a few cold ones still lingering after I had a very long day with the pass side, and I was a little bit mentally off. After a few very rookie mistakes, had some grub and a Monster Energy and the brain started working again. I just reoriantated everything from passenger side carefully and she slid right in.

Again the placement of the tool arm (only one) was crucial again as I made the braindead mistake of putting it in wrong spot and it would NOT go in. I scractched my head and said "WTF!!" Then the Monster kicked in. I was all orientated wrong, half asleep.


Torqued to specs

SO... Im officially in the rarified air, club of Moog HD springs in Tubular A-body Control arms installed, with all my fingers and toes still attached, and just a couple hundred curse words. I get an award from C.O. correct? Something special right?!
You got to be mentally straight here, as I had little sleep and a few cold ones still lingering after I had a very long day with the pass side, and I was a little bit mentally off. After a few very rookie mistakes, had some grub and a Monster Energy and the brain started working again. I just reoriantated everything from passenger side carefully and she slid right in.
Again the placement of the tool arm (only one) was crucial again as I made the braindead mistake of putting it in wrong spot and it would NOT go in. I scractched my head and said "WTF!!" Then the Monster kicked in. I was all orientated wrong, half asleep.
Torqued to specs
SO... Im officially in the rarified air, club of Moog HD springs in Tubular A-body Control arms installed, with all my fingers and toes still attached, and just a couple hundred curse words. I get an award from C.O. correct? Something special right?!
Last edited by JCMC64; December 19th, 2012 at 04:26 AM.


 December 19th, 2012, 03:18 AM
#211
JC
Thread Starter
Join Date: Feb 2012
Location: So Florida
Posts: 1,069

Definitely meaty tie rods here. Dont know if the others are originals...how to check? The outer tierods are toast. Inners are still good.
Replacing both.


I mocked these up to center link and spindles and they look real nice.
New Center link (pic coming)
Last edited by JCMC64; December 19th, 2012 at 03:22 AM.
December 19th, 2012, 04:45 AM
#212
JC
Thread Starter
Join Date: Feb 2012
Location: So Florida
Posts: 1,069
The rearend has been getting attention between all the other stuff...here is the progress so far. Its almost time to do the guts.
Stripped, sanded silk smooth to the bone, and prepped:


Primed with some Rust Preventative Primer


Still got some more work to go on pumpkin, though not much more.
Will shoot it with EW metal clear when all done with pumpkin.
Stripped, sanded silk smooth to the bone, and prepped:
Primed with some Rust Preventative Primer
Still got some more work to go on pumpkin, though not much more.
Will shoot it with EW metal clear when all done with pumpkin.
December 19th, 2012, 04:56 AM
#213
JC
Thread Starter
Join Date: Feb 2012
Location: So Florida
Posts: 1,069
Eastwood deluxe spray booth. Really hard to find on website, limited edition:

Im such a total rook!
Built up the primer real good then sanded to silky smooth. First round of coats with auto Gloss black:


Im such a total rook!
Built up the primer real good then sanded to silky smooth. First round of coats with auto Gloss black:


 December 19th, 2012, 05:23 AM
#215
JC
Thread Starter
Join Date: Feb 2012
Location: So Florida
Posts: 1,069
Quick mock up of rear disc, just to verify the need for at least 15" rims.
Got to figure out what rim size to go to.


Been thinking about something like these, feel free to opine
1)

2)

3)

I need at least 15 inch rims for the rear brakes, but want the rotors to fill up the rim space. I cannot stand those huge rims with tiny rotors look. Im not looking for low profile look...this go around . Stock look with slightly larger rims is what Im thinking for now.
Got to figure out what rim size to go to.
Been thinking about something like these, feel free to opine
1)
2)
3)
I need at least 15 inch rims for the rear brakes, but want the rotors to fill up the rim space. I cannot stand those huge rims with tiny rotors look. Im not looking for low profile look...this go around
. Stock look with slightly larger rims is what Im thinking for now.
Last edited by JCMC64; December 19th, 2012 at 05:28 AM.
December 19th, 2012, 10:44 AM
#217
wait.... what....
Join Date: Mar 2009
Location: London Ont Canada
Posts: 817
First step I use is to use Evaporust which chemically removes 100% of rust. You can reuse it too which helps on cost, but it gradually reduces its effectiveness as you reuse it. You hit them with EW "Pre" for cleaning. The bolts on the left (above pic) are after the Evaporust treatment, the ones on right are after the chemical oxiding which is the third step.
The final process is to coat with Eastwood Metal satin clear which really sets it off. (Forgot to take pics of clear coat on this set)
The final process is to coat with Eastwood Metal satin clear which really sets it off. (Forgot to take pics of clear coat on this set)
Oh yeah, i like the Boss 339's!
December 19th, 2012, 11:14 AM
#218
Just an Olds Guy
Join Date: Jul 2008
Location: Edmonton, AB. And "I am Can 'eh' jun - eh"
Posts: 24,525
Jim, you've been busy. Glad to see you got all that work done - I know what kind of frustration some of it has been.
Have to ask you this: on the front end, pls don't say the CA's are torqued to specs? They need to have the weight of the car on them before you torque. Otherwise you will likely end up with premature bushing failure or wrong ride height.
Have to ask you this: on the front end, pls don't say the CA's are torqued to specs? They need to have the weight of the car on them before you torque. Otherwise you will likely end up with premature bushing failure or wrong ride height.
January 8th, 2013, 09:38 AM
#220
JC
Thread Starter
Join Date: Feb 2012
Location: So Florida
Posts: 1,069
Hey Oldzzy. Im liking the 339's too.
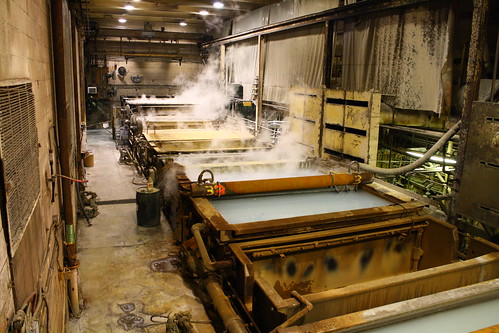
Quite a setup you have there, what is it for?
Im way behind in pics\updates again.
Going to switch gears a bit and get caught up on some other non frame\Susp\Engine stuff.
In the meantime had first batch of parts back from sand blaster. Got to figure out what colors for all of them. I also did the Radiator Core. Its all primed here are some pics:


 January 8th, 2013, 10:09 AM
#222
Wow that's quite a box full of blasted parts ! ,good luck with all that painting Jim ,don't know if you like the painting process but I certainly do, I just don't like having to buy all the paint ,always seem to run out before I'm done !!Thumbs up for the BOSS 339's
January 8th, 2013, 11:00 AM
#223
JC
Thread Starter
Join Date: Feb 2012
Location: So Florida
Posts: 1,069
Hey Oldsman,
I like painting small projects. One at a time, 2 at atime. But this is a headache when your also juggling an almost total restore at same time, So many things going on at once. Then the headaches of everyday life on top!
The process for me is picking up parts in batches from the blaster, taking them home, hitting them again with compressed air to clean off blasting media, setting up parts for priming, priming them, (yes, then to run out of primer in the middle!!) get all the coats laid before an hour is up, let it dry the required time, go get next batch from blasters, and repeat process.
Its a headache! I dont wont parts to flash rust so I got to control how much stuff I got to do at a time. If I had the funds, I would definitely not be doing this part! Painting is a artform. I can prime fine, and learned to top coat a little bit. But this is admittedly a bit over my head. Especially cause im so **** and a perfectionist. I keep Erics words in my mind on another thread in paint area that GM did not really put much effort into allot of these chassis parts paint wise, sometimes just shot a top coat or two with nothing else. So like Eric says, anything I do is going to be way better than that!
I have 3-4 coats of primer on most of this stuff.
And this metal is really eating up cans of primer.
I have a compressor and paint gun, but not very proficient at all with it.
Got to learn how to use it someday (NOW~!).
Here is a pic of the parts Im Powdercoating at the PCers- 2 Hood hinges, 4 Alt\Pwr steering brackets, 3 Pulleys.

I like painting small projects. One at a time, 2 at atime. But this is a headache when your also juggling an almost total restore at same time, So many things going on at once. Then the headaches of everyday life on top!
The process for me is picking up parts in batches from the blaster, taking them home, hitting them again with compressed air to clean off blasting media, setting up parts for priming, priming them, (yes, then to run out of primer in the middle!!
) get all the coats laid before an hour is up, let it dry the required time, go get next batch from blasters, and repeat process.Its a headache! I dont wont parts to flash rust so I got to control how much stuff I got to do at a time. If I had the funds, I would definitely not be doing this part! Painting is a artform. I can prime fine, and learned to top coat a little bit. But this is admittedly a bit over my head. Especially cause im so **** and a perfectionist. I keep Erics words in my mind on another thread in paint area that GM did not really put much effort into allot of these chassis parts paint wise, sometimes just shot a top coat or two with nothing else. So like Eric says, anything I do is going to be way better than that!
I have 3-4 coats of primer on most of this stuff.
And this metal is really eating up cans of primer.
I have a compressor and paint gun, but not very proficient at all with it.
Got to learn how to use it someday (NOW~!).
Here is a pic of the parts Im Powdercoating at the PCers- 2 Hood hinges, 4 Alt\Pwr steering brackets, 3 Pulleys.
Last edited by JCMC64; January 8th, 2013 at 11:35 AM.
January 8th, 2013, 11:14 AM
#224
I agree with Eric's comment ,GM really pushed these cars out of the factory at an alarming rate so it's no wonder they fell apart and rusted out so quickly.If GM had of fussed over the details like we do all the sticker prices back then would have been through the roof and no one could have afforded these cars.!Oh well try not to get to pissed off, after all it's supposed to be a relaxing hobby !
January 8th, 2013, 02:56 PM
#225
wait.... what....
Join Date: Mar 2009
Location: London Ont Canada
Posts: 817
I work in a steel processing plant, and we deal in coils of steel. those are tanks full of different chemicals such as, acid, and phosphate. Each coil weighs approx 4200lbs, and we put 2 coils at a time in the tanks. The tanks are long enough that a guy i work with put he 65 chevelle frame in the acid tank!
January 8th, 2013, 05:47 PM
#226
JC
Thread Starter
Join Date: Feb 2012
Location: So Florida
Posts: 1,069
You learn allot doing what Ive done, then looking back...I thought of this many times, just taking the body completely off and having frame dipped. That way the internal frame is taken care of too. It bugs me now that Ive done all this so far, and the internal frame is still caca. Maybe I will use some of the internal frame spray at some point. I could of also hit the floor boards easier with body off. Its just too late for the frame now, so just got to deal with next phases the way it is. Ive also learned how much chemicals are your friend during all this. You need to become a master chemist to know what chems to use for what job. Makes all the difference.
Last edited by JCMC64; May 29th, 2019 at 01:11 PM.
January 8th, 2013, 06:07 PM
#227
wait.... what....
Join Date: Mar 2009
Location: London Ont Canada
Posts: 817
One of the big problems using chemicals is making sure you get all the chemicals off or diluted. For example when using acid, if you don't neutralize it all it remains active, even under top coatings.
January 8th, 2013, 10:41 PM
#228
JC
Thread Starter
Join Date: Feb 2012
Location: So Florida
Posts: 1,069
Im also learning this with media blasted metal. You cant even touch the bare metal due to the oils on your hand. I tested one scrap they did for me, put my sweat on the bare metal...nothing would take off the sweat\oil stain. At least none of the chems I had. Very interesting. (remember, Im a real rookie to all this stuff)
Last edited by JCMC64; January 8th, 2013 at 10:44 PM.
January 9th, 2013, 03:55 AM
#229
wait.... what....
Join Date: Mar 2009
Location: London Ont Canada
Posts: 817
Im also learning this with media blasted metal. You cant even touch the bare metal due to the oils on your hand. I tested one scrap they did for me, put my sweat on the bare metal...nothing would take off the sweat\oil stain. At least none of the chems I had. Very interesting. (remember, Im a real rookie to all this stuff)
Last edited by oldzzy; January 9th, 2013 at 05:28 AM.
January 12th, 2013, 09:39 PM
#231
JC
Thread Starter
Join Date: Feb 2012
Location: So Florida
Posts: 1,069


 January 14th, 2013, 02:26 PM
#233
JC
Thread Starter
Join Date: Feb 2012
Location: So Florida
Posts: 1,069
For those interested, I found today another example of what Im modeling this restore after paint wise. In the end,
it will look identical to this but with 71' body appointments, and with all the modern upgrades underneath the
wrapping. The yellow paint will be richer too, more modern GM yellow like the new camaros.
http://www.zephyrmotors.com/Gallerie.../source/01.htm


it will look identical to this but with 71' body appointments, and with all the modern upgrades underneath the
wrapping. The yellow paint will be richer too, more modern GM yellow like the new camaros.
http://www.zephyrmotors.com/Gallerie.../source/01.htm
 January 14th, 2013, 03:30 PM
#235
Just an Olds Guy
Join Date: Jul 2008
Location: Edmonton, AB. And "I am Can 'eh' jun - eh"
Posts: 24,525
Jim,
The devil is in the detail. Really like the powdercoating! I ended up painting mine with similar results. Doesn't it feel good to be putting stuff back together as new??
I really like the theme you're creating for final paint. Even though you're chomping at the bit to drive it this year, be patient with the details of painting and fitting everything together.
Oh - yes, you can do that rear end work yourself if you get the right tools. Not sure if you can get the free tool rental on them from Autozone? Forgot to mention that in our last chat. You've already proven yourself with patience and skillsets. There is a complete write up in the CSM for what you want to do, so if you combine that with any of the how to vids on the web you'll be able to save yourself some $$.
January 14th, 2013, 05:24 PM
#236
Great project so far. I hope you can exorcise those electrical demons soon. Check your headlight switch for the dash light problems. Sometimes the rheostat in the dimmer part of the switch goes bad.
January 16th, 2013, 12:37 PM
#237
JC
Thread Starter
Join Date: Feb 2012
Location: So Florida
Posts: 1,069
(I corrected some info below after first posting, after I rechecked old gears a little closer)
--Alan-- Thx for the words. Re: Rearend...Ive been going back n forth on that one. I did find the shop in Ft Lauderdale that is top Rearend place in tri county area, which is a large area here in So Fla.-- Broward Powertrain. I went to 6 different places, and really talk to them all in detail. Half of them ended up recommending BP. I went there and talked to them at length. They are the right guys. Super professional, and you KNOW they know thier stuff. Amazing complex. They will put it all back together for $300-375. Including run out of axles, and other cool stuff. Of all the places I went to they by far impressed me the most. I just think its more prudent to let them get it perfect, than me hoping I get it right, if that makes sense. But trust me, I serioulsy considered doing it myself, and read tons and watched tons of video.
I took the guts out last night. Ring gear had some pretty decent pitting, quite a few teeth, from sitting a long time or something. I think maybe some water crept in at some point sat on top of oil. Pitting is all in over ring gear and one spider gear and one axle gear...maybe were all aligned just right I guess and sat in the water a long time? Also the gunk on bottom and sides of pumpkin had hardened into a hard rubber like coating. I used brake oil to brake it all up fairly easy, but what a mess. It really needs to be cleaned further real good. I got a good start on it, but it needs more...Brake cleaner for next round?
Really wonder how old gears could get so pitted though. (see coming pics)
I got those 3.42's gears as you know, but now the MAWs are kicking in again! Possible jump up to 30 Spline carrier and 30 spline Moser axles.
The reason is who wants to go through this again as in coming years I have other HP upgrades planned. I believe what ive read around here is 500hp being the the tipping point for Axle upgrades ( I know the slicks
thing comes in to play here too. Not sure this car would ever see slicks...but modern grippier street tires are probable.)
SO another decision to make. The only price difference is the axles as the 30 spline carrier price is pretty much the same as 28 spline...unless someone wants to correct me on that point or whole upgrade thing that Im not seeing.
But then my rearend will be set for whatever future thing I reasonably throw at it, cause Im clearly not keeping anything stock here.
(btw-Does anyone know what steel the hubs are on the Moser axles are? Thinking about the corrosion issue here.)
--Sampson--, Thx. The electrical demons Im hoping will be long gone by that point. I got almost all new wiring now front to back. I got 3 different sets of wiring on an amazing deal. $35 bucks a set brand new, the good stuff. Guy was a chevelle guy and he got a closeout lot deal on whole batch of wiring for chevelles and cutlass's. I sucked up everything he had for the cutlass.
Then I got another awesome deal on the rest of wiring. It really was all a mess, cracking, exposed wires, lots of splices, etc. So Im just ripping out all the old wiring. And yes, already replaced the light switch with new one. But the whole interior, Dash, A\C section, etc is all ripped out and will wait to get done until engine, driveline, suspension is completely done. And also going to be putting in new front floorpan first before electrical is hit again. Turns out floor pan has some issues, not too bad, but Im not going this far and not do that right too.
Pic time:


Pretty extensive pitting to me - Axle gear:

Last edited by JCMC64; January 16th, 2013 at 01:42 PM.


