
Into the unknown - Underhood restoration!

Thread Starter
Registered User
Joined: Feb 2008
Posts: 11,798
From: Plano, TX
Looks like I know what I will be doing tomorrow morning...
Got these from the sandblaster today. Very good job for a $60 price.

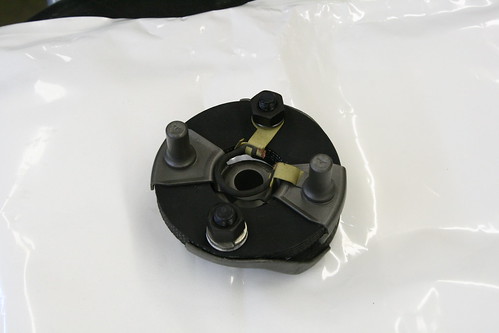
I always knew these rubber pieces on the fender supports looked like tire scraps, but now I'm convinced. One has a whitewall!


I always knew these rubber pieces on the fender supports looked like tire scraps, but now I'm convinced. One has a whitewall!
")

Registered User
Joined: Jan 2011
Posts: 1,665
From: Maryland
One point to consider is that te A6 clutch is not designed for cycling, while later clutches, used with cycling valves, are. I don't know specifically whether this is a problem, but there's a big difference between the older clutch pulling in, and staying in during the whole drive, and the newer ones cycling on and off, sometimes twice a minute, the whole time the engine is running.
- Eric
- Eric
Thread Starter
Registered User
Joined: Feb 2008
Posts: 11,798
From: Plano, TX
Assuming you are referring to CAA, the flush and recalibrate will run you about $100. If they have to "restore" it, they will cut it apart, replate the body and weld it back together with a different look to it. I think that service runs closer to $250.
X2. I know people use these cycling conversions but that was not the intent for the original clutch and I have to believe it will shorten the life of them. With limited use, maybe it's not a problem.
X2. I know people use these cycling conversions but that was not the intent for the original clutch and I have to believe it will shorten the life of them. With limited use, maybe it's not a problem.
I know what you mean about the A6 clutch not made for cycling. Something else to consider...
Thread Starter
Registered User
Joined: Feb 2008
Posts: 11,798
From: Plano, TX
Getting out early�
Saturday morning was painting day part 1. A variety of little parts, along with a couple larger ones, were painted.
I had to start at 8am and be done at 11am, as that is the only usable time where the temperature is below 90 AND the humidity is not too high.
After painting, I reassembled the intermediate shaft.

First job was to reference pictures of the shaft to see where the upper clamp was and where the rag joint was situated. Bearing square holes were greased, the spring installed (in the same original orientation), and bearing squares installed.

Next, pack the thing with grease.
You want to make your frosting look a little rugged�

OOPS! That�s the line for the �Cake �n� Bake� forum�����
Slide the assembly together and get the seal pushed in all the way so that the snap ring and be installed.
Excess grease will come out the top hole and the snap ring slots with interesting sounds. Parents will know what it sounds like�
So here is the assembled shaft and some of the parts that were painted today..

I had to start at 8am and be done at 11am, as that is the only usable time where the temperature is below 90 AND the humidity is not too high.
After painting, I reassembled the intermediate shaft.
First job was to reference pictures of the shaft to see where the upper clamp was and where the rag joint was situated. Bearing square holes were greased, the spring installed (in the same original orientation), and bearing squares installed.
Next, pack the thing with grease.
You want to make your frosting look a little rugged�
OOPS! That�s the line for the �Cake �n� Bake� forum�����
Slide the assembly together and get the seal pushed in all the way so that the snap ring and be installed.
Excess grease will come out the top hole and the snap ring slots with interesting sounds. Parents will know what it sounds like�
So here is the assembled shaft and some of the parts that were painted today..
Thread Starter
Registered User
Joined: Feb 2008
Posts: 11,798
From: Plano, TX
Painting day part 2
The last six big parts were painted. These were first sprayed with Eastwood�s self etching black primer, then with their �underhood� black. The underhood black is very thin, so a can does not go a long way. It dries fast, so up to 3-4 coats can be applied in little time, giving a very smooth finish.
Big parts were hung one at a time from a tree branch.

Little parts were hung on a coat hanger which hung from the branch.
They were hung to dry in the shed with the AC on 82*.
After that I pulled the condenser and drier and liquid line.

I want to get the new condenser and evaporator on order tomorrow.
A few forgotten parts were cleaned up and prepped for next weekend�s painting sessions, including the rag joint.
Big parts were hung one at a time from a tree branch.
Little parts were hung on a coat hanger which hung from the branch.
They were hung to dry in the shed with the AC on 82*.
After that I pulled the condenser and drier and liquid line.
I want to get the new condenser and evaporator on order tomorrow.
A few forgotten parts were cleaned up and prepped for next weekend�s painting sessions, including the rag joint.
Registered User
Joined: Jan 2011
Posts: 1,665
From: Maryland
[QUOTE=Lady72nRob71;301438]
I want to get the new condenser and evaporator on order tomorrow.
QUOTE]
Rob I would encourage you to look carefully at any condenser that you are thinking of buying. They are not quite the same as the factory ones, even the "Judging" ones on Ebay. The issue has to do with where the Receiver/Drier will be located based on the line coming up from the bottom on the pass side. Measure yours and I think you'll find it to be roughly 4.5" - 5" down from the top of the condenser. The replacements will end up being anywhere from 3" down (Judging one) to about 4" for some others. The problem is the lower clamp on the Receiver/Drier will not align with the hole on the bracket. The "Judging" one also places the R/D too far from the edge. I finally found one that was close but I had to bend the tube on the side to make everything work. Measure yours and ask the potential supplier to measure what they are selling to see if it will work. Attached are a few photos of the issues I ran into and the new one shown is the "Judging" quality one from Ebay. Sent that one back. You might be better off flushing yours and refinishing it as it looks pretty nice.
Also, that is one heck of a trick where you got that fan blade to hang there with the wire coming in from the side. That must be one tough wire you have!! Or, maybe there was a strong breeze when you took the photo!
Thread Starter
Registered User
Joined: Feb 2008
Posts: 11,798
From: Plano, TX
Please let me know anything else you learned, like who had the best fitting one and if it was special for R134. I have seen the regular copper tube styles which are not much different than the one I have.
PM me if you do not wish to name names here...
This is such a pain. Evaporators are the same thing.

Registered User
Joined: Jan 2011
Posts: 1,665
From: Maryland
As far as I know, the condenser is not a must chage item when using 134 and the OEM ones will work fine. Same thing with OEM evaporators. I would use as much OEM stuff as possible as some of the aftermarket stuff just isn't up to snuff for my liking. I've been very disappointed with some of the parts I have received for this 69 442 I am restoring.
Last issue you may encounter is the receiver/drier itself. The one I purchased turned out to look identical but it was just a little smaller in diameter. As a result, the clamps would not grab onto it. I solved the problem by using body side molding double face tape that I wrapped inside the clamps. Had to go with 2 layers of it. The tricky part was getting the clamps in the right place without the tape sticking. It's almost impossibel to see that fix but I know it's there.
Thread Starter
Registered User
Joined: Feb 2008
Posts: 11,798
From: Plano, TX
Condenser looks very good. But read below...
One of the guys there running 134 said that he used his Mustang's stock condenser for a while, then replaced it with one specially for 134 and it was a big difference. Of course he was running the dinky Sanden 508, if that makes a difference.
However after looking at some pictures of these 134 condensers, they look so similar to the stock ones. The 134 cross-flow styles seem only available in universal-fit models.
Geez... I want to do this all right the first time so not sure where to go next...

Maybe now when i get home I will dunk-tank the evaporator and see where the leak is. Hope the fish don't mind...
Registered User
Joined: Jan 2011
Posts: 1,665
From: Maryland
I checked an OEM condenser and the aftermarket one. Both are the same size and both have 32 tubes. The difference is the fins are spaced on 1/8" centers on the OEM unit and the aftermarket ones are on 1/16" centers. In general terms, the replacement units have twice as much fin material on them although that could be debated because the OEM fins are wavy which means more surface area. But suffice it to say the replacements offer more fin. With more fin, the thinking is more heat transfer. But I think one could argue that the amount of air that can flow through the replacements will be less because the fins are packed much closer together which in my mind hurts the heat transfer.
I have a friend with a 72 Cutlass that has 134 and everything is original. Not sure if the POA was recalibrated as he bought the car with the conversion already done. He just had the system charged as he had a small leak and he has outlet temps of 36F with outdoor temps of 85F.
I think it's difficult to compare the results between cars. I suspect a Mustang has a smaller condenser than those in these Cutlass cars and if so, size may mean everything.
Thread Starter
Registered User
Joined: Feb 2008
Posts: 11,798
From: Plano, TX
So now I read that the dryer units need a special desiccant (XH7 or XH9) to be used with R134. So far all the AC guys told me that a dryer is a dryer - it did not matter!! Anyone know about this?
See this is what I like hearing - real life stories of success.
Very good point about the fins. Thanks for the comparison info!
This is most likey what the vendors are stressing. More fins = more heat transfer. But true - more fins = less airflow. That cannot be good. I heard some guys needing more airflow so they install electric fans in front of the condenser. Don't want to go there either.
What compressor are you gonna use? Keep POA?
I have a friend with a 72 Cutlass that has 134 and everything is original. Not sure if the POA was recalibrated as he bought the car with the conversion already done. He just had the system charged as he had a small leak and he has outlet temps of 36F with outdoor temps of 85F.
Very good point about the fins. Thanks for the comparison info!
This is most likey what the vendors are stressing. More fins = more heat transfer. But true - more fins = less airflow. That cannot be good. I heard some guys needing more airflow so they install electric fans in front of the condenser. Don't want to go there either.
What compressor are you gonna use? Keep POA?
Registered User
Joined: Jan 2011
Posts: 1,665
From: Maryland
I purchased a reman stock compressor from Old Air Products and I had CAA flush and recalibrate the original POA. The finish was very nice and I didn't want the modified look on the POA so I told them to skip the complete restoration of it. I also had CAA build a complete set of hoses and had them re-use my original hose fittings and muffler so the look would be as close to original as possible. Just need to get this car finished so I can see how all of this works.
Thread Starter
Registered User
Joined: Feb 2008
Posts: 11,798
From: Plano, TX
I purchased a reman stock compressor from Old Air Products and I had CAA flush and recalibrate the original POA. The finish was very nice and I didn't want the modified look on the POA so I told them to skip the complete restoration of it. I also had CAA build a complete set of hoses and had them re-use my original hose fittings and muffler so the look would be as close to original as possible.
I hear that old A6 has enough capacity to cool my house!
Could you have it done by the end of the week so i know what to order?
Registered User
Joined: Jan 2011
Posts: 1,665
From: Maryland
Just kidding in case we have any PETA people reading this.
Registered User
Joined: Jul 2006
Posts: 694
From: Manassas, VA
On the R12/134 conversion, remember, 134 operates at a higher pressure, which is why you want to have everything tested. It may not leak with 12, but when you bump the psi, you now have leaks.
The later dryers all use the later material internally, and it's backwards compatible. You can have your original dryer rebuilt too, fyi.
If you choose to stay as much factory as possible, you might as well go R12. Not many places have setups which are for R12, and the oil (from 134) will contaminate your system. Best bet is to go somehwere specializing in AC restoration to have it charged, or spring for a vacuum pump and charge it yourself.
Yes, on the condensors, more fins = better performance, yes, slight change in air flow, but it's nominal. The difference is worth the benefit. If you're going as factory as possible, the denser fin population is visually noticable, fyi.
A6 compressors are fridgedaire, and they did use them in smaller house units. They are overkill for cars, which is just the way I like it!
If you find some of your stuff doesn't check out and you need OE replacements that are rebuildable, I have leftovers if you're interested. Mine's all from a 72, not sure how much difference there is...
.
Thread Starter
Registered User
Joined: Feb 2008
Posts: 11,798
From: Plano, TX
On the R12/134 conversion, remember, 134 operates at a higher pressure, which is why you want to have everything tested. It may not leak with 12, but when you bump the psi, you now have leaks.
The later dryers all use the later material internally, and it's backwards compatible. You can have your original dryer rebuilt too, fyi.
If you choose to stay as much factory as possible, you might as well go R12. Not many places have setups which are for R12, and the oil (from 134) will contaminate your system. Best bet is to go somehwere specializing in AC restoration to have it charged, or spring for a vacuum pump and charge it yourself.
Yes, on the condensors, more fins = better performance, yes, slight change in air flow, but it's nominal. The difference is worth the benefit. If you're going as factory as possible, the denser fin population is visually noticable, fyi.
If you find some of your stuff doesn't check out and you need OE replacements that are rebuildable, I have leftovers if you're interested. Mine's all from a 72, not sure how much difference there is...
.
But - how well could it be flushed and converted later?
Everything on my system will either be new or rebuilt or flushed. Would it be easier if I use the PAG oil now which is supposed to be compatible with both R's? The POA would have to be reserviced for sure, but that shouldn't be a big deal... Using R12 now would cost more at charging time but would be half the price of a new condenser with more fins for 134. Guaranteed cold will be the best part!
Thanks for the parts offer - mine is a 72 so most should be similar. The muff hose could be different though as 2 types were used.
I hate decisions...

Registered User
Joined: Jul 2006
Posts: 694
From: Manassas, VA
If you're sending out the POA, EVAP, and condenser for testing/refurb/calibration, than might as well convert now. You can use the original condenser, it will work fine, even if it's not as good as the newer ones. So you MIGHT see a 10 degree vent discharge difference, worse-case scenario, but it will still be acceptable performance.
My LeMans AC system had R12 in it from the factory all the way up until like 1993, worked flawlessly. I removed all components in 93, cleaned everything up, new dryer, original compressor, and went all the way until the middle of last summer before the compressor seals started to leak. That's like 40 years, and 8 engines, which equals about 680k miles, no kidding. So either way you go will be fine.
.
Thread Starter
Registered User
Joined: Feb 2008
Posts: 11,798
From: Plano, TX
Well it looks like I can get the condenser pressure checked and flushed at the local shop for 25 bucks, so i will do that and try to reuse it. Needs a clean and paint of course...
I think my mind is made up now. As long as the performance is not really limited, I am okay with it.
I will try to bubble-check the evap at home in the fish tank.
I think my mind is made up now. As long as the performance is not really limited, I am okay with it.
I will try to bubble-check the evap at home in the fish tank.
Thread Starter
Registered User
Joined: Feb 2008
Posts: 11,798
From: Plano, TX
Well, pressure testing the evap core failed. Tried a big bucket, but would not cover the whole core. With 2 connections plugged, I was able to get 60 lbs into it until the feed hose blew off. Stirred the neighbors up, as it sounded like a .22. No bubbles from what part was covered.
I thought about dunking it in the fish pond, but it was way too murky. No telling what was lurking about in there and I wanted to keep my hands...
I will take in the condenser to a local shop for test and flush so i will see if they can test the evap also.
I thought about dunking it in the fish pond, but it was way too murky. No telling what was lurking about in there and I wanted to keep my hands...
I will take in the condenser to a local shop for test and flush so i will see if they can test the evap also.
Thread Starter
Registered User
Joined: Feb 2008
Posts: 11,798
From: Plano, TX
Tony
Joined: Mar 2011
Posts: 450
From: wisconsin
Since you've already been diagnosed with the "Might as Wells"...
you might as well pull:
- the fenders
- the hood hinges
- the bumper
- the grills
- the headlight assemblys
- the radiator
- the core support (this will make pulling the engine so much easier)
- the a/c
- the engine
- the transmission
now you'll have clear access to the firewall and the frame rails for painting!! And as an extra special bonus, you can paint the engine and trans too!
just thought you needed a little more encouragement
your welcome!
I had the "Might as Wells" back in '97 too. In the end I was real glad that I took all this apart because it came out real nice. My only regret was that I made these decisions on the fly. It would have been much better had I planned to do all this in the first place.
Good luck and keep smiling.
Registered User
Joined: Jul 2006
Posts: 694
From: Manassas, VA
It's easier to plan on doing it all right from the start, since there's no duplication of effort. What would be a drag is you get it all back together and find out you picthed a rod or whatever and need to go through the engine. Then it all has to come back apart again. Ask me how I know! Hence why I just dove right in on my project. And it wasn't too bad. I saved parts & money for about 4 years, and for about a year worked weekends on it. Some weeknights in the summer too. Total time, maybe 16 months, once the body is complete, of weekends. (I don't do bodywork). Can do it in a shorter period of time with more effort, but it's amazing what you can get done in just a weekend!
.
.
Thread Starter
Registered User
Joined: Feb 2008
Posts: 11,798
From: Plano, TX
So I finally got around to breaking the two spindles down. This way I would be able to clean them up more and get �em ready for paint. The impact wrench sure made the nut removing easy. However the right side had its bolts rusted into the iron parts. It took WD40 and a hammer to finally break them free.
I got them apart and wirewheeled all the pieces a bit more.

I then washed them with simple green, rinsed, and dried with the leaf blower.
The shield plates and caliper mounts will be painted rather than plated. Therefore I soaked them in POR15 metal ready to etch them. This makes paint stick to them much better. Those were quickly rewashed to rid the etchant.
More AC fun�
Since I was already cleaning suspension parts, I also washed up the condenser and the dryer brackets with simple green and a stiff long-bristle brush. Had to repeat about 4 times as it was pretty nasty. Made a HUGE difference.
BTW, the lines were plugged with a rubber plug and cap to prevent any water entry. The fins were straightened after it dried � was not too bad. I will take it to the AC shop next week for test and internal flush.
I checked out the heater core (from what I could see from the firewall hole) and it looked good. There was quite a bit of red sand and dirt in there, but nothing that looked like leaks.

Also the Four Seasons expansion valve and dryer came in from Rockauto. Both seem to be just right � imagine that!
Not much done that day but it sure took time � a good 3 hours worth!
Oh � here is how the last painting batch came out � I am pretty satisfied!

The next day was just prepping the spindle parts and dryer clamps for paint...

This rag joint was a pain to mask.

Could not believe just that took an hour...
I got them apart and wirewheeled all the pieces a bit more.
I then washed them with simple green, rinsed, and dried with the leaf blower.
The shield plates and caliper mounts will be painted rather than plated. Therefore I soaked them in POR15 metal ready to etch them. This makes paint stick to them much better. Those were quickly rewashed to rid the etchant.
More AC fun�
Since I was already cleaning suspension parts, I also washed up the condenser and the dryer brackets with simple green and a stiff long-bristle brush. Had to repeat about 4 times as it was pretty nasty. Made a HUGE difference.
BTW, the lines were plugged with a rubber plug and cap to prevent any water entry. The fins were straightened after it dried � was not too bad. I will take it to the AC shop next week for test and internal flush.
I checked out the heater core (from what I could see from the firewall hole) and it looked good. There was quite a bit of red sand and dirt in there, but nothing that looked like leaks.
Also the Four Seasons expansion valve and dryer came in from Rockauto. Both seem to be just right � imagine that!
Not much done that day but it sure took time � a good 3 hours worth!
Oh � here is how the last painting batch came out � I am pretty satisfied!
The next day was just prepping the spindle parts and dryer clamps for paint...
This rag joint was a pain to mask.
Could not believe just that took an hour...
Thread Starter
Registered User
Joined: Feb 2008
Posts: 11,798
From: Plano, TX
More painting and getting� messy!
So the next day I got up early and went out at 830 to paint the spindle parts, and other various stuff.
Dust shields and rag joint got Eastwood�s Silver cad, the caliper mounts, bolts, and cast pieces got Eastwood�s Detail gray, and the dryer brackets got underhood black.
They were hung in the shed with the AC on 81 so they would dry correctly.
Those were all done within an hour.

So after then I decided to get down and dirty cleaning these nasty things:

They had not only sand and road tar, but also old undercoating and a variety of paint overspray.
So in taking the advice earlier in this thread, I used one of the most powerful cleaners to be found in the average home � oven cleaner�
I laid them out on a tarp to protect the plastic from scratches, and also protect the concrete from the cleaner.
I emptied the whole can onto both of the things and waited ten minutes, then started brushing.
Wow � this stuff dissolved everything it seemed.

After a long time of scrubbing, wiping the worst off with paper towels, and rinsing, I gave the final cleaning with Simple green.
They are very clean now, but the have white swirls in the black plastic. I can kinda see them on the before pictures also, so it is not damage from the cleaner.

Manufacturing flaws? Age? Discoloration from chemicals? Who knows�
After they dried in the hot TX sun (took about 5 minutes�), I took �em in the shed and pried up the staples used for the rubber flaps that cover the suspension. I plan to reuse these with the new flaps (if the ends do not break.)

Two hours later, they are now ready for undercoating.
Dust shields and rag joint got Eastwood�s Silver cad, the caliper mounts, bolts, and cast pieces got Eastwood�s Detail gray, and the dryer brackets got underhood black.
They were hung in the shed with the AC on 81 so they would dry correctly.
Those were all done within an hour.
So after then I decided to get down and dirty cleaning these nasty things:
They had not only sand and road tar, but also old undercoating and a variety of paint overspray.
So in taking the advice earlier in this thread, I used one of the most powerful cleaners to be found in the average home � oven cleaner�
I laid them out on a tarp to protect the plastic from scratches, and also protect the concrete from the cleaner.
I emptied the whole can onto both of the things and waited ten minutes, then started brushing.
Wow � this stuff dissolved everything it seemed.
After a long time of scrubbing, wiping the worst off with paper towels, and rinsing, I gave the final cleaning with Simple green.
They are very clean now, but the have white swirls in the black plastic. I can kinda see them on the before pictures also, so it is not damage from the cleaner.
Manufacturing flaws? Age? Discoloration from chemicals? Who knows�
After they dried in the hot TX sun (took about 5 minutes�), I took �em in the shed and pried up the staples used for the rubber flaps that cover the suspension. I plan to reuse these with the new flaps (if the ends do not break.)
Two hours later, they are now ready for undercoating.
Registered User
Joined: Nov 2010
Posts: 131
From: Chicago
Just wait until you remove the wheel well on the passenger side , you get to play with the heater and A/C , and if you are going to use the 2 wrench method ,works Great just make sure they are quality wrenches , Sears has a long handle chrome wrench set I have my eye on sooner or later it will be added to the collection ... enjoy ...
Thread Starter
Registered User
Joined: Feb 2008
Posts: 11,798
From: Plano, TX
The wheel well on the passenger side was pulled a few weeks ago and AC box already was pulled. No drama there like that stupid brake booster. I went ahead and bought the long handled wrenches, just because I like having more tools....
wait.... what....
Joined: Mar 2009
Posts: 817
From: London Ont Canada
Thread Starter
Registered User
Joined: Feb 2008
Posts: 11,798
From: Plano, TX
WOW - that took time and patience but it looks great! Excellent job!
What paints did you use? I like the silver plating one used on the round...
I have not been happy with Eastwood's "silver cad" paint - see rag joint and coil clamp at bottom. It is not very shiny like real cad. I got much better results with a walmart brand 'aluminum' paint I borrowed from my neighbor - see dashpot and cruise servo above.

I see that your rag joint has ground contacts on it - wonder why mine does not?

My rag joint looks nice now - good enough anyway. I wanted a new one but at 70 bucks, I kept the old one. The rubber looks to be part of a tire, so it is in pefect shape.
wait.... what....
Joined: Mar 2009
Posts: 817
From: London Ont Canada
Thread Starter
Registered User
Joined: Feb 2008
Posts: 11,798
From: Plano, TX
Industrial �Silly String�
At least that�s how undercoating sprays like� Last week on Sunday morning was very dry � what a surprise! Great time to spray the inner fender wells. It is best to shoot some scrap first to know how this stuff comes out of the can. Otherwise you can put too much down at once and get mega air bubbles. If this happens, just pop �em with a stick before they dry and spray over them. Here is one before spray:

I sprayed them at 830 am before it got hot and they were pretty much dried at 11, just in time to put them in the shed so the coating can cure under 90* for a day or so.
I used one 18oz can of Eastwood�s rubberized undercoating for each wheel well and saved a little extra for the rubber flaps that were installed that afternoon.
The fender well flaps were from OPG � a siliconized rubber stuff that is not too similar to the original stuff. It is much too flexible and shiny � dirt and grease will show well on these.

Oh, well � better than the torn up old ones.
I installed these in the shed, since it was air conditioned� Outside temp was at about 106 at this point and still rising!

A dremel with wirebrush was used to clean the undercoating from the staple legs.
Since they were all in good shape, I reused them. I mashed the rubber over the points, starting at the center deep section. From there I worked outwards keeping the flaps centered and lined up. A pair of pliers bent the points in to each other just enough to keep the rubber on.
After they were all on, I used a small metal plate as a backing and used some large pliers to bend the staples over completely.

It worked great, just a little time consuming.

I sprayed them at 830 am before it got hot and they were pretty much dried at 11, just in time to put them in the shed so the coating can cure under 90* for a day or so.
I used one 18oz can of Eastwood�s rubberized undercoating for each wheel well and saved a little extra for the rubber flaps that were installed that afternoon.
The fender well flaps were from OPG � a siliconized rubber stuff that is not too similar to the original stuff. It is much too flexible and shiny � dirt and grease will show well on these.
Oh, well � better than the torn up old ones.
I installed these in the shed, since it was air conditioned� Outside temp was at about 106 at this point and still rising!
A dremel with wirebrush was used to clean the undercoating from the staple legs.
Since they were all in good shape, I reused them. I mashed the rubber over the points, starting at the center deep section. From there I worked outwards keeping the flaps centered and lined up. A pair of pliers bent the points in to each other just enough to keep the rubber on.
After they were all on, I used a small metal plate as a backing and used some large pliers to bend the staples over completely.
It worked great, just a little time consuming.


