
Update progress on 64 "Post"

Registered car nut
Joined: Apr 2008
Posts: 1,146
From: Puyallup

Thread Starter
Registered User
Joined: Jul 2009
Posts: 3,190
From: Dallas-Fort Worth
moving along
As mentioned in the transmission section, I did not like the way I originally installed the cross member for the 200R4 conversion. (frame issues on a 64-65 a-body) Pictures will show how I (believe) I figured out to reposition it without bending the frame, possibly screwing up the pinion angle and the structural integrity of the frame. The solution was wedge washers with the addtion of a gusset on the bottom side of the frame. The modified 200R4 now sits in place. It's a BRF 200R4 built to handle the 425 build down the road. ( except for the converter) I was not happy with the rattle can finish on my fabbed up dual snorkel 64 442 air cleaner so my brother took it work and finished it. Close up pictures show where I grafted in the other snorkel. I will be working on the restoration of the core support,setting up the 200R4 TV cables, brackets, fill tube, finishing up the brake lines, installing the parking brake cable working my way too the rear for the final shake down making sure my handy is tight or torgued and greased. Would really like to pick out and install the radiator, tramsmission lines, shroud, electric fans, relays and all that's involved before the body shop calls for the chassis sometime late in January. I fellow club member thats building a 65 has a very sweet A/C bracket that works with the Sanden compressors is having one made for me.
IMG_1233.jpg
IMG_1234.jpg
IMG_1227.jpg
IMG_1229.jpg
IMG_1239.jpg
IMG_1245.jpg
IMG_1243.jpg
IMG_1240.jpg
IMG_1233.jpg
IMG_1234.jpg
IMG_1227.jpg
IMG_1229.jpg
IMG_1239.jpg
IMG_1245.jpg
IMG_1243.jpg
IMG_1240.jpg
Thread Starter
Registered User
Joined: Jul 2009
Posts: 3,190
From: Dallas-Fort Worth
almost ready for the body to be reunited
Just about got everything done as can be getting ready for the body shop. Now they are two weeks behind with the body ( probably longer). Has anybody else had problems with body/restoration shops working on a time line?  I will go ahead and restore/install the core support wiring harness, find a dust cover for the 200R4, I think I am going to run Gates #7066 3/8 push lock hose from the tank to the fuel pump. And start on the steering column, instrument panel. I have to see what kind of $$$ I have left after I pay my property taxes and insurance
  Then I will order a shrouded flex lite dual fan. Pick the correct alternator. Here are some more detail pictures including bending the trans lines, core support and headlight eyebrows, work on the dash-a 68-74 Nova column shift indicator lens.Fellow Club member Realfast57vetteguy fabbed a A/C bracket for a Sanden compressor. Nice job Mark ( probably could get enough interest in these to build several more)
IMG_1280.jpg
IMG_1281.jpg
IMG_1293.jpg
IMG_1295.jpg
IMG_1296.jpg
 92.jpg[/IMG]
IMG_1288.jpg
IMG_1285.jpg
IMG_1286.jpg
IMG_1289.jpg
IMG_1301.jpg
IMG_1302.jpg
IMG_1297.jpg
IMG_1279.jpg
IMG_1275.jpg
IMG_1276.jpg
I will go ahead and restore/install the core support wiring harness, find a dust cover for the 200R4, I think I am going to run Gates #7066 3/8 push lock hose from the tank to the fuel pump. And start on the steering column, instrument panel. I have to see what kind of $$$ I have left after I pay my property taxes and insurance Then I will order a shrouded flex lite dual fan. Pick the correct alternator. Here are some more detail pictures including bending the trans lines, core support and headlight eyebrows, work on the dash-a 68-74 Nova column shift indicator lens.Fellow Club member Realfast57vetteguy fabbed a A/C bracket for a Sanden compressor. Nice job Mark ( probably could get enough interest in these to build several more)IMG_1280.jpg
IMG_1281.jpg
IMG_1293.jpg
IMG_1295.jpg
IMG_1296.jpg
92.jpg[/IMG]IMG_1288.jpg
IMG_1285.jpg
IMG_1286.jpg
IMG_1289.jpg
IMG_1301.jpg
IMG_1302.jpg
IMG_1297.jpg
IMG_1279.jpg
IMG_1275.jpg
IMG_1276.jpg
Registered User
Joined: Apr 2010
Posts: 77
From: Southport, NC
Looking good!
Been awhile since we've talked. Talk about body shops. I took this body guy under my wing, helped him along because he did such great work. By the time he was done with me, he had warped my hood and deck lid, short cutted several areas in the trunk and lost several key parts from my tear down. Not to mention that he had received a fairly large advance. I pulled out and it took me months to find someone else and he was three hours away. I'm looking for the original guy because I have something for him. Anyway, your car is looking great, I love that air cleaner. I did mine in a matte finish, but I may redo mine after looking at yours. When do you estimate an on road date? I actually started mine yesterday, it was a great milestone. I thought we might have an issue since I di the rebuild about a year ago, but it fired right up. I will have the car for two years this April and hopefully I will have it on the road by then. Hope to put the glass in next week and then I can start on the interior. Hopefully by March, it will be ready for some touch up, wet sanding and a good buffing. My progress is listed on the 442 forum. Keep in touch and by the way, how do you upload those photobucket pics on here?
Randy
Randy
Thread Starter
Registered User
Joined: Jul 2009
Posts: 3,190
From: Dallas-Fort Worth
Och othiiia
OTHIIIA I just add the photos like I do on 442.com from my album on photobucket.com. The guy that runs the center called and he is going to get back on my ride Saturday. I did not mention that I did agree to a one year restoration job and got a great discount $$$ amount because it was considered a fill in car between other projects that are on a more timely frame. But now it's been 4 weeks longer than what we agreed too.His work is great, so lets see how it goes from here. I'm assuming he fully understands without me saying a word that this project has been getting ALOT of attention in our Hot Rod community, including you guys,other forums and the magazines ( Jeff Smith).
Thread Starter
Registered User
Joined: Jul 2009
Posts: 3,190
From: Dallas-Fort Worth
The chassis is ready to go except for deciding which type of fuel line I want to run and exhaust set up. It's been a long time, here are before shots:
DSCN2143-2.jpg
64outfrontjustgotit-2.jpg
DSCN2143-2.jpg
64outfrontjustgotit-2.jpg

Thread Starter
Registered User
Joined: Jul 2009
Posts: 3,190
From: Dallas-Fort Worth
Hang on Citcapp, I'm stoked too but the body shop will not be ready for the chassis for another 3-4 weeks, But I'm going up there next week to take some pictures. Not many people will ever believe what has actually transformed with this car. I am going to make a photo and description album, hard copy and on disc.
Thread Starter
Registered User
Joined: Jul 2009
Posts: 3,190
From: Dallas-Fort Worth
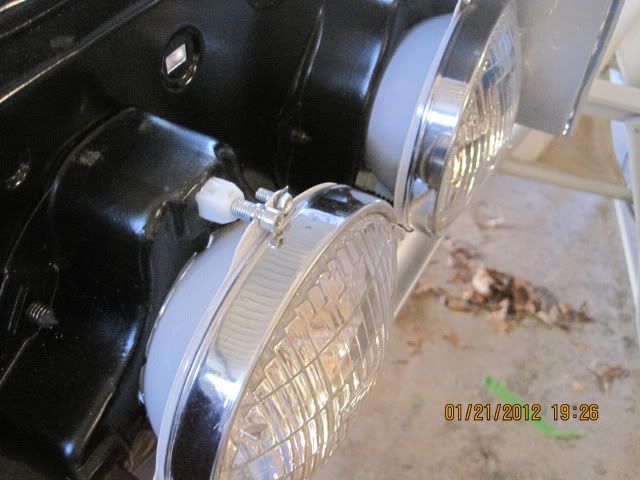
STARDATE04082012 still waiting for the body shop-still not in primer. That said I decided to install headers, sold the W-Z's too a club member, had to bend new front brake lines, installed a Flexalite 410 series dual electric fan, Powermaster mini starter. For a 64 F-85 only this fan fits perfect. ( 65's are 3inches taller). Given the number of square inches this should keep the 400E nice in cool in Texas heat. This is a stock rebuilt 3 core Harrison radiator. However I will need an aluminum radiator to support the 425.
IMG_1430.jpg
IMG_1428.jpg
IMG_1420.jpg
IMG_1423.jpg
IMG_1421.jpg
IMG_1427.jpg
IMG_1426.jpg
IMG_1418.jpg
64outfrontjustgotit.jpg
IMG_1430.jpg
IMG_1428.jpg
IMG_1420.jpg
IMG_1423.jpg
IMG_1421.jpg
IMG_1427.jpg
IMG_1426.jpg
IMG_1418.jpg
64outfrontjustgotit.jpg
Thread Starter
Registered User
Joined: Jul 2009
Posts: 3,190
From: Dallas-Fort Worth
Little less than an inch, plenty, of space, the motor should not move forward. If it does trust me you have more issues than a ruined fan!! If you use a 64 water pump pulleys etc. that pump has a shorter snout than later pumps. gives you even more room. I have a 64 pump and I compared it.
Registered User
Joined: Jan 2008
Posts: 3,515
From: South River, New Jersey
Wow....
Great Write up Rob, I was following along as well. what to write? LOL... your going like gang busters and I am stalled LOL.... very very nice work..
I hope the body shop gets her done soon, you are just about there!!! looking forward to the next installment
I hope the body shop gets her done soon, you are just about there!!! looking forward to the next installment
Thread Starter
Registered User
Joined: Jul 2009
Posts: 3,190
From: Dallas-Fort Worth
STARDATE 05242012-I'm starting to get stoked
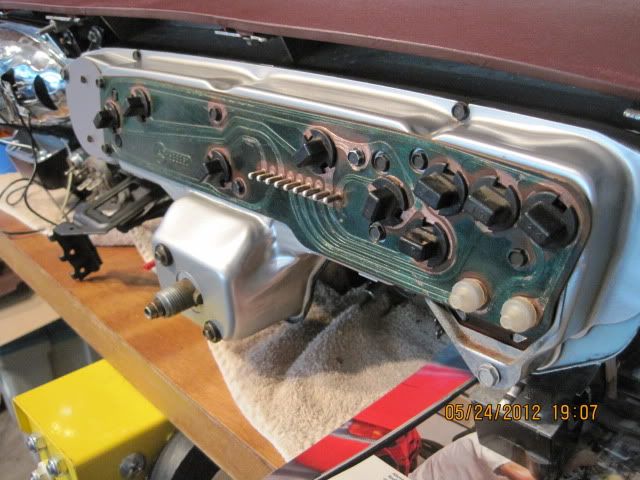
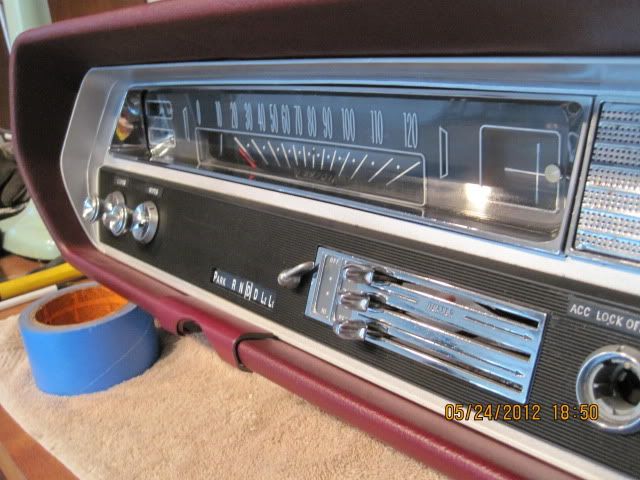
The body shop called and there maybe red paint on the body next week! In the meantime I just about finished restoring the dash and components. Steering column is next. I sent the circuit board and the fuel gauge to Red Line Gauge and Clock Repair in TN and they did a great job, very reasonable. The rest I did myself. I want to ( at least for know) continue to keep the "granny car " base model look, keeping the $$$$$ beneath the skin. With the Hotchkis suspension and all it would be almost impossible to stay in the seat in an Auto Cross event but we will deal with that later. So hopefully I will have the body on the car and back home by the 4th of July????IMG_1563.jpg
IMG_1572.jpg
IMG_1570.jpg
IMG_1559.jpg
Registered User
Joined: May 2012
Posts: 188
From: Fl
The body shop called and there maybe red paint on the body next week! In the meantime I just about finished restoring the dash and components. Steering column is next. I sent the circuit board and the fuel gauge to Red Line Gauge and Clock Repair in TN and they did a great job, very reasonable. The rest I did myself. I want to ( at least for know) continue to keep the "granny car " base model look, keeping the $$$$$ beneath the skin. With the Hotchkis suspension and all it would be almost impossible to stay in the seat in an Auto Cross event but we will deal with that later. So hopefully I will have the body on the car and back home by the 4th of July???? 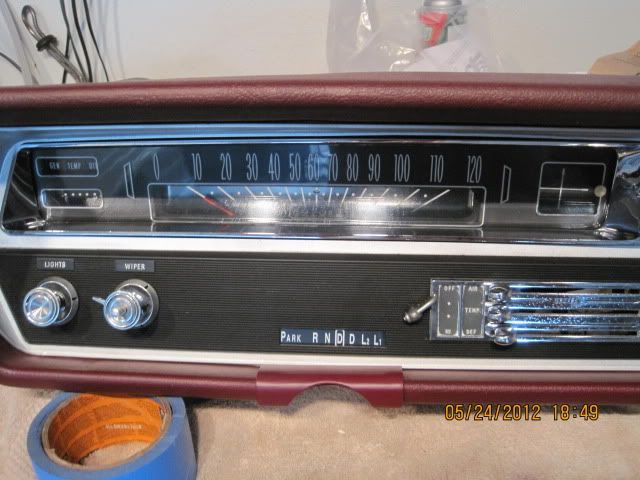

Thread Starter
Registered User
Joined: Jul 2009
Posts: 3,190
From: Dallas-Fort Worth
We have primer
Thanks guys for the compliments. YES we are moving along, here are some shots of the body, this poor thing has come along way. There is just about as much new metal as there is original metal on this car!!. If you include the floors and trunk there is much more! At least the body will be in red by this weekend.
IMG_1584.jpg
IMG_1583.jpg
IMG_1582.jpg
IMG_1581.jpg
IMG_1580.jpg
IMG_1585.jpg
IMG_1584.jpg
IMG_1583.jpg
IMG_1582.jpg
IMG_1581.jpg
IMG_1580.jpg
IMG_1585.jpg
Thread Starter
Registered User
Joined: Jul 2009
Posts: 3,190
From: Dallas-Fort Worth
Thanks Richard, the goal is now to have the car ready for the 2013 Power Tour out of Dallas next year. I will not go on another Power Tour without an overdrive and AC, been there done that. The 64 "rustbucket" should be ready with or without the built 425. When the rolling chassis goes to the body shop it will give me a chance to get the 67 ready to sell. It's a great driver, reliable is hell, had for 8 years but needs to have a new home, then I can finish building the 64 and start on the 63 Corvette.

Registered User
Joined: Jan 2009
Posts: 1,412
From: maryland
I really have a liking for '64 post cars and yours looks awesome! Out of ALL my years and body shops, I DO have one that is reliable, timely, and worth the money. He is a friend (we became friends after doing business several times) and I have given him many referrals and everyone is happy---even my attorney now has his work done there. My '72 442 received a COMPLETE tear down, body work, show quality paint, and re-assembly in about six months. We "contracted" (verbally) on a price and what he would do, what I would do, and when the car was to be finished, and it could not have been smoother. If anyone would like to have their car done there just PM me.
Keep us "posted" (pun intended) on your progress and let us in on that '63 'Vette!
Keep us "posted" (pun intended) on your progress and let us in on that '63 'Vette!
Thread Starter
Registered User
Joined: Jul 2009
Posts: 3,190
From: Dallas-Fort Worth
This is getting crazy
Every time I hear from the body shop he saying he keeps finding little imperfections and correcting. This week he was making sure the seams line up IE: doors, front and rear window channels due to the fact those are new doors I sourced and alot of patch panel work was welding in the window channels. As of 7/27/2012 he says he is final sanding with 400 and this should do it. In the meantime I went ahead and installed an Aluminum radiator from Champion. With a little research and phone calls to Champion. I figured out a 64-65 GTO radiator is almost a direct fit and you DO NOT have to modify the 64 core support. This radiator even has the outlet on the passenger side.This is good news for the 64 F-85 owners out there! The undercarriage turned out very good. Except to touch up the over spray it's good to go. If you look through the whole post that is a completely new floor, trunk, all the braces, inner fender wells, and even a sourced panel between the tail lights.
IMG_1645.jpg
IMG_1643.jpg
IMG_1644.jpg
IMG_1693.jpg
IMG_1691.jpg
IMG_1692.jpg
IMG_1645.jpg
IMG_1643.jpg
IMG_1644.jpg
IMG_1693.jpg
IMG_1691.jpg
IMG_1692.jpg
Registered User
Joined: Apr 2010
Posts: 77
From: Southport, NC
Nice paint
It looks great, what paint did you use? We used a 2008 corvette burgundy to replicate the Regal Mist. Very close to original but with a much deeper shine. I'm down to placing decals. I couldn't be happier with the way everything turned out.
Link to some pictures of the car:
http://s1155.photobucket.com/albums/...iii/?start=all
Link to some pictures of the car:
http://s1155.photobucket.com/albums/...iii/?start=all
Thread Starter
Registered User
Joined: Jul 2009
Posts: 3,190
From: Dallas-Fort Worth
the fun begins soon
Stardate 08022012, a few blimishes were fixed, all the over spray on the bottom is black now. They will be painting the doors, hood and trunk lid. Going to make arrangements with my buds to get a trailer and get the rolling chassis up to the body shop. Mount the body and let them put the rest of the panited parts on, shim, adjust,, door seals, weather strip etc. Get the "Rustbucket" home and go from there. Another surprise on the project coming soon.
Thread Starter
Registered User
Joined: Jul 2009
Posts: 3,190
From: Dallas-Fort Worth
OTHAIII I will find out what he used, I know the color code is what is on the ID tag, In think CC-Target Red. I also used some high end clear that actually makes the car look "wet"
Registered User
Joined: Jul 2011
Posts: 488
re
Stardate 08022012, a few blimishes were fixed, all the over spray on the bottom is black now. They will be painting the doors, hood and trunk lid. Going to make arrangements with my buds to get a trailer and get the rolling chassis up to the body shop. Mount the body and let them put the rest of the panited parts on, shim, adjust,, door seals, weather strip etc. Get the "Rustbucket" home and go from there. Another surprise on the project coming soon.
Thread Starter
Registered User
Joined: Jul 2009
Posts: 3,190
From: Dallas-Fort Worth
The cost of this build is WAYYYYY over budget, That said I may fire the car up and work out the bugs with the 67 400E that you have seen in previous pictures and build the 425 later. Now, I need to order $$$$$ worth of parts including Vintage A/C. The stock 400E will pull some, this is a base light weight, but the 425 thats on the drawing board, Will be just AWSOME. Got alot of parts already. And the rest of the car was built around the 425, all I have to do is change the converter on the 200R4.


