
Update progress on 64 "Post"

Thread Starter
Registered User
Joined: Jul 2009
Posts: 3,187
From: Dallas-Fort Worth
progress on 64 "Post" 400E about done
This past few weeks my attention was turned from sheet metal work and decided to use my 67 400E until I build the 455 down the road. Way early to be putting a motor together but I gathered up alot of parts I had in stock and ordered some. When I was installing the water pump I discovered that a few of the little 1/4 inch threaded holes in the timing cover were stripped Best advise was: remove the balancer/timing cover and weld 4 nuts on the back of the cover and re-install it. It was not easy putting that cover back on with the oil pan sealed even though I lossened the first two bolt on both sides of the pan. I hope it does not leak
 Encloed are what I spent most of the day outside working at 105 degrees My plan on this build is giving the post a 'STEALTH LOOK" Actually found a 66-67 big car Q-jet base that works the original stock Jetfire air cleaner. Currently sitting below air cleaner is an Edelbrock 800CFM performer, on a performer manifold.W-Z manifolds etc.weldedcover.jpg[IMG]
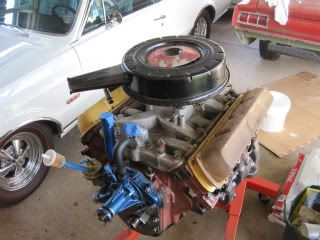 http://i119.photobucket.com/albums/o...i/IMG_0292.jpg[/IMG]IMG_0292.jpg
Best advise was: remove the balancer/timing cover and weld 4 nuts on the back of the cover and re-install it. It was not easy putting that cover back on with the oil pan sealed even though I lossened the first two bolt on both sides of the pan. I hope it does not leak Encloed are what I spent most of the day outside working at 105 degrees My plan on this build is giving the post a 'STEALTH LOOK" Actually found a 66-67 big car Q-jet base that works the original stock Jetfire air cleaner. Currently sitting below air cleaner is an Edelbrock 800CFM performer, on a performer manifold.W-Z manifolds etc.weldedcover.jpg[IMG]http://i119.photobucket.com/albums/o...i/IMG_0292.jpg[/IMG]IMG_0292.jpg
Last edited by therobski; Mar 16, 2011 at 03:53 PM. Reason: UPDATE PROGRESS 3/17/3011
Thread Starter
Registered User
Joined: Jul 2009
Posts: 3,187
From: Dallas-Fort Worth
This weekend I may get finished and paint the motor, wrap it up put her back in the corner and move with the body etc. I already bought the correct 400 bronze paint from Hirsche's but maybe even more strealth if I bought the 330 gold, but not many people these days know the differnce.

Registered User
Joined: Mar 2008
Posts: 1,012
From: Phx, AZ
I like the stealth engine, that intake does stick up a bit higher though.
I found a factory A4 intake for my 403, and it will be gold soon.
The 403 looks like the 330, just has wrong casting numbers.
Love the look with the exh manifolds.
I always have a water pump on the front cover, when putting it on with the pan already there.
Gives you leverage.
I wish I could run 2 of the non-punched factory valve covers, but it needs a breather somewhere, does it not?
Going for a clean look.
Good job, keep us posted.
Jim
Last edited by Warhead; Aug 12, 2010 at 04:55 PM.
Registered User
Joined: Sep 2006
Posts: 2,384
From: Union City Calif.94587
I sure hope you did some work on those water pump holes? They look real bad in the pic, I'll bet they are bad in real life. I have use "JB weld" in the past and filed smooth and some sealer. So far so good, no leaks. I hope yours will not leak.
Gene
Gene
Thread Starter
Registered User
Joined: Jul 2009
Posts: 3,187
From: Dallas-Fort Worth
Actually in the picture was the nuts welded to the cover.  I am coming back to Dallas today and will get back out in the heat over the weekend. As far as a PCV/breather on the 400 I am going to use the 330 covers and one vent is not punched. With that said I may use the original 330 oil fill tube with the breather cap.
I am coming back to Dallas today and will get back out in the heat over the weekend. As far as a PCV/breather on the 400 I am going to use the 330 covers and one vent is not punched. With that said I may use the original 330 oil fill tube with the breather cap.
Thread Starter
Registered User
Joined: Jul 2009
Posts: 3,187
From: Dallas-Fort Worth
It's to hot to weld ( 106 degrees) so I finished up with the 67 400E I will use in this project until the bad boy 455 is built. The motor internally is stock, performer manifold, Edelbrock 800 CFM carb. Morroso pan, W-Z exhaust manifolds, HEI. She ran ecellent maybe has 3-4K miles on it. I was going to sell this motor and use the proceds for the 455 build but as hard to find these early 400's are there seems to be a weak market for them. IMG_0296.jpgIMG_0295.jpgIMG_0297.jpg
Thread Starter
Registered User
Joined: Jul 2009
Posts: 3,187
From: Dallas-Fort Worth
Getting more done and more rust
Removed rear deck filler panel and discovered all sorts of rust holes. I have new 64 GTO replacement panel but I'm going to need some advice on some of this type of repair. One thing is that where I need to separate two parts that were spot welded together; there are rusted so bad I cannot locate the spot welds. One one part I tried gently and got up under it with an air chesel and it actually cut the spot weld loose but making a bigger hole; like a tear. Another area I used the air chesel just to where I thought the spot weld was and then used my high spped drill with a spot weld remover bit and had a little more success without alot of collateral damage. Any more tips and ideas , I need to make some patch panels for around the window channel. I need advice on how too.
Getting There
Joined: Jul 2006
Posts: 1,147
From: Regina S.K. Canada
Cut off wheel works wonders.......... quick grind where you think a spot weld might be.. I think it took me 1/2 hour with it if you miss the spot weld a bit not to big a deal the metal is thin and I just bent it off then ground the spot weld down with the cutoff wheel
I also put my plug welds in from the underside of the front and rear of the panel then panel glued the sides.. trust me alot easier grinding the welds down from the underside than in the trunk gutter channel
heres a link to mine I think it is second page somewhere
https://classicoldsmobile.com/forums...r-3-years.html
Thread Starter
Registered User
Joined: Jul 2009
Posts: 3,187
From: Dallas-Fort Worth
Alot of work done-update
RANZAN, got alot of tips from your rpevious threads,thanks. My biggest challenge was trying to locate the spot welds and remove them on a rusted out pieces. Few things I discovered yesterday removing these pieces is: I got up in between the two pieces with a small 1/2 inch wide chisel and tap it until it stops, I found that's where a spot welds were close, not exact so what I did unstead of using my spot weld remover. Then in a 360 degree fashion is use the chisel and cut under around the weld and pulled the piece loose and moved on to the next one. Of couse when I discovered where a spot weld was I used it until I could see a little rust around the drill hole and then stopped, using the chisel the rest of the way not going through both panels. It took awhile but goter done! Then I completely restored/cleaned the panel and package tray with a sander, wire wheel, ground down the remains of any spot welds, cleaned the surface with brake cleaner and sprayed/treated it with Rust encapsulator from Eastwood. The replacment panel was sanded and sprayed with seld eching primer Now I need some help with how to make patch panels for several holes in the window channle before I start welding everything.

Getting There
Joined: Jul 2006
Posts: 1,147
From: Regina S.K. Canada
do you have access to a metal break.. shinker/ stretcher?
you might be able to get away with small patch areas on channels depending on how much metal is left in there...cut just below roof angle still in the channel area
corners will be a little more tricky probably hammer and dolly work
you might be able to get away with small patch areas on channels depending on how much metal is left in there...cut just below roof angle still in the channel area
corners will be a little more tricky probably hammer and dolly work
car guy
Joined: Apr 2008
Posts: 5,675
From: Dallas TX
Its looking good Rob and Wes is putting you are the right track. His advice on cutting spot welds by grinding the top layer off with a cut off wheel is dead on. On those corners you need to get all the lead out around that area. You don't need to be grinding ,cutting, welding ect. with with that lead there. Its hard to say what to do in the corners without seeing it all cleaned up. The easiest thing to do it going to be make it in two patches like the factory is. Make one patch for the sail panel and another overlapping it fixing the roof panel.
The center areas are just going to take a few straight L shaped patches. You are going to have to get creative on bending. A few small pieces of angle iron and some c clamps make a great way to break metal over. If I had my new shop built and set up with fab tools all this could be knocked out in a day but not anything is set up now. I have to do everything by hand
Sorry I didn't respond earlier. I was at work all day and didn't get the message until this morning
Thread Starter
Registered User
Joined: Jul 2009
Posts: 3,187
From: Dallas-Fort Worth
Yes indeed, starting to get to many pulls in all directions for things that need to get done. Now I need to pull the trans on the 67, syncros are loose, going to rebuild/ restore it, a M-21, finish upgrading the interior and I'm thinking maybe sell the 67 down the road, because the 64 "post" I'm going to ride into the sunset, along with my 63 vette. But I will get back on track with the post and provide updates on the 64 build-up VERY soon.(Just teaser pictures on the 67)
Thread Starter
Registered User
Joined: Jul 2009
Posts: 3,187
From: Dallas-Fort Worth
RanZan here is another update. Few weeks ago I pulled the motor and trans loaded her up and took her to the restoration center. Finished up there and removed the rest of the front end, wiring harness and the dash. I felt is was best to get the car on a rotisserie and weld it all up the right way instead of me trying to weld laying on my back under the car. Plus it need to have the body raised up oof the frame because I wanted to replace the floor braces. The guys at the restoration center said I did a really did a good job cutting out all the rusted panels and cutting fitting the new panels in place. So I was proud to hear that since this was my first time this deep into a restoration. When they are finished wedling the next step is removove the body from the frame. I will then bring the frame home take it apart, get it sand blasted and powder coated and build a rolling chassis.
Getting There
Joined: Jul 2006
Posts: 1,147
From: Regina S.K. Canada
looking good Rob.... keep us updated
I know about the lying on the floor thing.... finally found a rotisserie for mine as well no more cold floors
Is the Filler panel in and welded ? how did it fit ?
the nice thing about yours is the trunk gutter is attached mine I have to fab them in
I know about the lying on the floor thing.... finally found a rotisserie for mine as well no more cold floors
Is the Filler panel in and welded ? how did it fit ?
the nice thing about yours is the trunk gutter is attached mine I have to fab them in
Thread Starter
Registered User
Joined: Jul 2009
Posts: 3,187
From: Dallas-Fort Worth
The trunk extensions (trunk turn downs) half of one was cut and welding in from a donor car the passenger side was not the best but alright. The restoration center called today (they need more $$$) and all the welding is complete including cutting up and fabbing from a donor rear end, the rear center section between the tailights-the lip, edge where the trunk meets the tail section. I will have more pictures. I hope to go ahead and pull the body and bring the frame home before the end of the year for a complete rolling chassis build while they are working on the body. I hope my Christmas BONUS is good. Don't need a membership to the Jelly Club-Whats the name of the movie where that came from?

Thread Starter
Registered User
Joined: Jul 2009
Posts: 3,187
From: Dallas-Fort Worth
Thanks guys, plans so far are-pulling the body within the next two weeks. I am going to build a rolling chassis while the body is being done ( looking at 14 months out) Going back together is a later model 3:91 8.5 posi, may go tubular on the front A-frames but definetly with a later year 70-72 Cutlass front disk brake system. May go with tubular rear control arms as well. Boxing the frame before I send it off to get it sand blasted and powder coated. Having a 1/2 inch fuel line bent to work with a RobMac fuel pump-going to use the little 330 line as a template, 3 inch mandrell exhaust to the mufflers 2.5 out back , Stage 2 200R4 and the list goes on. However eveything will be built to support a 425 goal is 550 HP at the flywheel although I may drop the perfect running stock 400E in and get cruising for a while. Depends on the $$$$ for the next few years. I say one thing for sure is that at the car shows there will not another base model sleeper 64-F-85 "post car " there built like this one.
Registered User
Joined: Apr 2010
Posts: 77
From: Southport, NC
Great progress
You are doing a fine job, I also like your plan for the car. Sorta like we did on the 71. The 64 will be an original resto since the car was very complete and very little rust, plus it's documented and I bought it from the original owner. Attach are some pics of the 455 we reworked out of my 71 442. It pumping around 460 hp especially on those cool days. Keep those pics coming.
Thread Starter
Registered User
Joined: Jul 2009
Posts: 3,187
From: Dallas-Fort Worth
Your are right. watch the movie every year during the Holidays. As far as my bonus-Company runs on a calendar year, won't really know until mid February should be good but nothing like last year. 2009 was my best year since I started my medical carreer back in 91.
Thread Starter
Registered User
Joined: Jul 2009
Posts: 3,187
From: Dallas-Fort Worth
new updates on 64 F-85
I went to the restoration center last week and took these pictures. I will go back up in a week or so and help pull the body, get it on a rotisserie and bring the chassis home. Take in down and start building the rolling chassis with alot of upgrades while the body is bring finished.


