
Engine and Engine Bay detail

Thread Starter
Registered User
Joined: Oct 2013
Posts: 435
From: Clinton Twp, MI
Engine and Engine Bay detail
I am starting my build/detail of the engine and bay on my 72 Olds. My goal is to have it be as close to stock appearing with out going completely crazy (Don't have the money to make every little part the exact correct color) My plan is to clean and degrease the engine block and bay. replace the Intake, valve cover and water neck gaskets. It has a Edelbrock intake on it right now and will prob leave it on but will be replacing the Edelbrock carb with the original rebuilt quadrajet 4bbl. We will also be replacing the distributor and coil with a Pretronix ignitor 2 system as well as a new master cylinder and power brake booster. I will post pics as I progress. We got all the gaskets, paints for the bay, block and manifolds, New positive and negative battery cables and top plate info stickers.

Thread Starter
Registered User
Joined: Oct 2013
Posts: 435
From: Clinton Twp, MI

Registered User
Joined: Sep 2012
Posts: 776
From: chicago il
I spent a lot of time detailing my engine about 400 plus hrs and be thorough about it and think everything through fuel brake lines headers etc and use stainless for a lasting look and ceramic headers and get touch up paint to avoid future hassles and label the different paints. I would also suggest painting the suspension with p==15 tinted,plus the frame. I also used heavy duty paints for racing purposes for minimal nicks and have had almost 0 problems and minimal upkeep.
Registered User
Joined: Sep 2012
Posts: 776
From: chicago il
I believe in looks and function and they can co-exist with thought .
I spent a lot of time detailing my engine about 400 plus hrs and be thorough about it and think everything through fuel brake lines headers etc and use stainless for a lasting look and ceramic headers and get touch up paint to avoid future hassles and label the different paints. I would also suggest painting the suspension with p==15 tinted,plus the frame. I also used heavy duty paints for racing purposes for minimal nicks and have had almost 0 problems and minimal upkeep.
Registered User
Joined: Aug 2013
Posts: 3,900
From: Central Illinois
One lesson I learned, although i still don't know the answer to, is that I wire-wheeled all my steel stuff; brake lines, trans lines, steel fuel line, etc. Degreased and shot them with clear-coat. A year later they are all rusting again (except for the fuel line). Even though I never take the car out in the rain or winter weather.
I also used a cheap paint on my grill, not anticipating the amount of smashed bugs it would encounter. Derp!
I also used a cheap paint on my grill, not anticipating the amount of smashed bugs it would encounter. Derp!
Thread Starter
Registered User
Joined: Oct 2013
Posts: 435
From: Clinton Twp, MI
I've done a lot of homework on paints to use and not use. My past experience is the Eastwood ceramic enamel engine paint works extremely well (used it on my chevelle) Lasts very long and very easy to clean up any grease and such. I also degrease, scuff then use a wax and grease remover before spraying. I also got enough clear plastic car cover we wrap our cars in at our shop in the paint booth to prevent any over spray. Bought all new rubber products (hoses and belts) as well as gaskets and other sealers.
Thread Starter
Registered User
Joined: Oct 2013
Posts: 435
From: Clinton Twp, MI
Registered User
Joined: Aug 2013
Posts: 3,900
From: Central Illinois

Acceleratii maxim rapidus
Joined: Jul 2013
Posts: 369
From: Great Southern Taxland...
This is one job I actually enjoyed, although it took many hours over several weeks to complete. I like what you did to your Chebby, it takes a while and your ocd side tends to come out after you start but the satisfaction of the finished job is worth it.
A few pics of mine before, during and after.
455resto1_zps57e45347.jpg
455resto2_zpsda13b4fa.jpg
455resto3_zpsc1d5b9aa.jpg
P1533_17-06-13_zps0a92cf69.jpg
a024cadc-a083-4b3e-9b7a-e8b82d4dacbf_zpsa4848e64.jpg
A few pics of mine before, during and after.
455resto1_zps57e45347.jpg
455resto2_zpsda13b4fa.jpg
455resto3_zpsc1d5b9aa.jpg
P1533_17-06-13_zps0a92cf69.jpg
a024cadc-a083-4b3e-9b7a-e8b82d4dacbf_zpsa4848e64.jpg
Registered User
Joined: Sep 2012
Posts: 776
From: chicago il
paint issues
One lesson I learned, although i still don't know the answer to, is that I wire-wheeled all my steel stuff; brake lines, trans lines, steel fuel line, etc. Degreased and shot them with clear-coat. A year later they are all rusting again (except for the fuel line). Even though I never take the car out in the rain or winter weather.
I also used a cheap paint on my grill, not anticipating the amount of smashed bugs it would encounter. Derp!
I also used a cheap paint on my grill, not anticipating the amount of smashed bugs it would encounter. Derp!
Registered User
Joined: Aug 2013
Posts: 3,900
From: Central Illinois
[IMG]
 [/IMG]
My engine was a black, greasy mess with weird wiring all over the place. Check out this triple fuel pump set up. Scary!
[IMG]
 [/IMG]
[IMG]
 [/IMG]
I actually pulled the engine while I did my renovation. Here's a couple after pics.
[IMG]
 [/IMG]
[IMG]
 [/IMG]
I went for a bit a bit of a cliche look with all the chrome but it makes me happy, lol.
Just an Olds Guy
Joined: Jul 2008
Posts: 24,528
From: Edmonton, AB. And "I am Can 'eh' jun - eh"
There should also be a circular hose tie that holds the upper hose to the radiator support


Thread Starter
Registered User
Joined: Oct 2013
Posts: 435
From: Clinton Twp, MI
Prior owner who did the intake and carb swapped out the covers. I know they aren't right but I like them. The master is leaking and being replaced with a new master and booster as well. I got the upper hose tie to go on when done. I will also be replacing the clamps with tower hose clamps for a more original look.
Thread Starter
Registered User
Joined: Oct 2013
Posts: 435
From: Clinton Twp, MI
Pffft, your bay looks pretty good to me. Here's one of my favorite before pics. Dig that metallic radiator hose.
[IMG] [/IMG]
My engine was a black, greasy mess with weird wiring all over the place. Check out this triple fuel pump set up. Scary!
[IMG] [/IMG]
[IMG]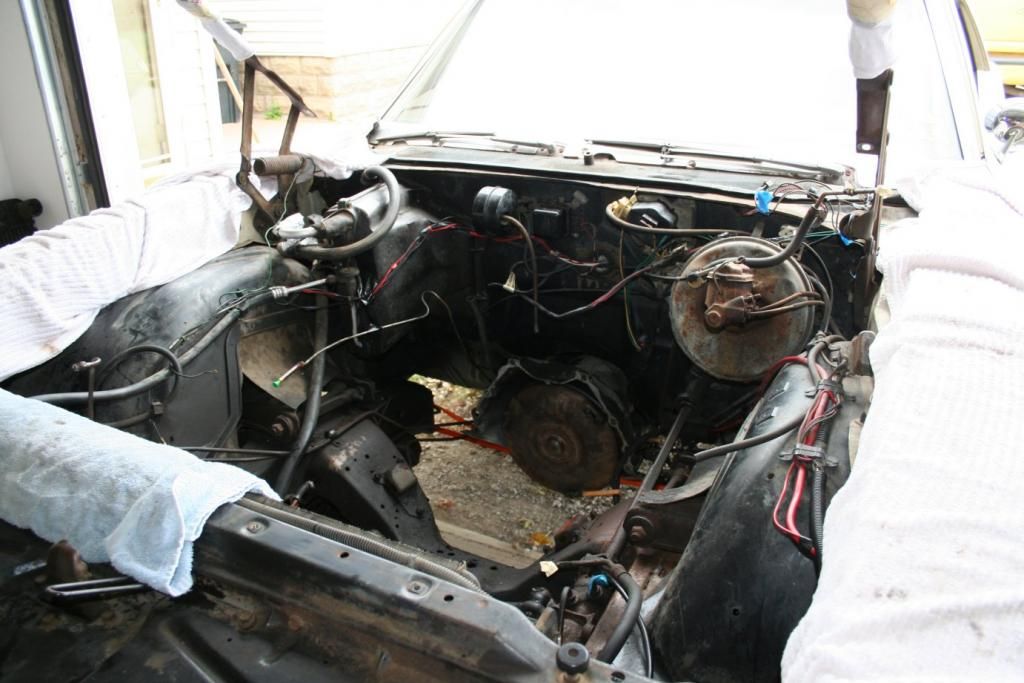 [/IMG]
I actually pulled the engine while I did my renovation. Here's a couple after pics.
[IMG] [/IMG]
[IMG]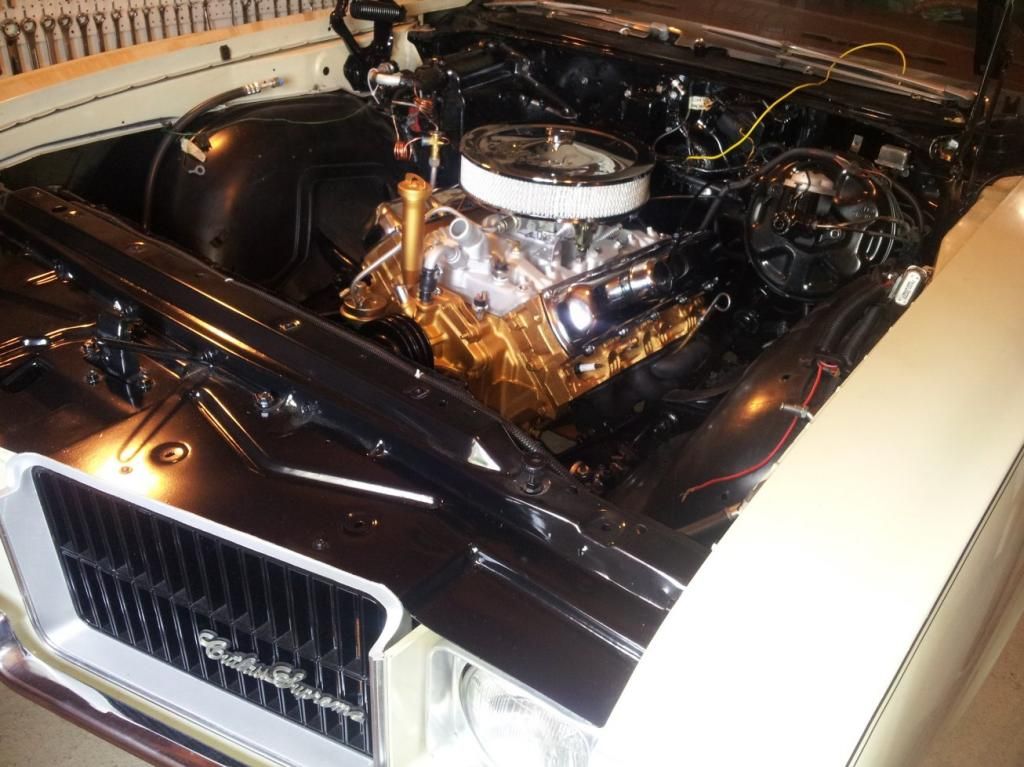 [/IMG]
I went for a bit a bit of a cliche look with all the chrome but it makes me happy, lol.
[IMG]
[/IMG]My engine was a black, greasy mess with weird wiring all over the place. Check out this triple fuel pump set up. Scary!
[IMG]
[/IMG][IMG]
[/IMG]I actually pulled the engine while I did my renovation. Here's a couple after pics.
[IMG]
[/IMG][IMG]
[/IMG]I went for a bit a bit of a cliche look with all the chrome but it makes me happy, lol.
You def put in a lot of work. Mine isn't that clean up close and in person. Did start the clean up last fall with a couple of cans of engine bright and a hot power washer
Just an Olds Guy
Joined: Jul 2008
Posts: 24,528
From: Edmonton, AB. And "I am Can 'eh' jun - eh"

Registered User
Joined: Aug 2013
Posts: 3,900
From: Central Illinois
Where might one find this little fiddly bit? I'm missing mine as well.
Registered User
Joined: Feb 2012
Posts: 359
From: Didsbury, Alberta
Looks good even before you start. But it is nice to see all shiny clean when you pop the hood as well. Look forward to seeing your finished pics. We did the same to the engine/engine bay in our 72'. Hadn't heard of using dryer sheets to keep critters away. Interesting idea.
Just an Olds Guy
Joined: Jul 2008
Posts: 24,528
From: Edmonton, AB. And "I am Can 'eh' jun - eh"
Mac, looks like this:
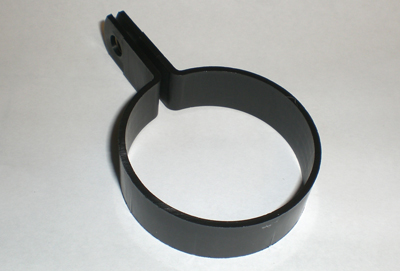
Common repro part from all the vendors. That pic is from Parts Place - 5.00
Part number CS4839T (1968 - 1975 Cutlass/442) UPPER PLASTIC HOSE CLAMP
Fusick calls it HC20 and charges 6.50 (same part BTW)
In Line Tube : 68-77 Top Plate Hose Clamp Pn # - INL11049 -2 pc $6.00 Set 1968-77 Oldsmobile, Cutlass, 442, W-30 Radiator Top Plate Hose Mounting Clamp and Screw. Used to hold the upper rad. hose
Supercars Unlimited Item #: 54-070 Description: All models. Price:$7.49

You get the idea - shop around.
Common repro part from all the vendors. That pic is from Parts Place - 5.00
Part number CS4839T (1968 - 1975 Cutlass/442) UPPER PLASTIC HOSE CLAMP
Fusick calls it HC20 and charges 6.50 (same part BTW)
In Line Tube : 68-77 Top Plate Hose Clamp Pn # - INL11049 -2 pc $6.00 Set 1968-77 Oldsmobile, Cutlass, 442, W-30 Radiator Top Plate Hose Mounting Clamp and Screw. Used to hold the upper rad. hose
Supercars Unlimited Item #: 54-070 Description: All models. Price:$7.49
You get the idea - shop around.
Thread Starter
Registered User
Joined: Oct 2013
Posts: 435
From: Clinton Twp, MI
Looks good even before you start. But it is nice to see all shiny clean when you pop the hood as well. Look forward to seeing your finished pics. We did the same to the engine/engine bay in our 72'. Hadn't heard of using dryer sheets to keep critters away. Interesting idea.
I used to keep my car up north in our garage up there and someone said the smell of dryer sheets detour mice and rats and such. I put them in the engine bay, interior and exhaust tip openings. I stored my cars up there so long its just force of habit to do at home in the winter.
Thread Starter
Registered User
Joined: Oct 2013
Posts: 435
From: Clinton Twp, MI
One thing I am on the fence and look for your guys input is the intake manifold. It is gold now and I know it should be gold but I like the look of the intake when it is silver. What are your guys thoughts??
Just an Olds Guy
Joined: Jul 2008
Posts: 24,528
From: Edmonton, AB. And "I am Can 'eh' jun - eh"
Generally the ones you see that are silver are aluminum intake manifolds. If you want to paint yours silver you can do that. Keep in mind that soon afterwards the heat crossovers on the top of the intake will start to discolor close to the carb and heat choke tubes (burn rusty brown). It shows less on gold than on silver unless you have something guaranteed to stay bright silver? Your call on appearance as it's not going to affect the performance. It would look cool for contrast IMO although I wouldn't do it - after all it's a cast iron intake. Not sure why manifold color really matters since it's not really a show car.
Registered User
Joined: Feb 2012
Posts: 359
From: Didsbury, Alberta
Both would look good. Myself I like seeing all that gold under the hood. It will basically come down to which you like to see best.
Thread Starter
Registered User
Joined: Oct 2013
Posts: 435
From: Clinton Twp, MI
Generally the ones you see that are silver are aluminum intake manifolds. If you want to paint yours silver you can do that. Keep in mind that soon afterwards the heat crossovers on the top of the intake will start to discolor close to the carb and heat choke tubes (burn rusty brown). It shows less on gold than on silver unless you have something guaranteed to stay bright silver? Your call on appearance as it's not going to affect the performance. It would look cool for contrast IMO although I wouldn't do it - after all it's a cast iron intake. Not sure why manifold color really matters since it's not really a show car.
The prior owner put on a edelbrock aluminum intake and painted it gold. I do have the original intake manifold as well. Not sure what to do but don't want to have any really nasty discoloration and don't have the funds for powder coating it.
Just an Olds Guy
Joined: Jul 2008
Posts: 24,528
From: Edmonton, AB. And "I am Can 'eh' jun - eh"
Powder coating would be a complete waste as it also would retain heat which you don't want. If you already have the aluminum one on there, just media blast it clean and keep it silver. It should be just fine and aluminum is a great heat dissipation part. Keep the OEM manifold for anyone who wants it when/if you sell the car.
Generally the EB manifolds flow much better than the OEM ones, so I'd just keep it on there all nice and cleaned up. It shouldn't show much discoloration even after it's been run any length of time.
Generally the EB manifolds flow much better than the OEM ones, so I'd just keep it on there all nice and cleaned up. It shouldn't show much discoloration even after it's been run any length of time.
Thread Starter
Registered User
Joined: Oct 2013
Posts: 435
From: Clinton Twp, MI
Powder coating would be a complete waste as it also would retain heat which you don't want. If you already have the aluminum one on there, just media blast it clean and keep it silver. It should be just fine and aluminum is a great heat dissipation part. Keep the OEM manifold for anyone who wants it when/if you sell the car.
Generally the EB manifolds flow much better than the OEM ones, so I'd just keep it on there all nice and cleaned up. It shouldn't show much discoloration even after it's been run any length of time.
Generally the EB manifolds flow much better than the OEM ones, so I'd just keep it on there all nice and cleaned up. It shouldn't show much discoloration even after it's been run any length of time.
That's what the prior owner did and I will do as well. Thank goodness he kept the original carb (and pieces) that is going to go back on the car cause I hate the edelbrock lol
Registered User
Joined: Aug 2013
Posts: 3,900
From: Central Illinois
powder coating would be a complete waste as it also would retain heat which you don't want. if you already have the aluminum one on there, just media blast it clean and keep it silver. it should be just fine and aluminum is a great heat dissipation part. Keep the oem manifold for anyone who wants it when/if you sell the car.
Generally the eb manifolds flow much better than the oem ones, so i'd just keep it on there all nice and cleaned up. It shouldn't show much discoloration even after it's been run any length of time.
Generally the eb manifolds flow much better than the oem ones, so i'd just keep it on there all nice and cleaned up. It shouldn't show much discoloration even after it's been run any length of time.
Acceleratii maxim rapidus
Joined: Jul 2013
Posts: 369
From: Great Southern Taxland...
Sounds like a great way to spend a weekend, tinkering with mechanical stuff. I find it relaxing in a guy sort of way, much like some people meditate. Of course, after a six pack or two it's not much like meditating at all..

Registered User
Joined: Feb 2012
Posts: 359
From: Didsbury, Alberta
Thread Starter
Registered User
Joined: Oct 2013
Posts: 435
From: Clinton Twp, MI


