
Eddie Hansen's '69 Cutlass Convertible

Thread Starter
Registered User
Joined: Jan 2008
Posts: 3,515
From: South River, New Jersey
More Gnawing..
Ok got a few things going on with the elephant went over today to check on the progress of the rebuild, I am not pushing them to get it done in a hurry, I have been paying Larry a chunk every couple of weeks and he has made steady progress.... while I was there today, saw this ***** and I love oldsmobiles but I have a soft spot for early mopars this is a 64-65 hemi, with yes a magnesium Manifold... ( probably worth what my whole olds motor costs LOL) it is in for a freshening up, thought it was cool figured you guys would enjoy looking over a coffee

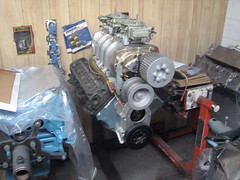
then headed to the back room where Larry was going to be finishing up this bad boy poncho. pretty neat...
then headed to the back room where Larry was going to be finishing up this bad boy poncho. pretty neat...
Last edited by Eddie Hansen; May 2, 2010 at 03:38 AM.
Thread Starter
Registered User
Joined: Jan 2008
Posts: 3,515
From: South River, New Jersey
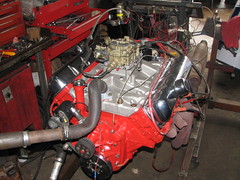
On to my progress...
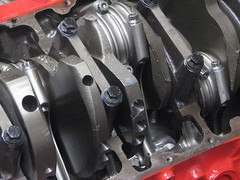
I got slightly delayed picking a cam and stuff, but the short block is all together now, Cam degreed in, and PAINT!!!! yeah!!!

ARP Main bolts probably weren't necessary but the do look good in there ( same for the eagle rods yowza!!)
ARP Main bolts probably weren't necessary but the do look good in there ( same for the eagle rods yowza!!)
Last edited by Eddie Hansen; May 1, 2010 at 10:45 AM.
Thread Starter
Registered User
Joined: Jan 2008
Posts: 3,515
From: South River, New Jersey
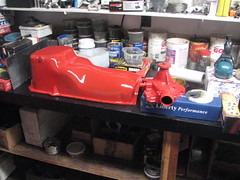
looks pretty stock...
Had the Milodon Pan painted the engine color, no need to advertise it holds a quart more and blends in better with the look I want, water pump has been painted up as well...
Thread Starter
Registered User
Joined: Jan 2008
Posts: 3,515
From: South River, New Jersey
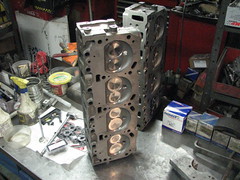
Heads are done...
The valves are installed with new guides, mild port on the heads egr bumps removed, and a little bowl work, nothing major just getting whatever I can out of the stock components and making it durable for the street, new valves as well, These were small valve heads but now have the 2.07's/1.68s in them
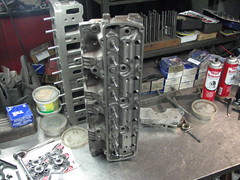
Other side, have to say the heads looked like brand new castings
Other side, have to say the heads looked like brand new castings
Thread Starter
Registered User
Joined: Jan 2008
Posts: 3,515
From: South River, New Jersey
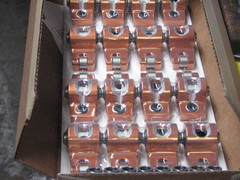
Full Rollers Rockers..
well originally was going to go with roller tipped rockers, but Larry did not like the 3/8ths stud, so we upgraded to harlan sharps.. looked pretty neat
Thread Starter
Registered User
Joined: Jan 2008
Posts: 3,515
From: South River, New Jersey
about all for now...
that is where we are at so far full size pics can be found here
http://www.flickr.com/photos/22989597@N02/
Larry is working on the performer manifold, he machined a block off plate for the manifold heat cross over and welded it in, and he will machine the divider a little to increase top end power.
He is also going to mill off the edelbrock and the performer 455 lettering from the manifold, and will paint it engine color to make it look more "stock" looking, The quadrajet carb is over at the carb shop being freshened and tweaked for my application...
sorry about all the pics, I just get pretty excited seeing stuff happening to the old girl....
Thread Starter
Registered User
Joined: Jan 2008
Posts: 3,515
From: South River, New Jersey
Nice...
well continuing to chew on the elephant LOL...
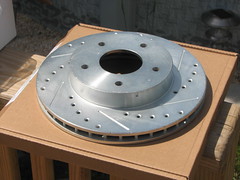
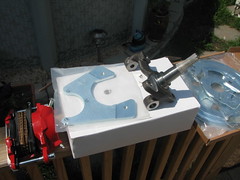
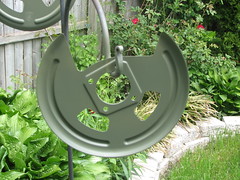
I have finished the rear so now is the time to do the disc brake conversion, I ordered a kit from the right stuff, I then upgraded to all stainless steel hoses, e-brake cables, and got a new Stainless steel hard line kit, I orderd the 9 inch power booster to make room for the slightly taller valve covers, I just started unpacking the kit, I will fit the parts, and once I am sure everything is good, I am going to paint them prior to final assembly, I did order the drilled and slotted? why? I have no idea got carried away, and also the powder coated calipers, hate rust!!
looks to be a well thought out kit
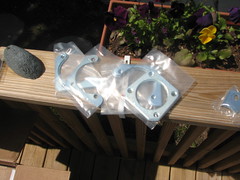
here are the front and rear backing plates, I will etch prime and paint these detail gray

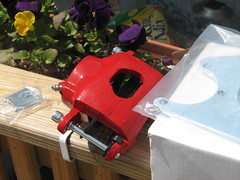
here are the powder coated calipers, these will look sharp and kinda ties in the engine color etc ( I know WTF??? ) work with me..LOL
I have finished the rear so now is the time to do the disc brake conversion, I ordered a kit from the right stuff, I then upgraded to all stainless steel hoses, e-brake cables, and got a new Stainless steel hard line kit, I orderd the 9 inch power booster to make room for the slightly taller valve covers, I just started unpacking the kit, I will fit the parts, and once I am sure everything is good, I am going to paint them prior to final assembly, I did order the drilled and slotted? why? I have no idea got carried away, and also the powder coated calipers, hate rust!!
looks to be a well thought out kit
here are the front and rear backing plates, I will etch prime and paint these detail gray
here are the powder coated calipers, these will look sharp and kinda ties in the engine color etc ( I know WTF???
) work with me..LOL
Thread Starter
Registered User
Joined: Jan 2008
Posts: 3,515
From: South River, New Jersey
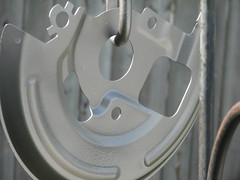
Note the little brackets foir the rear fuel lines, I will need to weld these onto the axle housing, after the install, it is why I haven't finished touching up the differential, cause I will need to clean the welding spots and repaint after welding but nice, glad they were included.
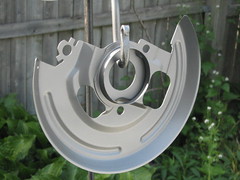
here are the rotors
here are the rotors
Thread Starter
Registered User
Joined: Jan 2008
Posts: 3,515
From: South River, New Jersey
Came with all the shims and spacers too
and another look at the caliper
don't want to bore you with a ton of pics, my whole rebuild pics are located here if you want to see bigger pics
http://www.flickr.com/photos/22989597@N02/
I didn't get the wash treatment to the rotors and such, figured it wouldn't hold up. so will be painting everything...
anyway feel good we are chewing on this project on a few fronts.. wanted to share...
Thread Starter
Registered User
Joined: Jan 2008
Posts: 3,515
From: South River, New Jersey
Thanks!
Thanks for the good words, finding the machinist was great for me, and as we have been going along on the build, he has been very accomodating, as i said above about the edelbrock performer, I asked for the center divider to be milled a bit, and I wanted the edelbrock name and model milled off, and then blasted to look "stock" he also milled a relief in the heat cross over and welded in block off plates then that was machined and it is like they never existed!! I couldn't be happier then I am with these guys. It's like he is also excited about building the motor and adding neat little "extras" and some trick machining cause he just loves the performance building, gotta love a guy who loves his work
I did mention that he could clean the shop a little better LOL... but they do chasis building as well, anyway it is great to see the build progressing, I hope to complete this portion of the build with posting a video of it running at the shop!!! yeehaa!!
I did mention that he could clean the shop a little better LOL... but they do chasis building as well, anyway it is great to see the build progressing, I hope to complete this portion of the build with posting a video of it running at the shop!!! yeehaa!!
Last edited by Eddie Hansen; May 3, 2010 at 08:23 AM.

Thread Starter
Registered User
Joined: Jan 2008
Posts: 3,515
From: South River, New Jersey
Hmmmmmmmmmmmmmmm
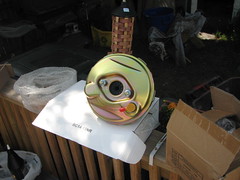
I will be very careful!!!! LOL... I didn't like the look of the milodon gold in there...LOL... besides J, I will be swinging the motor in while the fenders etc are still off the car, there's no core support on, there are no fenders, piece of cake LOL.. 
just need to figure out how to get the engine up to the front of the garage ( single car garage) with the hoist (non folding), i guess I will roll the car back ... that means gotta get the wheels on and body mounted LOL.. more elephant to chew...
just need to figure out how to get the engine up to the front of the garage ( single car garage) with the hoist (non folding), i guess I will roll the car back ... that means gotta get the wheels on and body mounted LOL.. more elephant to chew...
Registered User
Joined: Jan 2008
Posts: 109
From: Des Moines, WA
No need to apologize for too many pics because they are awesome. This is going to be a great build. Can't wait to see the finished product. Good luck and keep the pics coming. Very good thread....
Thread Starter
Registered User
Joined: Jan 2008
Posts: 3,515
From: South River, New Jersey
No..
Larry doesn't have a dyno on site, and the price for getting the motor over to a place that does,( he does use a place when the customer requires it) then the hook up and then dyno time was around 5-600 bucks, which sounded a bit pricey with all the things I still have to do to get the car back on track, it will however be running, cam break in, valve adjustments, etc on their engine running stand, I figure I will have between 375 and 400 honest ponies, it wasn't meant as a killer hp build or anything...just a decent motor with some good parts.
Thread Starter
Registered User
Joined: Jan 2008
Posts: 3,515
From: South River, New Jersey
the price did include the transport, the hook up, the unhooking and then the transport back. but it will be all set to drop in, and Larry said it will also include after installation support, he is a good guy, and I feel comfortable, oc course I can't sit around and say yeah dyno'd to xyz horsepower, but what the heck if it runs good, sounds good, and I feel good, then it's All GOOD!!!
Thread Starter
Registered User
Joined: Jan 2008
Posts: 3,515
From: South River, New Jersey
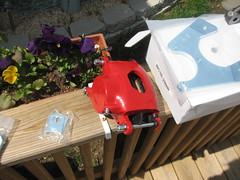
new booster
here is the 9 inch booster while it looks fairly stock it is 2 inches narrower in diameter, since I am swapping in a 455, and I will have slightly taller valve covers I figured it was the way to go.
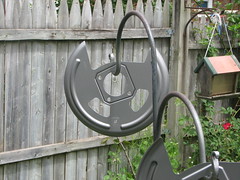
the kit really is complete, the one thing I really like are the rear dust plates, I do not think I have seen this on other kits, the thing I don't like is they are not stainless steel LOL.... no problem I'll just etch prime them and then paint them

the kit really is complete, the one thing I really like are the rear dust plates, I do not think I have seen this on other kits, the thing I don't like is they are not stainless steel LOL.... no problem I'll just etch prime them and then paint them
Thread Starter
Registered User
Joined: Jan 2008
Posts: 3,515
From: South River, New Jersey
strating to nibble
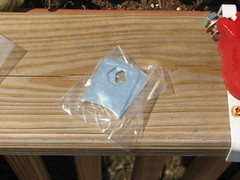
I go kind of slow, so I washed the front dust plates with lacquer thinner,
then used a rattle can etching primer (duplicolour)
then shot them with eastwood detail gray, the first set came out ok
I'll post more as I progress, but I do not seem to get much done during the week.
then used a rattle can etching primer (duplicolour)
then shot them with eastwood detail gray, the first set came out ok
I'll post more as I progress, but I do not seem to get much done during the week.
Thread Starter
Registered User
Joined: Jan 2008
Posts: 3,515
From: South River, New Jersey
Thanks Darrell!
Thanks Darrel will do, I will try to document all the different little projects in the overall big projects maybe it helps somebody,
I must say i was very impressed with the right stuff kit, and it just made sense to do the whole conversion since I already had the axles etc out of the rear, which leads me to believe that if your gonna eat an elephant, you need to ensure the elephant is NOT eating LOL... this guy is putting on weight....
Thread Starter
Registered User
Joined: Jan 2008
Posts: 3,515
From: South River, New Jersey
It's DONE!!!!!!!
Well got a call from the machine shop today, the motor is all done and is on the engine run-in stand, Everything was good, had to get bigger jets for the carb as it was leaning out some, he also had problems with the pertronix unit and just put a new set of points etc in, says it runs great.
well Now i have to sneak down there this week and gets some pics and Video!!! yeehaa another chunk of the elephant devoured....
well Now i have to sneak down there this week and gets some pics and Video!!! yeehaa another chunk of the elephant devoured....
Loose Radical
Joined: Dec 2007
Posts: 199
From: Joliet, Il
Been there, done that, but in a blizzard.
I had to drop mine in during a mini-storm recently.
I had to push the car out (over the humps and broken concrete) to get the engine and boom to the front area, and leave it sticking half out while I dropped it in (FROZE MY A$$ OFF, but it's in and running).
CIMG5562-1.jpg
CIMG5560-1.jpg
CIMG5556-1.jpg
Thread Starter
Registered User
Joined: Jan 2008
Posts: 3,515
From: South River, New Jersey
wow....
well I am glad I do not have to do it in a snow storm LOL... I do have to hurry now to get the new brakes on, and put the rear back in, so i can put the body back on so i can put the motor in LOL.... (deep breaths deep breaths)
Larry ( my engine guy) said he will go through my M-20 and freshen the seals, and probably replace the synchros etc, that's the next bite. but I can hardly wait to get down there and see this thing running....
Pat (CitCapp) Thanks I am really grateful for the help and advice i have received since I joined up here, and Richard"s anology about eating an elephant is done by one bite at a time has been going through my head each time i tackle a little project from the whole project...
I feel like that German guy from the snickers commercial " why am I always hungry!!! LOL....
Registered Luser
Joined: Aug 2006
Posts: 3,785
From: LI,NY
Lookin' good Eddie...I'm feeling what you are going through right now. Like waiting for a child to be born!(well, maybe not quite).....I hear ya on the dyno price, same over here on LI.... as it is, the build is a little more than we really wanted to spend!
Thread Starter
Registered User
Joined: Jan 2008
Posts: 3,515
From: South River, New Jersey
I know erik, but I think I will be happier in the end getting the upgrades that I did. If all I wanted was a big block olds I could order one from pep boys or somewhere for half the price, but who knows what you get?
anyway, plan to get over there this week and hopefully I can post video LOL....
anyway, plan to get over there this week and hopefully I can post video LOL....
Thread Starter
Registered User
Joined: Jan 2008
Posts: 3,515
From: South River, New Jersey
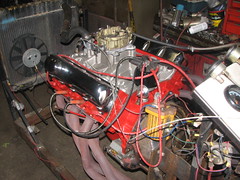
It is alive!!!!!!!!!!!!!!!!!!!!!!!!!!!!!!!!!!!!!!!!!!
Headed over to Hansen Racing Today, motor which has been sitting in my garage for over 10 years! is finally finished!! popped on my safety glasses and Larry started that big ***** up! All I can say is...
IT IS ALIVE!!!!!!!!!!!!!!!!!!!!!!!!!!!!!!!!!LOL !!!!!!!!

IT IS ALIVE!!!!!!!!!!!!!!!!!!!!!!!!!!!!!!!!!LOL !!!!!!!!
Thread Starter
Registered User
Joined: Jan 2008
Posts: 3,515
From: South River, New Jersey
real pics...
The Video portion of my camera wouldn't work, I know it was user error, sorry fellas you'll just have to trust me it was AWESOME!!!
here she is proud as a peacock
here she is proud as a peacock
Thread Starter
Registered User
Joined: Jan 2008
Posts: 3,515
From: South River, New Jersey
don't know why..
I thought this was a video of it running? but it sounded great, a bit loud with those turbo mufflers and headers, but geez it was great I can not stop smiling...
you can not see but he machined off the edelbrock and the cast performer lettering on the manifold, then reblasted it almost looks like a factory aluminum manifold
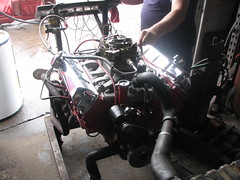
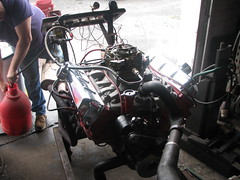
Here's Larry talking to the motor... LOL...
you can not see but he machined off the edelbrock and the cast performer lettering on the manifold, then reblasted it almost looks like a factory aluminum manifold
Here's Larry talking to the motor... LOL...
Thread Starter
Registered User
Joined: Jan 2008
Posts: 3,515
From: South River, New Jersey
Well That is about it fellas, I will pick up the motor in a week or two I asked Larry if he wouldn't mind to hold it there so I can make room in my little 1 car garage, hopefully I can hurry up and get the new brakes and lines on, and the body back down asap.
Oil pressure was great, Cam sounded good, not really lumpy but I am sure it will work great, I can not say enough good things about Larry Hansen at Hansen Racing Engines, I have not dealt with many engine builders, but I have to say Larry was patient, accomodating, and very knowledgeable.
I think he was more then fair on the pricing, and treated the project like it was his own build. the little details unasked for made all the difference to me, the extra machining, the trick little do dads he just does as part of his builds. it was important to me, and he is behind my project too, so now I will be dropping off the m-20 and the bellhousing for a freshening up, but that will be another bite to tell about it, this bite is DONE!!!!
thanks for all the support I got here, and Mark Remmel (cutlassfi) for his patience and knowledge for the cam selection!!
I am STOKED!!!!!!


Thread Starter
Registered User
Joined: Jan 2008
Posts: 3,515
From: South River, New Jersey
Cast Gray
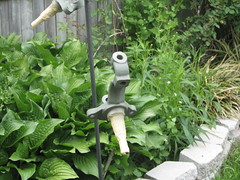
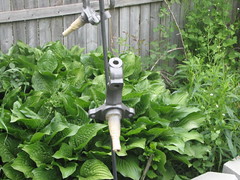
Then I sprayed them with eastwoods Cast Gray, I had previously done this on the original spindles, so everything should match, I will spray the original spindles with some wd-40 and wrap them up and box them away in case somebody wants to return this car to original, I doubt it but ya never know, I will put all the backing plates, and drum parts away since they have already been cleaned and painted.. will this car ever be worthy of a 100 percent "correct" resto? not in my lifetime I don't think.. but for the future olds guys... I am thinking of you LOL....
Here's the spindles painted
Here's the spindles painted
car guy
Joined: Apr 2008
Posts: 5,675
From: Dallas TX


