
Alaskan '72 Cutlass on a shoestring

Thread Starter
Unregistered Madman
Joined: Mar 2012
Posts: 55
From: Backwater, Alaska
Oh yeah. I used Nicopp stem to stern for the brakes (earlier write-ups here) including stainless steel nuts and braided steel flexible lines.
And I was considering that here, too, but the cheapest I could find was $60 a roll plus $20 in shipping- welcome to Alaska- whereas a chunk of steel preflared from Napa was like $16.
I'll probably still go Nicopp later, but not 'til I either swap the engine or radiator.
Doc.
And I was considering that here, too, but the cheapest I could find was $60 a roll plus $20 in shipping- welcome to Alaska- whereas a chunk of steel preflared from Napa was like $16.
I'll probably still go Nicopp later, but not 'til I either swap the engine or radiator.
Doc.
Thread Starter
Unregistered Madman
Joined: Mar 2012
Posts: 55
From: Backwater, Alaska
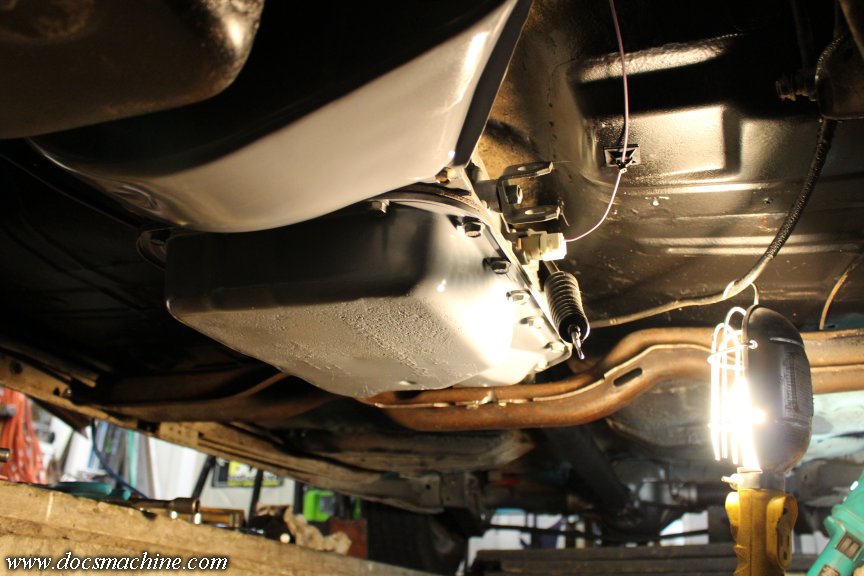
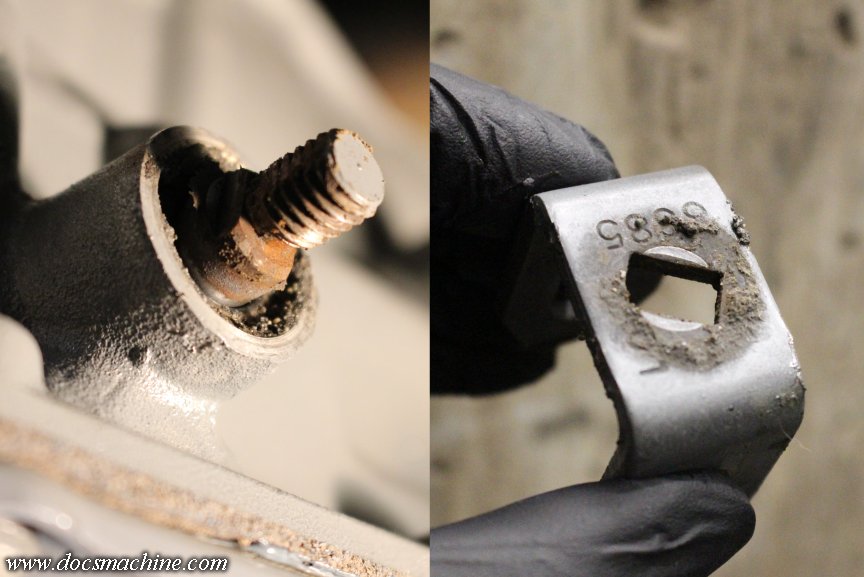
In a typical case of needing to do X, Y and Z before one can do A, B or C, I needed to set up a fixture on the mill for an already-overdue project. But before I did that, I wanted to bolt down the transmission crossmember while the table was still open and clear.
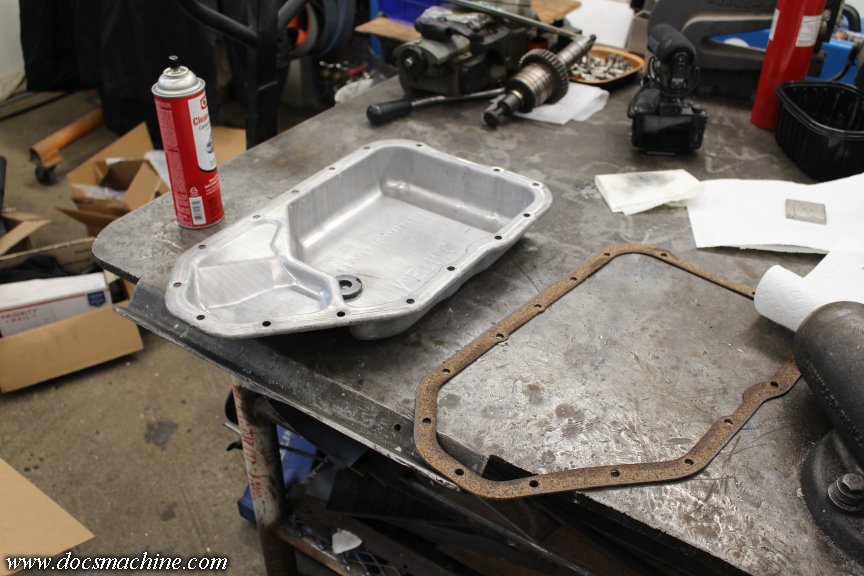
The issue is this- the rearmost bolt on the 2004R pan is covered by the lip of the crossmember.
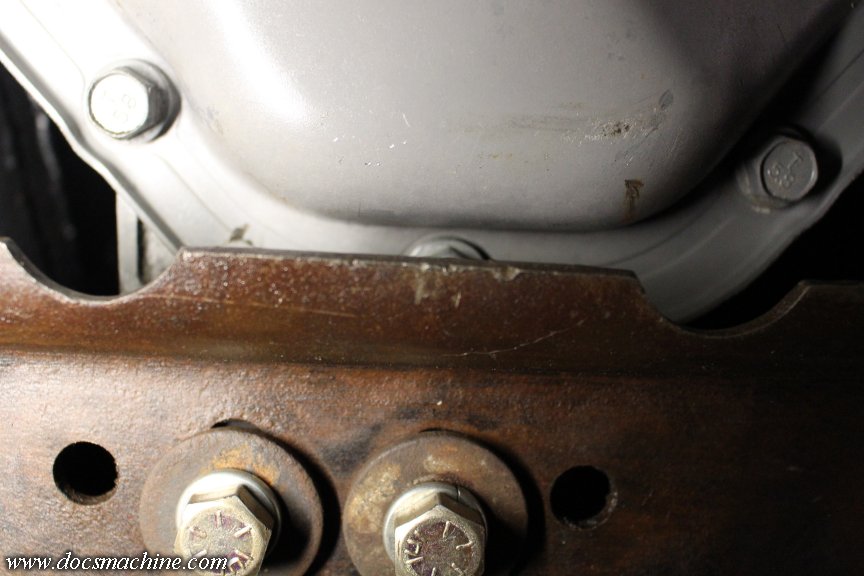
That angle doesn't really show how tight it is in there, the bolt is basically inaccessible. And, the pan needs to come off to install the converter lockup kit, and to help set the aforementioned TV cable. So I was able to lever up the trans, block it with some of the pit cribbing, and unbolt the crossmember.
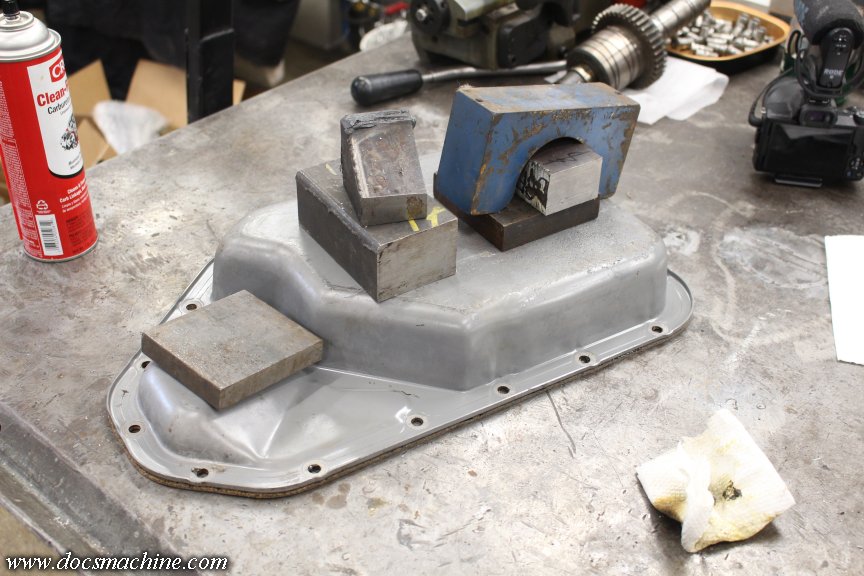
Once I had it out, it was a simple matter of bolting it to the mill table, and milling out a fresh groove.
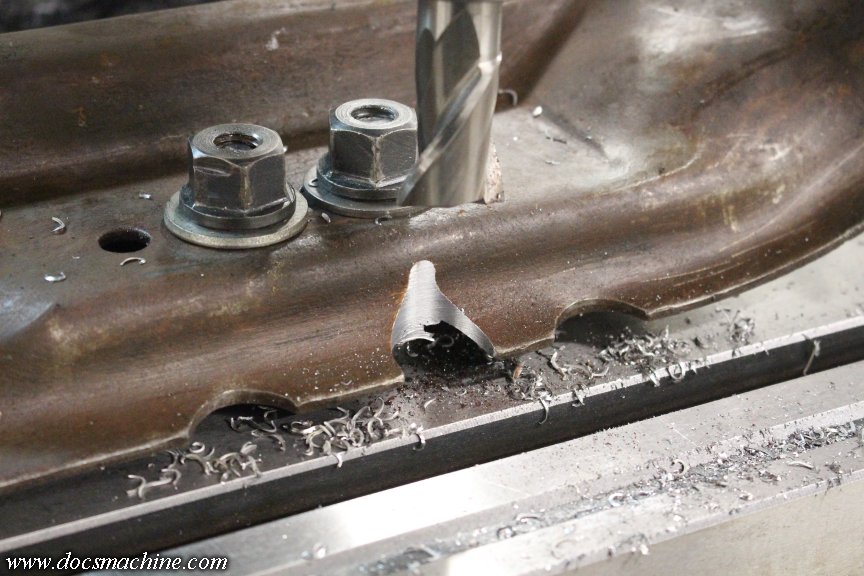
I had to go quite a bit deeper than the other two, since the bolt is further back- and even that wasn't quite deep enough, but it gives just enough workable access and I didn't want to thin the metal any more than I had to.
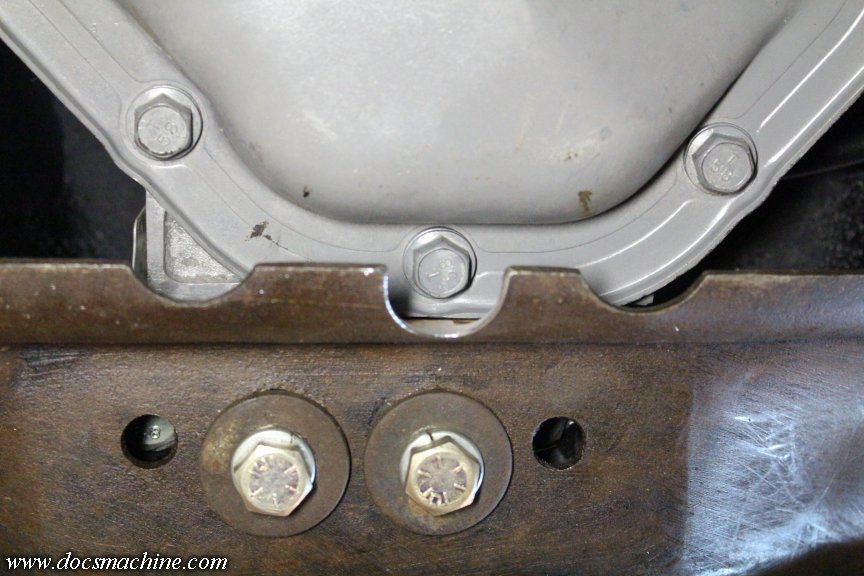
Bolted back into place, the pan can now be removed fairly easily.
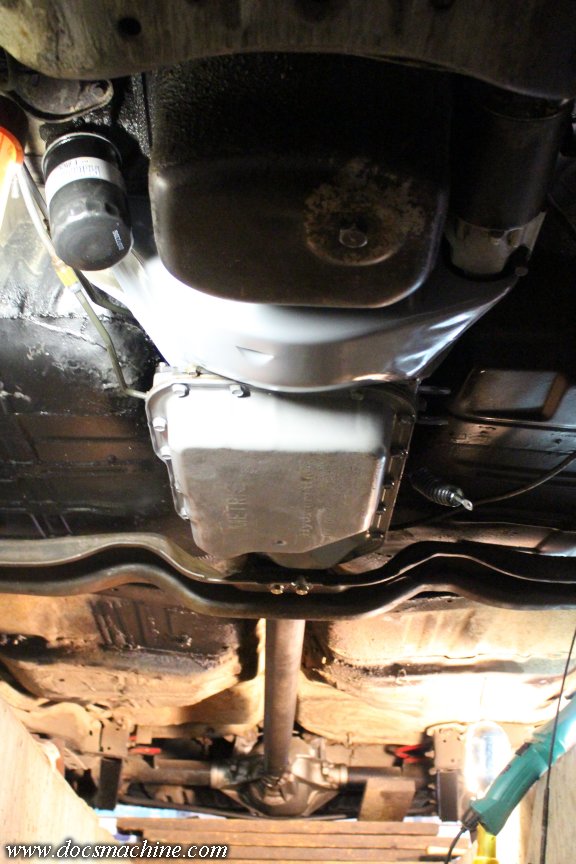
Quick overall shot:
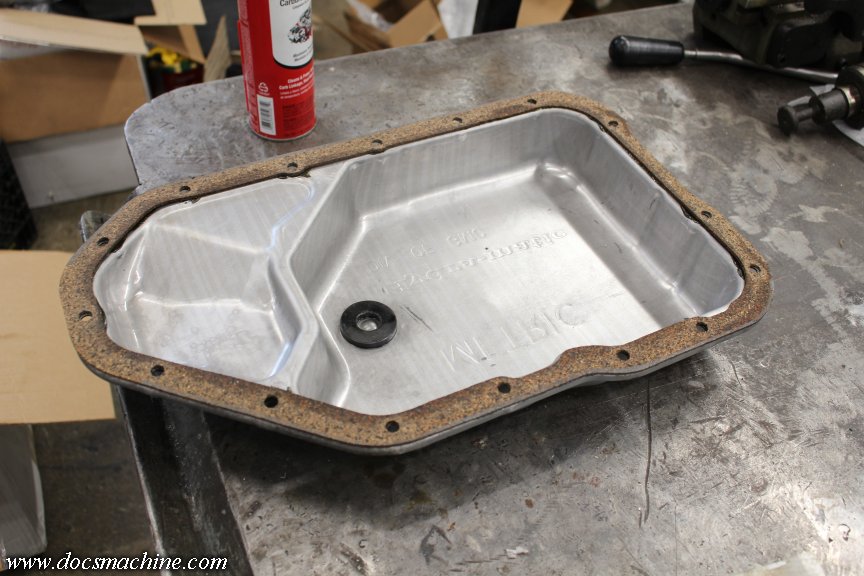
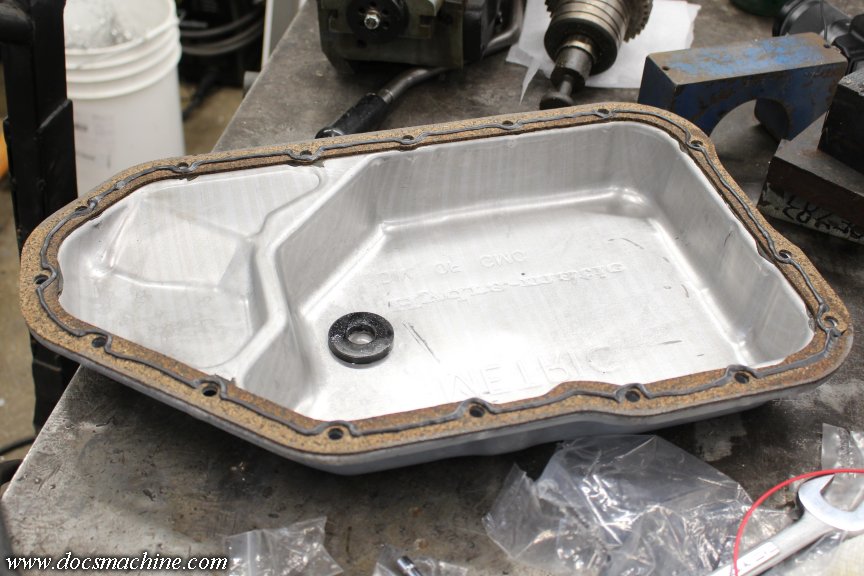
This was actually the ideal time to pull the pan- it had just been rebuilt, and had not yet been filled with fluid. The shop also hadn't used any sealant on the gasket. While I'm usually a big fan of gasket adhesives and the like- I hate leaks- it was again lucky since the pan needed to come off.
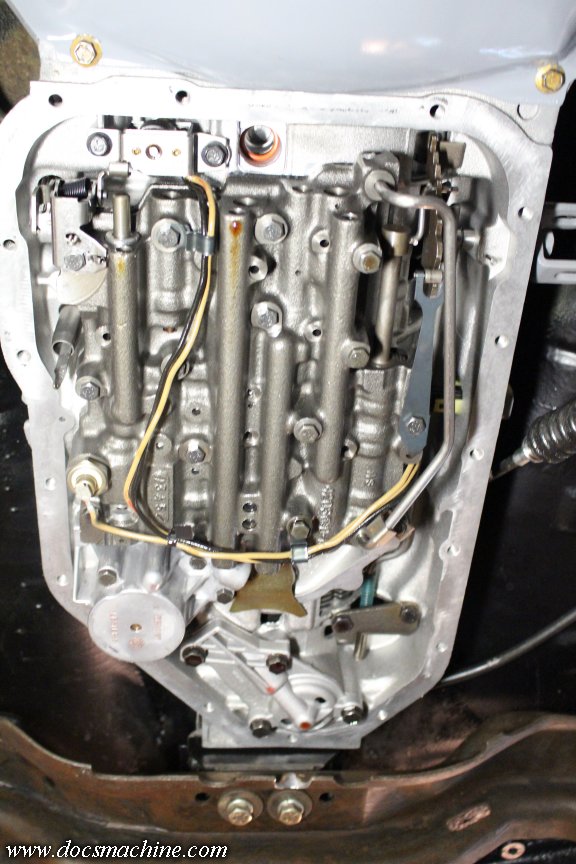
Here, the two bits with electrical wires connecting them have to come out- the upper one is a solenoid valve that controls fluid flow, and the round one on the left is a pressure switch.
Easy-peasy. The solenoid pops out after removing two 10mm bolts, the wires simply unclip, and the pressure switch simply unscrews.
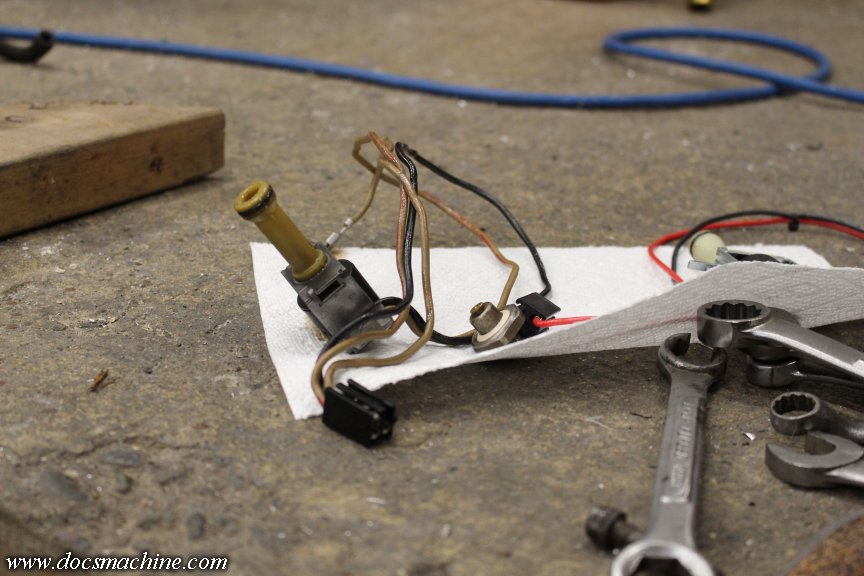
The new switch just screws back into place...
And the wires routed through the same clips, and the tail plugged into the side connector.
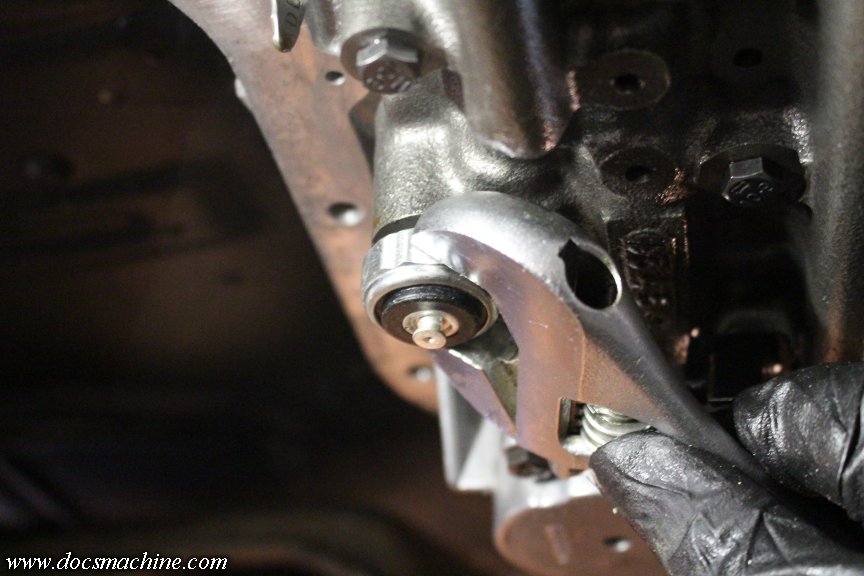
Also, I'm told the best way to adjust the TV is while being able to physically see the linkage-
.
I then mopped the dregs of oil out of the pan and degreased the sealing edge...
Made sure the gasket didn't have any oil or gunk on it, smeared a little Permatex #2 non-hardening sealer on the lip, and stuck 'em together.
Gently flipped the cover over, made sure the gasket hadn't shifted, and stacked a bit of weight on it.
I then left that to dry/cure, so it'll be ready to install when the time comes.
Doc.
The issue is this- the rearmost bolt on the 2004R pan is covered by the lip of the crossmember.
That angle doesn't really show how tight it is in there, the bolt is basically inaccessible. And, the pan needs to come off to install the converter lockup kit, and to help set the aforementioned TV cable. So I was able to lever up the trans, block it with some of the pit cribbing, and unbolt the crossmember.
Once I had it out, it was a simple matter of bolting it to the mill table, and milling out a fresh groove.
I had to go quite a bit deeper than the other two, since the bolt is further back- and even that wasn't quite deep enough, but it gives just enough workable access and I didn't want to thin the metal any more than I had to.
Bolted back into place, the pan can now be removed fairly easily.
Quick overall shot:
This was actually the ideal time to pull the pan- it had just been rebuilt, and had not yet been filled with fluid. The shop also hadn't used any sealant on the gasket. While I'm usually a big fan of gasket adhesives and the like- I hate leaks- it was again lucky since the pan needed to come off.
Here, the two bits with electrical wires connecting them have to come out- the upper one is a solenoid valve that controls fluid flow, and the round one on the left is a pressure switch.
Easy-peasy. The solenoid pops out after removing two 10mm bolts, the wires simply unclip, and the pressure switch simply unscrews.
The new switch just screws back into place...
And the wires routed through the same clips, and the tail plugged into the side connector.
Also, I'm told the best way to adjust the TV is while being able to physically see the linkage-
I then mopped the dregs of oil out of the pan and degreased the sealing edge...
Made sure the gasket didn't have any oil or gunk on it, smeared a little Permatex #2 non-hardening sealer on the lip, and stuck 'em together.
Gently flipped the cover over, made sure the gasket hadn't shifted, and stacked a bit of weight on it.
I then left that to dry/cure, so it'll be ready to install when the time comes.
Doc.
Last edited by DocN; Yesterday at 10:41 AM.
Thread Starter
Unregistered Madman
Joined: Mar 2012
Posts: 55
From: Backwater, Alaska
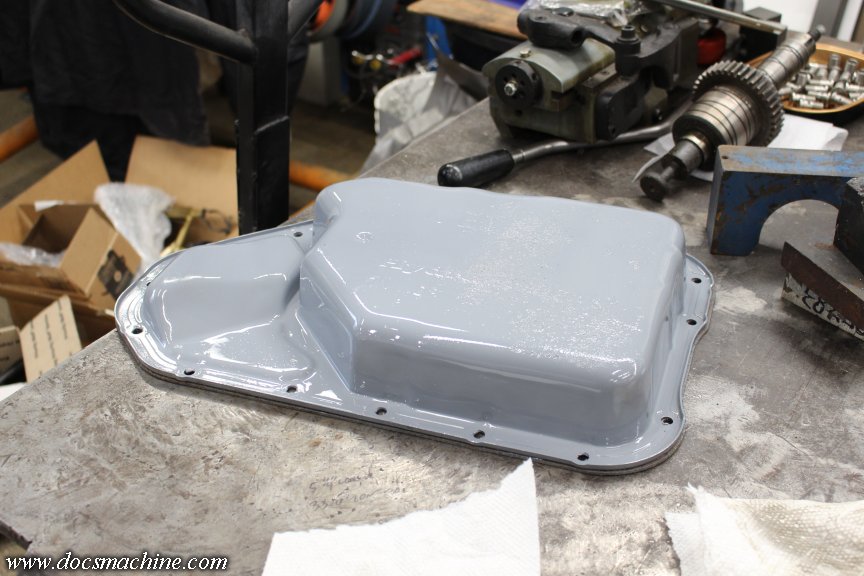
I took the pan outside and hit it with the last of that can of grey, since the shop painted it rather indifferently, and it got scuffed up when we slid it around to install it.
One bit I remembered to do was we'd damaged a ground cable when we were swapping the transmission, so I crimped a new eye on the end and bolted it to a convenient nearby stud.
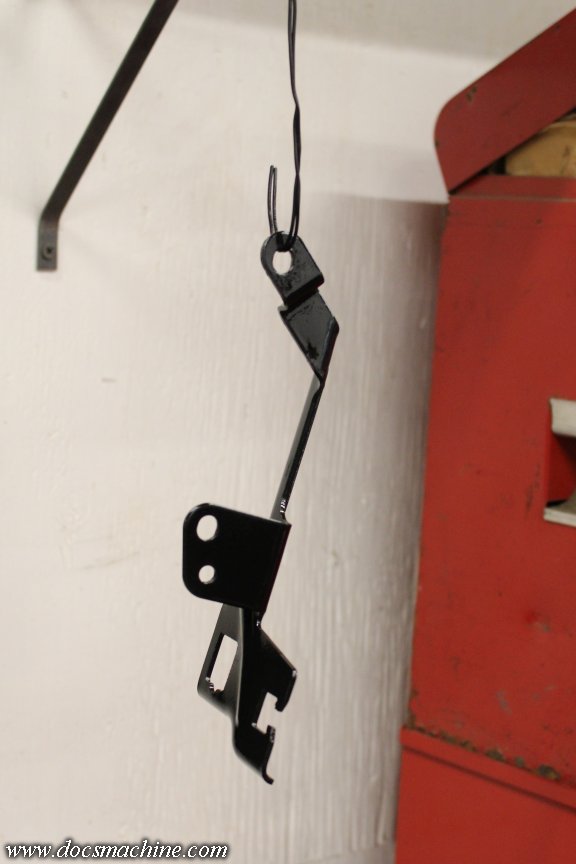
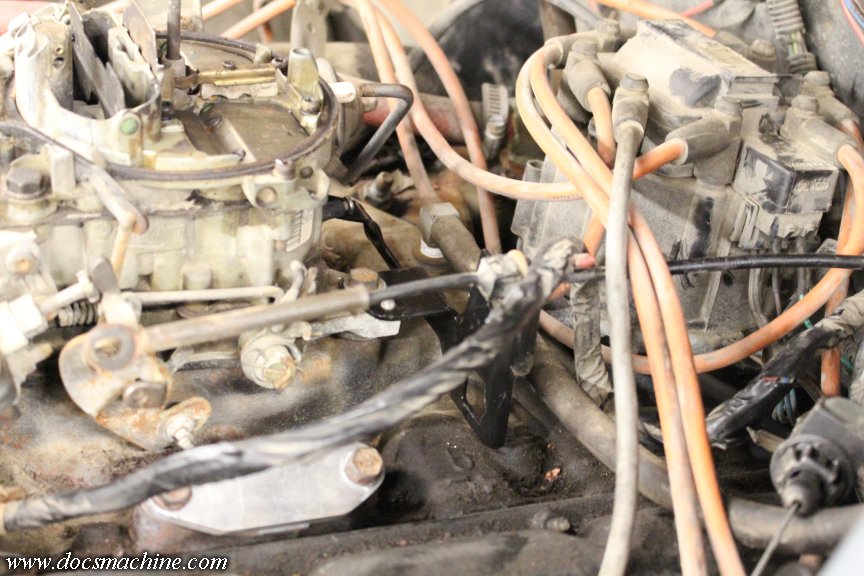
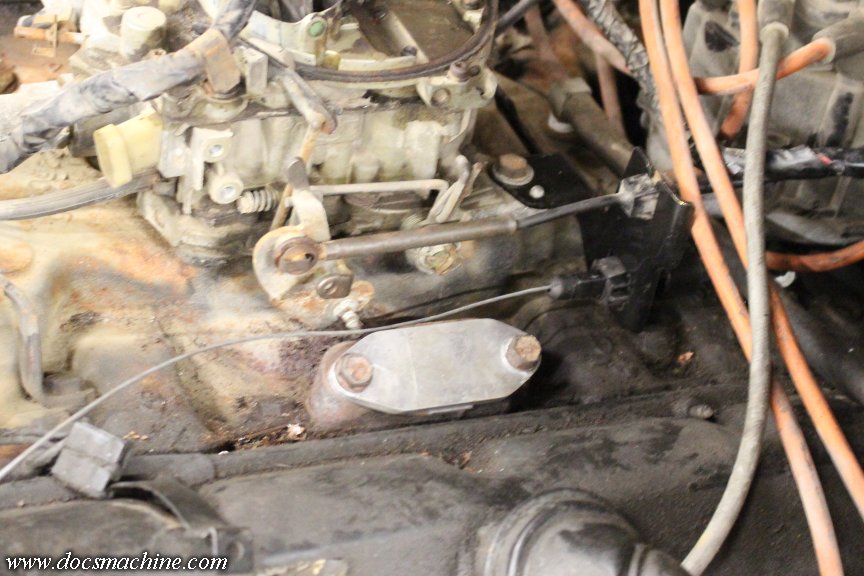
I'd also gotten in an aftermarket bracket to hold both the throttle cable and the TV cable. It was only cad plated, and this being Alaska, would have started to rust as soon as I showed it a picture of rain, so I hit it with a couple coats of glossy black.
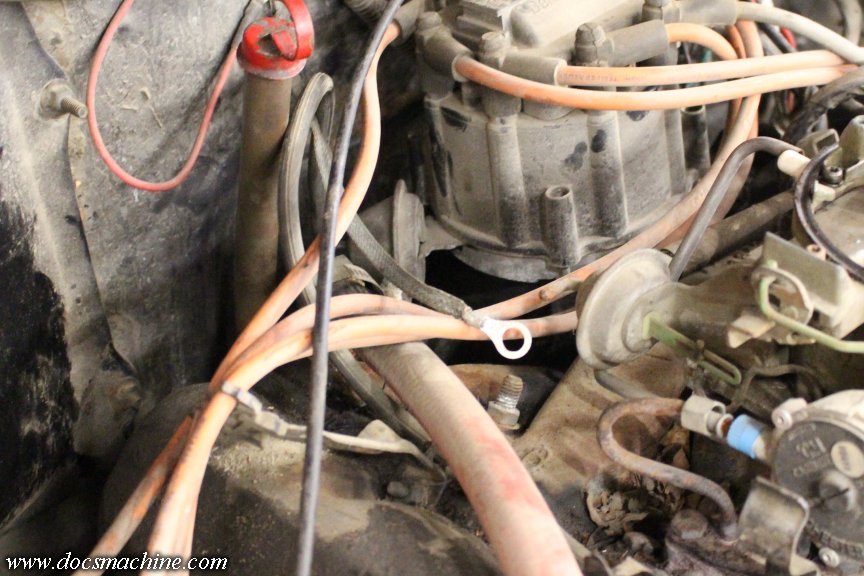
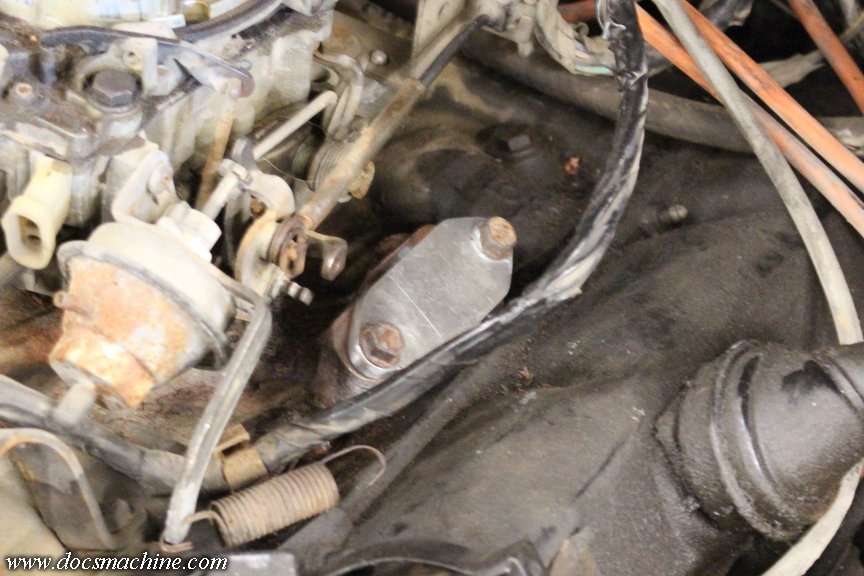
But mainly, of course, I wanted to start on the TV cable install. Unfortunately this thing was in the way:
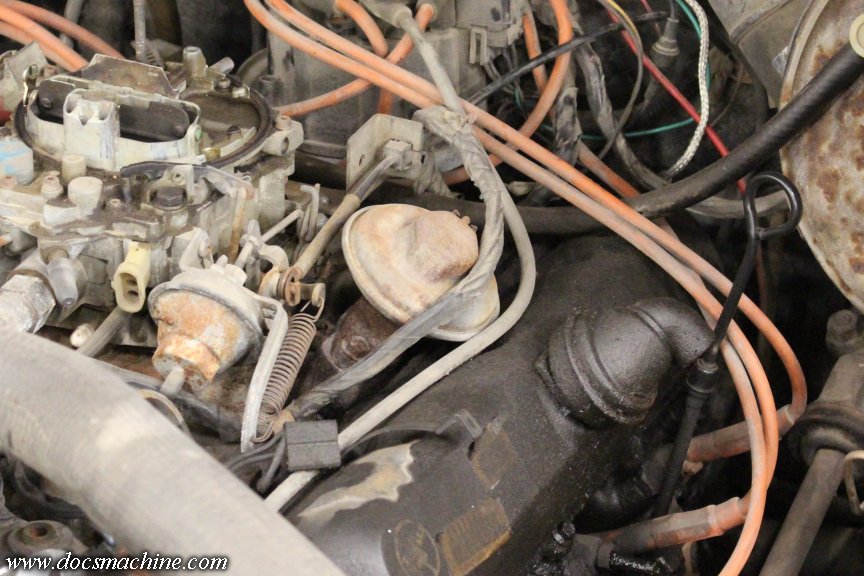
The EGR valve was basically abandoned as soon as I swapped the engine over and stripped off about six miles of vacuum lines, valves and controls. Thankfully, the bolts actually came free with no real complaint.
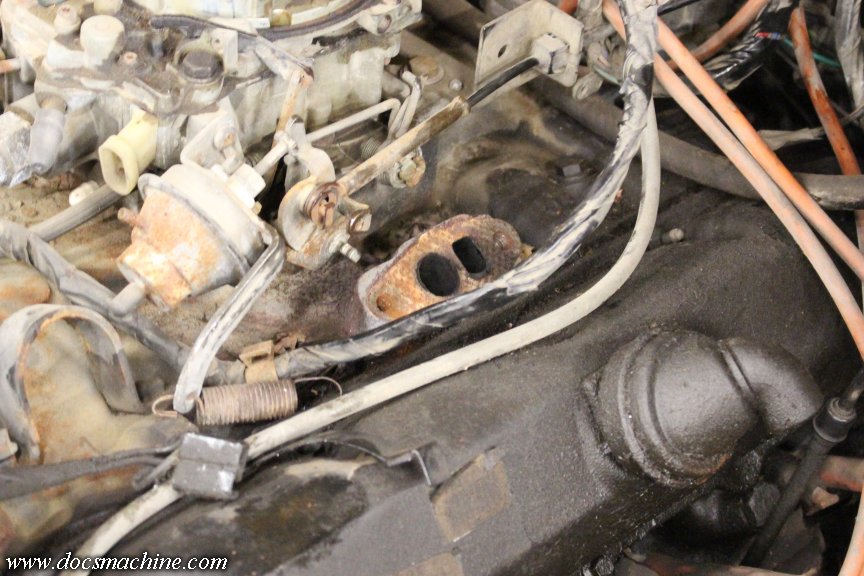
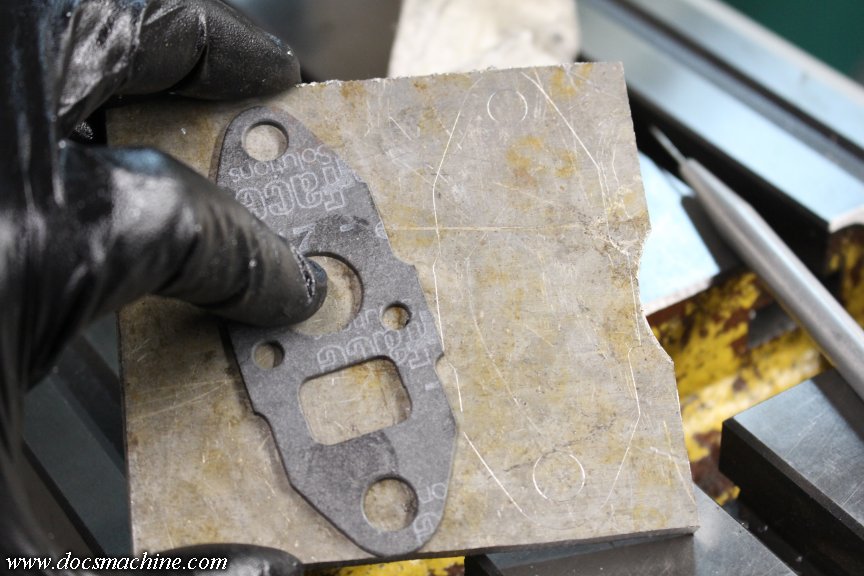
They make commercial blockoff plates, but hey, what do I own all these machine tools for if not to make a $20 car part?
Found a ratty chunk of plate in the bins, and scribed the outline of a new gasket on it.
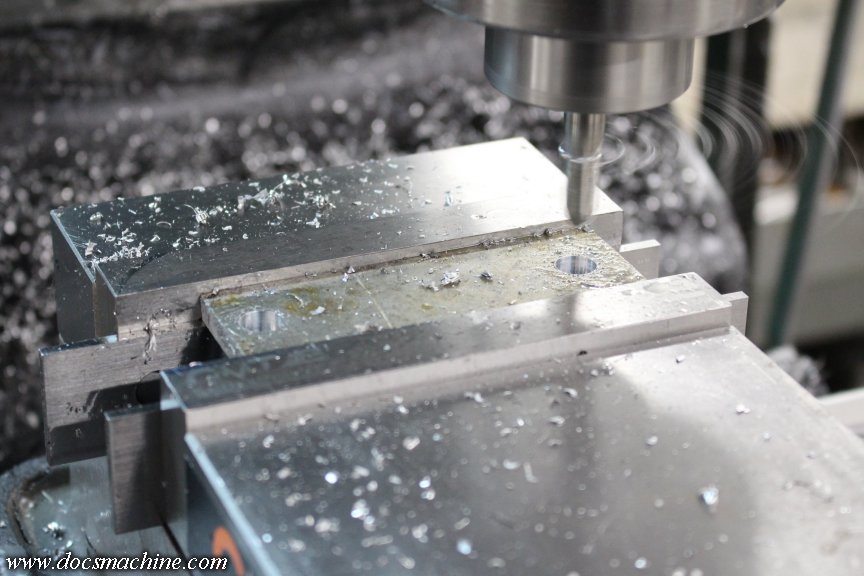
Bandsawed it out, milled it flat, poked a couple of holes in it...
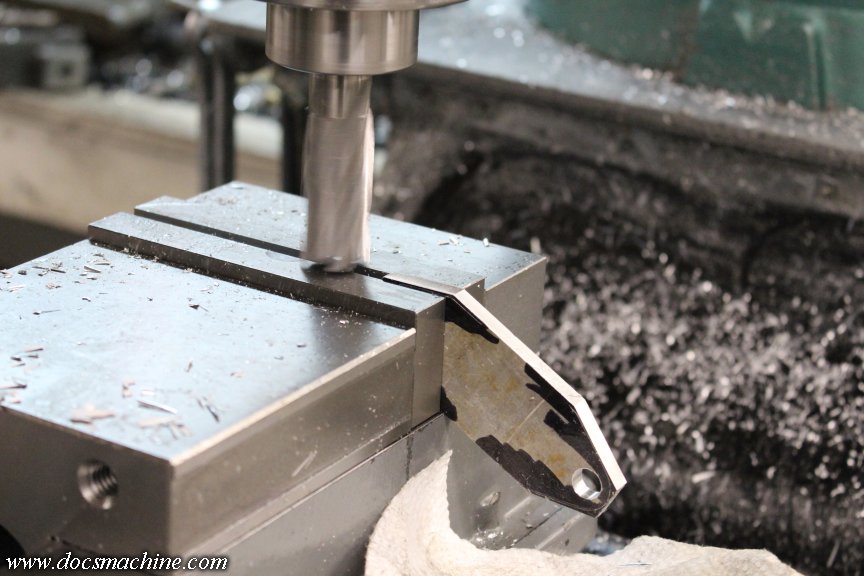
Milled the corners off...
Rounded it up a bit on the belt sander, smoothing things here and there, and presto! We have a thing!
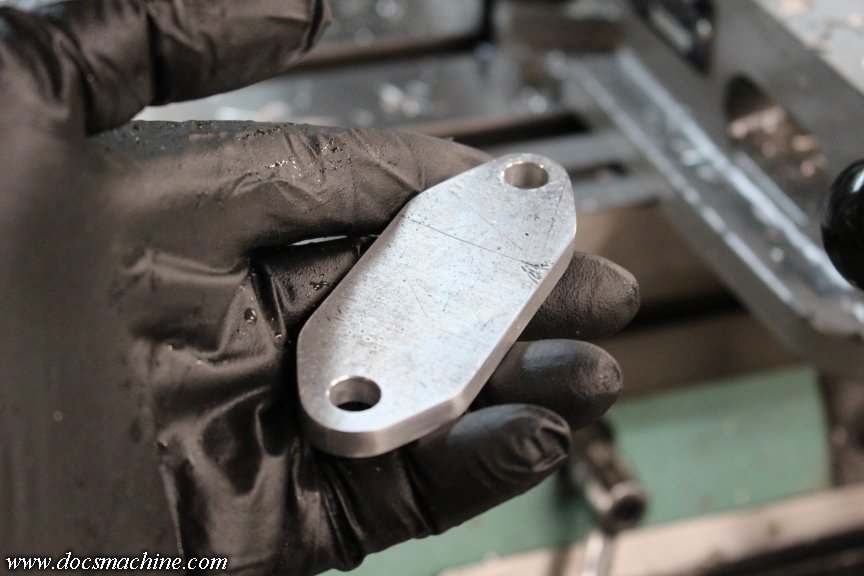
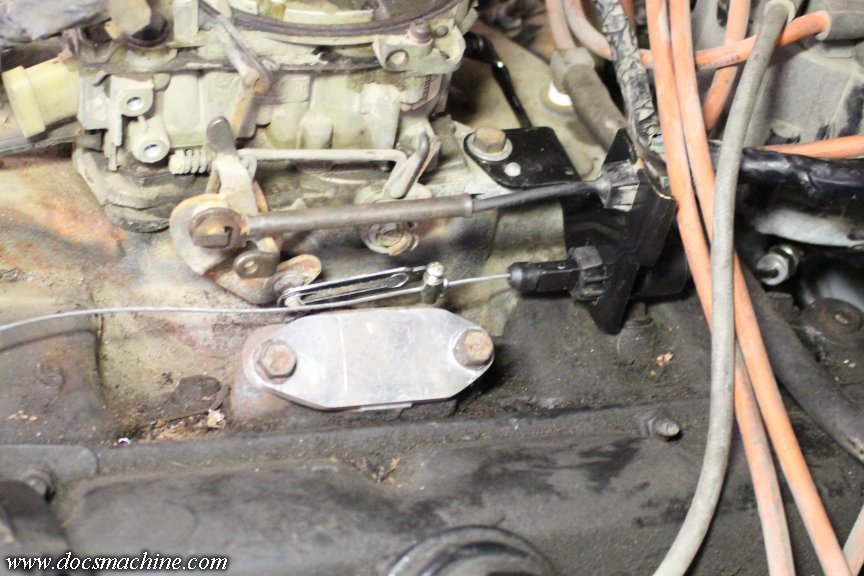
The new gasket, a little neverseize on the bolts, and there you have it. Easier access to the throttle cables.
The old bracket came right off, and the new one plunked back on just like it was meant to be there.
The rubber bushing in the old throttle cable, however, was a bit tired...
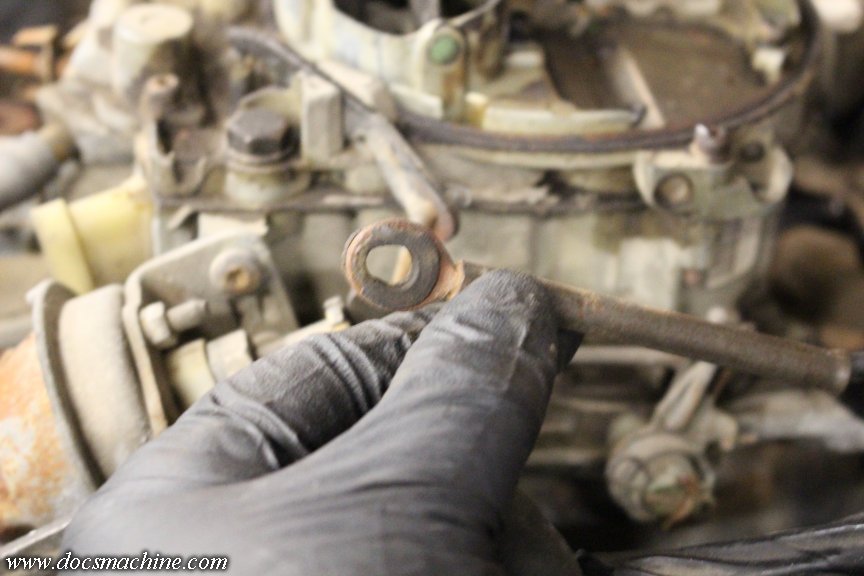
So I took a few basic measurements, found a stick of black Delrin, and just turned a fresh one.

Snapped back in place and completely obscured by the retainer clip.
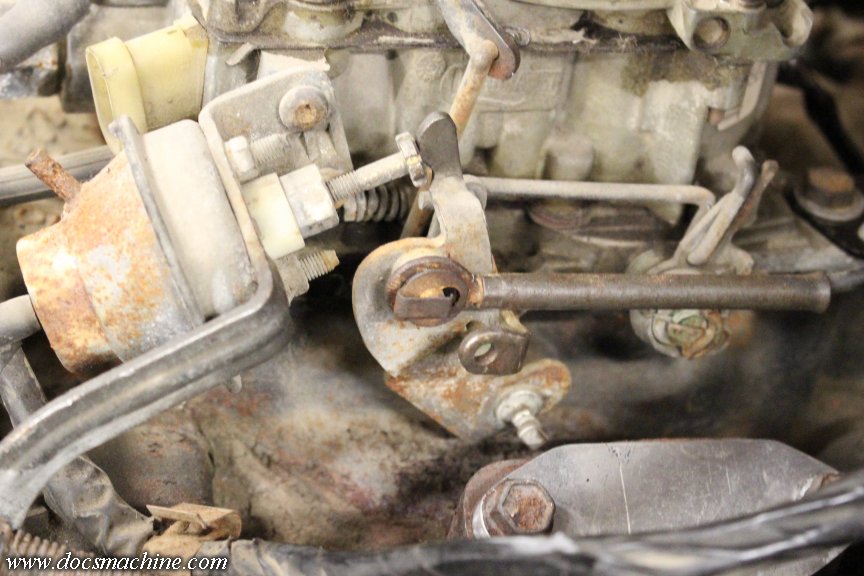
Finally the TV cable clipped into place...
And the linkage roughly set and clamped.
The inner cable is extra long, since the aftermarket cable I'm using is adjustable for overall length. In retrospect, I probably should have just used a factory cable, since it has an adjustment built in, but this one will work just fine.
I'll need to hire some help for the final adjustment, since I want to watch the linkage on the trans while the throttle is moved, just to be sure we're solidly in the ballpark.
Doc.
One bit I remembered to do was we'd damaged a ground cable when we were swapping the transmission, so I crimped a new eye on the end and bolted it to a convenient nearby stud.
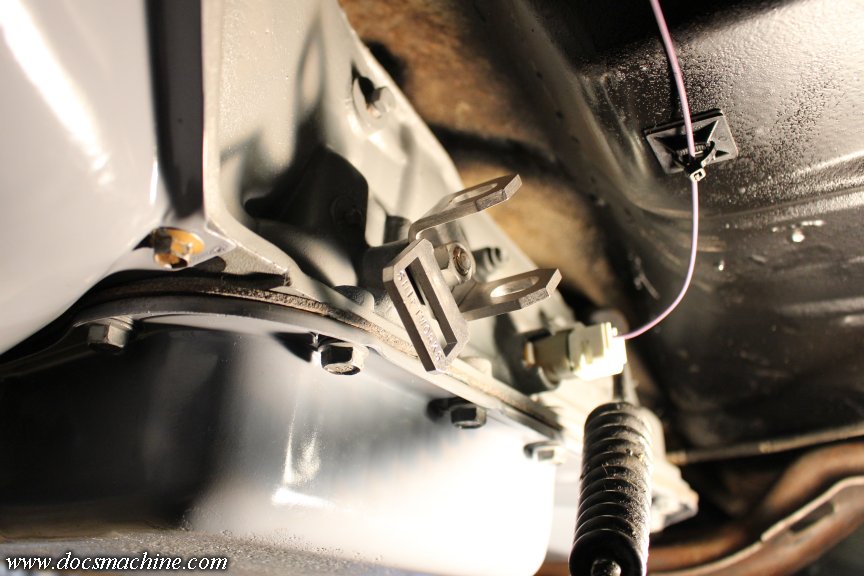
I'd also gotten in an aftermarket bracket to hold both the throttle cable and the TV cable. It was only cad plated, and this being Alaska, would have started to rust as soon as I showed it a picture of rain, so I hit it with a couple coats of glossy black.
But mainly, of course, I wanted to start on the TV cable install. Unfortunately this thing was in the way:
The EGR valve was basically abandoned as soon as I swapped the engine over and stripped off about six miles of vacuum lines, valves and controls. Thankfully, the bolts actually came free with no real complaint.
They make commercial blockoff plates, but hey, what do I own all these machine tools for if not to make a $20 car part?
Found a ratty chunk of plate in the bins, and scribed the outline of a new gasket on it.
Bandsawed it out, milled it flat, poked a couple of holes in it...
Milled the corners off...
Rounded it up a bit on the belt sander, smoothing things here and there, and presto! We have a thing!
The new gasket, a little neverseize on the bolts, and there you have it. Easier access to the throttle cables.
The old bracket came right off, and the new one plunked back on just like it was meant to be there.
The rubber bushing in the old throttle cable, however, was a bit tired...
So I took a few basic measurements, found a stick of black Delrin, and just turned a fresh one.
Snapped back in place and completely obscured by the retainer clip.
Finally the TV cable clipped into place...
And the linkage roughly set and clamped.
The inner cable is extra long, since the aftermarket cable I'm using is adjustable for overall length. In retrospect, I probably should have just used a factory cable, since it has an adjustment built in, but this one will work just fine.
I'll need to hire some help for the final adjustment, since I want to watch the linkage on the trans while the throttle is moved, just to be sure we're solidly in the ballpark.
Doc.
Thread Starter
Unregistered Madman
Joined: Mar 2012
Posts: 55
From: Backwater, Alaska
Had a chance to get some help to make sure I had the TV cable settings right, and after a small adjustment, I deemed them spot-on.
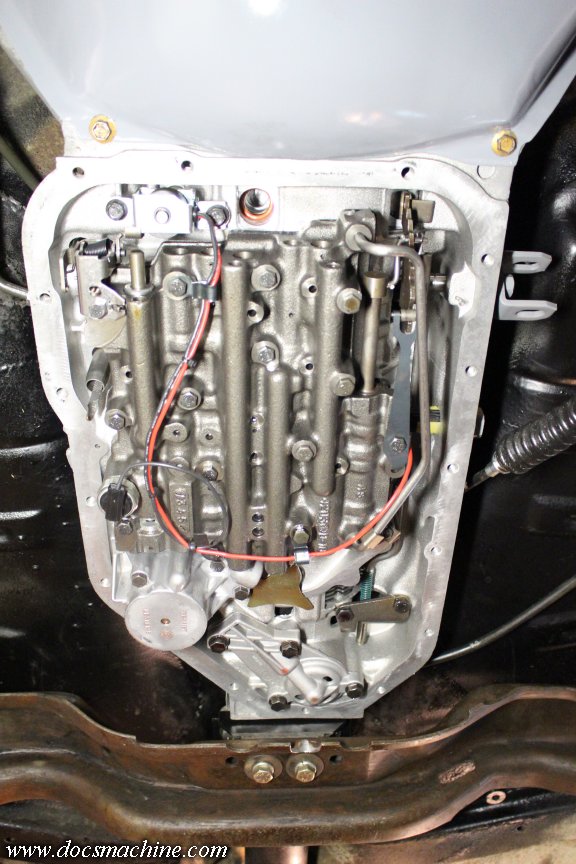
With that, I double-checked my mental checklist, plugged the filter back in place, threw a seam of RTV around the periphery of the pan gasket...
And buttoned 'er back up, though probably not for the last time.
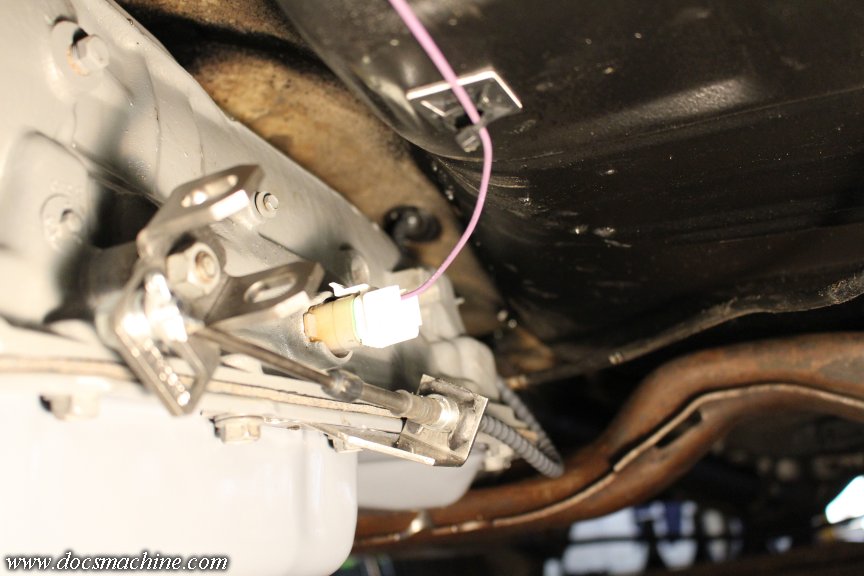
Also note the wire coming off the side. While I was down there I ran the wire from the plug, up into the engine compartment.
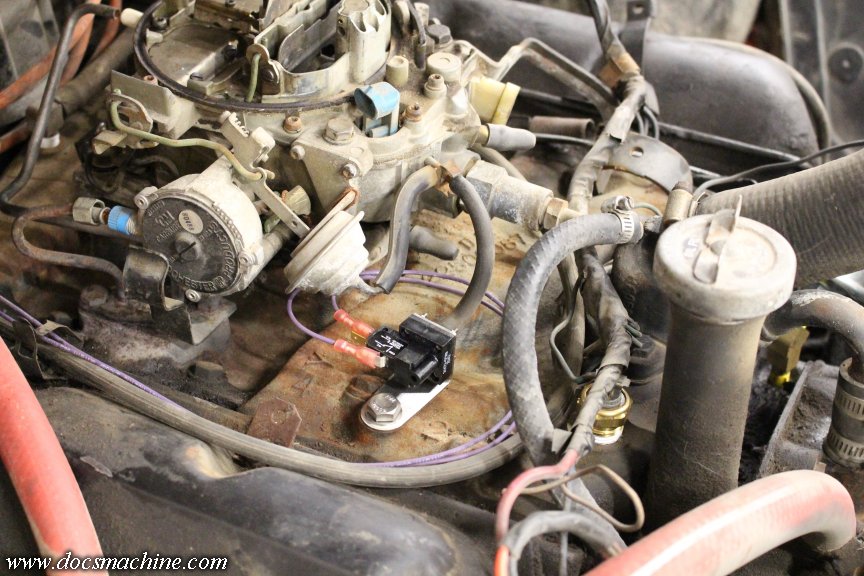
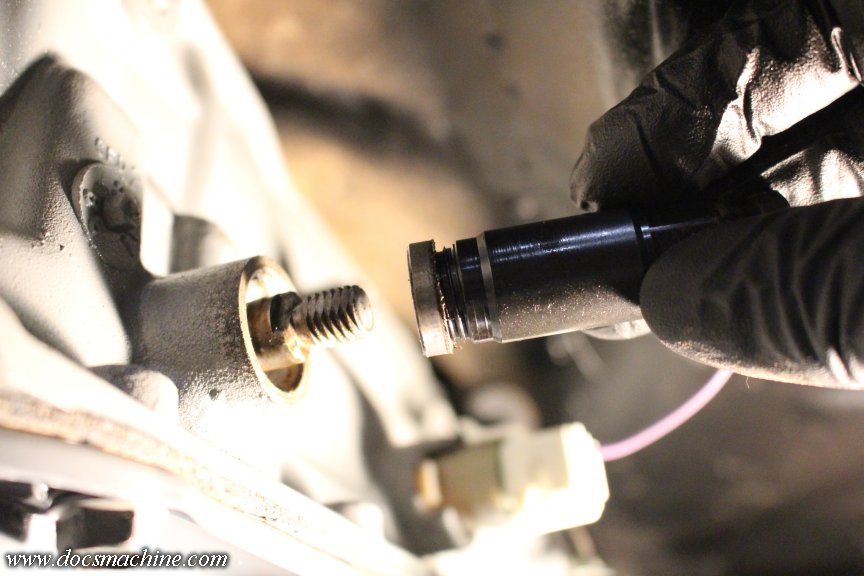
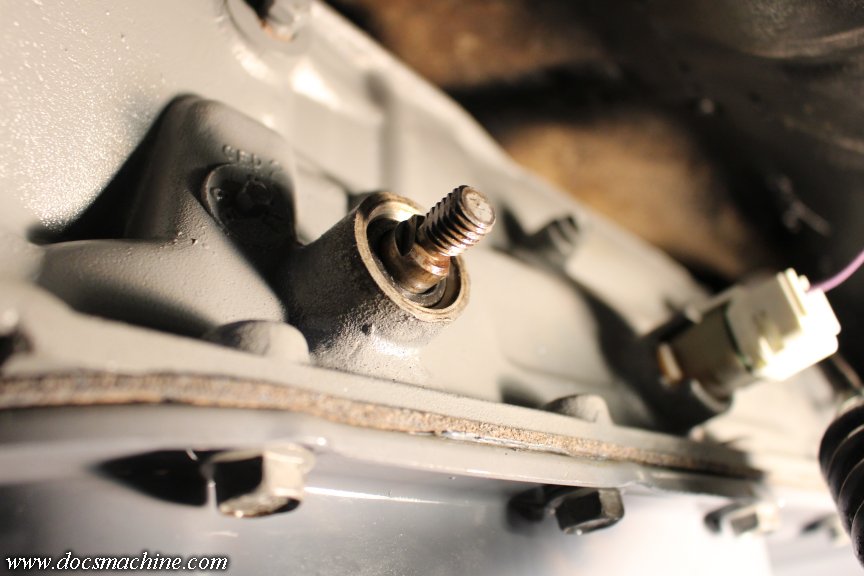
First up, I swapped the brake-light switch with this replacement from the kit...
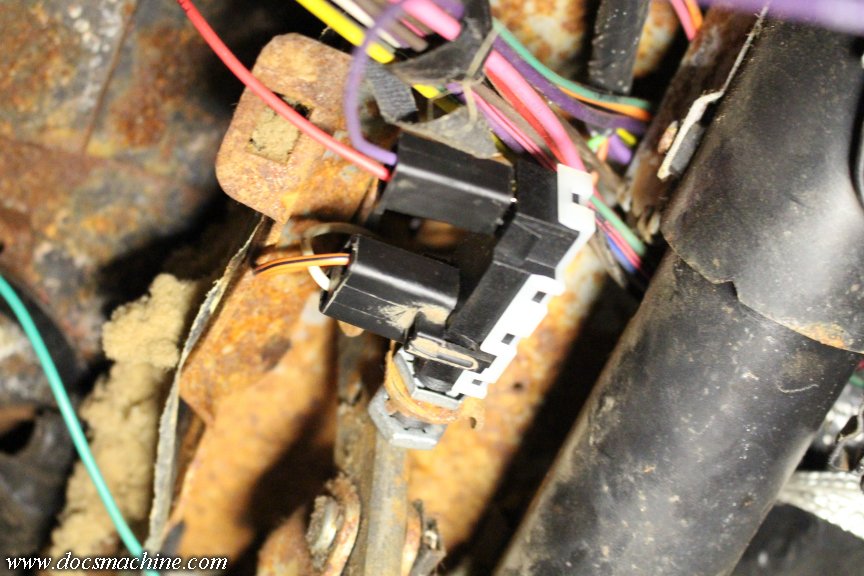
Which gives me a second pair of contacts. This is one of three switches that have to be closed in order for the converter to lock up in overdrive.
That needed to pull switched power from the fusebox, but unfortunately, I just had the one- and it was already running the ignition. So I paired up the wires and have it a new spade connector, both crimped and soldered in place.
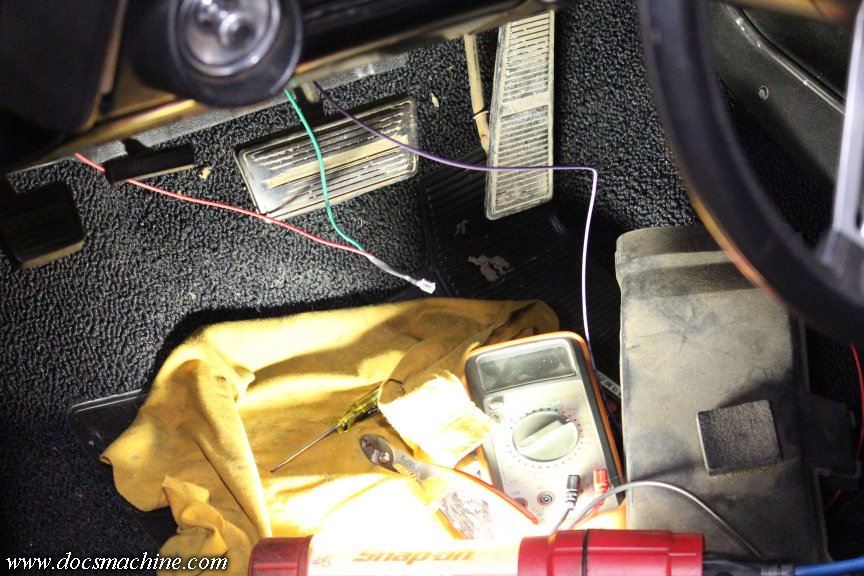
While I was under there, I disconnected the now-abandoned kickdown cable from the old TH350, and that left me a convenient hole in the firewall through which I could run the wire.
And finally, the last one in the series, the vacuum switch.
That's connected to ported vacuum, which means the throttle has to be open a certain amount to generate the vacuum to enable the lockup.
Pressure switch in the trans: Has to be in 4th/OD gear. Brake switch: Brakes can't be on. Vacuum switch: Throttle has to be open far enough, IE, the car is moving at a given speed or greater. All that equals true, the converter locks up.
Eventually I plan to try the delay relay, but for now, this gets me rolling.
Doc.
With that, I double-checked my mental checklist, plugged the filter back in place, threw a seam of RTV around the periphery of the pan gasket...
And buttoned 'er back up, though probably not for the last time.
Also note the wire coming off the side. While I was down there I ran the wire from the plug, up into the engine compartment.
First up, I swapped the brake-light switch with this replacement from the kit...
Which gives me a second pair of contacts. This is one of three switches that have to be closed in order for the converter to lock up in overdrive.
That needed to pull switched power from the fusebox, but unfortunately, I just had the one- and it was already running the ignition. So I paired up the wires and have it a new spade connector, both crimped and soldered in place.
While I was under there, I disconnected the now-abandoned kickdown cable from the old TH350, and that left me a convenient hole in the firewall through which I could run the wire.
And finally, the last one in the series, the vacuum switch.
That's connected to ported vacuum, which means the throttle has to be open a certain amount to generate the vacuum to enable the lockup.
Pressure switch in the trans: Has to be in 4th/OD gear. Brake switch: Brakes can't be on. Vacuum switch: Throttle has to be open far enough, IE, the car is moving at a given speed or greater. All that equals true, the converter locks up.
Eventually I plan to try the delay relay, but for now, this gets me rolling.
Doc.
Thread Starter
Unregistered Madman
Joined: Mar 2012
Posts: 55
From: Backwater, Alaska
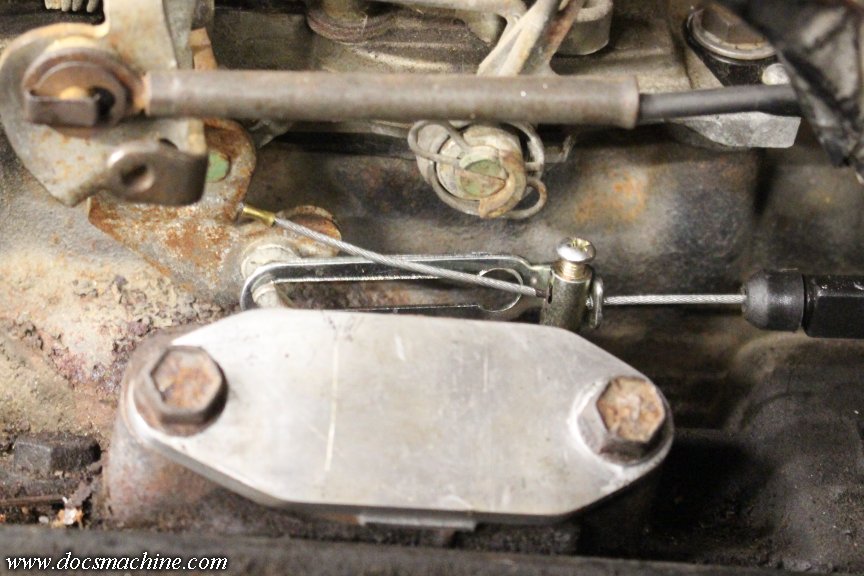
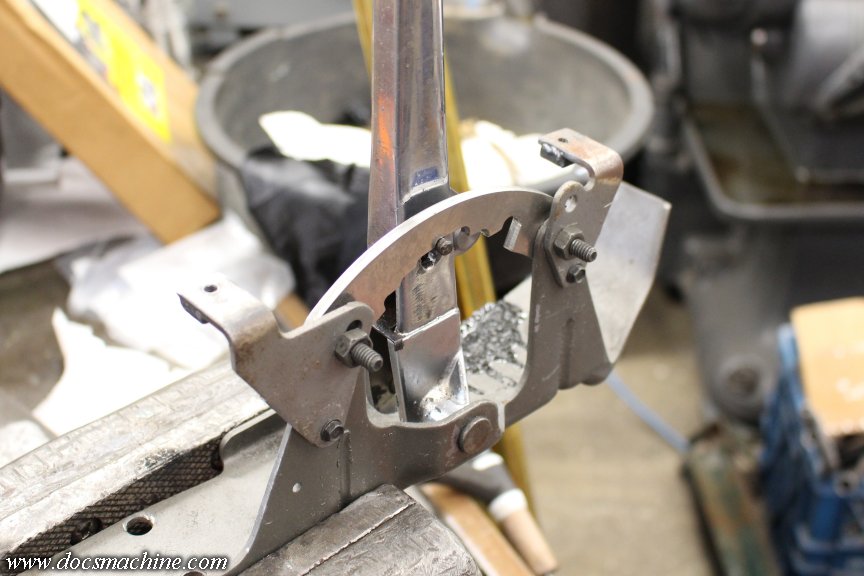
Next, since the TV cable is now hopefully set, I nipped a short chunk of small brass tubing, and crimped it to the exposed cable, leaving me a bit of adjustment room, if necessary. I snipped the rest off, and the ferrule will keep the end from fraying.
Which meant we were down to just the shifter modifications, which amounted to a new cable, a new quadrant and a new lever on the transmission itself. I removed the original... and it was immediately clear the shop that rebuilt the unit didn't remove the shift lever or shaft, and more importantly, didn't replace the seal.
That... rather annoyed me. Admittedly the seal apparently wasn't leaking, but still, new seals are part of the rebuild process. And in this case, it starts making one wonder where else they may have cut corners... Did I actually get a shift kit? Did they replace the old, worn clutches, or just rinse off the old ones and throw them back in? Bushings, bearings, internal O-rings?
The shop has a decent rep locally, and clearly gets plenty of business. Hopefully this was just a single oversight, and not indicative of other issues.
Anyway, there was one bit of luck that came out of that. Last fall, I'd thought that seal on my old tranny was leaking, and bought a kit that included a new seal and a tool set to replace it in place. Turned out that seal wasn't the leaker- the input shaft seal was, which eventually led to this whole fiasco. And I still had that kit. Screw in the tool and winch out the old seal...
Drive in the new one. Easy-peasy.
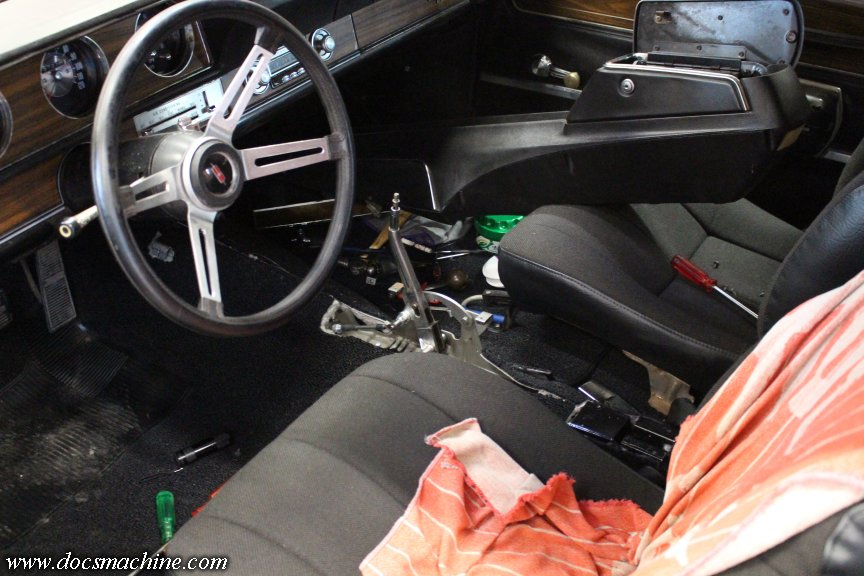
Then I could put the new linkage arm on...
And crack open the console to start working on the shifter itself.
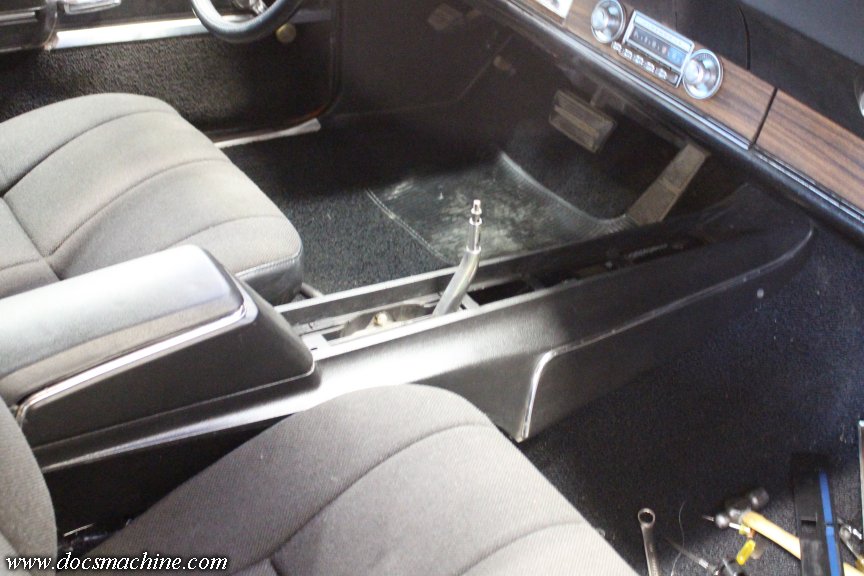
In another case of my outsmarting myself, I used a couple dabs of RTV to "glue down" the center insert when I originally installed the console. That proved more effective than I'd expected, and it was a bear to pull that panel off without breaking anything. When I go to reinstall, I had two useful recommendations- rubber cement or magnets- which I thought a couple bits of thin material cut from a fridge magnet, and some sheetmetal, might do the job. What's the usual recommendation?
After dismantling the whole mess and extracting the shifter and old cable...
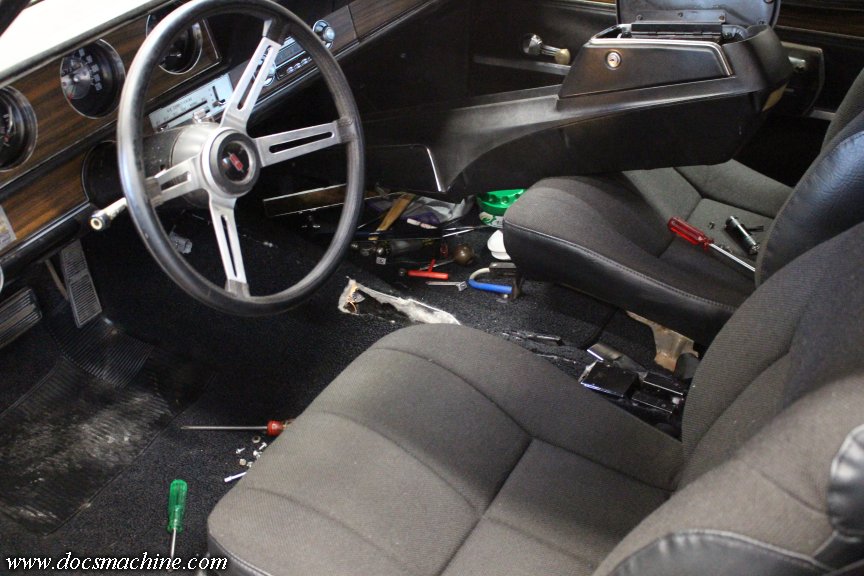
It was a simple job to install the new quadrant to the assembly...
... Fit the cable at the upper end and slip the whole thing back into place.
After that, it was a simple matter of making about 386 trips up and down into the pit, to adjust both ends of the cable and the pin connection on the arm and then check the action at the shifter. Pretty sure I have it right, but we'll see when I can finally fire it up.
After that, I could finally drop the column linkage back in (of course necessary to operate the neutral start and the ignition lock.)

There was just one last thing to do before I could light 'er up... okay, two things, I still need to fill the tranny with oil. But the other thing to bolt back on proved to be an entirely predictable but still unforseen problem... More on that later.
Doc.
Which meant we were down to just the shifter modifications, which amounted to a new cable, a new quadrant and a new lever on the transmission itself. I removed the original... and it was immediately clear the shop that rebuilt the unit didn't remove the shift lever or shaft, and more importantly, didn't replace the seal.
That... rather annoyed me. Admittedly the seal apparently wasn't leaking, but still, new seals are part of the rebuild process. And in this case, it starts making one wonder where else they may have cut corners... Did I actually get a shift kit? Did they replace the old, worn clutches, or just rinse off the old ones and throw them back in? Bushings, bearings, internal O-rings?
The shop has a decent rep locally, and clearly gets plenty of business. Hopefully this was just a single oversight, and not indicative of other issues.
Anyway, there was one bit of luck that came out of that. Last fall, I'd thought that seal on my old tranny was leaking, and bought a kit that included a new seal and a tool set to replace it in place. Turned out that seal wasn't the leaker- the input shaft seal was, which eventually led to this whole fiasco. And I still had that kit. Screw in the tool and winch out the old seal...
Drive in the new one. Easy-peasy.
Then I could put the new linkage arm on...
And crack open the console to start working on the shifter itself.
In another case of my outsmarting myself, I used a couple dabs of RTV to "glue down" the center insert when I originally installed the console. That proved more effective than I'd expected, and it was a bear to pull that panel off without breaking anything. When I go to reinstall, I had two useful recommendations- rubber cement or magnets- which I thought a couple bits of thin material cut from a fridge magnet, and some sheetmetal, might do the job. What's the usual recommendation?
After dismantling the whole mess and extracting the shifter and old cable...
It was a simple job to install the new quadrant to the assembly...
... Fit the cable at the upper end and slip the whole thing back into place.
After that, it was a simple matter of making about 386 trips up and down into the pit, to adjust both ends of the cable and the pin connection on the arm and then check the action at the shifter. Pretty sure I have it right, but we'll see when I can finally fire it up.
After that, I could finally drop the column linkage back in (of course necessary to operate the neutral start and the ignition lock.)
There was just one last thing to do before I could light 'er up... okay, two things, I still need to fill the tranny with oil.
But the other thing to bolt back on proved to be an entirely predictable but still unforseen problem... More on that later.Doc.

Thread
Thread Starter
Forum
Replies
Last Post
Stryke3
Major Builds & Projects
5
Jul 10, 2014 05:37 PM


