
64 F85 Proooject
 February 20th, 2012 | 03:55 PM
#42
Registered User
Joined: Jul 2009
Posts: 3,140
From: Dallas-Fort Worth
[QUOTE=therobski;368968]Try and use the 330 A/C bracket if you have it. It should work, the only question I have is the pulley alignment for the belts. FYI the 64 radiator will never cool the 455 and plus the lower outlet is on the drivers side: a 64 one year only radiator.. Now what I did only because my 64 radiator was near perfect and it's a temporary fix until I build the 425 was I paid 65.00 and had the outlet moved to the pass side. Also I'm going electric fans with a shroud to cool the 400E. To come up with this temp solution I spent alot of time on the internet and phone. I still have not picked a dual fan set up yet, there is only 2 inches clearance between the water pump pulley and the radiator. Which ever one I pick will work with the bad boy 425 along with a custom built aluminum radiator. It's all fun but when you start modifying from original it's not "plug and play"[/QUOTE
264rocket is correct X2.
264rocket is correct X2.
February 20th, 2012 | 08:26 PM
#43
Thread Starter
Registered User
Joined: Aug 2011
Posts: 87
From: Long Beach CA
The 65 to 67 radiators are of a different height. The bottom of the rad support has to be modified on the 64 Support to use the 65 & up Rad.
I cut my side panels of the support and modified the bottom some to get a bigger rad in.
Like has been said try the stock rad for the moment. Be sure to use a good fan, not the cheapo flex fan, they are junk. A good 7 blade with a clutch or check out Summit or Jegs for an electric fan set up.
You can use the 64 water pump on the 455 and then your stock Rad will hook up fine. And you can use all the brackets, pulleys, P/S pump, and Alternator from the 330. when you do that all the pulleys should line up.
Gene
March 6th, 2012 | 08:51 PM
#44
Thread Starter
Registered User
Joined: Aug 2011
Posts: 87
From: Long Beach CA
So I have the trans mount installed now and am running into an issue with the floor shifter. I think the trans still should be raised up a little as well, any ideas on how to know if its level? Also, the floor shifter definitely will not work in its original position. I'm thinking cutting the one piece floor shifter bracket into two and shift the front piece to the drivers side about an inch to allow the shifter to move. Anyone else run into this issue?

March 7th, 2012 | 07:16 PM
#46
Thread Starter
Registered User
Joined: Aug 2011
Posts: 87
From: Long Beach CA
I may order this since it uses cables and looks like I could get it to sit in the stock location.
http://www.summitracing.com/search/B...s&autoview=SKU
March 8th, 2012 | 05:31 AM
#47
Registered User
Joined: Oct 2005
Posts: 7,113
From: NJ
The star shifter had a large base like a mini console so we just used that and the car was a column shift car..... i am sure if you look you could find a shifter that could be adapted to the stock console....
March 9th, 2012 | 07:33 AM
#48
Registered User
Joined: Sep 2006
Posts: 2,384
From: Union City Calif.94587
If you can find a 68 to 72 floor shift any Cutlass or 442, they use a cable sys and should adapt to your consul.
Other wise after market would be the other choice.
Adapting your shifter is worth trying, if unsuccessful move on to the other choices.
Gene
Other wise after market would be the other choice.
Adapting your shifter is worth trying, if unsuccessful move on to the other choices.
Gene
April 3rd, 2012 | 07:46 PM
#49
Thread Starter
Registered User
Joined: Aug 2011
Posts: 87
From: Long Beach CA
Back to the cooling system problem. I figured out that my current radiator is a 4 row so I didn't have to buy a new one. I've also been running around trying to source a 330 water pump, the one I had on the 330 looks like it could crumble at any moment. I finally was able to have the correct one ordered by Orielly auto parts. Now that it has been installed, I need to find some molded upper and lower radiator hoses. Napa, Autozone, Orielly all offer flex hoses only. Anyone had good luck with Supercars Unlimited?
My fan shroud looks pretty beat up and probably not very effective, I may head to the junk yard to see if I can source a cheap replacement. Any ideas?
My fan shroud looks pretty beat up and probably not very effective, I may head to the junk yard to see if I can source a cheap replacement. Any ideas?
April 3rd, 2012 | 08:21 PM
#51
Thread Starter
Registered User
Joined: Aug 2011
Posts: 87
From: Long Beach CA
1. Find & install radiator hoses
2. Install fuel line
3. Install exhaust pipes and other misc items
4. Double check all electrical, fire engine up.
following weekends:
5. Install floor shifter
6. Create some shims for the trans mount bracket
7. Bolt bracket to frame.
8. Get the car towed to driveline shop to have the new axle and yoke made and installed
Hopefully by then it will at least be moving on its own and I can take it out for short trips.
April 24th, 2012 | 09:33 PM
#54
Thread Starter
Registered User
Joined: Aug 2011
Posts: 87
From: Long Beach CA
Its a slow moving project. Hahah. Well my Wife and I just had our first kid about 2 months ago and ever since the weekends have been filled with visitors so I haven't had much time to do any work.
I've been going back and forth on what to do with the radiator/water pump issue. After swapping the 330 pump onto the 455 I realized that all the other accessories and brackets would have to be swapped as well. The 455 ps pump and bracket was in the way of the 330 pump inlet and the 455 pulleys wouldn't work on the 330 pump either. My 330 power steering bracket was junk, along with some strange 330 ps pump that needed rebuilding. I also struggled to find a 4 row radiator with the same inlet/outlet as the 330. Weighing all my options, I decided to just get a new radiator with the outlet on the 455 pump side and then squeeze an electric fan in. Ended up with a 64 GTO radiator which is slightly taller but for the most part slides right in. I haven't installed it yet or checked hood clearance but I hope to get that sorted out this weekend. In the meantime I need to hunt down a slim electric fan. I think therobski is using one that I'm going to look into buying also, it just might be thin enough in the right places. If not I'll have to do some modifications to the radiator mount or find some push style fans.
I'm still debating what to do with my original 330? My wife doesn't want to use it as a coffee table inside (hahah), so I may wrap it up and stuff it into my shed just incase 20 years from now I want to rebuild it and put it back into the car.
April 25th, 2012 | 05:51 AM
#55
Registered User
Joined: Jul 2009
Posts: 3,140
From: Dallas-Fort Worth
Raising a family does take up alot of spare time and cash!!! Let me know about the hood clearance on the 64 GTO radiator, as mentioned I will need to go aluminum when I build the 425. As far as the electric fans check out mine. BUT also I heard that a Taurus electric fan from the bone yard will work too for a fraction of the cost, just make sure you wire it right-your stock alternator will not support one either, I think they are only 60amps. I bought a 100 AMP Power Master for $105.00, Also if you are wanting to keep the granny style column shift I have that solution for you as well.
IMG_1418.jpg
IMG_1424.jpg
IMG_1428.jpg
IMG_1421.jpg
IMG_1279.jpg
IMG_1278.jpg
IMG_1418.jpg
IMG_1424.jpg
IMG_1428.jpg
IMG_1421.jpg
IMG_1279.jpg
IMG_1278.jpg
 September 16th, 2012 | 09:53 PM
#58
Thread Starter
Registered User
Joined: Aug 2011
Posts: 87
From: Long Beach CA
So got everything bolted back up to the 455. Cranked it over for awhile trying to get some fuel up to the carb. That didn't work, but what did happen was one of my wires close to the coil smoked all the way back to the positive junction. All I see now is bare wire.  Not sure how that happened and it was too dark to investigate but I may need a new harness, any suggestions on places to buy them?
I'll try and see what caused the short this week, but I'm thinking all the wire movement I did in the process of getting the 455 in probably didn't help the brittle wires.
Not sure how that happened and it was too dark to investigate but I may need a new harness, any suggestions on places to buy them?I'll try and see what caused the short this week, but I'm thinking all the wire movement I did in the process of getting the 455 in probably didn't help the brittle wires.
April 12th, 2013 | 09:53 PM
#59
Thread Starter
Registered User
Joined: Aug 2011
Posts: 87
From: Long Beach CA
Its been too long since my last update. Time flies since I torched the harness. It took till December to get a new harness sent out to me and then till February to get it installed. Figured out the wire that got fried goes from the starter solenoid to the coil. Unfortunately it also smoked the wire going from the distributor to the coil. Which is fine if converting to HEI... but didn't realize that until after I ordered the harness and the HEI setup and installed both.
Was able to get it to fire up with some starter fluid for about 3 seconds. It still needs fuel in the carb so after my wiring issues I'll work on getting some good fuel to the carb.
Next task is to sort out the regulator wiring on the firewall. Heard that with my 72 455 Alternator I don't need the firewall regulator.
I hope to get some pics up this weekend.
Which is fine if converting to HEI... but didn't realize that until after I ordered the harness and the HEI setup and installed both. Was able to get it to fire up with some starter fluid for about 3 seconds. It still needs fuel in the carb so after my wiring issues I'll work on getting some good fuel to the carb.
Next task is to sort out the regulator wiring on the firewall. Heard that with my 72 455 Alternator I don't need the firewall regulator.
I hope to get some pics up this weekend.
April 13th, 2013 | 08:51 AM
#61

Registered User
Joined: May 2010
Posts: 49
Thanks for the response, it gives me a few ideas. Did you also use the center console? I'd like to retain a stock appearance on the interior plus I like the old school tach.
I may order this since it uses cables and looks like I could get it to sit in the stock location.
http://www.summitracing.com/search/B...s&autoview=SKU
I may order this since it uses cables and looks like I could get it to sit in the stock location.
http://www.summitracing.com/search/B...s&autoview=SKU
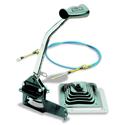
That's the shifter I'm using. Ay first I bought the Hurst version, but it uses shift rods, instead of the cable, so I exchanged it.
f342da20-8d6f-4918-8702-6da5403dd79f_zps381eb662.jpg
MVC-009S-4.jpg
Last edited by olds style; April 13th, 2013 at 09:20 AM.
April 13th, 2013 | 09:49 AM
#62
Justin
Joined: Mar 2012
Posts: 3,448
From: utah
I have done some research and have a few pics of different way people have done this let me know how it goes!
I should be doing mine shortly .
April 13th, 2013 | 11:23 AM
#63
" Hoo yah "
Joined: Sep 2009
Posts: 406
From: North Park,IL
I some how completely missed this thread. Nice score!. I just picked up a 1964 Cutlass last week. It jumped out in front of me and I drove from IL to KS to pick it up . My 72 442 project will now go the backburner, until I get this 64 done.
. My 72 442 project will now go the backburner, until I get this 64 done.
April 13th, 2013 | 11:25 AM
#64
Thread Starter
Registered User
Joined: Aug 2011
Posts: 87
From: Long Beach CA
Thanks for sharing. I did end up getting the B&M shifter but looks like I might have to fabricate something together for mounting it, where did you get the base for that shifter?
 April 13th, 2013 | 11:27 AM
#65
Thread Starter
Registered User
Joined: Aug 2011
Posts: 87
From: Long Beach CA
Nice! congrats! Must be a good runner to make that drive.
April 13th, 2013 | 11:36 AM
#66
" Hoo yah "
Joined: Sep 2009
Posts: 406
From: North Park,IL
Yes. It's pretty solid car. Quarters have some bondo and trunk needs a little work, but for the price and shape the car was in it was worth the drive(family trip), since locally people want a large amount of money for rusted junk. I'll start a build thread soon. It looks like 64-65 F85 Cutlass owners on this site are growing.
April 13th, 2013 | 11:36 AM
#67
Thread Starter
Registered User
Joined: Aug 2011
Posts: 87
From: Long Beach CA
Raising a family does take up alot of spare time and cash!!! Let me know about the hood clearance on the 64 GTO radiator, as mentioned I will need to go aluminum when I build the 425. As far as the electric fans check out mine. BUT also I heard that a Taurus electric fan from the bone yard will work too for a fraction of the cost, just make sure you wire it right-your stock alternator will not support one either, I think they are only 60amps. I bought a 100 AMP Power Master for $105.00, Also if you are wanting to keep the granny style column shift I have that solution for you as well.
 April 13th, 2013 | 06:50 PM
#69
Thread Starter
Registered User
Joined: Aug 2011
Posts: 87
From: Long Beach CA
Strange starting issue today. If I turn the ignition on, lights come on (brake, gen) then turn to start I get a click and thats it, then all the lights go out. If I then turn the ignition off, then back to on. Nothing, no lights, no click. If I wait 5 minutes the first scenario can be repeated. I checked the shifter switch is still in park, grounds to the batt and engine are good. Swapped the starter and solenoid out with a known good one. Maybe the starter relay? I'll have to check a few other things tomorrow.
April 13th, 2013 | 08:59 PM
#70
Thread Starter
Registered User
Joined: Aug 2011
Posts: 87
From: Long Beach CA
A new to do list for this car just to get it moving. I'll keep track here in case anyone has any suggestions or comments.
)- sort out the electrical issue in the above post.
)- drain and refill fuel tank with good fuel (anyone ever try putting fuel in the tank with a new type 5 gallon can? Seems like I need an old school elephant trunk style funnel to get some new fuel in)
)- figure out how to go from a solid throttle linkage ('64 330) to a cable ('72 455)
)-set timing
)-block off all unnecessary vacuum lines
)-buy a 1972 455 olds 98 service manual
)- figure out how to mount the new B&M shifter in the same location as the original so I can still use the center console.
)-move the brake line so it isn't touching the exhaust manifold (maybe some headers would be an easier fix?)
)-modify the exhaust pipes so they can bolt to the manifold
)-drill and bolt trans mount cross-member down
)-shorten and install drive shaft
)-install gauges (temp, oil, charge)
)-source and install radiator fan shroud, or install electric fans.
Probably missing a few things, at this rate I have at least another year before the car gets moving.
looking back... rebuilding the 330 would have been the cheaper and significantly quicker way to get this thing moving. Oh well, too far into it to stop now.
April 13th, 2013 | 09:02 PM
#71
Justin
Joined: Mar 2012
Posts: 3,448
From: utah
What exhaust manifolds did you use ??
Also I pulled a electric fan from the junk yard think I got it for five bucks and a relay kit from auto zone for 20 . to use with my chrysler four row radiator that I got for 30 bucks lol got kinda cheep the last month went all out on a brake kit
Also I pulled a electric fan from the junk yard think I got it for five bucks and a relay kit from auto zone for 20 . to use with my chrysler four row radiator that I got for 30 bucks lol got kinda cheep the last month went all out on a brake kit
Last edited by oldstata; April 13th, 2013 at 09:06 PM.
April 13th, 2013 | 09:14 PM
#72
Thread Starter
Registered User
Joined: Aug 2011
Posts: 87
From: Long Beach CA
What exhaust manifolds did you use ??
Also I pulled a electric fan from the junk yard think I got it for five bucks and a relay kit from auto zone for 20 . to use with my chrysler four row radiator that I got for 30 bucks lol got kinda cheep the last month went all out on a brake kit
Also I pulled a electric fan from the junk yard think I got it for five bucks and a relay kit from auto zone for 20 . to use with my chrysler four row radiator that I got for 30 bucks lol got kinda cheep the last month went all out on a brake kit
April 13th, 2013 | 09:18 PM
#73
Justin
Joined: Mar 2012
Posts: 3,448
From: utah
I read that they didn't fit, that's good info to know wondering if there is letters or numbers on them I have two Motors both from big cars one have w and t other I want to say is 1and 3
Any ways this might be part of your clearance problem
Any ways this might be part of your clearance problem
Last edited by oldstata; April 13th, 2013 at 09:30 PM.
April 13th, 2013 | 09:39 PM
#74
Thread Starter
Registered User
Joined: Aug 2011
Posts: 87
From: Long Beach CA
April 13th, 2013 | 09:43 PM
#75
Justin
Joined: Mar 2012
Posts: 3,448
From: utah
Thorton are cheaper not sure on shipping http://thorntonmusclecars.com/produc...aust-manifolds
 April 14th, 2013 | 08:52 PM
#77
Thread Starter
Registered User
Joined: Aug 2011
Posts: 87
From: Long Beach CA
Thorton are cheaper not sure on shipping http://thorntonmusclecars.com/produc...aust-manifolds
April 14th, 2013 | 10:22 PM
#78
Thread Starter
Registered User
Joined: Aug 2011
Posts: 87
From: Long Beach CA
Learned a lot today about starting problems. Long story short, jump to the last paragraph, its less painful that way.
Just a preface, I replaced the battery yesterday since the old one tested bad. 800CCA, should have been spinning that 455 nicely, but it wasn't.
So began today tracing wiring back from the starting solenoid and finding a relay that was connected to my starting solenoid which did nothing at all. Possibly was used for an alarm in the past. It had one wire going in and one going out so obviously there was no need for it. Removed that then I found the solenoid wire had bare spots that could have been touching ground. Those two fixes resolved the power going out when turning the ignition to start.
It did not resolve my slow crank though or the smoke and spark from the positive terminal when I cranked it over. I hunted through numerous forum posts on the issue. The two common problems were wiring and grounding, and then starters. I checked, triple checked, re-made all the wires going from the battery to the junction block, to the starter and grounds from the block to the battery and frame. Again found lots of loose connections, and thought this had to resolve the problem. No go, so replaced the starter with a known good. Same issue, still slow to crank.
Ended up reading on some random Ford forum if the distributor is too far advance the spark would light off too early and end up fighting itself. So I checked and the further I retarded the timing, the easier it cranked over. I must have set the distributor in just a bit too far advance and then when I cranked it the first time, it moved. Either way, found lots of wiring issues, resolved those and also learned timing... isn't everything but it sure helps. hahah
April 16th, 2013 | 07:24 PM
#80
Thread Starter
Registered User
Joined: Aug 2011
Posts: 87
From: Long Beach CA
That was the idea initially, but after doing the HEI upgrade and not knowing anything about tuning the original regulator, I thought it would be less troublesome to have an internally regulated alternator.


