When you click on links to various merchants on this site and make a purchase, this can result in this site earning a commission. Affiliate programs and affiliations include, but are not limited to, the eBay Partner Network.
I've experienced the no-start heat soak problem on several 400's and 455's I've owned. A starter solenoid heat shield fixed the problem for me each time. If you've got a hot no-start condition and turn the key and don't hear even a click, it's most likely the solenoid heat soak problem.
FYI, there are different performance level's of the Oldsmobile 350/400/455 starter. Look at the two electrical tabs coming out of the side of the starter that connect to the solenoid:
Heavy Duty (455) - 2 thick tabs
Medium Duty (400) - 1 thick and 1 thin tab
Light Duty (350) - 2 thin tabs
Car looks great! Wonder why the starter is acting up so quickly after rebuild? You don�t have headers so i would think it should be ok if the rebuild was good.
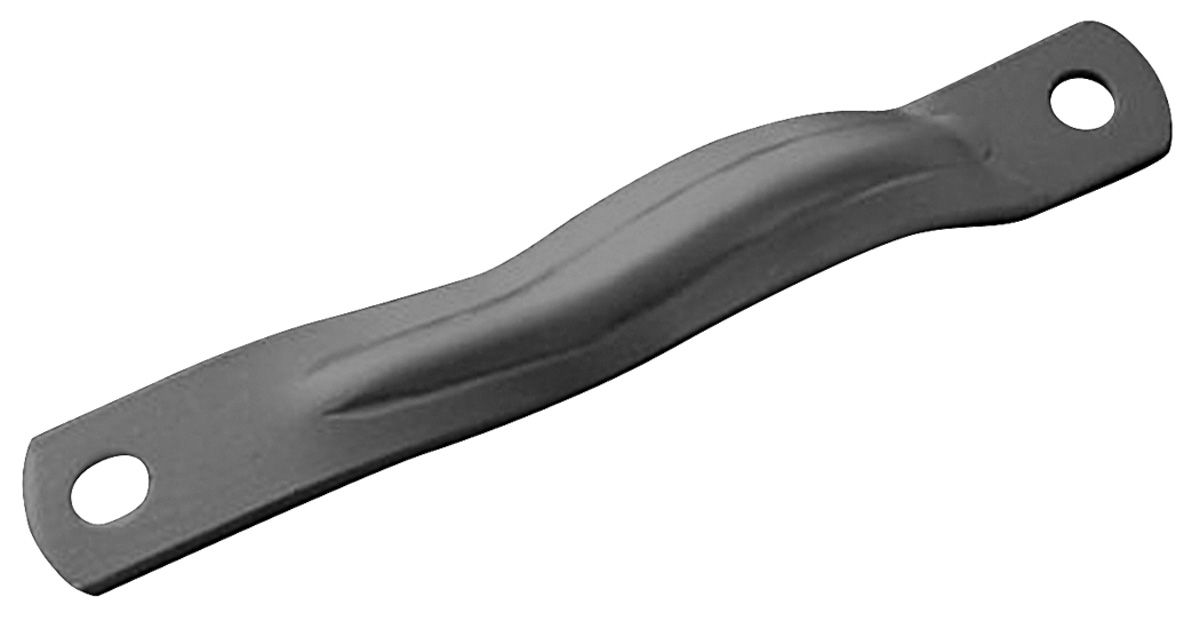
Congratulations on a beautiful car. One more place you might look for your overheating problem. If you installed an original type starter brace (pic below) you might want to check it. I found that on my car the starter brace was almost in direct contact with the left hand exhaust pipe. The heat was transferring directly from the exhaust to the starter. I removed the brace - problem solved.
I've experienced the no-start heat soak problem on several 400's and 455's I've owned. A starter solenoid heat shield fixed the problem for me each time. If you've got a hot no-start condition and turn the key and don't hear even a click, it's most likely the solenoid heat soak problem.
FYI, there are different performance level's of the Oldsmobile 350/400/455 starter. Look at the two electrical tabs coming out of the side of the starter that connect to the solenoid:
Heavy Duty (455) - 2 thick tabs
Medium Duty (400) - 1 thick and 1 thin tab
Light Duty (350) - 2 thin tabs
Thanks Brad, Mine is definitely the original 455 starter and Ideally I don't want to swap out the starter so I'll order one of those shields and give it a try. I see them listed on eBay. Cheers Rohan
Check the ground straps. They need to be clean and tight.
Is your ignition timing set properly?
Are the battery cables the correct size?
Are you using a high quality starter solenoid?
Yes to all those points unfortunately. The exhaust is too close for my liking to the starter, it's fine if the ambient temperature is in the 50s but does'nt like it when it's in the high 70s. It wasn't an issue when I first bought the car but it didn't have the original brace on it at that stage so it now has even closer contact to the heat source. I'm going to take that off today and see what difference it makes.
rand5204 I think your'e on to it. That's the only change I made in my restoration as that brace was missing when I bought the car and you're right the starter is extremely close to that brace. When I first bought the car it wasn't an issue at all. I can't imagine how those bigger plate type braces ever worked on the later models - it would have been an even bigger heat source.
Thanks Brad, Mine is definitely the original 455 starter and Ideally I don't want to swap out the starter so I'll order one of those shields and give it a try. I see them listed on eBay. Cheers Rohan
Rohan, yes keep that original starter for sure, that's the high torque starter you have there. Mine has the solenoid heat shield and I have the brace on it and have never had a problem, even with AC on a hot day. You might want to consider throwing a new high quality solenoid on there while you have the starter out. Good luck and keep us updated! Brad
I went up in size on the battery cables in my 442. Had them made by M&H, and they look stock.
I do not have the brace or a solenoid shield.
My car starts right up even in 90 degree weather.
Wow, thats good to know. I'll try a temporary shield today with some aluminium heat shielding that I'll strap onto the engine pipe temporarily to see what difference if any that makes. Sounds like it might need a combination of shielding and bigger cables for our hot Aussie summers. Thanks for the feedback, really appreciate it.
Rohan, yes keep that original starter for sure, that's the high torque starter you have there. Mine has the solenoid heat shield and I have the brace on it and have never had a problem, even with AC on a hot day. You might want to consider throwing a new high quality solenoid on there while you have the starter out. Good luck and keep us updated! Brad
Thanks Brad, I was wondering if you could fit both the shield & the brace so thats great to know. I'm not looking forward to lifting the starter out again without having the car on a hoist but thats the way it goes. Ill keep you posted on the results. Cheers Rohan
It's cooled off a bit here in Aus as we are well into Fall but the quest goes on to get things right. I ended up getting a NOS Delco starter solenoid and fitted a heat shield from ILT to protect the solenoid, the zinc plating wouldn't last 5 seconds down near the manifold so to get the best long term heat reflection I painted it in high temperature silver which will hopefully do the trick. Also replaced the terminal end of the cable to the solenoid as it was way too thin and already showed signs of a crack at the 90 degree bend. Hopefully we should see an improvement next time it hits the road. Only drama was scratching the paint on the starter getting it out so ended up repaint that.
Meanwhile fellow CO member 11971four4two has helped me out with a pair of the correct front calipers. My car had 2 different aftermarket calipers so these will go on once I can find a suitable "cast iron" look paint. I had them shipped to Brake & Equipment Services in Minneapolis who blasted & rebuilt them but there's still signs of a little rust so I'll need to blast them a little further before they go on the car over the coming week.
What a nice build, the attention to detail is obvious. This color combo just works and looks outstanding! Thanks for sharing your progress.
I have to agree on all these points. Love Love this car. It must stand out down there like nothing else. I would love to see car show pictures from down there sometime. Thanks for sharing all your work and details.
Thanks harriscu and no1oldsfan , appreciate the kind feedback. It's certainly been a bit of a challenge doing this Olds on the other side of the planet but I'm pretty happy with the result overall. no1oldsfan you asked about car shows down here and unfortunately the Bi-Annual Olds Club of Australia National Meet was cancelled last year but here's a link to photos of the previous one in 2018.
I see one picture. Looks like some nice cars. I bought this car at 17 so I love the Rally Red car. Do you get a fair amount of American cars down there?
What a nice build, the attention to detail is obvious. This color combo just works and looks outstanding! Thanks for sharing your progress.
Originally Posted by no1oldsfan
I have to agree on all these points. Love Love this car. It must stand out down there like nothing else. I would love to see car show pictures from down there sometime. Thanks for sharing all your work and details.
Originally Posted by no1oldsfan
I see one picture. Looks like some nice cars. I bought this car at 17 so I love the Rally Red car. Do you get a fair amount of American cars down there?
We don't have the numbers of American cars here like you have or Europe for the matter. Oldsmobile's production stopped here in 1950 but continued as imports and converted to RHD up until about 1980. I'm taking my '70 to its first show here on Saturday so I'll post a few pics. There are 80 or so photo's on that link above, when you click on the link only one photo will open but move your cursor toward the right or left side of the photo and arrows will appear to move forward or back. There are a few '70's and a '69 H/O there too.
I plan to park my car with that Rally Red '70 on Saturday so I'll snap a few pics to share.
Well it's finally Summer here in Australia so I'm back into it again, finishing things I hadn't got to and going back over things I'm not happy with. I'm currently switching the brake system to Dot 5 fluid so that's meant stripping and flushing everything clean. Meanwhile through winter here I stripped, blasted masked and painted the SS1 wheels and they came up pretty nicely. The flat black in the center doesn't look that flat in the photo but it's just the light that makes them look that way. I'll post some more pics in a week or so as things come together.
... Meanwhile through winter here I stripped, blasted masked and painted the SS1 wheels and they came up pretty nicely. The flat black in the center doesn't look that flat in the photo but it's just the light that makes them look that way. I'll post some more pics in a week or so as things come together.
Great looking SS1's! The date codes are very discernible.
Great looking SS1's! The date codes are very discernible.
Yes, its amazing how crisp & clear the date codes come up with a good clean & blast. Unfortunately 2 of the wheels aren't originally from the car and aren't the right date but they will do till a much nicer set arrive (that will be a winter project for next year).
Well just in time for Christmas and the wheels are all together again and look pretty nice I think. I was lucky enough to source 4 NOS wheel trims but couldn't find nice enough NOS centre caps so I ran with the repros from Thorntons which are really nice faithful reproductions.
Whilst the wheels have been off I decided to go back over a few things and that included completely stripping the brake system, flushing the lines, changing the hoses and all the seals to switch over to Dot 5 (silicon) brake fluid. I now have the correct original front calipers on and repainted the master cylinder in the correct "black" color. It's a very slow process bleeding the air from the dot 5 fluid and I'm still going as you need to wait several hours after topping the master cylinder but I'm hoping it's a worthwhile exercise in the end.
It's now Summer here in Australia so I'm aiming to be on the road again over the coming week and start enjoying a few cruises in it.
Merry Christmas everyone.
I also used DOT 5 silicone brake fluid in my Vista Cruiser. Trying to pump the air out didn't work. I found the best way to get air out of the rear lines was to elevate the rear and allow the fluid to flow by gravity. It took hours, but the air came out.
When it comes to replacing with silicone, I spoke to Karp's who rebuilt some of my stuff and they didn't recommend and couldn't guarantee if the switch was made. I'm not sure why but assume its because of chemical compatibility between rubber or plastic and silicone? I was gonna make the conversion myself but now I'm thinking to just stay with the original?
When it comes to replacing with silicone, I spoke to Karp's who rebuilt some of my stuff and they didn't recommend and couldn't guarantee if the switch was made. I'm not sure why but assume its because of chemical compatibility between rubber or plastic and silicone.
I've not heard of material compatibility issues with silicone fluid. I have heard that it is difficult to get the air out and the resulting compressibilty problems make it impractical for daily-driven cars. As well, the existing glycol-based fluid must be completely removed otherwise the pockets of old fluid absorb moisture and cause corrosion.
My brake parts were new when I made the change. I washed out the steel lines and followed with alcohol and dry compressed air. Six months later I again blew out the lines and added the silicone fluid.
Most people who go through the extensive steps to make the change have show cars where silicone's lack of reactivity with paint is most important.
Karp's may have felt that downsides overwhelmed and there were no up-sides for them. Ask them why they made their statement.
Thanks for your feedback everyone. Yes, there is certainly a risk with Silicon fluid but I felt it was worth trying given the benefits. My brothers & I used it on a fresh restoration of a '48 Olds and it wasn't successful but after much research in recent years we found that the largest problem is when rubber grease is used to assemble the master or wheel cylinders (and that's what we did at the time). Rubber grease & Silicon brake fluid are apparently incompatible and turn rubber into mush which will lock the cylinders up . In this change I have flushed the lines with alcohol and blew them out, replaced all the hoses, stripped all the cylinders and washed them out with alcohol and fitted new rubber seals using the silicon fluid as the assembly lubricant instead of rubber grease. I hope to be driving it from tomorrow so over the next month it should prove if the method I've tried is successful so I'll keep you all posted.
By the way Gary your right about the air bubbles, I gravity bled the front but had to pressure bleed the rear, you can't do it as quickly as regular fluid and you have to wait several hours with the master cylinder cap off to get rid of the air bubbles after topping up between bleeds.
Sounds like your on top of things as usual. Thanks for the info.
Thanks, I sure hope the research is worth the effort in the end. I still have a concern that the silicon fluid will be way less forgiving than regular fluid. It's much less vicious and it wont take much of a poor seal to result in a leak I'd say - so I hope in a months time that I'm not regretting the exercise .
Well here's my initial experiences with the Dot 5 (silicon) brake fluid. I've had just one little leak at this point and it was actually from one of the rear wheel cylinder bleeders. I've been locking up every fitting to the point that that I'm almost uncomfortable to go much further without risking a thread stripping. Bleeder screws are a bit different in that you risk rounding the small hex even with a ring spanner and sure enough even doing the bleeders up damn tight it leaked like a sieve - the viscosity of the Dot 5 isn't at all forgiving on the slightest poor connection . Anyway it took trialling a few other bleeder screws and finally problem solved.
The leak only became apparent under pressure with the booster operational and man a little bit of that fluid goes a long way. I've driven the car about 25 miles since fixing the leak and at this point I can't notice much difference with the pedal so I've got my fingers crossed that it stays that way. I'll be keeping a close eye on the rear wheel cylinders as I remain a little nervous that there wont be enough pressure on the cups to maintain a perfect seal when the car sits for weeks at a time un-driven through winter, but perhaps just pumping the brakes weekly might fix that.
Well, I'll finish off this thread with with my last report. The silicon brake fluid has been a success and have had no issues to date, I have been slowly going back over things that I haven't been completely happy with and have since sourced the correct oil pressure sender, door & ignition locks that are now in place. We are heading into winter here in Australia so I'll be beavering away on a much nicer set of red fender wells to replace the ones I have now that had to be painted, with a bit of luck they will be completed and installed before Spring ready for when we head to the Oldsmobile Club of Australia National Meet in early October.
I have driven it about 150 miles and it goes great, I do have a weep developing from the extension housing seal on the trans so that will be sorted this weekend before it's wrapped up for a winter break. Thanks everyone for your input and guidance over the last few years it's been really appreciated. My new thread will commence over the coming months on my next Olds project but that's a bit earlier than this one. Cheers for now. Rohan
Fantastic work! Thanks for sharing, and good luck with your resto of the (new) inner fenders.
These ones are pretty nice so it hopefully wont be a huge project. I've got all the tar & rubber off the underside already so the slow & tedious work is now underway