When you click on links to various merchants on this site and make a purchase, this can result in this site earning a commission. Affiliate programs and affiliations include, but are not limited to, the eBay Partner Network.
Doing a frame off on my 1970 Olds 442 convertible. Started in May. Been following all the tremendous major build threads for research as well as using shop/assembly manuals and my build sheet to restore back to factory originality.
One question I have is around the positioning of the color bands on the drive shaft. According to my build sheet, my bands are Brown and Blue. Here are my questions:
Is the Brown band closest to the yoke? How far down the shaft is the band? Is it one inch wide? How far from the Brown band is the Blue band? Is it an inch wide as well?
Thanks,
Jim
Welcome to the club! Good luck and don't forget to have fun doing it - sometimes I forget.
Jim, in my thread there is all the specs on the location and widths of the stripes, but as far as which color goes closest to the yoke and the shades of blue and brown, I just used my SWAG ....
Thanks Joe. Did you take the measurements (17 5/8" from the ear for the first band, 7/8" wide, 21 1/2" from the ear for the second band, 3/4" wide) from your drive shaft or was this documented somewhere? Curious mostly. Seems odd that the factory would have two different widths for the bands. My driveshaft was very rusty but there was a slight yellow band that appeared to be 1" wide approximately 21" from the weight just below the weld at the front of the driveshaft. From the assembly manual, I see no yellow band for 1970 so maybe mine is not original or from a different year. The documentation on my 442 is the most I have from any of my cars and I found no history about the shaft being changed. It had the original U joints in it!
I am having fun with this restoration! Doesn't mean I don't get frustrated now and again but just love being in the garage bringing the 442 back to life!!
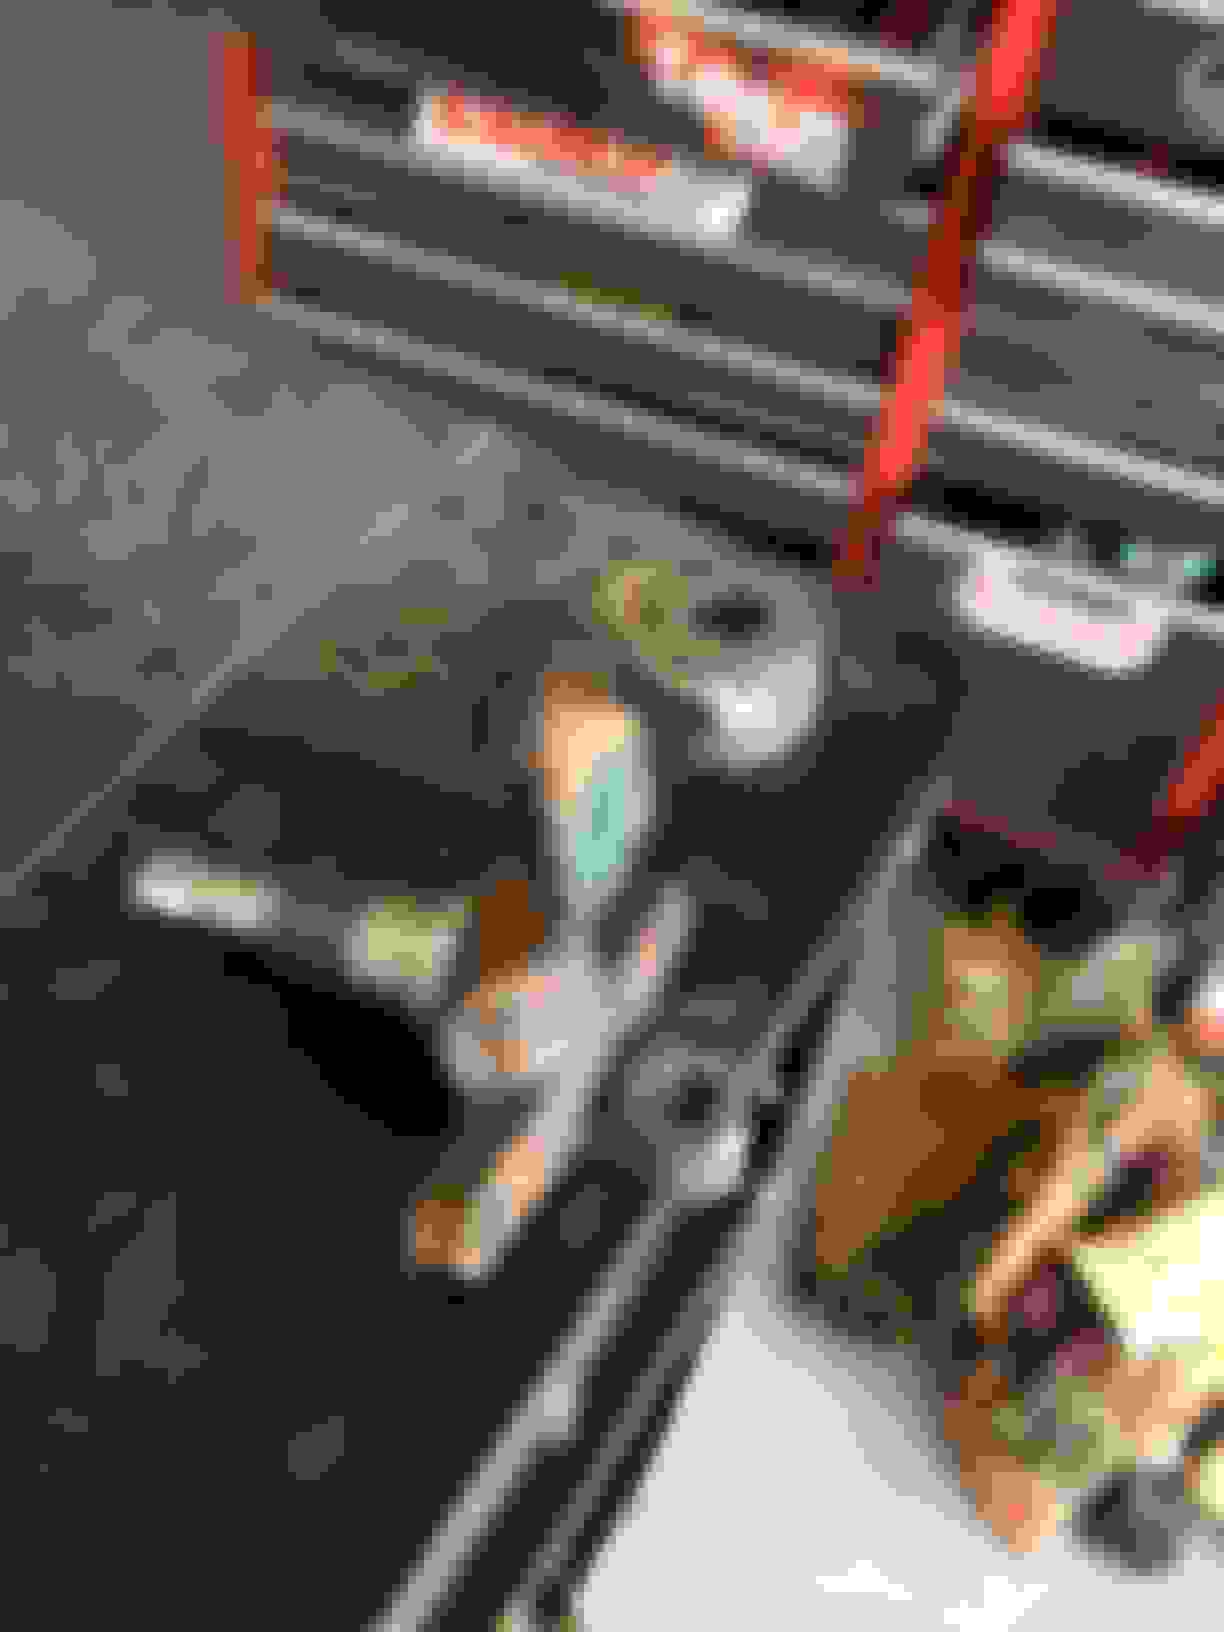
My shaft is the original one to the car and also had the original u joints in it. I tried like hell to save them - especially the rear one since it still had those assembly retainers that hold the diff. cups in place until it was installed, but there was too much wear on both joints and one of those cool retainers literally fell off from corrosion when I removed it!
I was able to tell exactly where the stripes went because of the corrosion. I think in the pics you can see that the paint stripes protected the metal so where there was no paint the corrosion was much worse. (think a photo negative image) The difference in stripe width I attribute to variations in the marking system paint - brush not evenly contacting the metal, paint running out, etc... I suspect this was not supposed to be a precise thing, just a assembly part ID guide.
Thanks Joe. Did you spray the bands or paint them with a brush? Paint dabs etc are typically brushed on. When I disassembled the front suspension and was cleaning the components, I found Green paint on one spindle and white on the other. Can you buy kits for the paint (was able to get a kit for my 69 Corvette frame off)? What did you use of paint on the shaft?
Been 6 years since I worked/posted any updates on my 70 442 restoration! A new job and home move have a way of shifting priorities! Good news is the new house provided much needed garage space for my toys! I retired the end of January and can now focus my attention on my cars. I needed to get my new garage set up (compressor, lights, 2 post lift, shelves, floor coating) which always takes longer than one thinks but with all this behind me now, I'm back working on the 442.
My 1970 442 Convertible was originally purchased on November 15,1969 at Empire Oldsmobile in Denver, CO. I have the original bill of sale, protect-o-plate and build sheet. My car was built the first week of October (10A) 1969 and was number 3861 off the line in Fremont, CA. The car has 60K original miles and heavily documented. I purchased the car in 2003 and am the third owner. I reached out to the original owner since I lived in Denver, and spoke with him about the car. He bought it for his wife (nice husband!). Later in the conversation he says to me, "did I tell you why I sold that car?" I replied no, and he says, "well, when my wife pulled up to traffic lights, guys would whistle at her! I had to sell that car!" I had a good laugh and thoroughly enjoyed my conversation with him. He was very meticulous about documenting all of his service and maintenance.
As I've deconstructed the car, I have found original GM parts/numbers for just about everything (steering, brakes, suspension, engine, tranny, rear end, distributor, alternator). The second owner, who I believe is a member of this site, added OAI, SS1 wheels, 4 spoke steering wheel and aftermarket radio. These are the only options that have been added to the car as far as I can tell. The car was purchased with the following options:
A02 Tinted Windshield
B32 Aux Front Floor Mats
B33 Aux Rear Floor Mats
B93 Door Edge Guard Moldings
D33 Remote Control Mirror
D55 Sports Console
G80 Anti-spin rear end
G90 3.08 Gears
JL2 Power Front Brakes
M40 Turbo 400
N47 Vari-ratio Power Steering
P02 Wheel Discs, Deluxe 14
U35 Electric Clock
U63 Deluxe Radio
I have purchased an original AM/FM radio as well as 8 track tape player and plan to install them during reconstruction.
When I stopped working on the 442 back in 2014, I had removed the front clip, motor, tranny and drive shaft. I had all the control arms and radiator support powder coated black. I media blasted all the steering and brake components. I had the turbo 400 and power steering gearbox rebuilt. The engine has been machined (bored .030", rotating assembly balanced, connecting rods resized with new Speedpro pistons). I purchased some Mondello goodies (cam, roller rockers, etc) to spruce up performance. And then I moved and changed jobs!
I plan to start uploading pictures as I continue the restoration. I have spent a lot of time reviewing several of the amazing 1970 442 restorations on this forum. The attention to detail is amazing. My plan is to use as many of the original parts that came with the car as possible to keep it authentic.
Welcome back jim, your plan to reuse many of the original parts is a good idea. Many times the originals are better made and the repops arenot always as good aquality as the original piece.
Here are a few pics from the initial tear down in 2014
Ready for lift out Came out without too much trouble. Time to de-grease! OG stamp Very clean Typical missing tooth Green and white paint dabs Yellow paint dab on the bottom Before and after media blast 44 years of dirt! Before I had researched all the original paint colors, I sprayed the firewall with Hot Rod black paint. I’m going to re-spray it but it really stands out!
Making progress with disassembly. Drained and removed the gas tank and rear bumper, removed the seats, belts and gauges. The gauge part numbers match the build sheet and the bumper has yellow marking with the number 42 that I will attempt to recreate after sending the bumper in for new chrome. The seat belts are in good shape and original. The drivers seat had washers used to raise the rear mounting bolt and when I placed it on the floor it would not stand up without a 2x4 block underneath. I will have to see what the issue is. Has anyone seen a problem with the seat brackets?
The floor mats appear to be original with GM part numbers on the back. I�ll post a picture for review by the forum. Here are a few pics:
Removed the back seat, belts, armrests, folding top trim panels which had been modified to accommodate after market speakers (bummer!) and rear door panels.
I was looking in the shop manual for instructions on how to remove the window glass and can’t seem to find any information. Does anyone know where the info can be found?
Thanks,
Jim Need to repair this hole Is this an original door panel? 0-10-R?
5 summers into a 70 442 conv frame off myself.
Mine also had the speaker holes cut in the back well covers. (Dang!) .
I notice you had the fiber board divider behind the rear seat. Been trying to figure out if the convertibles had that or not, guess they do. Mine did not.
Thanks for the pic!
BTW - the window glass procedures are in the Fischer Body manual. The online versions are barely readable though so good luck.
Eric
Thanks Eddie and Eric! Getting excited about having the interior completely removed although taking the dash pad off looks rather challenging!
Was able to remove the console this afternoon, managing to remove the panel assembly without breaking it which had adhesive underneath using a long thin screwdriver to expose the middle hex screws holding the console to the floor. Had to remove the interior of the console glove box to expose the rear screws only to find that the factory drilled one hole in the bracket. No big deal, I’ll drill a second hole when I put the console back in.
Could use some help. What’s the secret to removing the e-brake cable and housing? I’ve disconnected the cable end to the pedal mechanism and the other end of the cable is free. Thoughts?
Go inside the car and find where the cable comes through the firewall. Put a small hose clamp around the metal forks/springs that hold the cable in place.
Tighten the hose clamp until the forks/springs on the inside are compressed enough to allow pulling the cable through from the engine side.
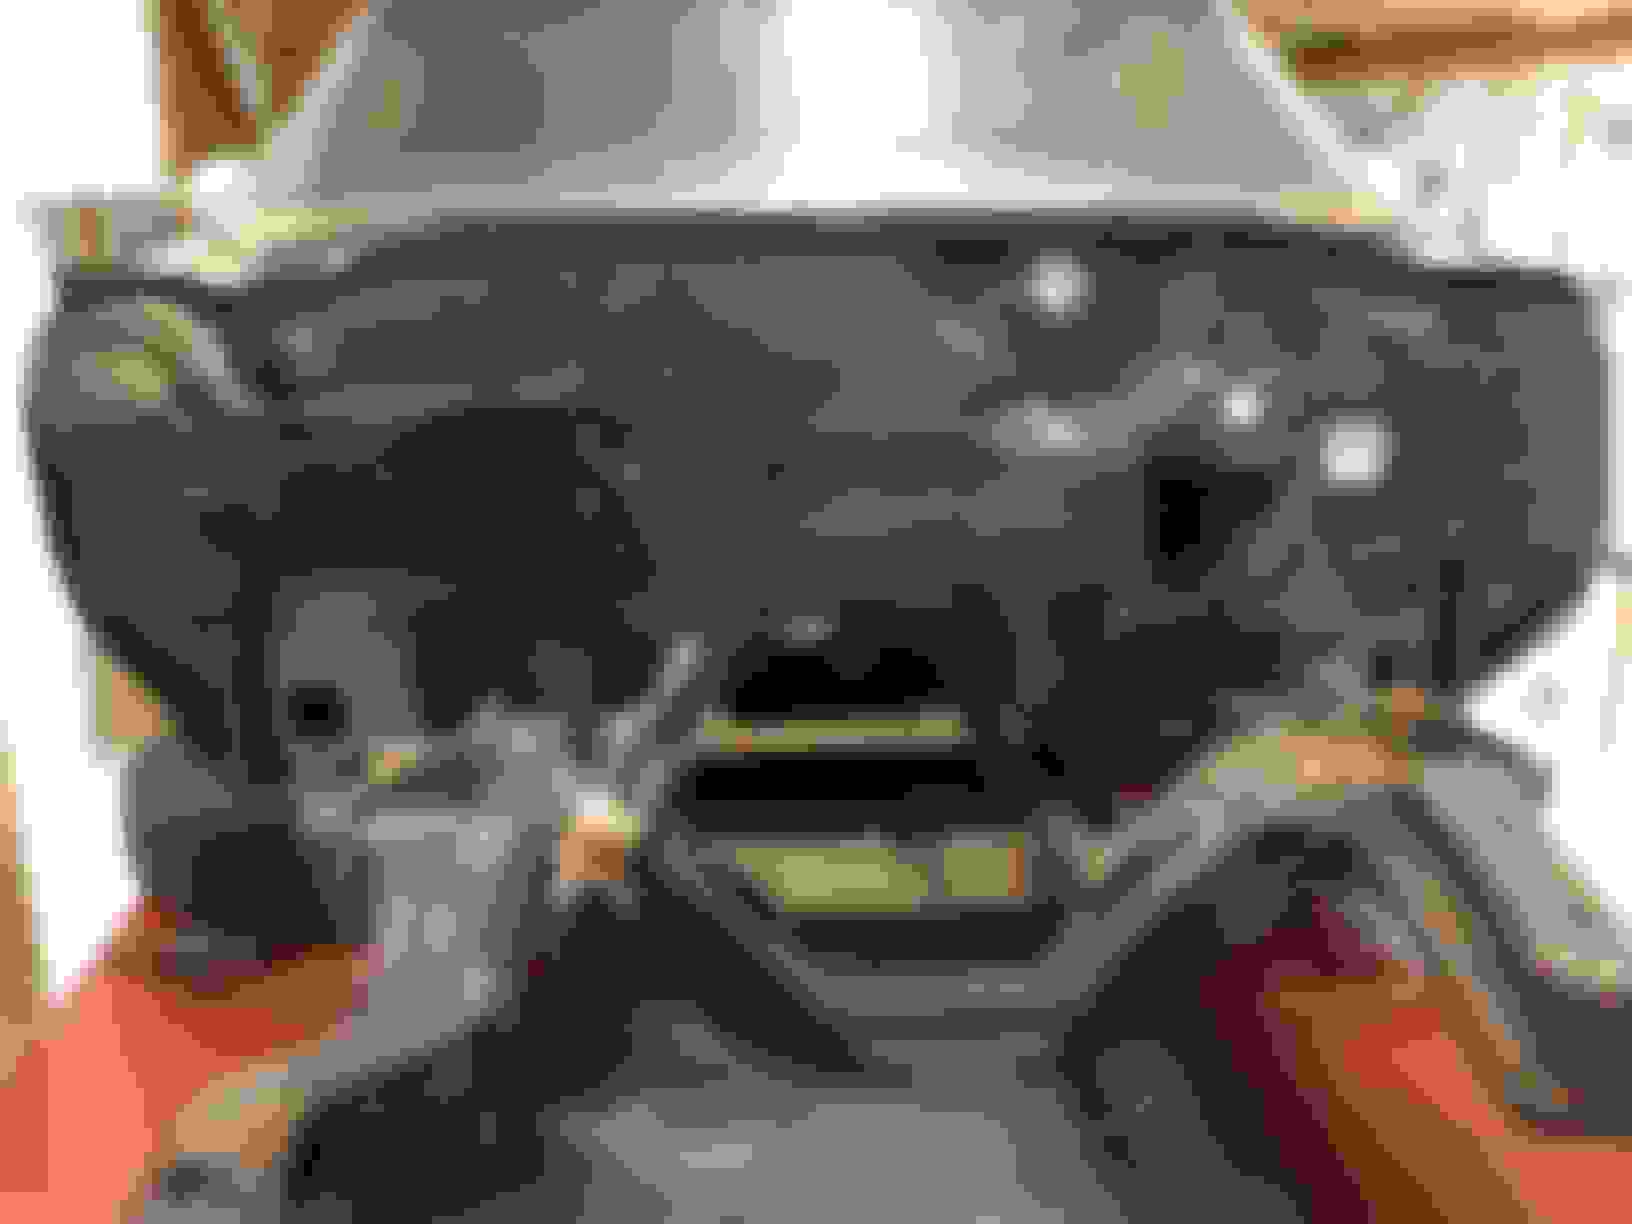
I am just about ready to lift the body off the frame using my two post lift. I’ve removed as much weight from the body (spare tire from the trunk, seats from the interior, console, etc). Should I be concerned about any body flex since it’s a convertible? I left the doors and the convertible top on for support. Thoughts?
Jim:
What work are you planning to do once you separate the body from the frame? If your plan to remove the doors, I would do this before separation and brace the door opening and across the back seat area from jamb to jamb. Even with the doors still on the car, the body will flex quite a lot and the top frame doesn't add any real support. I had to replace the whole floor pan, so I removed the doors and top mechanism and made braces that bolted to the door striker bolts and the upper fender mounts. Here's a pic of my floor replacement.
Big day for my project! My Dash Pad and Instrument Control Panel were liberated from my car!😀 I have to say it does take patience and a lot of contortions but ultimately it came out smoothly! Here are a few pics:
You did a nice job getting that dash out as a single piece with everything attached. I have some time this afternoon and will give you a call. Nice garage, btw!
Took a little time off for lobster season in the Keys but am back on the case! Pulled the body off the frame this afternoon. Was much easier than I thought. All the bolts came out without issue. Used two 4x4’s positioned under the rockers and off the body came!
I’ve followed several posted major builds on this site regarding the proper color for the body mounts (light green and dark green). Was interesting to find that mine were different! According to the GM numbering for body mounts, starting with the front most body mounts, #2, and counting sequentially towards the back with the last one being #7, instead of #4 being dark green, mine was yellow and the body mount had yellow printed on the mount and yellow paint on the mount. #5 which is by the shock tower was pink. I’ve included pictures to show the colors. Am interested to hear if anyone else has seen this before. My 442 was built in Fremont, CA (Z). I know most builds are W30 from Lansing, Michigan. Wondering if my colors are different because it’s a Fremont build.
Jim
Body off! #5 mount pink #4 mount with Yellow printed on the mount
Thats probably the nicest car Ive seen come off a frame for resto. Most are pretty rusty or rotten. The picture looks like a shot of it going back on the frame. That car should clean up like new. Good work so far and keep us updated, Ill be watching.
Curious about your plans now the body is off the frame? Earlier you asked about bracing. Are you just refreshing the frame and then reinstall body as is?
Last edited by scrappie; September 27th, 2020 at 06:09 AM.
The body and paint is in nice shape thanks to this being a Colorado car. However, on the quarter panels and deck lid, there was some body work that was done, circa 1980’s (drill holes and dent puller) that has fatigued over time and become visible in good lighting. My eyes are drawn to these imperfections now and they are all I see! So, the plan is to take it down to bare metal, weld up the holes and make it brand new. I’m going to keep the car as original as possible using as many of the original parts (which the majority are) and paint (20 - Azure Blue).
A friend of mine gave me a rolling body jig that he built to use when restoring his corvettes (63, 65, and 67). I have to modify it to align with the body mounts on the 442. The plan is to support the body on all of the body mount locations and take it to the body shop. This week I’ll be documenting the frame, removing the rear end, suspension fuel/brake lines, etc and taking the frame to media blast and powder coat. Bondo in quarter panels Bondo in deck lid
#7 Drivers side #7 Passenger side #6 Passenger side #6 Drivers side #5 with pink/purple color #5 #5 #5 #5 #4 Drivers side #4 Drivers side with Yellow lettering on the mount #4 Passenger side with Yellow #4 #4 Passenger with Yellow #4 Drivers side #4 Passenger with Yellow paint #3 Drivers side with light green color #3 Passenger side with light green #2 Passenger side #2 Drivers with some slight green color
Spent the last couple of days getting the frame ready for media blast and powder coat. Disassembled the rear suspension, removed the brake, fuel lines, and transmission cross member. Went to battle with the control arm bushings and emerged victorious! Even though the car spent most of its 50 years in Colorado, the underside was undercoated for some reason. Decided to get the paint scraper out to remove the undercoat overspray on the frame. Eight hours later the frame is clean! Other than being worn out, mostly good news. The frame has only surface rust and no pitting. Lots of clean metal that was preserved by the undercoat. Was able to find my VIN number stamped on the frame as well as the chassis identification and manufacturer stamp. Took pictures that are attached. Now for the bad news. The frame has a small ding just in front of the passenger rear wheel. Cross measurements at the rear indicate 1/2� difference which will require straightening. The good news is that cross measurements in the middle and front of the frame are equal. So the rear needs some adjusting but minimal.
Next up is disassembling the rear end and removing the undercoat from the body. Keep you posted.
Jim Separation from the frame Victory over the bushings! Frame scraping And more scraping Frame ID and manufacturer stamp. VIN stamp
Last edited by jimlabo; October 2nd, 2020 at 07:25 AM.
Hey Jim, looks like your making some progress. I just realized that your car is my cars cooler better looking brother. Mine is also a Fremont build 70 convertible. Originally the same color paint, interior and top, but mine is Cutlass Supreme 350 4bbl bench seat car. Did you find a build sheet? I would be interested in comparing it with mine.
Thanks for the response. Very cool to hear from a fellow Fremont car owner! I do have the build sheet. I’ve attached it. As you can see, it has a washed out spot but is mostly clean. As I disassemble the car and identify/document the parts, I’m excited to compare them to the build sheet and find originality. Scraping the frame yesterday and finding my VIN stamped on the frame along with the frame ID and manufacturer stamp was awesome.
Thanks for the response. Very cool to hear from a fellow Fremont car owner! I do have the build sheet. I�ve attached it. As you can see, it has a washed out spot but is mostly clean. As I disassemble the car and identify/document the parts, I�m excited to compare them to the build sheet and find originality. Scraping the frame yesterday and finding my VIN stamped on the frame along with the frame ID and manufacturer stamp was awesome.
Jim
Hello Jim,
Where in your Fremont built car did you locate the build sheet?
When I bought the car, the build sheet, original bill of sale and factory order were all laminated by the previous owner. Judging from the blurry spot on the build sheet, I’m confident it was above the gas tank. I’ve found build sheets from other GM cars (Corvette and Buick) above the gas tank.
Hey Jim, here is mine to compare. Mine was removed by the original owner but it appears to have been under the gas tank also. Your looks like a fairly early build and mine was towards the end of the production year.
Spent the afternoon modifying the body dolly that a friend gave me. Mocking it up to fit the 442. Hope to finish it up tomorrow. Spoke with several frame alignment shops about my findings. Consensus is not to pursue adjustment over 1/4.” Plan is to take the frame to media blast and powder coat next week.
Been busy getting as much work done on the 442 before we leave the mountains of Colorado for the Gulf of Florida. Took the frame, rear control arms and differential to media blast and powder coat last week. Expecting to pick them up and have them back in the garage this week. Finished the body dolly (finally after many adjustments to the leg height!), bolted the body down and took it to the body shop. Dropping off the hood and fenders today. The garage sure feels empty! Getting excited about being able to start building the car back up when I return! Here are a few pics from last week:
Making progress. Powder coating completed on the rear end. Body getting braced for rotisserie. The windshield gave in after 50 years. Unfortunate but expected. Hoping to pick up the frame and control arms tomorrow.
Looks great! When I powder coated my frame, suspension, sterling linkage, rear end and wheels I went with Silver Sparkle, it has a lot of metallic in it.

 December 6th, 2014, 01:00 PM