
1969 Olds Holiday Sport coupe, S body

Thread Starter
Registered User
Joined: Jul 2010
Posts: 78
1969 Olds Cutlass S Holiday coupe
Hello all,
I just got my first taste of a classic olds this summer. I just picked up a 1969 Olds Cutlass S Holiday Coupe (2dr hardtop). 350/th350, 12 bolt, Holiday Coupe is what the Vin decoded as.
This is the first classic olds that I have picked up. It will be my first classic olds to build.
How did I get this cutlass? well, I was in the process of building a LS1 engine for a 60's camaro or Chevelle. In my search for one of these cars I ran across an ad for this Cutlass that needed restored. After looking at the car and realizing the many similarities with the Chevelle (and the 12 Bolt in the rear), I picked it up and brought it home. The previous owner had purchased it for his kid hoping they could rebuild it together, but after the problems with the engine, they started bodywork, then back to the engine, the they started working the interior and it seemed they weren't getting anything accomplished, so they moved on to a new "project" and decided to let this one go.
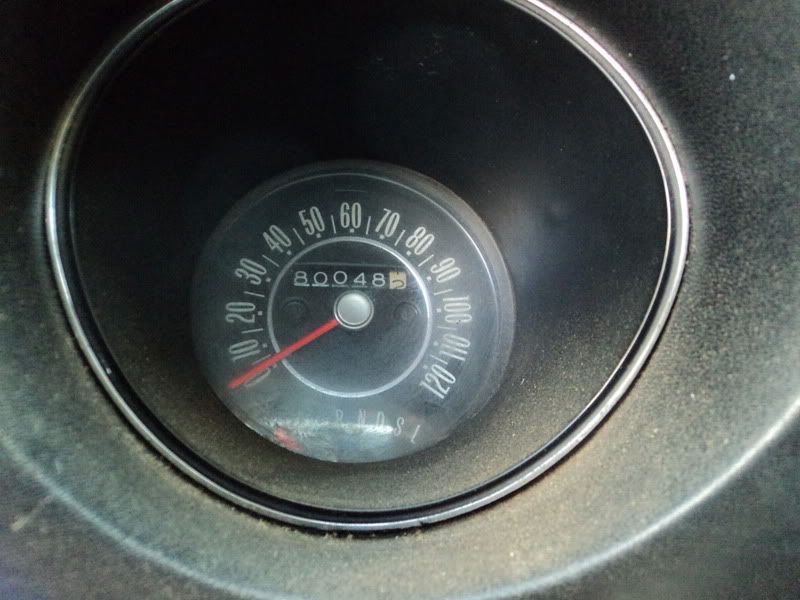
So what do I know about the Cutlass? Nothing. So far we have pulled the engine because the previous owner removed the top end off of it and couldn't tell me much about it. Took apart the "300hp 350" to find .005 wear on the standard bore, standard stroke engine. Although I thought the engine was all original I found an Offenhauser Intake in the trunk. the machinist working on revitalizing the engine said it had never been apart. So I checked the speedo and found only 80k on the Odo! Is it possible I have an 80k diamond in the rough? I sure hope so.
We had to bore the engine out 0.020 to get rid of some scratches the broke rings had put in there, and we had to turn the crank 0.010 to make a nice mating surface for the bearings. We are also balancing the rotating assembly and installing hardened valve seats with new valves.
Performance wise I will be installing an Edelbrock Performer RPM Cam, Performer RPM Intake, Edelbrock 1407 (750), and 1 3/4" Ceramic Coated headers. Jegs claims they made 397Hp with this setup so I am going to test the theory on this new engine. I will also be installing an HEI in the process, modifying the advance weights, and hope to have a nice screamer when I am finished. Once I get it back on the road I will start the bodywork.
Most of the body looks pretty good but she will need some quarters. Im not sure where the car came from but where ever it was has a bad case of cancer. The fenders look fine but the tops of the rear wells and the back of the rear wells are gone. have to rebuild with the right metal. Besides the rear quarters everything else looks pretty good with the exception of the hood. Shes got some wiskey bumps on the front of the hood and is missing her tongue so I have some searching to do.
After the engines good, body work is good, done and painted, I will order a new interior for her. I am just going to re-wrap the interior back to stock, new headliner, new carpet. Luckily the door panels look great and the dash is in good condition.
Here are some pics. If you have any suggestions please feel free to share. I always want to learn more about the cars that I rebuild. Thanks!
DSC00573.jpg
DSC00574.jpg
DSC00575.jpg
DSC00576.jpg
DSC00579.jpg
DSC00578.jpg
DSC00580.jpg
DSC00587.jpg
DSC00588.jpg
DSC00589.jpg
I just got my first taste of a classic olds this summer. I just picked up a 1969 Olds Cutlass S Holiday Coupe (2dr hardtop). 350/th350, 12 bolt, Holiday Coupe is what the Vin decoded as.
This is the first classic olds that I have picked up. It will be my first classic olds to build.
How did I get this cutlass? well, I was in the process of building a LS1 engine for a 60's camaro or Chevelle. In my search for one of these cars I ran across an ad for this Cutlass that needed restored. After looking at the car and realizing the many similarities with the Chevelle (and the 12 Bolt in the rear), I picked it up and brought it home. The previous owner had purchased it for his kid hoping they could rebuild it together, but after the problems with the engine, they started bodywork, then back to the engine, the they started working the interior and it seemed they weren't getting anything accomplished, so they moved on to a new "project" and decided to let this one go.
So what do I know about the Cutlass? Nothing. So far we have pulled the engine because the previous owner removed the top end off of it and couldn't tell me much about it. Took apart the "300hp 350" to find .005 wear on the standard bore, standard stroke engine. Although I thought the engine was all original I found an Offenhauser Intake in the trunk. the machinist working on revitalizing the engine said it had never been apart. So I checked the speedo and found only 80k on the Odo! Is it possible I have an 80k diamond in the rough? I sure hope so.
We had to bore the engine out 0.020 to get rid of some scratches the broke rings had put in there, and we had to turn the crank 0.010 to make a nice mating surface for the bearings. We are also balancing the rotating assembly and installing hardened valve seats with new valves.
Performance wise I will be installing an Edelbrock Performer RPM Cam, Performer RPM Intake, Edelbrock 1407 (750), and 1 3/4" Ceramic Coated headers. Jegs claims they made 397Hp with this setup so I am going to test the theory on this new engine. I will also be installing an HEI in the process, modifying the advance weights, and hope to have a nice screamer when I am finished. Once I get it back on the road I will start the bodywork.
Most of the body looks pretty good but she will need some quarters. Im not sure where the car came from but where ever it was has a bad case of cancer. The fenders look fine but the tops of the rear wells and the back of the rear wells are gone. have to rebuild with the right metal. Besides the rear quarters everything else looks pretty good with the exception of the hood. Shes got some wiskey bumps on the front of the hood and is missing her tongue so I have some searching to do.
After the engines good, body work is good, done and painted, I will order a new interior for her. I am just going to re-wrap the interior back to stock, new headliner, new carpet. Luckily the door panels look great and the dash is in good condition.
Here are some pics. If you have any suggestions please feel free to share. I always want to learn more about the cars that I rebuild. Thanks!
DSC00573.jpg
DSC00574.jpg
DSC00575.jpg
DSC00576.jpg
DSC00579.jpg
DSC00578.jpg
DSC00580.jpg
DSC00587.jpg
DSC00588.jpg
DSC00589.jpg
Last edited by ToBiN!; Apr 6, 2011 at 12:04 PM.
Thread Starter
Registered User
Joined: Jul 2010
Posts: 78
Update:
So I pulled the engine and trans a couple months ago. After I started tearing it down I discovered two cylinders had some pretty bad surface rust in them, there was about 3" of water in the bottom of the pan, and it looked like there were a couple spun bearings. So it was off to the machine shop.
Machine shop checked and magna-fluxed everything. It was further discovered that there were a couple broke rings, it had been overheated, and had been rode hard and put away wet many times. Luckily nothing is cracked and we have a very buildable unit.
After measurements it was discovered that the bore and stroke are standard and there is only .005 wear on the cylinders. According to the odometer reading ~80k, that makes this an original engine! So the car is an ~80k original mile car! YaY!
The machine shop had to push out the cylinders .020 to get rid of the surface rust and clean up the scratches in the cylinders from the broken rings. The crank had to be turned only 0.010 and the rest of the bottom end looked real good. I had the machine shop balance the bottom end and that required some welding on the flexplate and a new harmonic balancer. For the rebuild kit I ordered new pistons, molly rings, brass freezeplugs, and all the trimmings. Since it had been overheated at least once we had to check all the decks for warp-age, but the heads are not cracked, yay.
After hardening the valve seats so I can run unleaded safely, replacing all the exhaust valves and four bent intake valves we discovered that with the Edelbrock RPM cam I am required to convert the rockers to an adjustable rocker system. So yesterday I ordered a Comp Cams adjustable conversion that includes pushrods, guideplates, screw in rocker studs, and comp's magnum roller rockers. I don't like the magnum roller rockers (static base, roller tip) so I swapped them out for Scorpion's 1.6 blue anodized full roller rockers with needle bearings. The Scorpions are all made in the USA and after consulting and researching with some other builders in the area, we haven't heard anything horribly bad about them so they must be alright.
The machine shop called yesterday and said the engine is ready to pick up. I can only imagine the bill when I go to pick it up but at least its done and I know its done right. It should be a nice setup when I go to put it back in. should have it running late February or early January. Then we can start bodywork, paint, and interior!
I will take pics after I pick it up and I start putting it together.
Registered User
Joined: Nov 2007
Posts: 9,127
From: Rathdrum, Idano
Sounds like you have the start of a nice project. Look forward to seeing more build pictures as you make further progress. Engine sounds like a nice build. what pistons did you use and what compression are you hoping to achieve?
Thread Starter
Registered User
Joined: Jul 2010
Posts: 78
I think the machine shop had to shave the heads a little. Because of possibly being overheated they may have been a little warped. Because of possible shaving of the head, the incredibly small chambers on the heads, and the limited availability of pistons for these 350's I think there was only one way to go, stock + 0.020. Even though they are dished, the stock compression was 10.25:1, so Im pretty sure we will be right around the same if not a touch higher. I will have more info after I pick up the engine from the machine shop.
Thread Starter
Registered User
Joined: Jul 2010
Posts: 78
Ok, Update time.
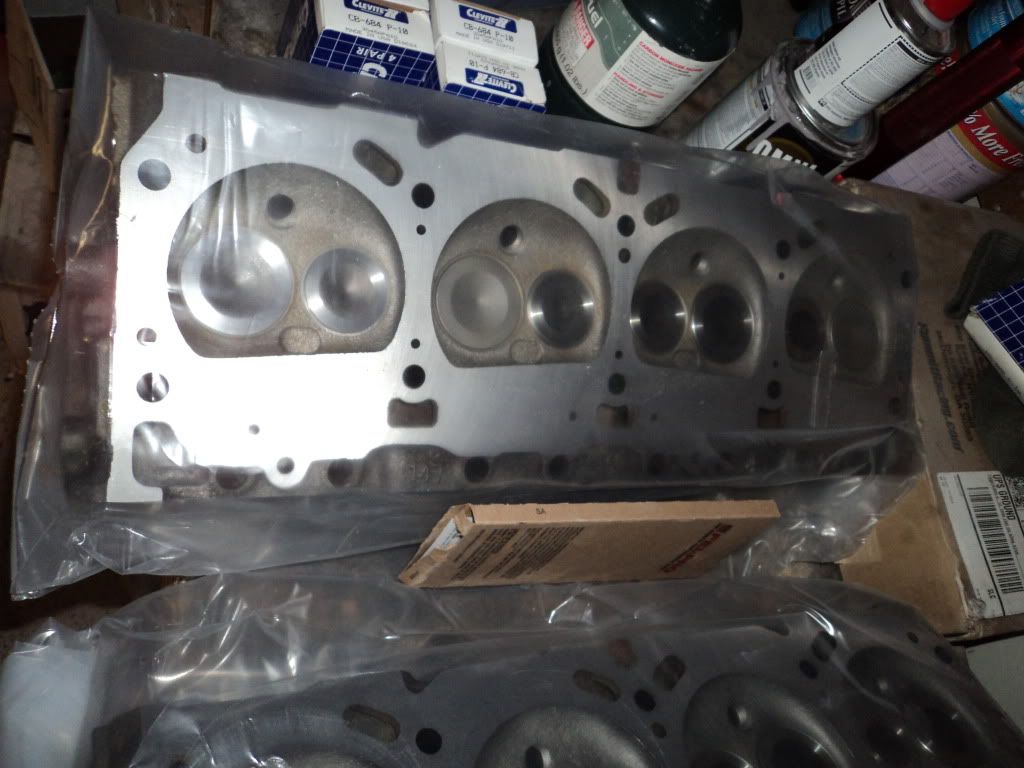
Got the engine back from the machine shop yesterday. Had to push it out 0.030 on the bore, .010 on the mains, and 0.010 on the rods. New pistons, freeze plugs, bearings, moly rings, the works. Had to shave the heads 0.006 to flatten them out, replace 4 intake valves (bent), harden the valve seats for unleaded fuel, and replace all 8 exhaust valves. I even paid the extra dough to have the rotating assembly balanced for longevity and performance.
I brought everything home, took a bunch of pictures, and started putting it together, but not before plastiguage. Looks like the bearing have about .002" clearance. At least .002 up to .003 so that should be wonderful!
Set the main bearings in, set the rear main in, and set the crankshaft in tonight with the Red assembly lube. Thats about all we had time for tonight on the engine. Also picked up a new oil pickup tube from the parts store so I can put together the pump assembly after the pistons, rods, rings, etc are in place. enjoy the pics.
Block with main bearings
DSC00783.jpg
Caps
DSC00782.jpg
Crank
DSC00796.jpg
DSC00797.jpg
DSC00800.jpg
Crank in block getting ready for caps.
DSC00799.jpg
Heads
DSC00784.jpg
#1 Piston and Rod
DSC00787.jpg
Yes, their dished, but that still should be around 10.25:1 compression.
DSC00789.jpg
Rings.
DSC00792.jpg
New harmonic balance
DSC00790.jpg
DSC00791.jpg
Performer RPM Cam, lifters
DSC00802.jpg
DSC00801.jpg
Guide plates, rocker pedestals, push rods
DSC00793.jpg
DSC00795.jpg
Scorpion Roller rockers
DSC00786.jpg
Thread Starter
Registered User
Joined: Jul 2010
Posts: 78
All, I need suggestions on what color this engine should be. I know stock color would be the gold, but am wondering if I should venture off into a Hugger Orange, Blue, Green, or at the very least black?
Suggestions? Keep in mind this is an 80k mile original car, but with some freshening up under the hood. If I go gold, I guess it'll be a nice sleeper until they hear the cam and headers. lol.
Suggestions? Keep in mind this is an 80k mile original car, but with some freshening up under the hood. If I go gold, I guess it'll be a nice sleeper until they hear the cam and headers. lol.
Old(s) Fart
Joined: Mar 2007
Posts: 50,799
From: Northern VA
Nice find and nice project. Just be aware that twelve bolts on the rear cover does not make a 12-bolt axle. Unless your car was built in Canada, you have a Type O axle with 12 bolts on the cover but only ten bolts holding the 8.5" ring gear. Real Chevy 12 bolt axles have an 8.875" ring gear held on with 12 bolts. Parts for the Type O are more difficult to find.
Thread Starter
Registered User
Joined: Jul 2010
Posts: 78
Ok, here's the trim tags. I guess this gives me better direction of what colors to go with when it comes time for paint. YaY! Its not the mustard yellow that's currently on it.
Vin: 336879F
BODY BY FISHER
ST 69 33687 BL 5859 BDY
TR 940 Y73 61 10 PNT
04B D99
ok, so this is what I see from the Plate.
1969
Cutlass, Holiday Coupe
Assembly Plant: Fremont, CA #5859 off the line
Trim Black
Two toned, Lower Color is Sable, roof is Black
Built the second week of April
Options: Y73 = Hood Pin Strips, D99 = Two Tone Paint (duh)
And from the Vin:
3 - Oldsmobile
36 - Cutlass
87 - Holiday Coupe
9 - 1969
F- Fremont, CA
Did I get all that correct?
Thread Starter
Registered User
Joined: Jul 2010
Posts: 78
Ok, just found the (61) "Sable" color and......well.........ug. Im not sure I can bring myself to paint this car the original color again, not after seeing that "sable" is a dark charcoal BROWN. As a matter a fact I think I threw up in my mouth a little bit after finally finding the color at the end of the internet.
So, Im thinking of a partial stock color. Even though its not stamped on the plate Im thinking of two toning using the platinum (1969 color) or champagne and the black on the roof. This way the black will match and the stripes will match. The only thing that won't match will be the platinum or champagne, whichever I decide.
So, Im thinking of a partial stock color. Even though its not stamped on the plate Im thinking of two toning using the platinum (1969 color) or champagne and the black on the roof. This way the black will match and the stripes will match. The only thing that won't match will be the platinum or champagne, whichever I decide.
Thread Starter
Registered User
Joined: Jul 2010
Posts: 78
Alright, got the engine together and dropped into the hole today. Now time to get the parts hooked up.
Header clearance is 0.001 to the cross member, but im sure they will work themselves to a perfect fit.
enjoy...
Header clearance is 0.001 to the cross member, but im sure they will work themselves to a perfect fit.
enjoy...
Thread Starter
Registered User
Joined: Jul 2010
Posts: 78
wow, glad I joined this forum. no comments in two weeks of the build.
FWIW, its in, its running. I still have some tuning to do because its very sluggish. I think it needs some timing work and maybe a different carb. It has a '75 quadrajet on it right now, I figure with the altitude I am at (6250ft) a 650cfm Edelbrock would work a bit better.
FWIW, its in, its running. I still have some tuning to do because its very sluggish. I think it needs some timing work and maybe a different carb. It has a '75 quadrajet on it right now, I figure with the altitude I am at (6250ft) a 650cfm Edelbrock would work a bit better.

Registered Loser
Joined: Mar 2010
Posts: 132
Keep on....
[quote=ToBiN!;246532]wow, glad I joined this forum. no comments in two weeks of the build.
Well, for what it's worth, I enjoyed reading your thread. I think it's cool that you remained Olds-powered, painted the engine gold, and are leaning toward a correct color combination.
I agree with you on the color...originality is great but if a color looks terd-brown to you...there's some very nice correct '69 colors that would look great with the contrasting top color.
I encourage you to keep showing us stuff, lol.
Thread Starter
Registered User
Joined: Jul 2010
Posts: 78
actually no, we didn't rebuild the transmission. After the machine shop verified that the 80k on the odo was probably original, and checking the trans to find red fluid, I figured the trans only had ~80k, same as the odo.
Since we found red fluid in the trans and all the tell tell signs the parts only have 80k, I just put in the transgo shift improver kit. It feels real good so far. I haven't been able to really lay into it since its the new build, but I think its going to hold together fine. Thanks for the inquiry.
Since we found red fluid in the trans and all the tell tell signs the parts only have 80k, I just put in the transgo shift improver kit. It feels real good so far. I haven't been able to really lay into it since its the new build, but I think its going to hold together fine. Thanks for the inquiry.
Official Tire Kicker
Joined: Feb 2008
Posts: 576
From: Sasebo, Japan.
Looks like your doing a great job. I did a frame off on mine but didn't have the money to do the engine at the time so all I did was put a new oil pump, water pump, intake manifold and Holly carb on it. Engine has over 200G so it is tired but still runs OK. Some day I would like to pull it again and rebuild the entire thing, once I have some extra money that is. Only problem would be getting the engine out and back in wihout damaging anything else like the paint. Oh well, did ewhat I could. Good luck with your resto, it is a daily grind but worth it in the end when you can hop in the car and drive it!
Thread Starter
Registered User
Joined: Jul 2010
Posts: 78
Alright, so we originally put the quadra-junk on there and it idled, but the idle jets were screwed all the way in and it didn't kill the car so I know the carb is trash.
Monday I got a Edelbrock 1406 with elec choke. Put it on last night and started adjusting. I finally got it dialed in and think I need to get newer gas in it. The title was signed in 2004 so the county is going to charge me an extra $100 to register it for "late fees" since I didn't register it within 30 days of "getting" it.
Finally got insurance on it (less then $120/yr, full coverage, $500 deductable, Unlimited mileage, woot!) and plan on driving it most if not all this weekend and next week to/from work. I may need to change my metering rods and some of the jets to get it dialed in because at this altitude its pretty rich (6250ft; no air).
I went ahead and put in some mechanical guages (Oil, temp, and Amp) and picked up a small SunTach II to stick on the column so I can keep track of the rpms during this break-in process.
I had to disconnect the vacuum advance because the cam is causing the vacuum to be non constant and therefore bounce around. So I have to rely on the weights in the hei for proper timing of the car. I may get into it tomorrow and "adjust" the weights and stretch the springs a bit to get more timing when I need it.
Once I get to drive it a bit I will report back how its coming. In the meantime while I am driving it I will be working the body one panel at a time. Im going to start on the hood sometime and need to get some metal for the quarters to put back in.
Last edited by ToBiN!; Apr 1, 2011 at 10:53 PM.

Registered User
Joined: Apr 2011
Posts: 1
Thread Starter
Registered User
Joined: Jul 2010
Posts: 78
The only clearance issues were the headers. The pass side header actually rests on the cross member. I figure after a couple hundred miles the header pipe that hits the cross member will "self conform."
Name of this game is when you put the engine in, just set the headers in the engine bay, drop the engine in, bolt the headers onto the engine, then finish getting the engine set in with the engine mounts.
good luck.
Name of this game is when you put the engine in, just set the headers in the engine bay, drop the engine in, bolt the headers onto the engine, then finish getting the engine set in with the engine mounts.
good luck.
Thread Starter
Registered User
Joined: Jul 2010
Posts: 78
Ok, so its been just over a month and I wanted to stop in with an update.
I spent some time getting all the chrome off the car to get it ready for paint. I took all the emblems off and blocked the car out. Since it was originally the saber, then someone painted it red, and then it seemed there were two coats of yellow on the car I had plenty of material to work with.
After blocking the entire car out I ran it to a buddy to have him shoot it flat black. Having the car all one color instead of multiple colors I think will really set it off. Amazingly enough when I got the car back from the paint booth I was surprised with the results. It came out better then I ever expected, so yesterday I started putting some of the chrome back on.
I started with the back bumper. Since it was already off it was easy to polish. The choads that owned the car before evidently primed and painted the car numerous times with the chrome and emblems on the car so I have red, gray, black, and of course yellow overspray on what seems like e-v-e-r-y-t-h-i-n-g! I have a lot of polishing to do.
On my way home yesterday I stopped by Lowes and picked up some Brasso metal polish and some 00 steel wool for polishing. I polished up the entire back bumper removing all of the multi colored overspray, rust, and water stains from years of sitting outside. After that I took out the taillights and had to remove the yellow from the parts that were supposed to be black. Luckily enough I was able to use a little lacquer thinner on the 00 steel wool and removed only the yellow, leaving the black accents around the jambs of the taillights.
After polishing the taillights and the bumper was time to reinstall. I got the bumper back on, license plate light screwed back in, and lined up the bumper where it looked the best. It almost molded into the body because I got it closer then it was when I bought the car.
Tonight I polished the deck lid trim and the Olds Rocket trim for the rear marker lights and reinstalled them. Unfortunately I didn't get pictures of the polished trunk lock, decklid trim, and Rocket emblems on. I will have to get them tomorrow when I get some more time on it.
For now I have included a pic of the rear after getting the polished bumper and polished taillights installed. Enjoy.
Today I ordered a new carpet kit for the car. 80/20 loop, black, just like the original carpet that was in the car with a 40% pad for sound deadening and carpet longevity.
I plan on having all the chrome back on my the time GoodGuys Carshow hits Loveland, CO the end of may. I plan on putting it up there for sale to see if someone else wants to take the torch and continue the restoration. If it doesn't sell there then I will run it back down to Pueblo, CO for NSRA Hot Rod Nationals and put it in their swap meet. If it doesn't sell there then you may find it on Ebay.
Until next update....
Last edited by ToBiN!; May 17, 2011 at 09:11 PM.
Thread Starter
Registered User
Joined: Jul 2010
Posts: 78
ok, fine. Here are todays completions.
Mask and repaint grills. Front edges are shiny alum and the fins are flat black.
polish the front bumper
added 1" carb spacer
deleted the fuel pressure regulator
replaced all the coolant hoses and clamps.
Now pix...
Mask and repaint grills. Front edges are shiny alum and the fins are flat black.
polish the front bumper
added 1" carb spacer
deleted the fuel pressure regulator
replaced all the coolant hoses and clamps.
Now pix...
Last edited by ToBiN!; May 20, 2011 at 08:28 PM.
Certifiable car addict...
Joined: Apr 2011
Posts: 392
From: SW Ohio
man, compared to what you started with, that's turning out very nicely! I always did like the "Rat Rod" satin black look. I've had a few rattle-can black cars over the years. Mostly to hide the midwest cancer, but they always look better in one solid color. You mentioned the altitude and carburation before. Where are you at specifically, and what's the alt. there? I was born in Denver, and been up to Leadville a few times and up & down the front range. Nothing like an old 70's rig trying to make it through the Eisenhower tunnel when it's not tuned for that missing oxygen. I remember running out of gas from vapor lock once at the buffalo bill gravesite up over Golden and having to coast all the way down to 70 and into denver before I could find an open filling station. I think that was about 10 miles or so of downhill with no power brakes. Fun times!
-Jeff
-Jeff
Thread Starter
Registered User
Joined: Jul 2010
Posts: 78
thanks for the compliments guys!
Jeff - I am in CoSprings and the alt here is 6250ft or so. This one doesn't have power brakes anyway so it works.
Willidog - I needed the 1" carb spacer because of the heat transfer between the intake and the carb. Since they are both edelbrock and I don't have an airgap, on nice days the bowls would boil the gas, overflowing into the intake. This would make it really hard to restart once I got to where I was going. I would have to clear the plugs to get it to start and then keep the rpms up around 1500 until the carb dried back out, otherwise it was rich and hard to drive. Im hoping this carb spacer helps the carb stay cool and keeps the gas liquid until its time to atomize.
Matt at American Speed said its a common problem.
Certifiable car addict...
Joined: Apr 2011
Posts: 392
From: SW Ohio
I lived in Co. Springs til Dad got transferred to WPAFB back in the mid 70's and been in Ohio pretty much since then. I did move back there for a while in the mid 90's for a little over a year. Lived in Denver then. Beautiful country out there. I really miss it. Now I wanna dig out the old "Flying-W Wranglers" albums and give em a spin.
Certifiable car addict...
Joined: Apr 2011
Posts: 392
From: SW Ohio

Thread Starter
Registered User
Joined: Jul 2010
Posts: 78
Jeff - sounds good. Hit me up anytime! I don't plan on moving anywhere else..
Michael, I got a 1" plastic spacer. Did you get plastic, phenolic, or alum? I was afraid to doing alum because of the heat transfer, thus is why I wanted phenolic or plastic.
The plastic seems to be working better now. Since I finally got the bumpers back on with the plates I can start driving it more this week. I will know more at the end of the week. I will let you know if I still have issue.

Registered User
Joined: Sep 2010
Posts: 173
From: moses lake wa
No i went with alum spacer tell me if the plastic spacer works. I was told it was my flots or something in my jets that i would have to blow it out.If you could please get back to me on your next post thank you.
Thread Starter
Registered User
Joined: Jul 2010
Posts: 78
Updates from Sunday
- Remounted airshocks and reran airlines for rear airshocks. Airshocks were already in but no airlines hooked up. Had to reverse the install so the airlines exited towards the frame instead of the towards the exhaust like the last dumbass installer did. Filled rear airshocks up to 75psi and then drained back down to about 40psi for ride comfort and look.
- inspected HEI connections. I have installed two 2 5/8" Tachs in the dash and neither one works. So now I am suspect of the aftermarket HEI dizzy and the tach output of the dizzy. I finally got another one on monday and will try to install when I get the chance.
Update from Monday after work
Polished and reinstalled outside door handles and locks. Reinstalled passenger door panel and handles. Repaired/replaced drivers side window guides and reinstalled drivers door panel and handles.
Mike, so far it seems the 1" spacer is keeping the gas from boiling into the intake as it did before. I will continue driving it and let you know if the situation changes.


