
1966 Tri-carb Cleanup

Thread Starter
Ben
Joined: Mar 2009
Posts: 1,851
From: Snohomish, WA
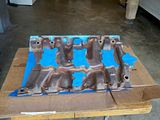
This belongs to a friend of mine. he asked me if i'd take it, clean it up, repaint the intake & find out what I could about it for him.
When he bought his 66 442 a couple years back, it was in a box in the trunk, wasn't even mentioned in the listing!
So looking for opinions from the experts.
I don't see any "tags" on the carbs, or even any part numbers on them.
Any way to tell if they are "correct" or even what year they were from?
How does the fuel line & linkages look? Are these original?
Any thoughts/opinions are welcome.
He is starting to think about selling his car. Its a very very nice car, but far from origonal- 99.9% sure its not an original tri-carb car.
Wondering if he ought to sell this thing by itself, or spend the $$ to rebuild the carbs and install on the car (& tune) or just "clean it up" and include it in the sale of the car. He's pretty far upside down on the car already after paint, rechroming, and interior... so spending more $$ to rebuild carbs & dial it in is only worth it if its going to genreate a lot more money or a lot more interest in the car.
What do you think?
Thanks-
Ben
smDSC00658.jpg
smDSC00659.jpg
smDSC00661.jpg
smDSC00663.jpg
smDSC00664.jpg
smDSC00665.jpg
smDSC00666.jpg
smDSC00669.jpg
Last edited by RAMBOW; Jan 22, 2011 at 03:33 PM.

Registered User
Joined: May 2009
Posts: 1,393
From: Austin, Tx
The carbs and choke assembly look correct. The air cleaners, fuel lines and linkage are not. Manifold date code 364 =Dec. 30, 1965. All in all looks like a decent system. Fuel lines and air cleaners are available as repops.
Henry
Henry
Registered User
Joined: Jun 2010
Posts: 3,613
From: Rogues Island, USA
Here's an original set sans linkage, fuel lines and air cleaners. What you have looks like a Pontiac set of carbs although I'm not sure if Pontiac used a front inlet on the center carb. Pontiacs also had smaller air inlets up top to my knowledge at least on the outboard carbs.
Thread Starter
Ben
Joined: Mar 2009
Posts: 1,851
From: Snohomish, WA
Thanks for the info guys.
I fount this site, which has an excelent set of photos of a setup being restored:
http://www.sparkyscarbs.com/tric.htm
Easy to see how the linkages & fuel lines are totally wrong on the carbs I've got after seeing the photos.
Are the correct linkages/carb arms being reproduced by anyone?
He gave me a set of the reproduction fuel lines, and the correct repop air cleaner lids & bases to install on it.
Thread Starter
Ben
Joined: Mar 2009
Posts: 1,851
From: Snohomish, WA
pn's on carbs are 7029683 7031575 & 7029683 found em cast on the side in a circle on each carb under some gunk. Weird.
Front carb has a vacum line coming out the rear of the baseplate, rear carb does not.
Decided i'm going to clean and rebuild the carbs for him, regardelss if they are "correct or not" they will work. I found and ordered the correct fuel lines, found a site that has pontic linkages repop, but not the olds ones. I will keep looking, but likley will just re-use the linkages he has.
I think I would like to try to install it and get it running on his car. I've done a lot of reading in the last few days on these, and i think over time people have trumped them up to be more complicated than they really are. We'll see how it goes anyway.
Thread Starter
Ben
Joined: Mar 2009
Posts: 1,851
From: Snohomish, WA
Does this stuff look like a decent reproduction of the linkages & stuff?
http://cgi.ebay.com/ebaymotors/1966-...Q5fAccessories
Says at the bottom that they will sell stuff separately...
http://cgi.ebay.com/ebaymotors/1966-...Q5fAccessories
Says at the bottom that they will sell stuff separately...

Registered User
Joined: Mar 2008
Posts: 4,026
Correct setup (except for the fuel feed line from the fuel pump to the T block, and extra return spring to the engine lift strap), is shown in Dec 2010 Muscle Car Review, p. 36. The repro stuff you reference has the wrong bends in the second line from top and the bottom line. The linkage may not fit to the carbs you have.
Thread Starter
Ben
Joined: Mar 2009
Posts: 1,851
From: Snohomish, WA
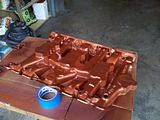
Hit the intake with stripper & a pressure washer, then wire wheel for about 30 mins- Followed by Fusick's Bronze. It shore is a purdy chunk of iron. 
The Carb kits showed up today too so i can finnaly start tearing down the carbs for dipping.
The Carb kits showed up today too so i can finnaly start tearing down the carbs for dipping.


Last edited by RAMBOW; Feb 22, 2011 at 12:11 PM.
Thread Starter
Ben
Joined: Mar 2009
Posts: 1,851
From: Snohomish, WA
Tore down the front & Rear carbs & an hour soaking in the can of carb cleaner
1171194077_photobucket_37530_.jpg
Think i'll need to hit the cast iron base plate with some paint. What color was that plate originally? Was it natural or was it painted?
I've seen some painted cast gray & some painted black...
1171194077_photobucket_37530_.jpg
Think i'll need to hit the cast iron base plate with some paint. What color was that plate originally? Was it natural or was it painted?
I've seen some painted cast gray & some painted black...
Thread Starter
Ben
Joined: Mar 2009
Posts: 1,851
From: Snohomish, WA
What were the factory Center & Outboard Jeting supposed to be for these?
Currently it has 60's in the center & 68's in the outters.
Any suggestions for what they should be for a mild 455?
Thanks-
Ben
Currently it has 60's in the center & 68's in the outters.
Any suggestions for what they should be for a mild 455?
Thanks-
Ben
Thread Starter
Ben
Joined: Mar 2009
Posts: 1,851
From: Snohomish, WA
1171194077_photobucket_38499_.jpg
Carbs are all back together, Still waiting for reproduction linkage & fuel lines.
Discovered i need a new choke pulloff as the plastic housing on this one is cracked and disentegrating.. I'll order a few more jet combinations and a few extra top plate gaskets when i do, for tweaking it later.
The pic above was before "fixing" the air cleaner bases. Apparently they were for some other weird combination of carburators (pre 65?)... 2 outter ones were just slightly smaller than the air horn, so I had to hog out the lower lip with a dremel... the center one was almost 1/4" too small, I had to cut the whole bottom lip of the base off before it would slide on the center carbs airhorn.
Sigh. Sucks trying to make something wrong work right, but they eventually went on fine. Need to do a little more sanding & deburring of the bottom lip/edge, then repaint the bases flat black, and that will be done.
anyway, pretty happy with it all so far. Getting excited to install it on his car and try to get it running.
Thread Starter
Ben
Joined: Mar 2009
Posts: 1,851
From: Snohomish, WA
Repop Linkages & Fuel Lines showed up yesterday. Very pleased.
Only the Main Center carb arm was wrong, the rest included in the kit were identical to what was on the carbs. The new center arm bolted right to the factory arm on the carb, rest of the new linkage went right on, looks and works right.
Repop fuel lines & fittings are nice, although i know from Rund's postings they are not exact.. From all the photos i've looked at, the only differnece I can see is the line to the rear carb does not have the sharp crease in it where the line straightens into the junction block.... anyway, they are plenty close enough for me. Much better than what it had before. Not trying to be perfect anyway.
Question for anyone else who has one of these setups...
Will an HEI large body distributor fit, or do you need a small body distributor like a stock points or MSD?
I'm sitting here looking at the back of the intake to the rear carb spacing and i'm thinking it will need the small body distrib. I think my friends car has a standard HEI in it now. One more speedbump i guess. (and check for him to write)
Anyway.. new choke pull off, handful of jets, and a little vial of "throttle blade sealant" is on its way, otherwise these things are pretty much ready to bolt onto his car.
Another question... The exhaust crossover passage blocks did not have any gaskets under them when i took them off- just metal to metal. Should i get some gasket paper and make up some, or just use high temp rtv when i put them back down, or nothing like they were before?
Thanks!
Ben
Last edited by RAMBOW; Mar 2, 2011 at 09:37 PM.
Registered User
Joined: Nov 2007
Posts: 1,190
From: Charleston, West Virginia
The following pics should be correct (Bottom pic shows tag locations):
Tripowerdetail-rightside.jpg
Tripowerdetail-leftside.jpg
Tri-powertags.jpg
Tripowerdetail-rightside.jpg
Tripowerdetail-leftside.jpg
Tri-powertags.jpg
Last edited by 67442nut; Mar 2, 2011 at 10:07 PM.
Registered User
Joined: Mar 2008
Posts: 4,026
Mike Siedlik's copper lines and the line from the fuel pump to the filter have the correct bends. The linkage rods, bracket on the oil filler, and stuff on the firewall originally had a dark gray/brown phosphate type coating. The factory didn't use teflon tape, of course.
It's a sickness!
Joined: Jan 2008
Posts: 208
From: Roswell, GA
Thread Starter
Ben
Joined: Mar 2009
Posts: 1,851
From: Snohomish, WA
Well, its all done. DAG sealer & correct center carb jets arrived last week. Sealed the end carbs throttleblades & installed the correct jets- Took a couple final pics, but its done & ready to go on his car.
Gotta do the before & After shots of course!
smDSC00658.jpg
smDSC00669.jpg
And after!
finished-3.jpg
finished-1.jpg
Gotta do the before & After shots of course!
smDSC00658.jpg
smDSC00669.jpg
And after!
finished-3.jpg
finished-1.jpg
It's a sickness!
Joined: Jan 2008
Posts: 208
From: Roswell, GA
Nice job! Verrrry nice.
Where did you find the bottom piece to the choke? I was going covert it to an electric choke, but can't figure out how to do it.
I run with the crossovers blocked, wonder if this kind of choke would still work OK.
Where did you find the bottom piece to the choke? I was going covert it to an electric choke, but can't figure out how to do it.
I run with the crossovers blocked, wonder if this kind of choke would still work OK.
Thread Starter
Ben
Joined: Mar 2009
Posts: 1,851
From: Snohomish, WA
When i install it on his car, i plan to set the crossovers to block the heat passage- that way the paint won't burnoff & discolor the intake.
The choke will work even with the crossovers blocked, but just not as efficient as it would if they were opened... But really- For a car that is stored inside & driven only on nice days, you really don't need a choke at all.
A extra couple seconds during startup to keep it reved up and your good to go on all but the coldest days.
Thread Starter
Ben
Joined: Mar 2009
Posts: 1,851
From: Snohomish, WA
Thread Starter
Ben
Joined: Mar 2009
Posts: 1,851
From: Snohomish, WA
IT RUNS!!!
I spent the last couple months off and on as time would allow (not much) going over to my friends place, pulled off his torqer intake & holley carb... installed the L69 manifold & carbs. It fought us every step of the way... But this morning, we filled up the center carb w/ fuel through the vent tube, and kicked it over and came right to life.
Great idle, nice and smooth. Sounds real cool when the outter two carbs open up.
Still have some tuning & tweaking to do, but he's real happy with how it turned out, and I am too.
Pics to follow
Last edited by RAMBOW; Jul 26, 2011 at 01:04 PM.
Thread Starter
Ben
Joined: Mar 2009
Posts: 1,851
From: Snohomish, WA
I never got around to tuning his car the way it was setup before with the torqer, and i'm all but certain he had major vacume leaks, stock timing (4deg BTDC), and waaay over carbed for his cam with a holley 850dp.
Just firing it up in the garage with this setup, the idle quality was immediately noticeable. Much smoother. Throttle response is great. I put the timing at ~14 degrees initial which should be about 34 total. He runs 100 octane av gas, so i don't think we'll see any pinging issues.
he didn't want to test drive it today because it was dumping rain. supposed to be nice later this week, so i'll get back over there, finish tweaking stuff and get a few test drives in.
I was always unimpressed with how his car performed before, very curious to see how it will do now.
Thread Starter
Ben
Joined: Mar 2009
Posts: 1,851
From: Snohomish, WA
As promised, photo evidence...
First, the car
Gene-66-442.jpg
And...
gene-66-442-L69-1.jpg
gene-66-442-L69-2.jpg
Factory AC & Cruise control unit really clutter up the engine bay a lot, and man o man did Olds sure over engineer all the alternator & powersteering pump & AC brackets. I swear it took longer to get the alternator and power steering brackets out of the way than it did to R&R the intake.
Thread Starter
Ben
Joined: Mar 2009
Posts: 1,851
From: Snohomish, WA
finshed the last couple tweaks and took it out for a spin.
Nice and responsive, no bogs. Idles smooth. Man it sure has a distinctive sound when you open the two outter carbs
Not sure that it feels any stronger than it did with the torqer & 850dp, but my friend is definitely happy with it- which means i'm happy wiht it.
Next... Onto rebuilding his front suspension.
Registered User
Joined: May 2011
Posts: 253
From: Flushing mi.
Just wondered where vacume advance is drawn from on the tri power setup .I have a threaded hole on the rear secondary near or at the lower corner of the bowl that has a plug in it and a tube on the upper horn of the front secondary.I start to pick up a shake before the secondaries kick in and dont have any place to put a vacume line fron distributor to primary carb.help thanks Glen
Thread Starter
Ben
Joined: Mar 2009
Posts: 1,851
From: Snohomish, WA
Just wondered where vacume advance is drawn from on the tri power setup .I have a threaded hole on the rear secondary near or at the lower corner of the bowl that has a plug in it and a tube on the upper horn of the front secondary.I start to pick up a shake before the secondaries kick in and dont have any place to put a vacume line fron distributor to primary carb.help thanks Glen
On my friends car, his center carb is a pontiac carb, and was missing that port.
I could have drilled it out and pressed in a tube, but instead we simply chose to setup the distributor w/o vacume advance.
Registered User
Joined: May 2011
Posts: 253
From: Flushing mi.
I was told by the shop that installed the pertronics i wouldnt need the vac advance but i dont belive them .I think i can use the body of the original 2 barrel and the horn and base from the carb he left me when he stole my originals and went out of bussiness(i did get to search the complete shop with his lawyer and they were not to be found i think he had a buyer the day i dropped them off because he tried to sell me these ones as soon as he saw mine claiming they were left by a customer and ready to go on my intake)That way i will get vac from primary.Now it dies as soon as i try to start the secondaries so i hope vacume cure that.I also found i had a bent fanblade so i have one being delivered tomorrow with hope of curing the shake i am experiencing starting around 1500 rpm.Thanks for the info Glen

Thread
Thread Starter
Forum
Replies
Last Post


