
Headliner - do I HAVE to take the glass out?

Thread Starter
Registered User
Joined: Aug 2013
Posts: 3,900
From: Central Illinois
Headliner - do I HAVE to take the glass out?
My headliner has pulled away from its bows in a couple of spots...a couple of real good spots. It actually looks salvageable in that there are no tears, just came unsewn but there's no way to pull the seams together, not even close, for resewing. Do the windshield and rear glass really have to come out for this repair?
[IMG]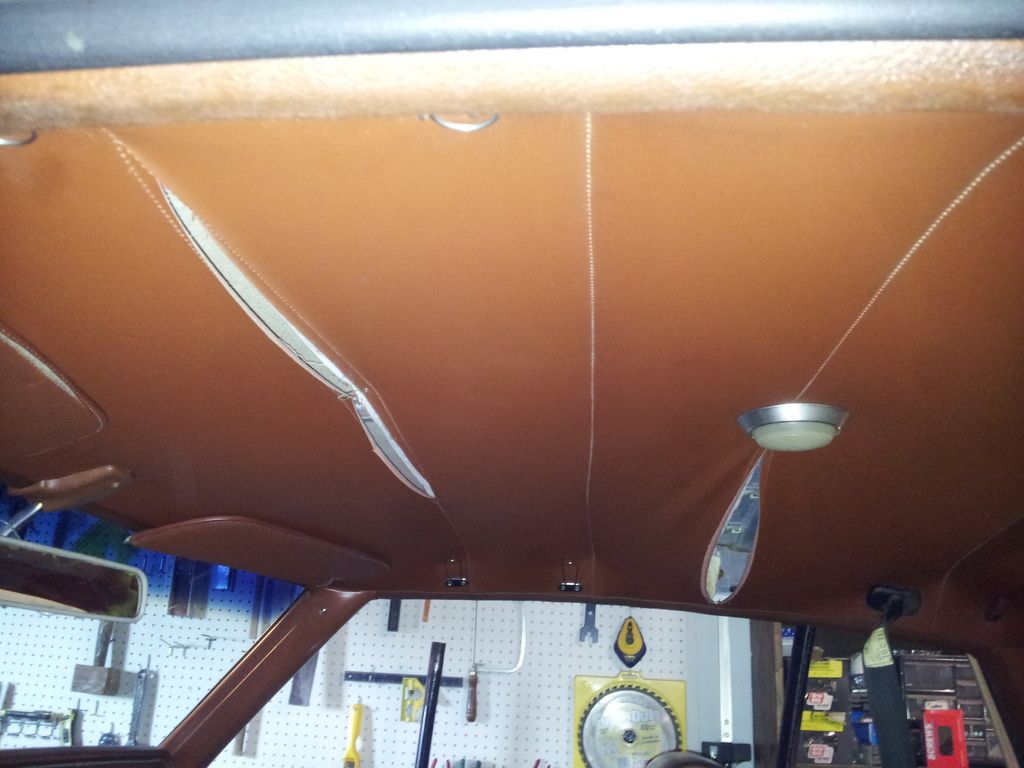 [/IMG]
[IMG]
 [/IMG]
Registered User
Joined: Apr 2012
Posts: 2,972
From: New Mexico
No Mac, it's just easier on an install without the windows in. If you took your car to the upholstery shop to have a HL installed, they wouldn't remove the windows.
IIRC, you mentioned a few days ago that you were wanting to change the color of your interior....MAW go ahead and put that black one in you been lusting over.......
but seriously, if the stitching has deteriorated enough to break open at the seams, my guess would be that all of the seams are probably getting weak. Time for a new one so you don't have to mess with it again in a couple of years.
Leg-en-dary, Leg-en-dary, Leg-en-dary..............
Thread Starter
Registered User
Joined: Aug 2013
Posts: 3,900
From: Central Illinois
Well then, it's a good thing I have a student that works at an upholstery shop. Trouble is, she's already getting an A in my class. ")
I'll definitely go with black; I'm really feeling the black interior.
Thanks for the replies fellas.
I'll definitely go with black; I'm really feeling the black interior.
Thanks for the replies fellas.
Ben
Joined: Mar 2009
Posts: 1,851
From: Snohomish, WA
some tips if you are going to do it yourself:
1. go to a local office supply store and buy a couple boxes of these 1" binder clips
http://www.officedepot.com/a/product...11488596-VQ21-
You can use them to stretch out the headliner before you glue it, and allow you to glue it in small sections as you go. Buy enough to go all the way around.
2. Heat.... When you have the old headliner out, and area ready to start- toss the new headliner in your clothes dryer on high for 5-6 mins (no longer) this will most of the factory folds/wrinkles out of it, and get it to be soft & stretchy.
While doing the work, consider leaving your side windows UP, and either put a small electric space heater in the car with you (be careful of course!), or a couple of those halogen work lights that get super hot (also be careful!).
This will keep the headliner stretchy & tight while you are working on it.
3. Don't buy spray glue in a rattle can like the 3m super 77 or similar, it won't work for headliners. Instead get the 3m super weatherstrip adhesive in the tube- works much better.
There is a great write up on team chevelle on how to install a headliner yourself- these steps will be the same for your olds. take a look:
http://www.chevelles.com/forums/showthread.php?t=161372
Last edited by RAMBOW; Mar 31, 2015 at 10:21 AM.
Thread Starter
Registered User
Joined: Aug 2013
Posts: 3,900
From: Central Illinois
Hey man, I learn from the best 
Thanks Rambow, I appreciate the write-up. I haven't decided if I want to deal with this myself, especially taking out the glass. My student that works for an upholstery shop (that deals with a lot of classic cars) said they wouldn't have to take the glass out. $300 for the install, $150 for the liner. Seems reasonable.
I did run across the Chevelle write up during my research. Good little article.
some tips if you are going to do it yourself:
1. go to a local office supply store and buy a couple boxes of these 1" binder clips
http://www.officedepot.com/a/product...11488596-VQ21-
You can use them to stretch out the headliner before you glue it, and allow you to glue it in small sections as you go. Buy enough to go all the way around.
2. Heat.... When you have the old headliner out, and area ready to start- toss the new headliner in your clothes dryer on high for 5-6 mins (no longer) this will most of the factory folds/wrinkles out of it, and get it to be soft & stretchy.
While doing the work, consider leaving your side windows UP, and either put a small electric space heater in the car with you (be careful of course!), or a couple of those halogen work lights that get super hot (also be careful!).
This will keep the headliner stretchy & tight while you are working on it.
3. Don't buy spray glue in a rattle can like the 3m super 77 or similar, it won't work for headliners. Instead get the 3m super weatherstrip adhesive in the tube- works much better.
There is a great write up on team chevelle on how to install a headliner yourself- these steps will be the same for your olds. take a look:
http://www.chevelles.com/forums/showthread.php?t=161372
1. go to a local office supply store and buy a couple boxes of these 1" binder clips
http://www.officedepot.com/a/product...11488596-VQ21-
You can use them to stretch out the headliner before you glue it, and allow you to glue it in small sections as you go. Buy enough to go all the way around.
2. Heat.... When you have the old headliner out, and area ready to start- toss the new headliner in your clothes dryer on high for 5-6 mins (no longer) this will most of the factory folds/wrinkles out of it, and get it to be soft & stretchy.
While doing the work, consider leaving your side windows UP, and either put a small electric space heater in the car with you (be careful of course!), or a couple of those halogen work lights that get super hot (also be careful!).
This will keep the headliner stretchy & tight while you are working on it.
3. Don't buy spray glue in a rattle can like the 3m super 77 or similar, it won't work for headliners. Instead get the 3m super weatherstrip adhesive in the tube- works much better.
There is a great write up on team chevelle on how to install a headliner yourself- these steps will be the same for your olds. take a look:
http://www.chevelles.com/forums/showthread.php?t=161372
I did run across the Chevelle write up during my research. Good little article.
Registered User
Joined: Jul 2009
Posts: 2,222
From: Brooklyn, NY
some tips if you are going to do it yourself:
1. go to a local office supply store and buy a couple boxes of these 1" binder clips
http://www.officedepot.com/a/product...11488596-VQ21-
You can use them to stretch out the headliner before you glue it, and allow you to glue it in small sections as you go. Buy enough to go all the way around.
2. Heat.... When you have the old headliner out, and area ready to start- toss the new headliner in your clothes dryer on high for 5-6 mins (no longer) this will most of the factory folds/wrinkles out of it, and get it to be soft & stretchy.
While doing the work, consider leaving your side windows UP, and either put a small electric space heater in the car with you (be careful of course!), or a couple of those halogen work lights that get super hot (also be careful!).
This will keep the headliner stretchy & tight while you are working on it.
3. Don't buy spray glue in a rattle can like the 3m super 77 or similar, it won't work for headliners. Instead get the 3m super weatherstrip adhesive in the tube- works much better.
There is a great write up on team chevelle on how to install a headliner yourself- these steps will be the same for your olds. take a look:
http://www.chevelles.com/forums/showthread.php?t=161372
1. go to a local office supply store and buy a couple boxes of these 1" binder clips
http://www.officedepot.com/a/product...11488596-VQ21-
You can use them to stretch out the headliner before you glue it, and allow you to glue it in small sections as you go. Buy enough to go all the way around.
2. Heat.... When you have the old headliner out, and area ready to start- toss the new headliner in your clothes dryer on high for 5-6 mins (no longer) this will most of the factory folds/wrinkles out of it, and get it to be soft & stretchy.
While doing the work, consider leaving your side windows UP, and either put a small electric space heater in the car with you (be careful of course!), or a couple of those halogen work lights that get super hot (also be careful!).
This will keep the headliner stretchy & tight while you are working on it.
3. Don't buy spray glue in a rattle can like the 3m super 77 or similar, it won't work for headliners. Instead get the 3m super weatherstrip adhesive in the tube- works much better.
There is a great write up on team chevelle on how to install a headliner yourself- these steps will be the same for your olds. take a look:
http://www.chevelles.com/forums/showthread.php?t=161372
Ben
Joined: Mar 2009
Posts: 1,851
From: Snohomish, WA
Hey man, I learn from the best
Thanks Rambow, I appreciate the write-up. I haven't decided if I want to deal with this myself, especially taking out the glass. My student that works for an upholstery shop (that deals with a lot of classic cars) said they wouldn't have to take the glass out. $300 for the install, $150 for the liner. Seems reasonable.
I did run across the Chevelle write up during my research. Good little article.
The headliner itself should cost you about $75 from any of the vendors btw.

Registered User
Joined: Nov 2008
Posts: 1,120
From: Mass
Its been holding up fine for 5 years with no signs of fabric deterioration.
Dont be so hasty to buy new.
Thread Starter
Registered User
Joined: Aug 2013
Posts: 3,900
From: Central Illinois
http://www.ebay.com/itm/Headliner-Bl...f4c4a3&vxp=mtr
Registered User
Joined: Jul 2009
Posts: 2,222
From: Brooklyn, NY
Hmm, not finding anything for $75 ish. Year One, OPGI, Legendary, are considerably more. Are we talking eBay? I did find this....
http://www.ebay.com/itm/Headliner-Bl...f4c4a3&vxp=mtr
http://www.ebay.com/itm/Headliner-Bl...f4c4a3&vxp=mtr
Thread Starter
Registered User
Joined: Aug 2013
Posts: 3,900
From: Central Illinois
It may be a while before I can start. The next few weeks at work are going to be h*ll.
Thanks for the tips, fellas.
Registered User
Joined: Apr 2012
Posts: 2,972
From: New Mexico
Yes, you buy those separately
Yes, it will be glued in. May come right off, or not............
Thread Starter
Registered User
Joined: Aug 2013
Posts: 3,900
From: Central Illinois
some tips if you are going to do it yourself:
1. go to a local office supply store and buy a couple boxes of these 1" binder clips
http://www.officedepot.com/a/product...11488596-VQ21-
You can use them to stretch out the headliner before you glue it, and allow you to glue it in small sections as you go. Buy enough to go all the way around.
2. Heat.... When you have the old headliner out, and area ready to start- toss the new headliner in your clothes dryer on high for 5-6 mins (no longer) this will most of the factory folds/wrinkles out of it, and get it to be soft & stretchy.
While doing the work, consider leaving your side windows UP, and either put a small electric space heater in the car with you (be careful of course!), or a couple of those halogen work lights that get super hot (also be careful!).
This will keep the headliner stretchy & tight while you are working on it.
3. Don't buy spray glue in a rattle can like the 3m super 77 or similar, it won't work for headliners. Instead get the 3m super weatherstrip adhesive in the tube- works much better.
There is a great write up on team chevelle on how to install a headliner yourself- these steps will be the same for your olds. take a look:
http://www.chevelles.com/forums/showthread.php?t=161372
1. go to a local office supply store and buy a couple boxes of these 1" binder clips
http://www.officedepot.com/a/product...11488596-VQ21-
You can use them to stretch out the headliner before you glue it, and allow you to glue it in small sections as you go. Buy enough to go all the way around.
2. Heat.... When you have the old headliner out, and area ready to start- toss the new headliner in your clothes dryer on high for 5-6 mins (no longer) this will most of the factory folds/wrinkles out of it, and get it to be soft & stretchy.
While doing the work, consider leaving your side windows UP, and either put a small electric space heater in the car with you (be careful of course!), or a couple of those halogen work lights that get super hot (also be careful!).
This will keep the headliner stretchy & tight while you are working on it.
3. Don't buy spray glue in a rattle can like the 3m super 77 or similar, it won't work for headliners. Instead get the 3m super weatherstrip adhesive in the tube- works much better.
There is a great write up on team chevelle on how to install a headliner yourself- these steps will be the same for your olds. take a look:
http://www.chevelles.com/forums/showthread.php?t=161372

Thread
Thread Starter
Forum
Replies
Last Post
197064buickspec
Parts For Sale
0
Aug 4, 2014 12:26 PM
MASH4077
Eighty-Eight
7
Feb 22, 2011 11:07 AM
JMW803
Electrical
17
May 13, 2010 04:43 PM
allwood2006
Parts Wanted
3
Nov 12, 2009 11:52 AM


