
Trying to take out rear seats 71 cutlass S

Thread Starter
Registered User
Joined: Jun 2010
Posts: 34
Trying to take out rear seats 71 cutlass S
Hello, I just bought new seat covers and am trying to take out the rear seats. I see that the bottom of the seat is hooked in to the floor itself. Whats the easiest way to get the whole seat out? Do i ttake the back of the seat out first?
Thanks
Thanks
Ben
Joined: Mar 2009
Posts: 1,851
From: Snohomish, WA
Push down on the lower cushion and at the same time push it straight back- it should then pop up, then you can pull it up. Sometimes you have to do this process on each side since there are two hooks on the floor holding it.
THe upper cushion is attached at the bottom (behind the lower cushions rear edge) by two bolts, once those are out, you then push it straght up and it will come off. THere are three hooks below the package tray that hold it on.
Hope this helps.
THe upper cushion is attached at the bottom (behind the lower cushions rear edge) by two bolts, once those are out, you then push it straght up and it will come off. THere are three hooks below the package tray that hold it on.
Hope this helps.
Registered User
Joined: Aug 2013
Posts: 3,900
From: Central Illinois
I, myself, couldn't get my seat out using brute force. So I thought I'd share this. Hope it helps.
https://classicoldsmobile.com/forums...moval-tip.html
https://classicoldsmobile.com/forums...moval-tip.html
Registered User
Joined: Dec 2012
Posts: 3,079
From: Birmingham, Alabama
Let us know how it works out.
I usually pull the front seat out so as to have more room to work and use two valve lifters and some PB Blaster. I spray the contact points under the seat where the seat spring hooks in. Then I push directly on the seat spring where it hooks in while lifting up in the spring with the other valve lifter.
I

Senior Moment Member
Joined: Jan 2007
Posts: 3,236
So you can't get the back seat out. Very easy. But, you are going to recover it? Very difficult! I did this same thing with my buckets. Got them out, started in with the hog ring plyers, and sent them to the Interior shop. You got ***** man, or some mad upholstery skills! Good luck!
Last edited by z11375ss; May 24, 2015 at 05:31 PM.
Registered User
Joined: Aug 2013
Posts: 3,900
From: Central Illinois
Well, I wasn't chucking tools at the wall and spewing a string of obscenities but it took me from 9 AM to about 7 PM yesterday (with an hour for lunch) just to do the bench. Maybe I have the wrong hog-ring pliers because I finally resorted to threading the rings through by hand and closing them with needle-nose.
And I'm sure adding the extra foam made it more difficult as well.
Glad yours weren't so hard to do, Ken.
And I'm sure adding the extra foam made it more difficult as well.
Glad yours weren't so hard to do, Ken.
Registered User
Joined: Aug 2013
Posts: 3,900
From: Central Illinois
Thanks Z, the obsession has its upside  I like your new sig pic, btw.
Ken, I realized our difference. A front bench is way different than a rear. It has a hump that holds the seat backs. There's a list with a wire inside that has to be pulled down into the crevice and hog ringed. And then the carpet stretches over the back and down under and hog ringed, and of course the front down and under the front and hog ringed. Not to mention all the hardware that has to be reinstalled. I've read here on CO that the front bench with armrest is the most difficult. And I would have to agree. I'm glad I did it but I would have to think twice before doing it again.
[IMG]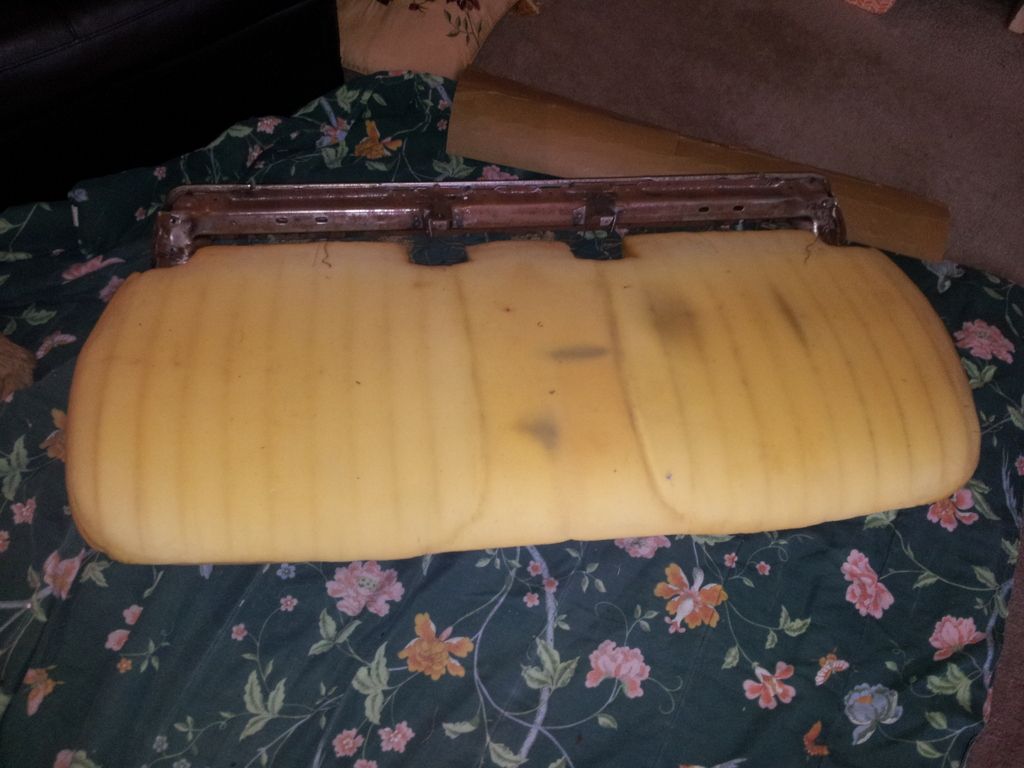 [/IMG]
TSS, do you have buckets or bench in front?
I like your new sig pic, btw.Ken, I realized our difference. A front bench is way different than a rear. It has a hump that holds the seat backs. There's a list with a wire inside that has to be pulled down into the crevice and hog ringed. And then the carpet stretches over the back and down under and hog ringed, and of course the front down and under the front and hog ringed. Not to mention all the hardware that has to be reinstalled. I've read here on CO that the front bench with armrest is the most difficult. And I would have to agree. I'm glad I did it but I would have to think twice before doing it again.
[IMG]
 [/IMG]
TSS, do you have buckets or bench in front?
Registered User
Joined: Feb 2010
Posts: 174
From: Toronto, Ontario
i did my rear seats myself, left the split front bench seat to the professionals. i found a load of mouse poop in the top cushion, replaced all the foam with car foam i got from a fabric store. I'm happy with my result and the money i saved. give it a try, its not hard. just follow the instructions and watch some videos on youtube before hand.
Registered User
Joined: Jun 2014
Posts: 111
From: Frozen Tundra, Bismarck ND
A little late. But here's what I do. My old chevelle I'd reach down and push hard to pop them out but the cutlass, not happening. I figured out if I sit on the back seat floor, feet handing outside of door. I can lean firmly into the seat with my shoulder at same time push up with my elbow and it pops right out. I think I had that seat out 4 times in the last month, fixing top cylinders, speakers and refilling pump reservoir.
Thread Starter
Registered User
Joined: Jun 2010
Posts: 34
Hello Everyone,
so i used Macadoos link that showed the use of 2x4s, wow, it literally took me 30 seconds to get that lower section removed, thanks Macadoo. I unbolted the bottom part of the upper seat but still cant figure out how the top half of the upper seat is hooked. i tried just pushing vertically up but that didnt work and i dont want to bend anything. anyone have any ideas? Btw, thanks everyone for their input. I appreciate having this community available. also, i did find a 1972 quarter under the seat...i will just think that it has been there for 40 years, keeping it in the ash tray as good luck.
Thanks
Rafe
Registered User
Joined: Aug 2013
Posts: 3,900
From: Central Illinois
Glad it worked for ya
The back seat has two bolt on either side of the bottom (which you got) and [I believe] three hooks along the top, one on each side and one in the middle. The hooks have a small protrusion so you have to kind of push in on the top as you push up. Sometimes it's easy, sometimes not. Keep at it, you'll get it.
[IMG] [/IMG]
The back seat has two bolt on either side of the bottom (which you got) and [I believe] three hooks along the top, one on each side and one in the middle. The hooks have a small protrusion so you have to kind of push in on the top as you push up. Sometimes it's easy, sometimes not. Keep at it, you'll get it.
[IMG]
 [/IMG]
NOVICE car nut
Joined: Nov 2010
Posts: 3,140
From: Milwaukee Wisconsin
There are two bolts holding the upper portion of the seat down ( rear seat ). You have to remove the lower part first revealing the two bolts . Once you get the two bolts off , the seat pushes upward and comes off ..... I'm assuming it would be the same on most of these cars .
Registered User
Joined: Aug 2013
Posts: 3,900
From: Central Illinois
Lol, yeah, that was pretty bad, sorry. Maybe this will help?
[IMG]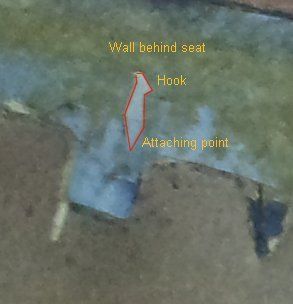 [/IMG]
Correct. But if you look at the photo, the three upper hooks have a small protrusion towards the back wall necessitating the need to push the top of the seat back a little (sometimes) while lifting up.
[IMG]
 [/IMG]
There are two bolts holding the upper portion of the seat down ( rear seat ). You have to remove the lower part first revealing the two bolts . Once you get the two bolts off , the seat pushes upward and comes off ..... I'm assuming it would be the same on most of these cars .
Thread Starter
Registered User
Joined: Jun 2010
Posts: 34
Hello All,
to report in, i finally got the upper part of the rear seat out of the car. it took me using my legs to push the upper part of the seat, where they attach to the protruding hooks, inward as my wife pulled up on the seat.
I installed the new seat covers myself and they look great. took me a total of about 4 hours. The question now i have is the old seat covers have a thin narrow rod , 1 in each section, do i need to reuse those? I did not but since i havent put the seats back in the car, i can do it a little easier. I almost threw the old seats away when i noticed that they wouldnt fold easy.
Thanks everyone
Registered User
Joined: Aug 2013
Posts: 3,900
From: Central Illinois
I haven't done my backs yet, just my fronts, but I believe those are necessary. I can't remember the terminology but the seat covers should have long cylindrical tubes of fabric those slide in. Then you hog-ring around those. I doubt the fabric alone will hold the hog-rings.

Thread Starter
Registered User
Joined: Jun 2010
Posts: 34
thanks guys.
I agree, i should reuse those. Funny thing, i just youtube'ed a video of a guy redoing his back seats on a 69 buick skylark, and he did not mention reusing them and he actually showed how he put the hog clips on that particular section just like I did, behind the sewed seam, but it only makes sense to reuse the rods. It shouldnt take me long to undo that one section and add the rods.
Thanks again everyone.
Thread Starter
Registered User
Joined: Jun 2010
Posts: 34
Mac,
i have never done anything like this in the past and i would probably never do again because its cheap to have them done. The shop near me was going to charge 120 dollars if I brought him the back seat. I am definitely having someone do the front 50 50 split bench. It took me about 4 hours to do the recovering on the back seat but again never have done it before so i would say it was alot easier than i thought it would be. So if you already did your fronts yourself, the backs will be a walk in the park.
BTW, so i put the rods back in last night..took me about 2 hours as i had to undo the hog rings and then redo just those 2 sections. at the same time i put in a new package tray...wow, what a difference new seat covers and package tray make.
thanks again
Rafe
Registered User
Joined: Aug 2013
Posts: 3,900
From: Central Illinois
Yeah, but that's $120 we can spend on other parts 
When the time comes, I'll do them myself, if for nothing else, I like the bragging rights.
Nothing like a new package tray, right? And it's not too hard to do either.
When the time comes, I'll do them myself, if for nothing else, I like the bragging rights.
Nothing like a new package tray, right? And it's not too hard to do either.

Thread
Thread Starter
Forum
Replies
Last Post
Flye
General Questions
5
Nov 25, 2012 03:49 PM
deltathunder
Major Builds & Projects
8
Apr 22, 2012 09:36 AM
MASH4077
Eighty-Eight
7
Feb 22, 2011 11:07 AM
JMW803
Electrical
17
May 13, 2010 04:43 PM
chris83
General Discussion
3
Sep 17, 2009 06:08 PM


