
Sport steering wheel install (repro)
 May 23rd, 2010, 05:45 PM
#1
Classic GM Fan
Thread Starter

Join Date: Aug 2009
Location: Keizer, OR
Posts: 217
Sport steering wheel install (repro)
I had to pull the sport steering wheel back off to adjust (bend) the turn signal lever just a little bit so my hand wouldn't hit it while holding the wheel. So I decided to take some pics in case anybody else was thinking about going with the repro sport wheel from The Parts Place.
I had no issues at all and am pleased with it.
This is a super-easy project and most people won't need this how-to but just in case somebody does....here we go.
OK, first, point your wheels straight ahead. Then pull your old steering wheel. You'll need simple hand tools and maybe a cheap ($10) steering wheel puller from the auto parts store. You'll see the dust cover under the wheel with the horn contact sticking up. Make sure that's not missing or you'll have no horn.
Note the index mark on the steering shaft is straight up.
Last edited by mv213; May 23rd, 2010 at 05:58 PM.
 May 23rd, 2010, 05:51 PM
#4
Classic GM Fan
Thread Starter
Join Date: Aug 2009
Location: Keizer, OR
Posts: 217
Place the horn button adapter with the extended leg down, pushing down on the the horn contact. Hold it in place and screw it to the hub with three more #8-32 screws.
Last edited by mv213; May 23rd, 2010 at 06:29 PM.
May 23rd, 2010, 05:54 PM
#5
Classic GM Fan
Thread Starter
Join Date: Aug 2009
Location: Keizer, OR
Posts: 217
Now you just need to pop the horn button into place and admire your handiwork. The whole process shouldn't take more than a half hour at the most. I also took the opportunity to touch up a couple of scratches on my steering column from reinstalling the dash.
I think The Parts Place really did a nice job on this kit.
I think The Parts Place really did a nice job on this kit.
May 23rd, 2010, 09:00 PM
#7
Classic GM Fan
Thread Starter
Join Date: Aug 2009
Location: Keizer, OR
Posts: 217
My main thought in writing this up was so that anybody thinking about this wheel/kit will realize it's a nice kit and super easy to do.
May 23rd, 2010, 09:00 PM
#8
Just an Olds Guy
Join Date: Jul 2008
Location: Edmonton, AB. And "I am Can 'eh' jun - eh"
Posts: 24,525
Mine is OEM and looks great in spite of a couple of very minor nicks in the rubber. (probably from my ring finger or something) Does PP have decent grain on the rubber part of the wheel or is it smooth? Kind of hard to see from your pic. And, you're right. It's a piece of cake to change over from a deluxe wheel. I'm planning on changing my column over to a tilt, and adding cruise. I've got the tilt column; it's rebuilt and ready to install.
2008_0314MILLER0022-Copy.jpg?t=1274673478
Hey, I just noticed. This post is 1972 for me!! Ya I know, big deal.
2008_0314MILLER0022-Copy.jpg?t=1274673478
Hey, I just noticed. This post is 1972 for me!! Ya I know, big deal.
Last edited by Allan R; May 23rd, 2010 at 09:02 PM. Reason: Cool !
May 23rd, 2010, 09:04 PM
#9
Classic GM Fan
Thread Starter
Join Date: Aug 2009
Location: Keizer, OR
Posts: 217
Hi Allan! The repro wheel has grain, my understanding is that it's a little coarser than the OEM but since every OEM sport wheel I've seen has the grain worn off, I guess it's not a big deal. I did buy a used OEM sport wheel on ebay a few years back but it wasn't in great shape. I sold it and bought the kit when it came out. I've been waiting for about 5 years to install it.
Last edited by mv213; July 20th, 2010 at 08:40 PM.
May 23rd, 2010, 09:16 PM
#10
Just an Olds Guy
Join Date: Jul 2008
Location: Edmonton, AB. And "I am Can 'eh' jun - eh"
Posts: 24,525
Hi Allan! The repro wheel has grain, my understanding is that it's a little courser than the OEM but since every OEM sport wheel I've seen has the grain worn off, I guess it's not a big deal. I did buy a used OEM sport wheel on ebay a few years back but it wasn't in great shape. I sold it and bought the kit when it came out. I've been waiting for about 5 years to install it.
I remember about 25 years ago I installed a Grant wheel, and it was WAAY too small + the darn horn contact wouldn't work with it, and there was no horn contact kit with the wheel. So I yanked it and took it back. Took a while to brain up to getting an OEM wheel, but I'm glad I did. Still have the old deluxe wheel the car came with, it's pretty heavy and a really good candidate for restoration. Only has 2 cracks but also needs the pearl inlay done. Local wheel restorer said about $200.00. But I don't think that will happen. Got other and better things to do with the $$.
 May 24th, 2010, 05:47 PM
#12
Classic GM Fan
Thread Starter
Join Date: Aug 2009
Location: Keizer, OR
Posts: 217
One of the things I noticed when I installed my wheel is that it kind of limits my sight to the tach and oil/temp/voltage gages. Maybe it's just the way I'm sitting. Have you noticed anything like that? I know mine is the right wheel (not the starfire one-it's about and inch smaller in diameter), but I like the look and the feel.
I remember about 25 years ago I installed a Grant wheel, and it was WAAY too small + the darn horn contact wouldn't work with it, and there was no horn contact kit with the wheel. So I yanked it and took it back. Took a while to brain up to getting an OEM wheel, but I'm glad I did. Still have the old deluxe wheel the car came with, it's pretty heavy and a really good candidate for restoration. Only has 2 cracks but also needs the pearl inlay done. Local wheel restorer said about $200.00. But I don't think that will happen. Got other and better things to do with the $$.
I remember about 25 years ago I installed a Grant wheel, and it was WAAY too small + the darn horn contact wouldn't work with it, and there was no horn contact kit with the wheel. So I yanked it and took it back. Took a while to brain up to getting an OEM wheel, but I'm glad I did. Still have the old deluxe wheel the car came with, it's pretty heavy and a really good candidate for restoration. Only has 2 cracks but also needs the pearl inlay done. Local wheel restorer said about $200.00. But I don't think that will happen. Got other and better things to do with the $$.
May 24th, 2010, 06:01 PM
#14
"me somebody" site member
Join Date: Jul 2007
Posts: 1,612
I saw a vendor selling the repro wheel a years or two back at Carlisle...I thought there was something "off" about how the vinyl cover curved around the rim, thought there may have been a crease / bend around the entire facing edge (when looking straight on at it). May have been a bad example, but it just didn't look right to me.
February 10th, 2012, 09:36 AM
#16
Classic GM Fan
Thread Starter
Join Date: Aug 2009
Location: Keizer, OR
Posts: 217
If your horn is going off continuously when you put the horn button adapter on, there is something wrong with the horn button adapter, the two pieces of metal are making contact.
Last edited by mv213; February 10th, 2012 at 10:08 AM.
February 10th, 2012, 10:38 AM
#19
Registered User
Join Date: Feb 2008
Location: Plano, TX
Posts: 11,798
Glad this thread resurfaced. It is good motivation to make me put on my sport wheel that I recently de-goo'ed. Since it is this easy, i can put the delux back on should it goo up again..
Good writeup!
Good writeup!
February 10th, 2012, 10:39 AM
#20
Registered User
Join Date: Jul 2010
Location: Montreal, QC
Posts: 2,175
 February 10th, 2012, 11:58 AM
#22
Registered User
Join Date: Jul 2010
Location: Montreal, QC
Posts: 2,175
I recently in the past week had a full front clip mAW
Started with the 442 grille restoration.
Started looking at stone shields. Decided I MaW replace the headlamp housings while I'm at it.
Hey, that bumper looks mighty crooked and rusty. New bumper!
February 10th, 2012, 12:12 PM
#24
Registered User
Join Date: Jul 2010
Location: Montreal, QC
Posts: 2,175
Hah, definitely.
Sometime in april I plan to pick a fight with the booster and MC...
Last year I went under the car with a coat hanger and tube bender and redid all my lines in SS, stupid that I didn't take pics back then. The master and booster is the last crappy rusted thing left in my engine bay. And logic dictates that a leaky mC is eventually gonna go...
February 10th, 2012, 12:49 PM
#25
Classic GM Fan
Thread Starter
Join Date: Aug 2009
Location: Keizer, OR
Posts: 217
Hah, definitely.
Sometime in april I plan to pick a fight with the booster and MC...
Last year I went under the car with a coat hanger and tube bender and redid all my lines in SS, stupid that I didn't take pics back then. The master and booster is the last crappy rusted thing left in my engine bay. And logic dictates that a leaky mC is eventually gonna go...
Sometime in april I plan to pick a fight with the booster and MC...
Last year I went under the car with a coat hanger and tube bender and redid all my lines in SS, stupid that I didn't take pics back then. The master and booster is the last crappy rusted thing left in my engine bay. And logic dictates that a leaky mC is eventually gonna go...
While I have it out, I Might As Well get out the wire brush and do some prettying up at the back of the car.......
February 10th, 2012, 03:29 PM
#26
Just an Olds Guy
Join Date: Jul 2008
Location: Edmonton, AB. And "I am Can 'eh' jun - eh"
Posts: 24,525
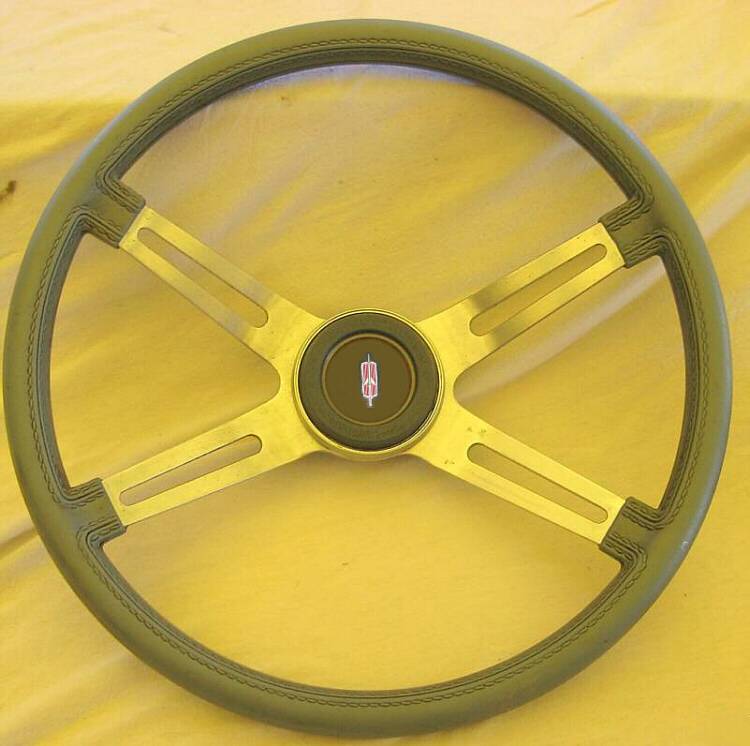
This is a 15 1/2" wheel. look carefully at the pattern where the rubber stops on the spokes
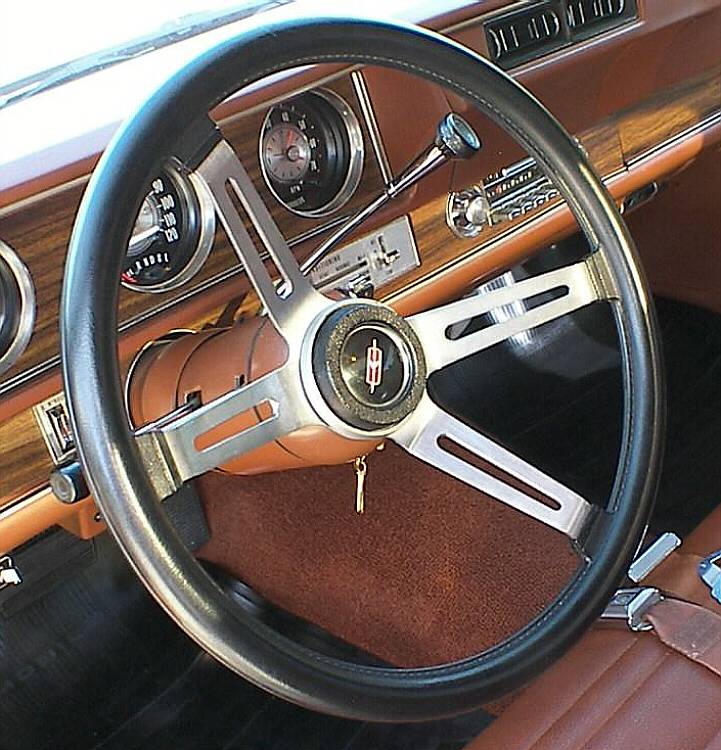
This is the starfire that originally came in with the Omega.

He's right Rob, you already did the shaft. Time to do the column - you'll have the wheel off anyway and from there it's only another 2 screws and 5 bolts. Not hard at all....
If you already have a leaky MC, it's already gone. Usually the rear seal. I know you're looking for a replacement. Sent you a PM link to a guy in ONT that rebuilds them if you want to keep your OEM MC.
ROB!!! Another MAW customer.....
February 10th, 2012, 04:25 PM
#27
Classic GM Fan
Thread Starter
Join Date: Aug 2009
Location: Keizer, OR
Posts: 217
Hi Allan, good info on the two types of sport wheels.
Not hard to pull the gas tank. The tailpipes get in the way a little bit. I siphoned all the gas I could out. Then disconnected the ground and sender wires. Remove the clamp that holds the filler neck to the body. Leave the gas cap on. Cut the rubber fuel hose and plug the tank end to prevent vapor or fuel leakage. Make sure the vent hose is free to drop down. Then use a floor jack and two-by-four to hold the tank up. Remove the front strap bolts and pull the straps down. Lower the tank, jockying it to one side to clear the tailpipes. Done!
Not hard to pull the gas tank. The tailpipes get in the way a little bit. I siphoned all the gas I could out. Then disconnected the ground and sender wires. Remove the clamp that holds the filler neck to the body. Leave the gas cap on. Cut the rubber fuel hose and plug the tank end to prevent vapor or fuel leakage. Make sure the vent hose is free to drop down. Then use a floor jack and two-by-four to hold the tank up. Remove the front strap bolts and pull the straps down. Lower the tank, jockying it to one side to clear the tailpipes. Done!
February 11th, 2012, 09:37 AM
#28
Registered User
Join Date: Jul 2010
Location: Montreal, QC
Posts: 2,175
Hey, I'm taking a lunch break. Just got done pulling my gas tank. Managed to NOT set myself, my shop, or my car on fire. Need to replace the fuel gauge sender.
While I have it out, I Might As Well get out the wire brush and do some prettying up at the back of the car.......
While I have it out, I Might As Well get out the wire brush and do some prettying up at the back of the car.......
How did you support the gas tank when you took it out? It's pretty much right up against my chest when i'm under the car. i'm kinda worried it's going to crush me after raining gas on my face after cutting the lines.....
 February 11th, 2012, 09:39 AM
#29
Registered User
Join Date: Jul 2010
Location: Montreal, QC
Posts: 2,175
\
Yes! Do it while your inner liners are out. Much easier to get the lower booster bolts. Don't forget the one on the side that holds the brake lines.
If you already have a leaky MC, it's already gone. Usually the rear seal. I know you're looking for a replacement. Sent you a PM link to a guy in ONT that rebuilds them if you want to keep your OEM MC.
ROB!!! Another MAW customer.....
I think you're definitely onto something good. I'm going to give that guy in ontario a call. I sent that ebay guy a question asking "is this master cylinder for drum/drum brakes" he said the following
"master cylinders were all the same through 67-72"
**BUZZZZZZ** WRONG ANSWER,
looks like i won't be buying from his ebay store anytime soon
 February 11th, 2012, 09:59 AM
#30
Registered User
Join Date: Mar 2010
Location: Moreno Valley, CA
Posts: 824
I also started a condition guide for sports wheels. Here is the post. Lee
https://classicoldsmobile.com/forums...ion-guide.html
https://classicoldsmobile.com/forums...ion-guide.html
February 11th, 2012, 12:14 PM
#31
Classic GM Fan
Thread Starter
Join Date: Aug 2009
Location: Keizer, OR
Posts: 217
You do not want to try this with gas in the tank, unless you want to take a chance on barbecuing yourself. Be ready to plug the tank end of the rubber gas line, and leave the gas cap on.
February 11th, 2012, 04:08 PM
#33
Just an Olds Guy
Join Date: Jul 2008
Location: Edmonton, AB. And "I am Can 'eh' jun - eh"
Posts: 24,525
The starfire wheels always had the color coded wheels, center caps and lower adapters. I think one of the big draws for lots of people is the starfire wheel simply because it allows the entire column assy to match the interior. Lucky me, my interior is black, and so is my column. So everything matches right off the line.

Thread
Thread Starter
Forum
Replies
Last Post
ManCutty
Parts For Sale
18
March 12th, 2017 10:14 AM
crazy'boutOlds
Parts For Sale
1
March 26th, 2008 09:29 PM


