Body Bushing Color - Found A Really Good Match, But Have A Question
 November 23rd, 2014, 02:33 PM
#1
Body Bushing Color - Found A Really Good Match, But Have A Question
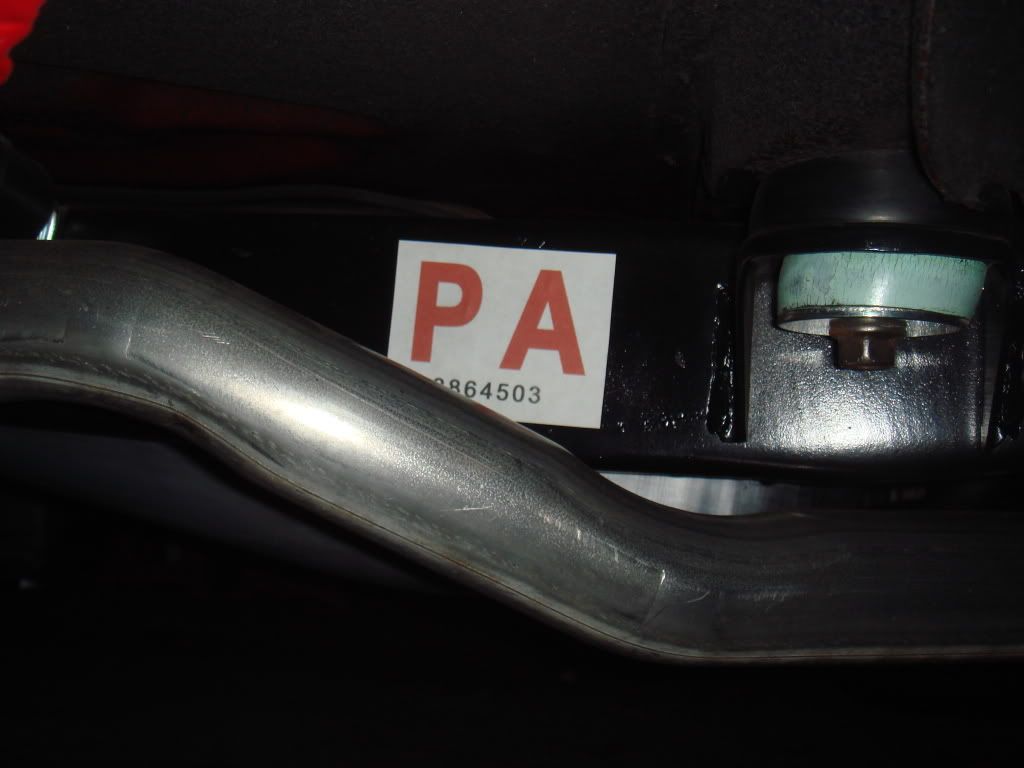
Today, I went to Lowe's and looked through their spray bomb collection looking to match the greenish color that some of my OE bushings have. I bought the "OE" style set from ILT and they look very well built, but all the rubber is black. I had saved one on the best condition lower rubbers and compared it to the finished item after painting - looks great and the right rubbery sheen as well. The paint I used is Valspar Color Radiance Satin Moonlit Surf - PN 86020. ILT says the color should be turquoise, but the Moonlit Surf is dead on to my original part. And at least on mine, the rubbers were painted - not made from a green material like I have seen others claim.
However, while I was reading the instructions included in the ILT kit, it said the upper rubbers (the ones with the metal insert) should also be colored. They are listed as being a "Moss Green". I could swear my original uppers were black only when we got them off the car. I know the pucks that do not have the bolt running through them were black for sure. Does anyone know for sure about the upper color - i.e. seen the originals out of an undisturbed car?
However, while I was reading the instructions included in the ILT kit, it said the upper rubbers (the ones with the metal insert) should also be colored. They are listed as being a "Moss Green". I could swear my original uppers were black only when we got them off the car. I know the pucks that do not have the bolt running through them were black for sure. Does anyone know for sure about the upper color - i.e. seen the originals out of an undisturbed car?
Last edited by costpenn; November 23rd, 2014 at 03:13 PM.


 November 23rd, 2014, 03:50 PM
#3
Jasen, did as you suggested - and even more confused!
PIM does indeed call for the upper mounts to be painted, but they specify the same color ("Dk. Green") as the lower portion. Again, maybe mine were just really wasted, but I could not find any paint on my uppers. ILT calls for it to be a different shade of green. I'll go with what the PIM says and paint mine green.
Next, the PIM calls for the pucks (without bolts) to be Dark Green as well. Mine were black, and ILT says they are supposed to be black. Will leave mine black.
Most interestingly, the PIM says that only the #3 position bushings (upper and lower) should be a different color altogether ("Lt. Green") This one has me stumped. It does not agree with what was on my car or what the ILT kit says.
So to recap, ILT says there should be different colors on the same bushing positions, PIM says they should be the same. PIM calls for one position to be a different color, ILT says no. And the puck color is also not in agreement between the two.
Sigh...
 November 24th, 2014, 05:02 PM
#6
Registered User

Join Date: Aug 2010
Posts: 772
I think we may find differences from plant to plant as well as year to year. regardless of the assm manual.
I did a 68 Conv.442 rescently ,nice survivor and it had Green upper and lowers.
Did a 72 last year and it had green uppers and Yellow lowers.
I did a 68 Conv.442 rescently ,nice survivor and it had Green upper and lowers.
Did a 72 last year and it had green uppers and Yellow lowers.
November 24th, 2014, 07:02 PM
#9
Registered User

Join Date: Feb 2009
Posts: 2,026
My originals said CHEVROLET on the sides.
 Fremont car.
November 25th, 2014, 09:13 AM
Fremont car.
November 25th, 2014, 09:13 AM
#12
Registered User
Join Date: Apr 2010
Location: Connecticut
Posts: 1,471
Wow, I love seeing this level of detail !
I don't think I'm familiar with ILT. Can you give me the website please?
I'm wondering if they would have mounts that would be correct for my 98. I replaced all of the mounts when I did the frame-off but the 2 under the radiator support were no longer available so I had to improvise and use 2 that were meant to go under the firewall, hoping they would be good replacements. The nose of the car isn't as tight as it should be so I'd really like to find correct replacements.
November 25th, 2014, 12:04 PM
#14
Registered User
Join Date: Feb 2009
Posts: 2,026
November 25th, 2014, 02:01 PM
#15
Registered User
Join Date: Feb 2009
Location: Brazil Indiana
Posts: 11,503
My uppers were painted but the bottoms and solids were not painted. I have taken several cars apart and only ever seen one with the lowers painted and that was a 72. I have to set the body on my car Sunday so I am going to have to do this now or never. I plan to go to Lowes tomorrow and see what I can find.
November 25th, 2014, 02:18 PM
#16
Registered User
Join Date: Feb 2010
Location: West Michigan
Posts: 1,587
For those of you who are really picky about color, if you shop at an art supply store, you'll find a remarkable selection of paints and colors. Think Michaels, Hobby Lobby, or on-line. How well any of these paints will work of rubber, I don't know.
For what it's worth, I think Costpenn's green is too blue and not green enough. (That's comment, not criticism.) I describe the original green (at least as it appears 40 years later!) as "oxidized copper." Doesn't it look just like the greenish color that bare copper becomes when exposed to the elements?
For what it's worth, I think Costpenn's green is too blue and not green enough. (That's comment, not criticism.) I describe the original green (at least as it appears 40 years later!) as "oxidized copper." Doesn't it look just like the greenish color that bare copper becomes when exposed to the elements?
November 25th, 2014, 03:50 PM
#17
For those of you who are really picky about color, if you shop at an art supply store, you'll find a remarkable selection of paints and colors. Think Michaels, Hobby Lobby, or on-line. How well any of these paints will work of rubber, I don't know.
For what it's worth, I think Costpenn's green is too blue and not green enough. (That's comment, not criticism.) I describe the original green (at least as it appears 40 years later!) as "oxidized copper." Doesn't it look just like the greenish color that bare copper becomes when exposed to the elements?
For what it's worth, I think Costpenn's green is too blue and not green enough. (That's comment, not criticism.) I describe the original green (at least as it appears 40 years later!) as "oxidized copper." Doesn't it look just like the greenish color that bare copper becomes when exposed to the elements?
Don't know if you read my post, but that Moonlight Surf color I used is an EXACT match to what was on my best, most well preserved lower original biscuit I had on my car (pic was in a previous post) I have to admit I am not sure on the #3 position color (lighter green) - the PIM just says "Lt. Green".
Also, my photography skills with my cell phone have been known to suck - the pic makes them look a lot bluer than they are in sunlight.
Last edited by costpenn; November 25th, 2014 at 03:52 PM.
 November 26th, 2014, 02:35 PM
#19
Registered User
Join Date: Feb 2009
Location: Brazil Indiana
Posts: 11,503
I just found earlier today one of my lowers with some color on it. Very small spot but found something that looks correct. Most all my uppers have some color on them and they are definitely not the same color as the lower I have. I am going to experiment tonight and see what I get. I will post some results. I did pick up a can of the Radiance Satin Moonlit Surf and it looks very close to my spot on the bottom bushing like Joe said but I have something else that also looks close. I am going to compare them and see.
November 26th, 2014, 04:51 PM
#20
Registered User
Join Date: Feb 2009
Location: Brazil Indiana
Posts: 11,503
I found a great example of the two differant colors between the upper and lower. This is from my 70 W-30. Looking through them again tonight and found where the paint from a lower had rubbed onto the upper and off to the side you can see where the uppers paint ran to the bottom side. This is a good side by side comparison. The paint is completly gone on my bottoms but at least found this. One lower has a very small spot but that is all. I wonder why the paint on the bottoms are more often gone on the cars I find?
November 26th, 2014, 05:07 PM
#22
Registered User
Join Date: Feb 2009
Location: Brazil Indiana
Posts: 11,503
This is what I came up with for the bottom. The Moonlit Surf that Joe has is very close to this. I got some paint from Hobby Lobby from the plastic model area. It is called Model Master Custom Lacquer System "Tropical Terquoise". I think it matches mine just slightly better but again, Both are very close.
December 3rd, 2014, 05:58 PM
#23
Registered User
Join Date: Feb 2009
Location: Brazil Indiana
Posts: 11,503
Thanks for starting this thread. I was discouraged to the point that i was not even going to paint them. I wanted a flexible paint but didn't know what to do. This turned out good enough for me. My wife had a flexible fabric paint that I experimented with but it was red. That paint is stuck so good to my old used bushings that i can get it to come off at all. The problem is that I can not find the correct color in her fabric paint.
December 3rd, 2014, 06:55 PM
#24
Thanks for starting this thread. I was discouraged to the point that i was not even going to paint them. I wanted a flexible paint but didn't know what to do. This turned out good enough for me. My wife had a flexible fabric paint that I experimented with but it was red. That paint is stuck so good to my old used bushings that i can get it to come off at all. The problem is that I can not find the correct color in her fabric paint.
I'm debating on painting my uppers slightly different like you did. The ILT instructions that come in their kit states they are different, but the PIM says they are the same. Since you found both slightly different paints on your originals, looks like the ILT notes are correct, and the Lt. Green called for in the PIM is just a general term.
December 3rd, 2014, 07:02 PM
#25
Registered User

Join Date: Nov 2011
Location: milwaukee
Posts: 547
in the 71 manual there are even 2 that require a stripe. i mixed up a batch of my own paint to match the originals.bodymounts.jpg
December 4th, 2014, 03:27 PM
#26
Registered User
Join Date: Feb 2010
Location: West Michigan
Posts: 1,587
That explains everything. I was wondering how you could consider it an EXACT match with what I was seeing on my monitor. The lighting you used, your cell phone, and my monitor all conspired to change the color.
January 2nd, 2015, 07:39 AM
#27
Registered User

Join Date: Dec 2011
Posts: 7,286
Do you guys ever feel that maybe you are just getting carried away with the detail?
What about matching the surface texture of the proper shade of aquamarine for the iner stripe of the upper half of the lower section of the 3rd one back, if made on Tuesday, by the slightly buzzed factory worker. Don't forget the line workers' fingerprints.
What about matching the surface texture of the proper shade of aquamarine for the iner stripe of the upper half of the lower section of the 3rd one back, if made on Tuesday, by the slightly buzzed factory worker. Don't forget the line workers' fingerprints.
January 2nd, 2015, 08:47 AM
#28
Registered User

Join Date: Feb 2009
Posts: 2,257
Ha! Good one Chris.
I worked in a GM plant in 1972 on the assembly line. To say the cars were built with loving care would be putting lipstick on the hog.
55 cars per hour, with a minimum level of care, and barely adequate QC.
The level of detail in these restoration threads is 1000X what GM did back in the day.
The paint on the chassis and suspension was just enough to prevent rust before it got to the dealers' lot.......
Do you guys ever feel that maybe you are just getting carried away with the detail?
What about matching the surface texture of the proper shade of aquamarine for the iner stripe of the upper half of the lower section of the 3rd one back, if made on Tuesday, by the slightly buzzed factory worker. Don't forget the line workers' fingerprints.
What about matching the surface texture of the proper shade of aquamarine for the iner stripe of the upper half of the lower section of the 3rd one back, if made on Tuesday, by the slightly buzzed factory worker. Don't forget the line workers' fingerprints.
January 2nd, 2015, 10:47 AM
#29
Registered User
Join Date: Feb 2009
Location: Brazil Indiana
Posts: 11,503
Do you guys ever feel that maybe you are just getting carried away with the detail?
What about matching the surface texture of the proper shade of aquamarine for the iner stripe of the upper half of the lower section of the 3rd one back, if made on Tuesday, by the slightly buzzed factory worker. Don't forget the line workers' fingerprints.
What about matching the surface texture of the proper shade of aquamarine for the iner stripe of the upper half of the lower section of the 3rd one back, if made on Tuesday, by the slightly buzzed factory worker. Don't forget the line workers' fingerprints.
January 2nd, 2015, 12:09 PM
#30
Registered User
Join Date: Dec 2011
Posts: 7,286
Doing the best you can do is always admirable. I was not disparaging your work, to be sure. I went to some lengths to duplicate the details of a '66 442 when restoring it- replaced the PN sticker on the steering column, for example, which will never be seen after installation. In the correct font and size lettering.
I guess I am just saying that for rubber body mounts I would use as delivered for the average car, for more detail spray some of any color near what was found on the old ones, in a careless manner as if making a color differentiation clue back in the day, and call that proper.
Kudos to those who push the envelope for a better color match- and SHARE THAT SPECIFIC INFO so that others can follow suit. Now, about that coverage, texture, and overspray....
January 2nd, 2015, 01:57 PM
#31
Doing the best you can do is always admirable. I was not disparaging your work, to be sure. I went to some lengths to duplicate the details of a '66 442 when restoring it- replaced the PN sticker on the steering column, for example, which will never be seen after installation. In the correct font and size lettering.
I guess I am just saying that for rubber body mounts I would use as delivered for the average car, for more detail spray some of any color near what was found on the old ones, in a careless manner as if making a color differentiation clue back in the day, and call that proper.
Kudos to those who push the envelope for a better color match- and SHARE THAT SPECIFIC INFO so that others can follow suit. Now, about that coverage, texture, and overspray....
I guess I am just saying that for rubber body mounts I would use as delivered for the average car, for more detail spray some of any color near what was found on the old ones, in a careless manner as if making a color differentiation clue back in the day, and call that proper.
Kudos to those who push the envelope for a better color match- and SHARE THAT SPECIFIC INFO so that others can follow suit. Now, about that coverage, texture, and overspray....
May 13th, 2017, 03:55 PM
#33
Registered User

Join Date: Jun 2013
Location: North west Indiana -Florida
Posts: 455
Where do the two green ones go with the smaller hole in the middle. I just got the same set looks like but i did not get the solid mounts. They are sending them to me now. Are the larger holes correct for a 1970 442 ?? Thanks

Thread
Thread Starter
Forum
Replies
Last Post
1Fastolds
Ninety-Eight
10
August 19th, 2015 07:47 AM


