


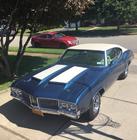
Troubleshooting 1972 Cutlass before it's my daily driver


Thread Starter
Registered User
Joined: Jul 2011
Posts: 77
 Troubleshooting 1972 Cutlass before it's my daily driver
issues:
ISSUE 1
shifter cable needs alignment tune,* I have no clue how to fix this (see bottom of post)
-every gear is one too high (neutral is what drive should be , etc)
-Drive is NOT working, I have to manually shift or stay in 3rd
(for clarity 1st 2nd and 3rd DO work fine, just not drive)
ISSUE 2
top needs fluid (dunno where the hose is)
-It's a convertible, the top stays down and won't go up, I assume it is out of fluid
-Where can I access the place to add fluid (where is the hose, how do I access it ),
ISSUE 3
need to find way to get dash off and clock out for fuel gauge to fit there, need tach (might put tach in clock instead of fuel gauge)
-the current clock and fuel gauge are broken , and of course it has no stock tach without Rallypack
-I need a picture or tutorial on how to remove the dash and the clock gauge and also would like tips for a replacement tach or fuel gauge to replace clock with that FIT the clock gauge (4")
Additional Info
I know how to add a tach in but not fuel gauge, is it just connected to the fuel sender then grounded and put via 12V to fuse box?
Shifter* Fuel gauge*
*Also, I live in Nashville TN, should I visit any mechanic to help fix the shifter and add the fuel gauge since I don't know how?
How much $ would we look at?
Thanks for any clarifications, I look forward to contibute to this website with things I am more understanding with
ISSUE 1
shifter cable needs alignment tune,* I have no clue how to fix this (see bottom of post)
-every gear is one too high (neutral is what drive should be , etc)
-Drive is NOT working, I have to manually shift or stay in 3rd
(for clarity 1st 2nd and 3rd DO work fine, just not drive)
ISSUE 2
top needs fluid (dunno where the hose is)
-It's a convertible, the top stays down and won't go up, I assume it is out of fluid
-Where can I access the place to add fluid (where is the hose, how do I access it ),
ISSUE 3
need to find way to get dash off and clock out for fuel gauge to fit there, need tach (might put tach in clock instead of fuel gauge)
-the current clock and fuel gauge are broken , and of course it has no stock tach without Rallypack
-I need a picture or tutorial on how to remove the dash and the clock gauge and also would like tips for a replacement tach or fuel gauge to replace clock with that FIT the clock gauge (4")
Additional Info
I know how to add a tach in but not fuel gauge, is it just connected to the fuel sender then grounded and put via 12V to fuse box?
Shifter* Fuel gauge*
*Also, I live in Nashville TN, should I visit any mechanic to help fix the shifter and add the fuel gauge since I don't know how?
How much $ would we look at?
Thanks for any clarifications, I look forward to contibute to this website with things I am more understanding with
Last edited by hunter; Aug 30, 2011 at 07:51 PM.
Thread Starter
Registered User
Joined: Jul 2011
Posts: 77
http://www.sunpro.com/product_detail.php?pid=16472 seems like it would work, is the mount frame removable to put in the clock

Old(s) Fart
Joined: Mar 2007
Posts: 50,802
From: Northern VA
Buy a factory Chassis Service Manual and Fisher Body Manual for the answers to all your questions.
You didn't tell us if this is a floor or column shifter - the adjustment process is different. Also, Drive IS third, so I'm afraid your comment doesn't make sense.
Fluid for the hydraulic top mechanism is located in the trunk under the back window. Remove the cardboard cover and you'll see the top motor. There is a reservoir at the end of the motor with a rubber plug in it. Pull out the plug, add fluid. You will likely need to add fluid and cycle the top several times to bleed the air out.
You didn't tell us if this is a floor or column shifter - the adjustment process is different. Also, Drive IS third, so I'm afraid your comment doesn't make sense.
Fluid for the hydraulic top mechanism is located in the trunk under the back window. Remove the cardboard cover and you'll see the top motor. There is a reservoir at the end of the motor with a rubber plug in it. Pull out the plug, add fluid. You will likely need to add fluid and cycle the top several times to bleed the air out.
Thread Starter
Registered User
Joined: Jul 2011
Posts: 77
Buy a factory Chassis Service Manual and Fisher Body Manual for the answers to all your questions.
You didn't tell us if this is a floor or column shifter - the adjustment process is different. Also, Drive IS third, so I'm afraid your comment doesn't make sense.
Fluid for the hydraulic top mechanism is located in the trunk under the back window. Remove the cardboard cover and you'll see the top motor. There is a reservoir at the end of the motor with a rubber plug in it. Pull out the plug, add fluid. You will likely need to add fluid and cycle the top several times to bleed the air out.
You didn't tell us if this is a floor or column shifter - the adjustment process is different. Also, Drive IS third, so I'm afraid your comment doesn't make sense.
Fluid for the hydraulic top mechanism is located in the trunk under the back window. Remove the cardboard cover and you'll see the top motor. There is a reservoir at the end of the motor with a rubber plug in it. Pull out the plug, add fluid. You will likely need to add fluid and cycle the top several times to bleed the air out.
It's a dual gate shifter on the floor, "D" is a gear on the left side to automatically shift 1, 2, and 3rd, standing for "Drive" the gear pretends to be "N" ~ Neutral.
Thank you for the top location, helps a ton!
Where can I get a service manual
Last edited by hunter; Aug 31, 2011 at 08:05 AM.
Old(s) Fart
Joined: Mar 2007
Posts: 50,802
From: Northern VA
There is at least one 1972 CSM and about a dozen Fisher Body Manuals on ebay as I write this.
Thread Starter
Registered User
Joined: Jul 2011
Posts: 77
And again, D and 3 are exactly the same. The transmission neither knows nor cares whether the shifter is in the LH or RH gate. All it cares about is the position of the lever on the side of the trans. Leave the shifter in the 3 position on the RH gate and it will shift automatically exactly the same if it were in the LH gate in the D position. Adjustment is done at the trans lever. The cable attaches to a stud on the trans arm that is in a slot. Loosen the nut and the stud slides in the slot to adjust shifter position. Of course, once you do that, you will then need to adjust the backdrive linkage going from the trans to the steering column so your neutral safety switch works correctly.
There is at least one 1972 CSM and about a dozen Fisher Body Manuals on ebay as I write this.
There is at least one 1972 CSM and about a dozen Fisher Body Manuals on ebay as I write this.
Thread Starter
Registered User
Joined: Jul 2011
Posts: 77



Nutless Supreme.
Joined: Jul 2010
Posts: 61
From: North Haven,CT/Fayetteville,NC
i just recently put a tach in the clock delete spot. all you gotta do is remove two screws that go upward right infront/above the gauges. There are two more screws that hold the bezel in from the bottom of the dash. If you look on the bottom of the dash on either side of the steering wheel you will see to plastic plates (mine are transparent blue) take those off (screws) and there will be one screw under each holding the bezel in. once the bezel is off there will be two screws holding the clock delete in or i think 3 screws if it is a clock. run green wire to "tach" connection on the tach, black to a ground, red to 12v keyed and white either to your dimmer or if you want it on at all times when car is keyed connect it with red. i used a chrome bezel whiteface tach from the local parts store, i think a cheap sunpro. It almost fit right into the bezel but was loose. I wrapped some thin weather stripping around and press fit it into the dash bezel. Fits super snug and is perfectly centered. Just gotta two chrom rings the same as on the tach to put over the speedo and cluster gauge to make it even and have the dash pop a little, make it look almost like a fancy factory option.
Thread Starter
Registered User
Joined: Jul 2011
Posts: 77
i just recently put a tach in the clock delete spot. all you gotta do is remove two screws that go upward right infront/above the gauges. There are two more screws that hold the bezel in from the bottom of the dash. If you look on the bottom of the dash on either side of the steering wheel you will see to plastic plates (mine are transparent blue) take those off (screws) and there will be one screw under each holding the bezel in. once the bezel is off there will be two screws holding the clock delete in or i think 3 screws if it is a clock. run green wire to "tach" connection on the tach, black to a ground, red to 12v keyed and white either to your dimmer or if you want it on at all times when car is keyed connect it with red. i used a chrome bezel whiteface tach from the local parts store, i think a cheap sunpro. It almost fit right into the bezel but was loose. I wrapped some thin weather stripping around and press fit it into the dash bezel. Fits super snug and is perfectly centered. Just gotta two chrom rings the same as on the tach to put over the speedo and cluster gauge to make it even and have the dash pop a little, make it look almost like a fancy factory option.
Thread Starter
Registered User
Joined: Jul 2011
Posts: 77
do i connect the green to the distrubutor signal ? The stock clock wasn't a tic-toc-tach just a clock, so I think I'd have to run the green one from the firewall to dist. Should still be very simple either way; thanks again

Thread
Thread Starter
Forum
Replies
Last Post


