
Rebuilding a 394 Fuel Pump


Thread Starter
Registered User
Joined: Aug 2015
Posts: 103
From: Mannheim, PA
Rebuilding a 394 Fuel Pump
As promised I will describe the rebuild of my 1961 Dynamic 88 fuel pump. Fuel pump rebuilds are not fun, I will never do another. This thread will require multi posts to finish. Here we go; The fuel pump started to leak oil but otherwise remained operational. I searched the maintenance manual and decided should be fun, yea right! IMG_0468_zps25886a63.jpg Here is the fuel pump prior to removal. Disconnecting the vacuum lines, the fuel line from the tank, the pressure line to the fuel bowl and removal of two bolts had the pump on the bench in no time. I also removed the generator drive belt to gain access. IMG_0523_zpso6taxttv.jpg Fuel pump has been cleaned prior to teardown. The manual says to start with the fuel pump sideIMG_0525_zpswdsylcqb.jpg. Removing the four screws allowed access. Still fun at this point. IMG_0527_zpsy0t2gwtw.jpg
Here you see the fuel in and out valves. Next I removed the screws separating the diaphragm housing from the valve assembly, a slight tap broke the seal exposing the diaphragm. IMG_0528_zpskw8kzbzt.jpg
Up to this point everything proceeded as expected. Now the manual says to tip the diaphragm and unhook the rod from the pump actuator arm. Years of crud prevented the rod from sliding off the end of the actuator arm. I pushed on the spring and tilted the diaphragm, wouldn't release! I attempted to get the darn thing to release all week. After much thought I decided to drill the diaphragm end which would allow more ability to position the rod and not have to depress the spring. The process worked and after repeated attempts the rod separated, YES. IMG_0529_zps2uza4zcy.jpg
Last edited by Larry/car; Dec 22, 2015 at 08:14 AM.
Thread Starter
Registered User
Joined: Aug 2015
Posts: 103
From: Mannheim, PA
Here we have the drilled diaphragm and the separated rod arm. Note the crud that was under the diaphragm. Check the rod seal in the housing, it age hardened allowing the oil to enter the chamber and vent overboard, reason for repair. Now how to remove the seal from the housing?IMG_0531_zpsugjonq0h.jpg
Last edited by Larry/car; Dec 22, 2015 at 08:23 AM.
Thread Starter
Registered User
Joined: Aug 2015
Posts: 103
From: Mannheim, PA
I devised a fixture using a bolt head to fit under the retainer and pull the seal out of the IMG_0532_zpsclbuuwha.jpghousing, by alternating from side the seal retainer came out easily (to my amazement). That concludes the fuel pump disassembly. On to the vacuum side. Turning the pump housing over I proceeded to remove the screws holding the vacuum housing together. There is a strong spring on top of the diaphragm that really pushes as you separate the housing halfs. Exercise care not to damage anything including yourself. Notice spring seat on top of exposed diaphragm.IMG_0539_zps8od0z0uk.jpg h IMG_0538_zpsn9k79ldx.jpg
Last edited by Larry/car; Dec 22, 2015 at 08:47 AM.
Thread Starter
Registered User
Joined: Aug 2015
Posts: 103
From: Mannheim, PA
This is what was hiding under the diaphragm! IMG_0541_zpsqwtpyn39.jpg The rod seal has been removed with the same process as on the pump side. Notice the vacuum valve, removed prior to cleaning. (there is a gasket under all the valves). IMG_0551_zpss1ayvjsd.jpg The vacuum diaphragm separated from the actuator rod with just a quarter turn of the diaphragm. Now the really fun part of the process begins after cleaning. The diaphragm assembly is not part of the kit (just the rubber seal) and the rod has to be pressed out enabling you to replace the seal. I had access to a press and help from a friend to accomplish the procedure, took us three hours to accomplish. IMG_0552_zpspqmlwfdn.jpg At this point I was sick of it and didn't take pictures of the installation of the valves. The process is strait forward; remove the valves by tapping them out, cleaning the recess, install gasket, press in place (carefully pressed in place with a C-clamp) staked housing to hold valve with a sharp center punch.
Last edited by Larry/car; Dec 22, 2015 at 09:10 AM.
Thread Starter
Registered User
Joined: Aug 2015
Posts: 103
From: Mannheim, PA
After all the valves and seals are in place it is now time to begin assembly. Manual says to start with the fuel side. The fuel diaphragm has to be attached to the pump actuator rod. I dreaded this process from the time the old diaphragm rod finally detached itself. Tilting the diaphragm assembly and slowly/carefully inserting the rod into the seal I heard a click, "yes" it just slid into place. The diaphragm has to be positioned flush with the pump housing in order to attach the valve assembly to the pump with the diaphragm seal sandwiched in between. The screws started easily and I slowly tightened, the manual says to flex the diaphragm prior to final tightening. With that procedure accomplished I torqued down the screws. Cycling the pump actuator I felt suction on the fuel in side of the pump, a good sign. IMG_0529_zps2uza4zcy.jpg Picture of original diaphragm (didn't take a picture of replacement). You slowly cycle pump actuator to bring diaphragm to pump housing and secure in place to assemble unit.
Last edited by Larry/car; Dec 22, 2015 at 10:29 AM.
Thread Starter
Registered User
Joined: Aug 2015
Posts: 103
From: Mannheim, PA
On to the vacuum side: The vacuum diaphragm is attached to the actuator with just a quarter turn of the diaphragm assembly. The diaphragm rubber seal has to be positioned appropriately to align the holes with the housings and have the rod in the proper position (90 degrees) attached to the pump actuator. A strong spring is positioned on top of the diaphragm as the pump is assembled. This presented a problem as the screws are not long enough. I adjusted two C-clamps to provide the proper distance needed to start screws without applying undue pressure to the assembly. I slowly tightened screws to secure assembly to the pump. Again I flexed the new diaphragm to relieve undue stress. IMG_0558_zps9facrszf.jpg
Last edited by Larry/car; Dec 22, 2015 at 10:46 AM.
Thread Starter
Registered User
Joined: Aug 2015
Posts: 103
From: Mannheim, PA
Engine ready for install: IMG_0560_zpsax6nhm8p.jpgIMG_0557_zpspqw2kfyu.jpgPump is now lubed before installation, have no idea how long it would take the engine to provide lubrication to actuator and the diaphragm rod seals so I squirted engine oil into the pump. Should prevent excessive seal wear on initial operation. I also added gasoline into the pump to provide valve lubrication on initial start up. The pump installation is fairly strait forward and no problems arose.
Last edited by Larry/car; Dec 22, 2015 at 11:05 AM.
Thread Starter
Registered User
Joined: Aug 2015
Posts: 103
From: Mannheim, PA
The engine cranked for what seemed forever (hoses were dry) the cylinders started to hit and the engine settled into a smooth idle. IMG_0564_zps0sjgjtn2.jpg After determining there were no leaks I took the car for a short drive. The car performed normally. IMG_0565_zpsssefgdz3.jpg Another successful repair!!!!!
Last edited by Larry/car; Dec 22, 2015 at 11:13 AM.
Thread Starter
Registered User
Joined: Aug 2015
Posts: 103
From: Mannheim, PA
I hope this presentation was educational and gives you an idea what is involved in overhauling a fuel pump (same procedures are required on similar mechanical fuel pumps). I decided to rebuild my pump because the car only has 44,000 miles. Replacement pump mileage is unknown. Another reason; these cars are old and replacement parts could sit on the shelf for years, seals could be as bad or worse.

Thread Starter
Registered User
Joined: Aug 2015
Posts: 103
From: Mannheim, PA
My pleasure. As our cars age we need to share this kind of information. I got the pre-run lubrication idea from reading problems others have experienced with premature seal failure, with only a few thousand miles on the clock. Purchasing new old stock pumps that have been sitting on the shelf for fifty years or more. The rubber seals could be in worse shape than in the pump you are replacing.
Last edited by Larry/car; Dec 23, 2015 at 06:16 AM.
Registered User
Joined: Oct 2004
Posts: 7,743
From: Forest Ranch Ca.
On to the vacuum side: The vacuum diaphragm is attached to the actuator with just a quarter turn of the diaphragm assembly. The diaphragm rubber seal has to be positioned appropriately to align the holes with the housings and have the rod in the proper position (90 degrees) attached to the pump actuator. A strong spring is positioned on top of the diaphragm as the pump is assembled. This presented a problem as the screws are not long enough. I adjusted two C-clamps to provide the proper distance needed to start screws without applying undue pressure to the assembly. I slowly tightened screws to secure assembly to the pump. Again I flexed the new diaphragm to relieve undue stress. 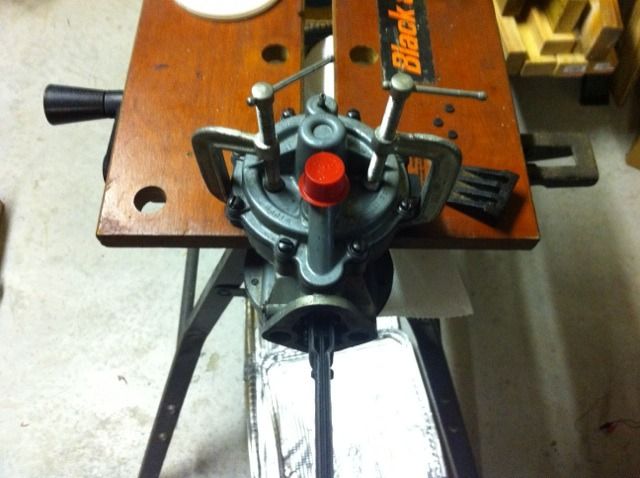

Thread Starter
Registered User
Joined: Aug 2015
Posts: 103
From: Mannheim, PA
That fuel diaphragm rod was quite a problem. The vacuum diaphragm seal replacement was the hardest part of the challenge. I am guessing a new replacement vacuum diaphragm assembly is no longer available so we now have to rebuild the old one. Without a press I am not sure that a successful rebuild would of been possible. Squeezing the seal between the metal plates proved quite a procedure. I should have taken pictures, I was taken back by having to perform the diaphragm rebuild.


Thread
Thread Starter
Forum
Replies
Last Post
Larry/car
General Questions
14
Dec 20, 2015 05:41 AM


