When you click on links to various merchants on this site and make a purchase, this can result in this site earning a commission. Affiliate programs and affiliations include, but are not limited to, the eBay Partner Network.
Clever storage idea. Thank DeWalt, Makita and others for Grinders.......LOL. Looks like you are using very thick stock. Crank up the voltage. If you are using flux core wire, (and if your welder supports it) I strongly suggest you upgrade to using Shielding Gas, (MIG). Your welds will come out A LOT smoother, hardly any spatter. (much less grinding....... - ask me how I know..........)
[QUOTE=RandyS;1241316]Another very important aspect of being able to weld well is having the proper helmet. An auto darkening helmet is a must.[/QUOTE
x2. And don’t cheap out on one. The one i use at work is a miller performance series and it is far and away better then the cheap metal man brand I use at home. Just my two cents.
If you have an instruction manual with your welder, read it front to back. As stated buy yourself a gas bottle of C25 and learn to MIG weld. Better penetration. Also when running MIG always push the arc, don't drag it. My dad was a 50 year pipeline welder who taught me to weld when I was around 10 and I actually got better than he was.
Clearly not enough power for that thickness- Your mostly getting "patch-weld" to surface, not burning through material. And when you sand them down.. Welding is greatly compromised.
Tho those will still last on that use. That size welder is not anyways meant to weld really thick material- unless you cut atleast other part to 45 degree angle where it joins the other part. Then you start filling from the bottom, bead by bead. It should look like this " V " from the seam, and then you start filling from the bottom of that "vee". But it Still should melt the base material.
Auto-dim mask isnt any "must have" item.. More about preference. I dont like auto-dim masks, rather use the "conventional" mask. Even hand-held mask has it uses every now and then.
One thing i dont get- why are we always talking about MIG-welding, when ( thrown from hat) 90% of hobby-welding is actually MAG-welding, or shelf-shielded welding. Its industry standard to call everything just MIG- but why?
One thing i dont get- why are we always talking about MIG-welding, when ( thrown from hat) 90% of hobby-welding is actually MAG-welding, or shelf-shielded welding. Its industry standard to call everything just MIG- but why?
Because most people do not know what the acronym stands for.
MIG - Metal Inert Gas. Just means solid wire filler and an inert gas to shield the puddle from oxygen to prevent oxidation while welding.
MAG - ? Is a term used to mean the wire has the flux imbeded into the wire or commenly called flux core.
I'm not a welder. I had a Father and Brother that were welders but their gone. I get by. Vision is important. As said previously get a quality hood, I have a Lincoln Viking with a "cheater" lense, it's like "reading glasses." Heat is critical for penetration. As also said, grind a bevel "V" after you tack weld, if you have a torch heat the weld area, then weld. Thicker stock, I "draw" circles, to get the most heat into the weld. Jmo.
Clearly not enough power for that thickness- Your mostly getting "patch-weld" to surface, not burning through material. And when you sand them down.. Welding is greatly compromised.
Tho those will still last on that use. That size welder is not anyways meant to weld really thick material- unless you cut atleast other part to 45 degree angle where it joins the other part. Then you start filling from the bottom, bead by bead. It should look like this " V " from the seam, and then you start filling from the bottom of that "vee". But it Still should melt the base material.
X 2
1. Did you ever try that Certanium rod you mentioned for welding cast iron in another post a long time ago ?
2. You Sir, are a welder.
.........Just my .02 Oro's.
Wow! thanks for all the input.
It took me a while to realize all the youtube videos I was watching for MIG aren't exactly the best for flux core welding "drag the slag vs push" etc.
I guess I went a little overboard on the stock (but it was only 50 cents or so more expensive by the foot) sometimes I am my own worse enemy.
As suggested I think I will try the gas setup I have sitting on the shelf.
Also, I can switch it over to 230v
And the v of course.
Looks tight to get a V on the 90's (any tricks?)
An angle grinder is your friend. The 'V' is not mandatory if your welder can weld 'hot' enough. Going to 230v will help. Turn up the voltage but not the wire feed as much. This will make for a hotter arc. As mentioned, the idea is to melt the metal at the joints with the wire.
And the v of course.
Looks tight to get a V on the 90's (any tricks?)
Thanks again
Tim
All you can do on the 90 is to V the mating piece as best you can. Then put a strong tack one side before welding the opposite side to prevent pulling and the joint not being 90 degrees.
You do understand that welding with flux core uses reverse polarity compared to MIG...right? Lots of horrible flux-core or MIG welding is because of backwards polarity.
Welding has made me an expert at grinding.
The best thing I ever did to improve my welding skill was to get rid of a 120-volt welder for a 240-volt welder.
Last edited by Schurkey; Apr 14, 2020 at 05:24 PM.
I had a hobart handler 180, When I ran out of the flux core it came with and got a bottle of 25/75 and a roll of normal wire my welds got infinitely better. Reverse the polarity when you do. The more you weld the better you get. Then I got married and the welder wasn't part of the plans in the new house .. . .Now I can probably buy another one.
You do understand that welding with flux core uses reverse polarity compared to MIG...right? Lots of horrible flux-core or MIG welding is because of backwards polarity.
Do you know why it takes reverse polarity for flux core? The reason is because the heat from the arc goes into the wire first to enable the flux to melt and shield the weld puddle. When MIG welding the heat goes into the work producing a better penetrating puddle and therefore a smoother weld.
Because most people do not know what the acronym stands for.
MIG - Metal Inert Gas. Just means solid wire filler and an inert gas to shield the puddle from oxygen to prevent oxidation while welding.
MAG - ? Is a term used to mean the wire has the flux imbeded into the wire or commenly called flux core.
No, MAG stands for Metal Active gas,
"MAG welding uses active shielding gases, primarily for the welding of steels. These shielding gases are mixtures of carbon dioxide, argon and oxygen. Examples of these active gases include CO2 , Ar + 2 to 5% O2 , Ar + 5 to 25% CO2 and Ar + 10% CO2 + 5% O2."
Copied shamelessly that jargon. Looking those shielding gases listed you get fast why we should be actually talking about MAG-welding most of the time.
Originally Posted by tkcutlass
And the v of course.
Looks tight to get a V on the 90's (any tricks?)
Tim
Just do the best you can with the vee. Everything you get makes it stronger weld. If you weld really thick material, where the vee is deep and wide, then you kinda should re-work your tactic. There you would first weld the root shut, then both sides of the vee- creating buffer layer between the two parts. At last you fill the vee with welding. Hard to describe.
Originally Posted by OLDSter Ralph
X 2
1. Did you ever try that Certanium rod you mentioned for welding cast iron in another post a long time ago ?
2. You Sir, are a welder.
.........Just my .02 Oro's.
1. Actually yes, totally forgot to update. It behaved like nickel-rod, soft and easy to weld ( easy meaning = with really low amperage, so low local heat). Cant yet say anything about it lasting or not? Atleast it attached through old cast.
2. Nah, just working at CMM ( cold milling machine). And those suckers start to disintegrate pretty fast after new.
Sadly your 0.02 € is also 0.02 dollars
Hey btw, question out of the blue. 120 volts and 220 volts? Whats the thing? You have two different voltages at USA? Here we just have 230V, and then the welders are rated by the size of fuse, roughly 16A and 32A.
1. Actually yes, totally forgot to update. It behaved like nickel-rod, soft and easy to weld ( easy meaning = with really low amperage, so low local heat). Cant yet say anything about it lasting or not? Atleast it attached through old cast.
Sadly your 0.02 € is also 0.02 dollars
Hey btw, question out of the blue. 120 volts and 220 volts? Whats the thing? You have two different voltages at USA? Here we just have 230V, and then the welders are rated by the size of fuse, roughly 16A and 32A.
Thank you for the welding rod update. I thought I had missed it.
We have two voltages available here. Generally, heavy electrical load items like home air conditioners (cooling), heat pumps, electric kitchen stoves, electric clothes dryers and welders require 230V. 110-120V is used for everything else (lighting,small appliances, clothes washers and refrigerators). Small, cheaper, "hobbyist" MIG's use 120V and flux core wire.
If you have an instruction manual with your welder, read it front to back. As stated buy yourself a gas bottle of C25 and learn to MIG weld. Better penetration. Also when running MIG always push the arc, don't drag it. My dad was a 50 year pipeline welder who taught me to weld when I was around 10 and I actually got better than he was.
I'm not an expert by any means but have a nice Miller and do pretty decent. I have done both ways, some experts say push, some say pull. I like to pull since I can see my puddle as I go along. I've been doing replacement panels etc and it does not matter then since your just giving a quick blast spaced apart to keep warp away'
You are coming along nicely. Practice at different voltages and wire speed to get the desired effect. I have found when welding metal at an angle (like you are) you can often use the joint to guide the gun, thus creating a nice straight bead.
If you don't have a drill press, start with a small diameter bit, and then step up to the finished size you need. ex. start at 1/8", step to 3/16", step to 1/4" etc. Even an inexpensive drill press from HF will make your drilling heavy stock much easier.
on another note how do I drill through that 3/16 stock. I think I killed a brand new bit without making it through
What size drill bit ? Drilling through hot rolled or cold rolled ? Usually, slower RPM's and more pressure makes the difference. Some oil helps also. Always start with a 3/32" to 1/8" pilot hole. Most drill bits don't cut in the center, unless they have had the "web" thinned or are "center cutting" drill bits.
If you are using a light weight welder and thick metal i've always used a torch and heated ahead of my welds, this will get you better penetration and a smoother job. But there is nothing better/ easier than the correct equipment designed for the job at hand. Somehow I find myself driving tacks with a 3# single jack.... Tedd
I pull my FCAW welds, push my MIG welds. I'm probably the minority, but I prefer to weld aluminum over steel any day, and twice on Sundays. AL is just easier.
I'd love a more powerful personal garage welder. That said, I've yet to have any reason to do anything but FCAW 110v, whether it be thin sheet metal/body panel repair up through structural frame areas, even cast iron repair. I prefer to butt-weld sheet panels rather than crimp and overlay, did when I replaced panels on the Olds and patched the hood and fender pan on my tractor. I'd prefer a TIG to add heat without material, but nothing a strong hot wrench can't add.
To my eye, OP, look like not enough heat, too fast a weld, and not sticking to the seam. On a test panel, turn up the heat until you burn through, then dial it back until you don't. Also, in all honesty, I've found the Vulcan VCAW wire from harbor freight to lay even better beads than Lincoln.
One thing which could ease you on training. You can pulse the weld with your finger, dont hold the trigger just on. That way it gives you time to actually inspect the weld you make, and Still keep the formed heat on weld. Try to aim for as low weld as possible, just barely over the surface(s) you weld, not high like in pictures.
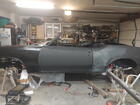
Welder and supplies to build a $90 engine cradle $1500
Learning to weld Priceless?
Hoping to recoup some costs building things myself. (rotisserie and plenty of sheet metal work in my future)
230 V makes a big difference Broke the nozzle on the new gloss black had to switch to hammered black Not the prettiest and hopefully won't fall apart Casters up next
casters could use some help, they came with a shelving unit, I thing their aluminum nut may have stripped, time for a proper nut I think Fits nicely under the bench giving access to some parts. TH350, trunk lid, passenger door and rear bumper all from totaled 71 cutlass Th400 and dual exhaust from donor car, still haven't found the his/hers shifter
I finished this project today. It is a fully adjustable tire bead breaker and removal/installation tool that mounts to either fwd/aft receivers on my truck. Most of the materials are 1/4 wall and is made of 85% drops and repurposed steel. I’ve got about $25 invested not including wire/gas/electricity and of course time. I use a Miller 210. I’ve drilled the table for 5 on 4.75,5 on 5, GM 6 and 8 lug patterns (for now). The bead breaker attachment can be used on the table or by laying the wheel on the ground and using the lower pivot bracket points. I’ve been able to put a wheel as big as my wife’s 20” Yukon wheels on it. It’s been kind of a fun project and I’ve loved the frugality and functionality of it. I had both of my sons come out to have them use it on some old tires. Simple pleasures
Last edited by Funkwagon455; Apr 26, 2020 at 09:13 PM.
Weld splatter as well as grinder Sparks immediately attach themselves to any window glass in your car truck motorcycle house and render it scrap be careful





 - ask me how I know..........
 )
)











 .... Tedd