


Tinning compound



Registered User
Joined: Mar 2013
Posts: 421
I use commonly available flux. And while I haven't build any lead sleds I do still own one of the first cars I did 20 years ago. I think cleanliness is more important at that stage than anything else. Cut your substrate with a clean abrasive ( I use 80-180 depending on what finish level I'm going for) then flux and flash it with your torch or iron. Ready for lead.

Thread Starter
Justin
Joined: Mar 2012
Posts: 3,453
From: utah
Thanks guys have some coming
This is for my door there are a bunch of small dents/ wrinkle on the edge and I can't get to it as it's a seam area so we are doing the led work instead of bondo
E46B2D76-4503-40FD-BBD8-22DC6991F31B.jpg
We tried the solder/w flux but it wasn't sticking like we wanted to in the two holes we were filling
This is for my door there are a bunch of small dents/ wrinkle on the edge and I can't get to it as it's a seam area so we are doing the led work instead of bondo
E46B2D76-4503-40FD-BBD8-22DC6991F31B.jpg
We tried the solder/w flux but it wasn't sticking like we wanted to in the two holes we were filling
Thread Starter
Justin
Joined: Mar 2012
Posts: 3,453
From: utah
Silver solder is 100.00 a lb tho lol the tinning compound and led was only like 50.00
As silver was my next if I couldn't find it went to five body supply stores and they all told me we have the led but never heard of the compound so frustrated
As silver was my next if I couldn't find it went to five body supply stores and they all told me we have the led but never heard of the compound so frustrated

Registered User
Joined: May 2012
Posts: 1,503
From: laingsburg mi
muratic acid works well. be very careful with it. caution on the edge metal too much heat will raise the panel next to the edge crimp. i used to do the lead work at fisher body, if you need some help id be glad to help you on here.
Registered User
Joined: Mar 2013
Posts: 421
Thanks guys have some coming
This is for my door there are a bunch of small dents/ wrinkle on the edge and I can't get to it as it's a seam area so we are doing the led work instead of bondo
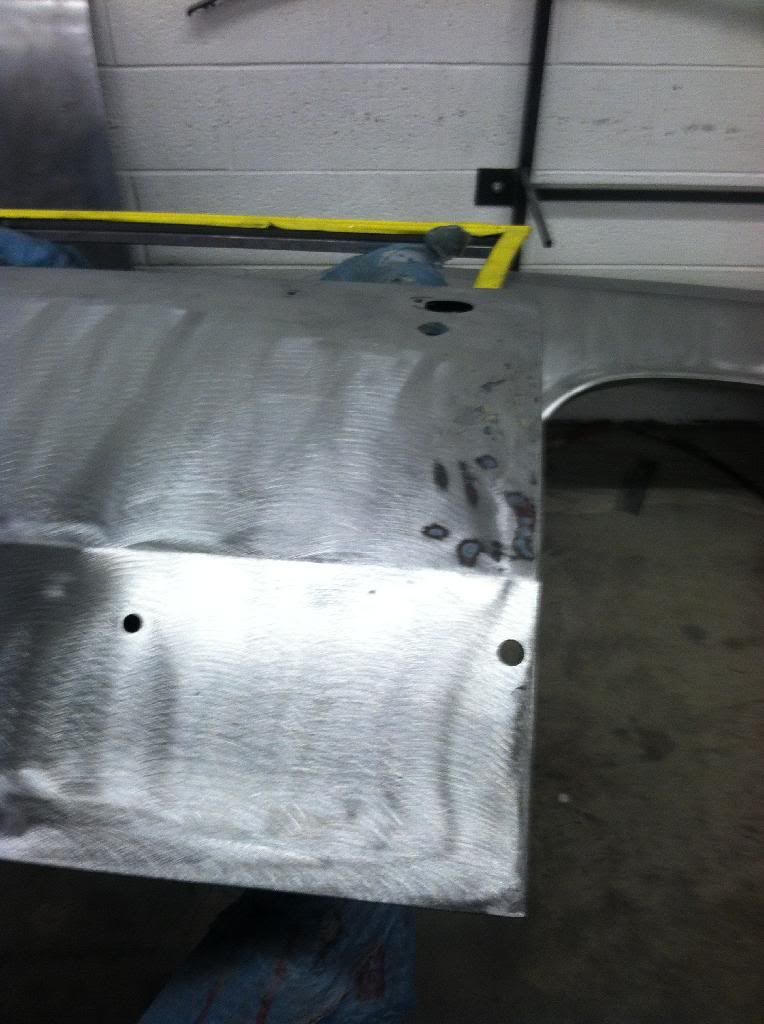
We tried the solder/w flux but it wasn't sticking like we wanted to in the two holes we were filling
This is for my door there are a bunch of small dents/ wrinkle on the edge and I can't get to it as it's a seam area so we are doing the led work instead of bondo

We tried the solder/w flux but it wasn't sticking like we wanted to in the two holes we were filling
Thread Starter
Justin
Joined: Mar 2012
Posts: 3,453
From: utah
The holes you see are trim holes. There was two small rust holes that we started to fill with the solder, but it didn't stick to well it was rusted from the front from rock chips on the edge they were threw the skin but not the back part of the door
Registered User
Joined: Mar 2013
Posts: 421
Ah, rust pitting can be difficult to clean and get lead to stick to. As oldolds88 said muratic acid works well or a spot blaster could be used. If your using solder go with acid core, it's specific for autobody and available at the paint store.
Thread Starter
Justin
Joined: Mar 2012
Posts: 3,453
From: utah
Here is a few pics of the solder filled holes I will be doing led work near the edge to fill some dings
56B0AC02-3D27-4D1B-8FD3-33D13EF24055_1.jpg
C6682174-104B-4C1A-960B-4845556BBC1E_1.jpg
066A3680-1B87-4CD5-A2E8-72125786E91C_1.jpg
56B0AC02-3D27-4D1B-8FD3-33D13EF24055_1.jpg
C6682174-104B-4C1A-960B-4845556BBC1E_1.jpg
066A3680-1B87-4CD5-A2E8-72125786E91C_1.jpg
Registered User
Joined: May 2012
Posts: 1,503
From: laingsburg mi
tap the edges of the hole inward so it is tapering. that small hole should be half dollar size when tapped in. tin around the area to the size of about 3 inches,that will give you plenty to work with when finishing it down. hand finish ,so that you can creep up on the final finish. if you get agressive with the grinder the finished lead will be lower than the base metal. safety first,gloves, resperator, and goggles. i use a 70/30 blend 70 %lead 30%tin. soft,easy to work and genuine oldsmobile. the paddles i use are made from birdseye maple,i put a cross hatch pattern on the face of them with a hacksaw blade. it's to move and tamp the lead when its being applied. rust will not tin,it has to be blasted or cut out and a backer piece welded in if the hole is bigger than a dime. paint,dirt,and filler will not tin.if its tinned correctly,lead will stay for a very long time. i use beeswax on the paddles to keep the lead from sticking,oil will work but i prefer the wax. if the lead isnt tamped down, or there is dirt,and debris in the lead there will be pits in the finished piece, if they arent too bad you can use spot putty to fill them. if you want i can give step by step. or i can bore everybody with babbling. if you cant tell, i like doing lead work. its fasinating to me.
Thread Starter
Justin
Joined: Mar 2012
Posts: 3,453
From: utah
The holes had the two seams so there was metal behind it I spot sand blasted them
I do have a body guy that has done this teaching me a few tricks . I have been metal wiring doors forward I think I've done 80% of it my self
If you would like to see more look up my build
https://classicoldsmobile.com/forums...024#post688024
I do have a body guy that has done this teaching me a few tricks . I have been metal wiring doors forward I think I've done 80% of it my self
If you would like to see more look up my build
https://classicoldsmobile.com/forums...024#post688024
Registered User
Joined: Mar 2013
Posts: 421

Oldstata. Glad to see your making progress here! However, as a word of caution those hard edges around your lead work are an omen. Any edge in lead work or welding is a "hotspot" for a crack, that contamination will hide in there just as rust does. The problem is you won't find out for months or years after you have $$$ on top. Then it takes time plus money to fix it. I would re-flow it/fill it until it is level and you will have peace of mind to boot. And kudos to oldolds88! You sound like an experienced lead man! I've never had the stones to try oil or old thick wheel bearing grease on my paddles, just too many ways to make a problem IMO.


Thread Starter
Justin
Joined: Mar 2012
Posts: 3,453
From: utah
Got the tinning butter today not sure what to think about east wood just yet half the tub was spilt all over the box. I need to call them it's less then half full
Any how, wasn't what my buddy was expecting as he used a powder I guess back in the day
We are going to give it a shot any ways
Any how, wasn't what my buddy was expecting as he used a powder I guess back in the day
We are going to give it a shot any ways
Thread Starter
Justin
Joined: Mar 2012
Posts: 3,453
From: utah
Sorry in advance for posting this twice,but a few of you helped me and I thought you would like to see the progress.
East wood tinning butter and lead work
Okay
1. Clean area very well if need be spot sand blast
2. Mix the tinning butter as it seams to settle.
3. Apply a thin coat of tinning butter to the area about 3" around
4. I used steal wool in vise grips and heated area as I spread running compond around. Apply a small amount of lead drops as your doing this to help prep the are. It will get really shiny when ready
5. Apply lead where needed and begging to work with lead paddles
6. File to finish up after area has cooled
7 clean area very well before paint
8F4F250B-5371-4C80-ACD8-11C6874C4EA5.jpg
E379F151-2694-4D35-B487-2A1949665CF9.jpg
21F7ABAA-A952-477A-9650-F0D18242BE0B.jpg
BC9C1F22-F51C-420D-89B2-2639049F9D56.jpg
01DC8DCE-EE16-41DB-8A3D-D81F3C9290D3.jpg
3570D553-4A73-409C-A1A9-4BC0722424A9.jpg
East wood tinning butter and lead work
Okay
1. Clean area very well if need be spot sand blast
2. Mix the tinning butter as it seams to settle.
3. Apply a thin coat of tinning butter to the area about 3" around
4. I used steal wool in vise grips and heated area as I spread running compond around. Apply a small amount of lead drops as your doing this to help prep the are. It will get really shiny when ready
5. Apply lead where needed and begging to work with lead paddles
6. File to finish up after area has cooled
7 clean area very well before paint
8F4F250B-5371-4C80-ACD8-11C6874C4EA5.jpg
E379F151-2694-4D35-B487-2A1949665CF9.jpg
21F7ABAA-A952-477A-9650-F0D18242BE0B.jpg
BC9C1F22-F51C-420D-89B2-2639049F9D56.jpg
01DC8DCE-EE16-41DB-8A3D-D81F3C9290D3.jpg
3570D553-4A73-409C-A1A9-4BC0722424A9.jpg

Thread
Thread Starter
Forum
Replies
Last Post


