
Stereo install

Thread Starter
Navy P-3 FE (Ret.)
Joined: Dec 2009
Posts: 759
From: Great Mills, MD
Stereo install
Figured I'd post my stereo upgrade, AM just doesn't cut it that's if it worked. I mounted the stereo unit under the dash and I'm in the process of installing a pair of 6 x 9's in the rear, 6 3/4 's in kick panels and a 10" sub in the trunk. All speakers are Infinity Kappa series with Pioneer amps (100 watt 4 channel, 300 watt mono). I'm going to replace the carpet also. Some pics attached.
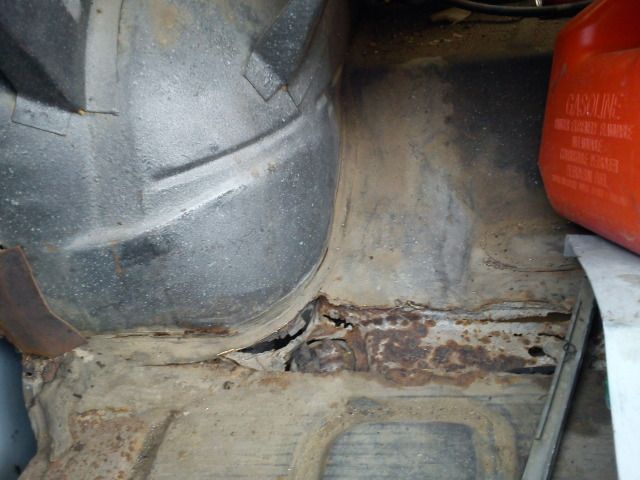
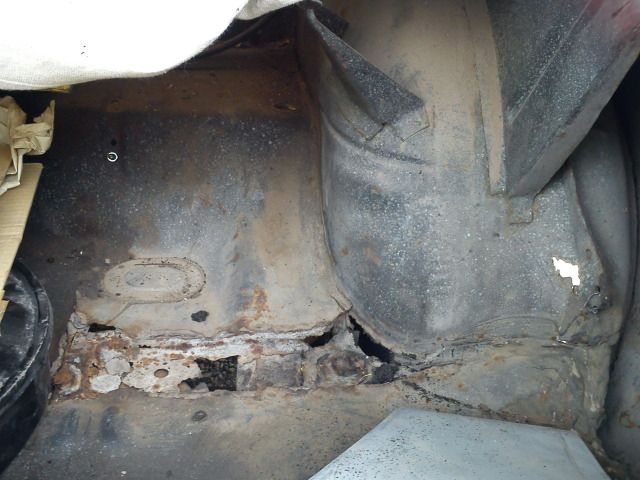
I removed the back window for two reasons, Made in much easier to install the 6x9's but also to repair a hole.
I removed the back window for two reasons, Made in much easier to install the 6x9's but also to repair a hole.

Thread Starter
Navy P-3 FE (Ret.)
Joined: Dec 2009
Posts: 759
From: Great Mills, MD
I'm using kick panels that have cutouts but the speakers I have need spacers to fit. There is only about 1 1/2 inches of depth. I may try to construct something that will also angle the speakers a little.
The rear speakers mount from the top and require the grill, maybe not a good choice for the package tray but I knew that the window leaked, even though the car hasn't seen water in 15 years, I figured might as well fix that. If I have to remove the speakers for some reason it might be a challenge.
The rear speakers mount from the top and require the grill, maybe not a good choice for the package tray but I knew that the window leaked, even though the car hasn't seen water in 15 years, I figured might as well fix that. If I have to remove the speakers for some reason it might be a challenge.


Registered User
Joined: Sep 2010
Posts: 1,659
From: Norfolk, Va
The rear speakers mount from the top and require the grill, maybe not a good choice for the package tray but I knew that the window leaked, even though the car hasn't seen water in 15 years, I figured might as well fix that. If I have to remove the speakers for some reason it might be a challenge.
Thread Starter
Navy P-3 FE (Ret.)
Joined: Dec 2009
Posts: 759
From: Great Mills, MD
Yes there is. I have it removed right now. I've heard that some basically move it over about an inch which I assume they bend it at the firewall and move the handle end over but I don't see that happening. I'll check it when I get the speakers mounted.
Thread Starter
Navy P-3 FE (Ret.)
Joined: Dec 2009
Posts: 759
From: Great Mills, MD
MDF is pretty easy to shape so you could start with a 3/4 inch cutout to space the speaker out then angle it by grinding away part of the back of it. Wrap the spacer with vinyl so it matches the kick panel and it should look just fine.
I always used the thin speaker grills with screw-in studs on those rear decks and mound the speaker on the bottom. You might be able to score something like that at your local stereo shop. If you still have a local stereo shop. They are not as plentiful as back in the '80s and '90s when I was installing.
I always used the thin speaker grills with screw-in studs on those rear decks and mound the speaker on the bottom. You might be able to score something like that at your local stereo shop. If you still have a local stereo shop. They are not as plentiful as back in the '80s and '90s when I was installing.
The tweeters in the speakers are raised a bit and actually have a button to adjust frequency. I like how they sound and curious how they'll sound now.
Registered User
Joined: Sep 2010
Posts: 1,659
From: Norfolk, Va
Yes there is. I have it removed right now. I've heard that some basically move it over about an inch which I assume they bend it at the firewall and move the handle end over but I don't see that happening. I'll check it when I get the speakers mounted.
Or you could have the first '67 Cutlass with a hand operated park brake in your center console.

Thread Starter
Navy P-3 FE (Ret.)
Joined: Dec 2009
Posts: 759
From: Great Mills, MD
I have never installed the ready-made kick panel mounts, that is why I was interested in them. Can you just move the mounting bolt that attaches the park brake to the dash over toward the steering column? Simply change the angle that it rests at? It would be out into your knee space a little bit more but would seem to be the easiest fix without removing it completely.
Or you could have the first '67 Cutlass with a hand operated park brake in your center console.
Or you could have the first '67 Cutlass with a hand operated park brake in your center console.
Where the brake attaches at the dash can be moved a little, not much metal on either side. I may just do without. Honestly I don't use the car much and won't miss it. I do have a button on my quarter stick shifter maybe, no that won't work.
I just got done mounting the 6 x 9's and it was still a PITA even with the window out, can't imagine with it in. You think you got everything lined up and three of the four screws won't go in because things are not lined up.
Administrator
Joined: Oct 2009
Posts: 42,385
From: Poteau, Ok
I chose to mount my 6" rounds in the front door panels. I didn't want to fuss in the kick panel area with mine having the vent. All rear 6x9's are a PITA to install laying on your back in the trunk. I don't use the supplied sheet metal screws, I use machine screws with nuts underneath.
Registered User
Joined: Aug 2013
Posts: 12,655
From: Evansville, IN
I think I'm just going to run turnswitch.com's reproductions in the front and rear along with my technically not correct for 67 reverb kit. I just need FM, I don't need uber bass. I do LIKE good sound systems, and I think I will put one in a custom car I do.
How hard is pulling the stainless trim on the rear window?
How hard is pulling the stainless trim on the rear window?
Thread Starter
Navy P-3 FE (Ret.)
Joined: Dec 2009
Posts: 759
From: Great Mills, MD
I chose to mount my 6" rounds in the front door panels. I didn't want to fuss in the kick panel area with mine having the vent. All rear 6x9's are a PITA to install laying on your back in the trunk. I don't use the supplied sheet metal screws, I use machine screws with nuts underneath.

Thread Starter
Navy P-3 FE (Ret.)
Joined: Dec 2009
Posts: 759
From: Great Mills, MD
I think I'm just going to run turnswitch.com's reproductions in the front and rear along with my technically not correct for 67 reverb kit. I just need FM, I don't need uber bass. I do LIKE good sound systems, and I think I will put one in a custom car I do.
How hard is pulling the stainless trim on the rear window?
How hard is pulling the stainless trim on the rear window?
I had to remove the vinyl trim also to get at the area I repaired.
I got pics of the spacers and trim clips for the vinyl top, new ones.
The trim work around the back window needs to be removed starting at the center top working clockwise. The vinyl trim snaps off on the straight piece and the end piece is held on buy those clips in the picture.
Thread Starter
Navy P-3 FE (Ret.)
Joined: Dec 2009
Posts: 759
From: Great Mills, MD
I scratched the trim because I was careless, it can be done without messing it up. Also I was using too much pressure when I hit a clip, pulling too hard. You need just enough pressure to release the clip and pop the trim out. The windshield trim is the same, I've done one before.
Don't know if have seen those clips so here's a couple pictures. The top part is what the trim snaps into and your trying to pry it away to release the trim.
Don't know if have seen those clips so here's a couple pictures. The top part is what the trim snaps into and your trying to pry it away to release the trim.
Last edited by 67Olds442X2; Oct 13, 2016 at 07:09 PM.
Thread Starter
Navy P-3 FE (Ret.)
Joined: Dec 2009
Posts: 759
From: Great Mills, MD
Well I never thought to just put the kick panels together with spacers and speakers and see if they fit. Sure enough they do, I was always test fitting the speaker after the panels were in. No metal to cut. Next will be insulating the floor, installing window etc. Added a couple pics of a rust free trunk.
Registered User
Joined: Sep 2010
Posts: 1,659
From: Norfolk, Va
Dood, that's just cruel! Mine has a few pieces of metal left in between all the holes. I'll be getting lots of practice welding sheet metal while fixing mine.
IMG_20120317_175840.jpg IMG_20120317_175942.jpg
Hoist.gifHoist.gifHoist.gif
IMG_20120317_175840.jpg IMG_20120317_175942.jpg
Hoist.gifHoist.gifHoist.gif
Thread Starter
Navy P-3 FE (Ret.)
Joined: Dec 2009
Posts: 759
From: Great Mills, MD

Sorry about that, I'm usually nice. You may not want to look at my floor pans. Best of luck fixing yours, You might be able to get a one piece trunk pan. My two previous cars where pretty bad, a gentleman on this sight bought one and fixed it up nicely.
Thread Starter
Navy P-3 FE (Ret.)
Joined: Dec 2009
Posts: 759
From: Great Mills, MD
E-brake will not work. I don't see where I could bend it far enough. Now when I had said the panels worked, well as you can see that the panel does stick out. The dimmer switch and the panel are closer together. I may try it as is, I don't want to cut the metal behind. I'll have to see how it looks with the carpet installed. I can do without the e-brake.
Registered User
Joined: Aug 2013
Posts: 12,655
From: Evansville, IN
If you don't mind it looking stupid, perhaps you could shorten the e brake pedal and get it up and behind the speaker, enough to get your foot in there. It will be harder to push, but probably acceptable.
Registered User
Joined: Jun 2010
Posts: 3,613
From: Rogues Island, USA
67Olds442X2 that bracket can be removed from underneath to give you more access but it is on a frame mount. If you need new ones Speedway has them in their catalog or website.
I've been told silicone bronze welding rod is the way to go if you TIG the sheet metal. Not sure if it's made in MIG wire, I need to check for my project. It uses straight argon gas too.
I've been told silicone bronze welding rod is the way to go if you TIG the sheet metal. Not sure if it's made in MIG wire, I need to check for my project. It uses straight argon gas too.
Thread Starter
Navy P-3 FE (Ret.)
Joined: Dec 2009
Posts: 759
From: Great Mills, MD
Thanks for the tips and replies.
I'm in the process of putting the window back in and the window weld i got is a little too thick, it's 3/8" but no give to it. I knew I was in for trouble when I was putting it around the pinch weld it was as thick as the rubber blocks that are supposed to hold the window. I got the window in but can't get the trim installed. I've been heating it up with a hair dryer to soften the sealer and got one clip engaged. I put new clips in and of course they are tight.
I got the window weld off e-bay, not that e-bay is bad, but it was square compared to the 3M version that I got as backup which is round and thinner. I have a feeling I'll be removing it and using the 3M stuff if heating don't help.
Registered User
Joined: Sep 2010
Posts: 1,659
From: Norfolk, Va
I'm just giving you grief. My floor pans look better than the trunk so far but someone cut a big ol' honkin' hole under the passenger seat that I will have to deal with.
Thread Starter
Navy P-3 FE (Ret.)
Joined: Dec 2009
Posts: 759
From: Great Mills, MD
All is good. I didn't take it like you may have thought, I knew you were kidding around. I was trying to be funny in my reply but probably came out wrong.
Registered User
Joined: Sep 2010
Posts: 1,659
From: Norfolk, Va
Nah, I took it right and so did you. My reply was for everyone else. I once made a comment like that on another forum and I was roasted pretty good for being too harsh. So now I always make sure everyone is in on the fun when I make jokes like that.
Thread Starter
Navy P-3 FE (Ret.)
Joined: Dec 2009
Posts: 759
From: Great Mills, MD
Video of my car.
Thread Starter
Navy P-3 FE (Ret.)
Joined: Dec 2009
Posts: 759
From: Great Mills, MD
Sub woofers for the trunk. Waiting on new rear window, old one didn't do well on the install. I think the trim is harder to put on than to take off. There's times when things aren't going well and you should stop trying.

Thread
Thread Starter
Forum
Replies
Last Post
techcote
General Discussion
1
Dec 25, 2012 01:37 PM


