General Discussion Discuss your Oldsmobile or other car-related topics.

To paint or polish Vin

Thread Tools
 
Search this Thread
 
Old March 16th, 2023, 07:54 PM
  #1  
Registered User
Thread Starter
 
Carsick's Avatar
 
Join Date: Oct 2014
Location: San Bernardino, CA
Posts: 338
To paint or polish Vin

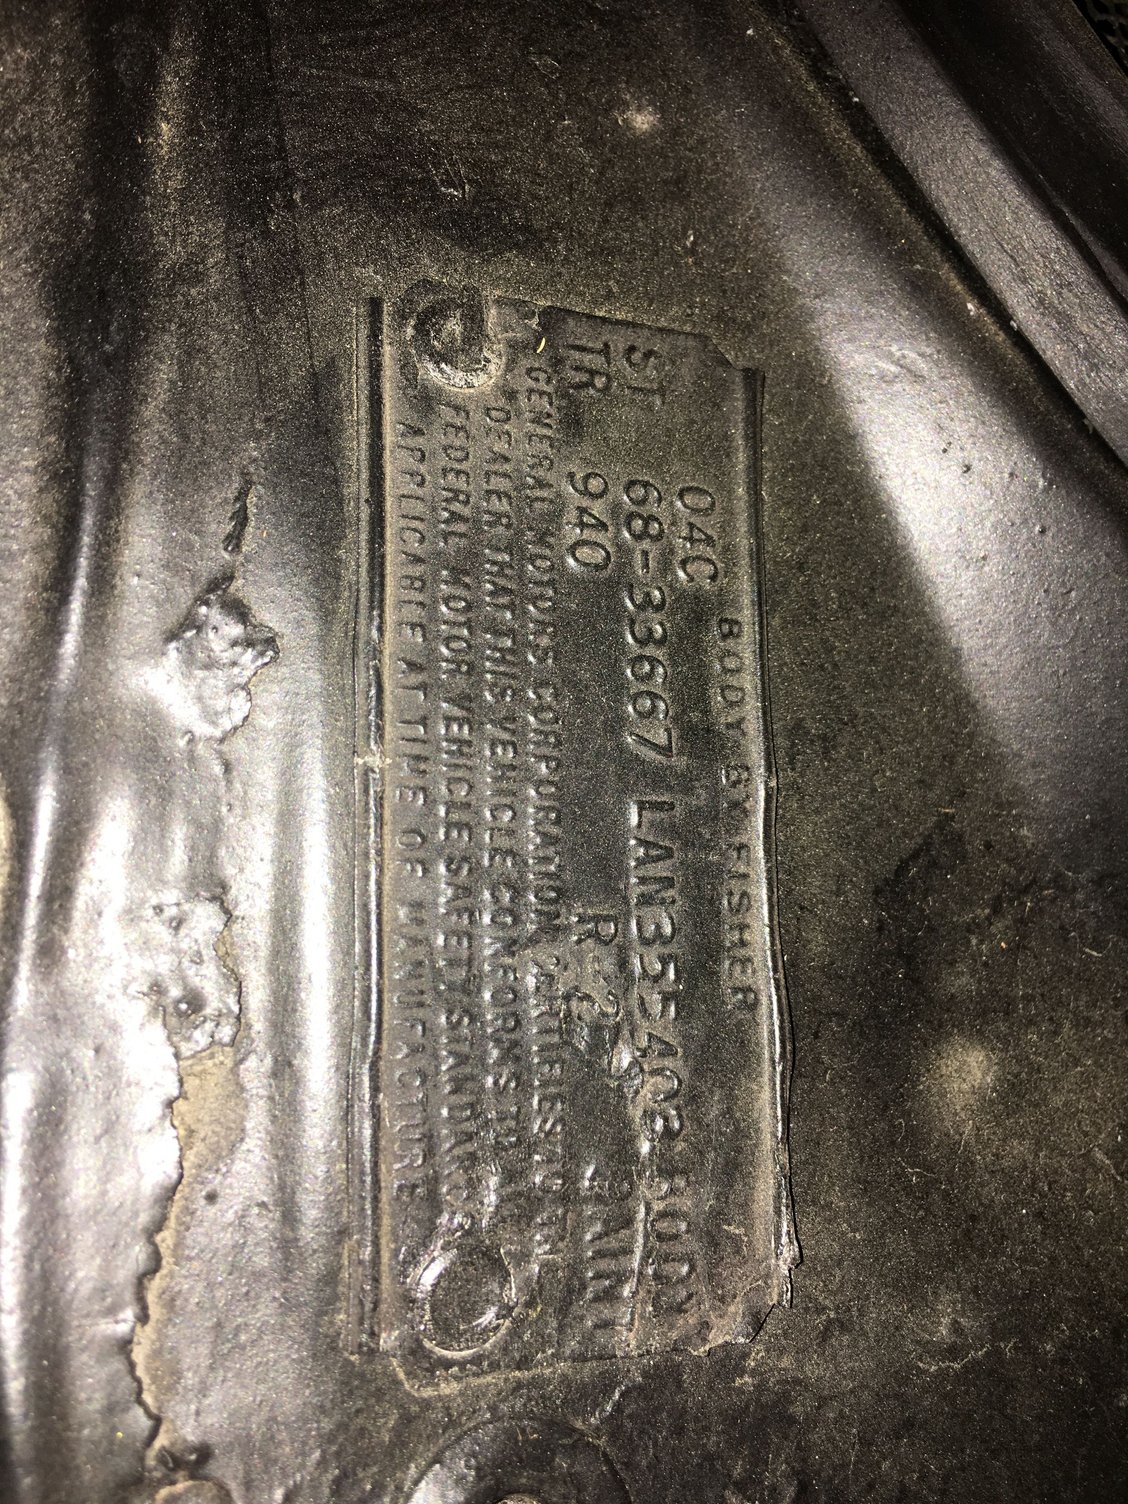
I'm going to be repainting the fire wall and am kinda lik

ing the idea of polishing it up. Thoughts...

Thanks
Carsick is offline  
Old March 16th, 2023, 08:46 PM
  #2  
Registered User
 
Koda's Avatar
 
Join Date: Aug 2013
Location: Evansville, IN
Posts: 10,944
That's not the vin. Don't beat it too hard or you'll hurt the font. Light sand, then paint the black of the rest of the firewall.
Koda is offline  
Old March 16th, 2023, 10:21 PM
  #3  
Registered User
Thread Starter
 
Carsick's Avatar
 
Join Date: Oct 2014
Location: San Bernardino, CA
Posts: 338
I used some paint thinner and some 400. So black like the firewall?
Carsick is offline  
Old March 16th, 2023, 10:30 PM
  #4  
Registered User
 
Koda's Avatar
 
Join Date: Aug 2013
Location: Evansville, IN
Posts: 10,944
Yes, it was riveted on, then glops of seam sealer were dabbed on the rivets, then it got painted with the firewall. Semi-gloss or satin black.
Koda is offline  
Old March 16th, 2023, 10:39 PM
  #5  
Registered User
Thread Starter
 
Carsick's Avatar
 
Join Date: Oct 2014
Location: San Bernardino, CA
Posts: 338
Yeah I think I'll go with the factory look minus the seam sealer...
Carsick is offline  
Old March 16th, 2023, 10:42 PM
  #6  
Registered User
 
Koda's Avatar
 
Join Date: Aug 2013
Location: Evansville, IN
Posts: 10,944
Put something there, it's a hole.
Koda is offline  
Old March 16th, 2023, 10:43 PM
  #7  
Registered User
Thread Starter
 
Carsick's Avatar
 
Join Date: Oct 2014
Location: San Bernardino, CA
Posts: 338
There are rivets where the holes would be though?

Last edited by Carsick; March 17th, 2023 at 07:51 AM.
Carsick is offline  
Old March 17th, 2023, 07:20 AM
  #8  
Registered User
 
oddball's Avatar
 
Join Date: Sep 2011
Location: Plano, TX
Posts: 1,899
It'll still leak. The problem is where that is can let water lead down to the inside of the firewall or between the panels. A relatively minor problem, especially if the car stays in the garage and only sees good weather.
oddball is offline  
Old March 17th, 2023, 08:34 AM
  #9  
Registered User
 
oldolds88's Avatar
 
Join Date: May 2012
Location: laingsburg mi
Posts: 1,462
the rivets center is pushed thru when being installed just put a dab of plumbers' putty, or divers' gum on it and smooth it over.
oldolds88 is offline  
Old March 17th, 2023, 09:55 AM
  #10  
Registered User
Thread Starter
 
Carsick's Avatar
 
Join Date: Oct 2014
Location: San Bernardino, CA
Posts: 338
Originally Posted by oldolds88
the rivets center is pushed thru when being installed just put a dab of plumbers' putty, or divers' gum on it and smooth it over.
will do....liquid nails should do it!
Carsick is offline  
Old March 17th, 2023, 09:58 AM
  #11  
Registered User
 
fleming442's Avatar
 
Join Date: Mar 2010
Location: Mt.Ary, MD
Posts: 3,087
Ummmm, there's a big hole with a screen over behind it. Don't the rivet holes go through to the cowl?
fleming442 is offline  
Old March 17th, 2023, 10:45 AM
  #12  
Old(s) Fart
 
joe_padavano's Avatar
 
Join Date: Mar 2007
Location: Northern VA
Posts: 48,229
Originally Posted by fleming442
Ummmm, there's a big hole with a screen over behind it. Don't the rivet holes go through to the cowl?
Yes. Water gets into the cowl under normal conditions. That's why there are drains at the bottom of the side panels. The cowl tag rivets have a dab of seam sealer from the factory not for water sealing but to prevent vibration.

And FYI, these are not normal rivets.


joe_padavano is online now  
Old March 17th, 2023, 10:52 AM
  #13  
Registered User
 
F-85 4-4-2's Avatar
 
Join Date: Jul 2009
Location: Hinckley, Ohio
Posts: 773
I'd think that the seam-sealer on the rivets is there to keep cowl rainwater from dribbling down the firewall. Joe, never thought vibration prevention.
Trim tags are stamped aluminum, I wouldn't touch 'em with any abrasive. Solvent wipe and spray.

Last edited by F-85 4-4-2; March 17th, 2023 at 01:13 PM.
F-85 4-4-2 is offline  
Old March 17th, 2023, 12:46 PM
  #14  
Running On Empty
 
Vintage Chief's Avatar
 
Join Date: Jul 2018
Location: Earth
Posts: 20,119
These guys have a custom tool (they say) if you're interested & totally retentive regarding what the back-side of the rivet should look like (who would care WTF the back-side looks like?). At any rate:

RIVET INSTALLATION INSTRUCTIONS

These instructions are for Trim Tag rivet installation only.

There are two methods to install the rivets:

1) The easiest way is to merely epoxy the rivets in place (do not use super glue). Put a small amount of epoxy around the barrel part of the rivet and push the rivet through the trim tag into the firewall/cowl. Let the epoxy set and the tag will look like it was installed at the factory. No one can see behind the firewall/cowl to see that the rivet was not crushed against the back. As an extra precaution I would suggest putting a dab of the epoxy on the back of the trim tag.

2) We now offer a custom made rivet installation tool for an additional $17.00 when you order a new trim tag. This tool will ensure that the rivets are installed in precisely the same way the factory installed them at the plant. The appearance of the rivet from both the front and the back will be factory correct. Also, note that most trim tag rivets had Black Sealer/ Body Filler (caulk) pushed into the hollow part of the rivet after installation

Click here for Rivet Ordering Instructions.
SOURCE: http://www.trimtags.com/rivet-instal...tructions.html
Vintage Chief is online now  
Old March 17th, 2023, 12:57 PM
  #15  
Registered User
 
allyolds68's Avatar
 
Join Date: Jul 2008
Location: Seneca Falls, NY
Posts: 5,288
Originally Posted by Vintage Chief
These guys have a custom tool (they say) if you're interested & totally retentive regarding what the back-side of the rivet should look like (who would care WTF the back-side looks like?). At any rate:


SOURCE: http://www.trimtags.com/rivet-instal...tructions.html
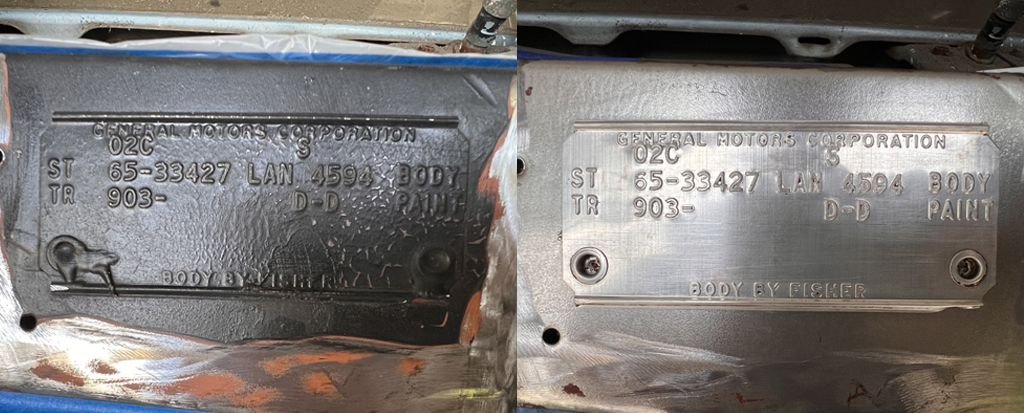
Or you can drill a small hole in the center of the rivet, install a small bolt through with a nut and washers on each end, drawing them tight to squish the rivet, remove nut bolt and washer, & dab a factory looking wad of caulk in the hole on the top of the rivet. (I'm not sure the back side of mine looks any different....lol)

Looks identical to factory:


Last edited by allyolds68; March 17th, 2023 at 01:00 PM.
allyolds68 is offline  
Old March 17th, 2023, 01:02 PM
  #16  
Running On Empty
 
Vintage Chief's Avatar
 
Join Date: Jul 2018
Location: Earth
Posts: 20,119
Mike - That looks nice (even oriented right-side up).


Vintage Chief is online now  
Old March 17th, 2023, 01:38 PM
  #17  
Old(s) Fart
 
joe_padavano's Avatar
 
Join Date: Mar 2007
Location: Northern VA
Posts: 48,229
Originally Posted by Vintage Chief
These guys have a custom tool (they say)
I actually have the tool. You can also use a punch. This isn't rocket science. You just have to push down on the dome part down inside the rivet, which expands the cylinder enough to lock it in place. This is not a highly-loaded application. The factory did this in seconds on the assembly line.
joe_padavano is online now  
Old March 17th, 2023, 01:50 PM
  #18  
Registered User
 
allyolds68's Avatar
 
Join Date: Jul 2008
Location: Seneca Falls, NY
Posts: 5,288
Originally Posted by joe_padavano
I actually have the tool. You can also use a punch. This isn't rocket science. You just have to push down on the dome part down inside the rivet, which expands the cylinder enough to lock it in place. This is not a highly-loaded application. The factory did this in seconds on the assembly line.
I didn’t even realize they were designed to be punched and expanded. I swear the rivets I bought didn’t look like the ones you posted above
allyolds68 is offline  
Old March 17th, 2023, 01:58 PM
  #19  
Registered User
 
Rallye469's Avatar
 
Join Date: Feb 2008
Location: Jacksonville, FL
Posts: 2,053
That's the one part I decided to go with chemicals.
Paint stripper worked amazingly well.


Rallye469 is online now  
Old March 17th, 2023, 01:58 PM
  #20  
Running On Empty
 
Vintage Chief's Avatar
 
Join Date: Jul 2018
Location: Earth
Posts: 20,119
Originally Posted by joe_padavano
I actually have the tool. You can also use a punch. This isn't rocket science. You just have to push down on the dome part down inside the rivet, which expands the cylinder enough to lock it in place. This is not a highly-loaded application. The factory did this in seconds on the assembly line.
Pardon me; but, if you own the tool - I'd consider it rocket science.


Vintage Chief is online now  
Old March 17th, 2023, 02:00 PM
  #21  
Registered User
 
F-85 4-4-2's Avatar
 
Join Date: Jul 2009
Location: Hinckley, Ohio
Posts: 773
Originally Posted by allyolds68
...drawing them tight to squish the rivet...
Squish is close. I think they're actually called crush rivets.
F-85 4-4-2 is offline  
Old March 17th, 2023, 02:05 PM
  #22  
Old(s) Fart
 
joe_padavano's Avatar
 
Join Date: Mar 2007
Location: Northern VA
Posts: 48,229
Originally Posted by allyolds68
I didn’t even realize they were designed to be punched and expanded. I swear the rivets I bought didn’t look like the ones you posted above
joe_padavano is online now  
Old March 17th, 2023, 02:55 PM
  #23  
Registered User
Thread Starter
 
Carsick's Avatar
 
Join Date: Oct 2014
Location: San Bernardino, CA
Posts: 338

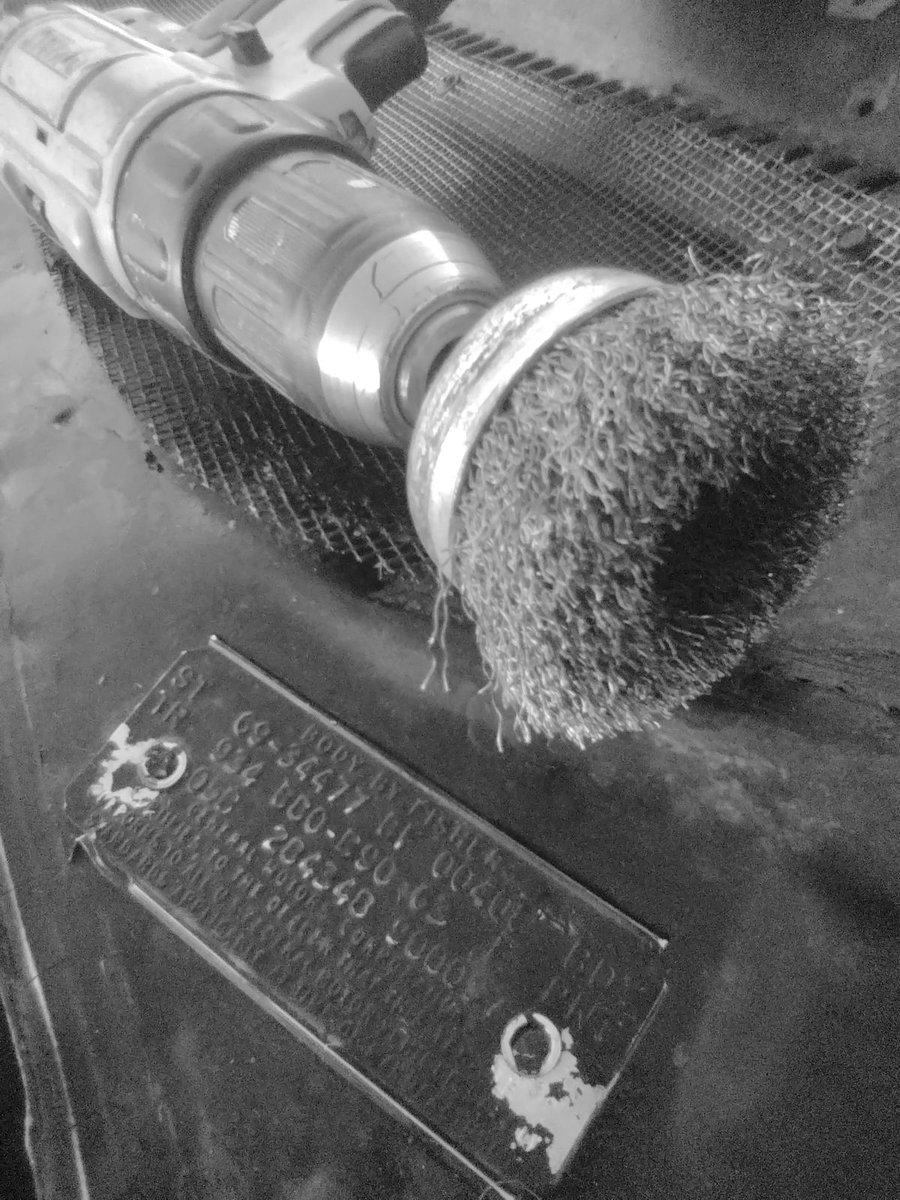
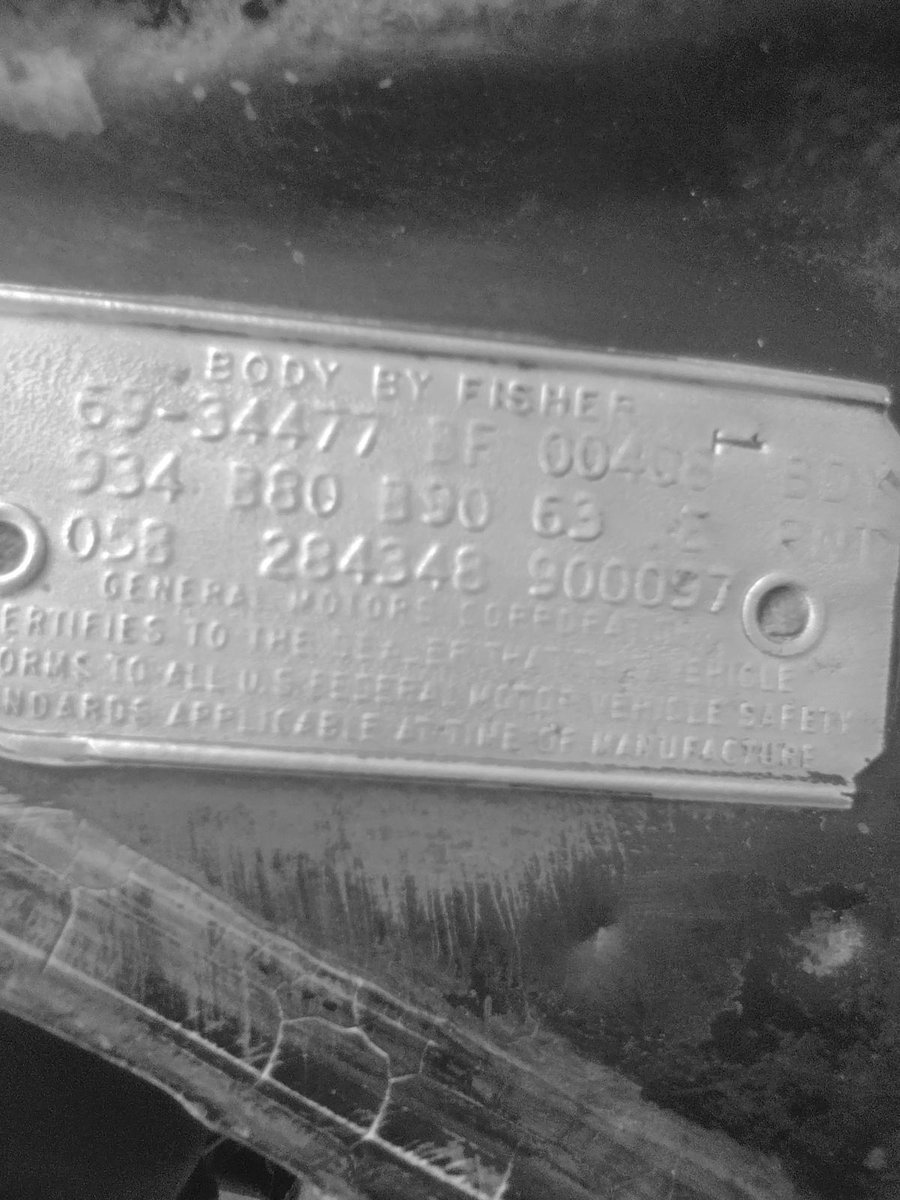
Well 'someon' got a little trigger happy with the wire brush....ill take pics after I clean it up with some thinner.

Is the "1" factory?
​​​​​
Carsick is offline  
Old March 17th, 2023, 03:45 PM
  #24  
Running On Empty
 
Vintage Chief's Avatar
 
Join Date: Jul 2018
Location: Earth
Posts: 20,119
Originally Posted by Carsick
Is the "1" factory?​​​​​
You're scaring me. What "1" are you talking about?
Vintage Chief is online now  
Old March 17th, 2023, 03:47 PM
  #25  
Running On Empty
 
Vintage Chief's Avatar
 
Join Date: Jul 2018
Location: Earth
Posts: 20,119
Oh I see it now...the sideways "1".

Don't know.
Vintage Chief is online now  
Old March 17th, 2023, 06:38 PM
  #26  
Registered User
 
FStanley's Avatar
 
Join Date: Oct 2015
Posts: 539
Originally Posted by Rallye469
That's the one part I decided to go with chemicals.
Paint stripper worked amazingly well.

I second the stripper worked well if you use the wire brush you will destroy the tag its just a flimshy Aluminum? plate..
FStanley is offline  
Old March 17th, 2023, 07:51 PM
  #27  
Registered User
 
Koda's Avatar
 
Join Date: Aug 2013
Location: Evansville, IN
Posts: 10,944
Originally Posted by Carsick

Well 'someon' got a little trigger happy with the wire brush....ill take pics after I clean it up with some thinner.

Is the "1" factory?
​​​​​
Yes that's why we said not to do that....
Koda is offline  
Old March 17th, 2023, 08:40 PM
  #28  
Registered User
Thread Starter
 
Carsick's Avatar
 
Join Date: Oct 2014
Location: San Bernardino, CA
Posts: 338
Originally Posted by F-85 4-4-2
I'd think that the seam-sealer on the rivets is there to keep cowl rainwater from dribbling down the firewall. Joe, never thought vibration prevention.
Trim tags are stamped aluminum, I wouldn't touch 'em with any abrasive. Solvent wipe and spray.
I defiantly learned my lesson, I mean that guy probably did.
Carsick is offline  
Old March 19th, 2023, 04:47 AM
  #29  
Registered User
 
oldolds88's Avatar
 
Join Date: May 2012
Location: laingsburg mi
Posts: 1,462
the only tool we used at the factorywas a scratch awl with the end shorted,rounded and polished,put it on rivet,smack with palm of hand
oldolds88 is offline  
Old March 19th, 2023, 06:30 AM
  #30  
Registered User
 
fleming442's Avatar
 
Join Date: Mar 2010
Location: Mt.Ary, MD
Posts: 3,087
Originally Posted by oldolds88
the only tool we used at the factorywas a scratch awl with the end shorted,rounded and polished,put it on rivet,smack with palm of hand
....and there you have it.
fleming442 is offline  
Old March 19th, 2023, 12:54 PM
  #31  
Rocket Renegade!
 
BangScreech4-4-2's Avatar
 
Join Date: Dec 2014
Location: Vancouver Island
Posts: 4,837
Curious about the sideways '1' though. Anybody know?
BangScreech4-4-2 is online now  
Old March 19th, 2023, 06:20 PM
  #32  
Oldsdruid
 
rocketraider's Avatar
 
Join Date: Dec 2007
Location: Southside Vajenya
Posts: 10,531
It's a Fremont plate. Who knows?
rocketraider is online now  
Old March 20th, 2023, 04:36 AM
  #33  
Registered User
Thread Starter
 
Carsick's Avatar
 
Join Date: Oct 2014
Location: San Bernardino, CA
Posts: 338
Yup me too...
Originally Posted by BangScreech4-4-2
Curious about the sideways '1' though. Anybody know?
Carsick is offline  
Related Topics
Thread
Thread Starter
Forum
Replies
Last Post
Dave26
General Discussion
6
July 3rd, 2017 03:49 PM
mike623
General Discussion
0
April 2nd, 2011 06:58 PM
kimberlies7
The Newbie Forum
14
August 30th, 2009 12:35 PM
jonstringer
Chassis/Body/Frame
2
May 19th, 2008 06:13 PM


Quick Reply: To paint or polish Vin


All times are GMT -7. The time now is 05:24 PM.