
Making a new gauge cluster/panel


Thread Starter
Registered User
Joined: Aug 2011
Posts: 388
From: Crosby, TX
Making a new gauge cluster/panel
I've long wanted to do something different with the dash in my '72 Cutlass Supreme convertible. The woodgrain insert died a long time ago, and we painted the panel flat-black - but never liked it. Bought another woodgrain overlay, but just didn't like it either.
I've had this idea for a long time, and finally pulled the trigger.
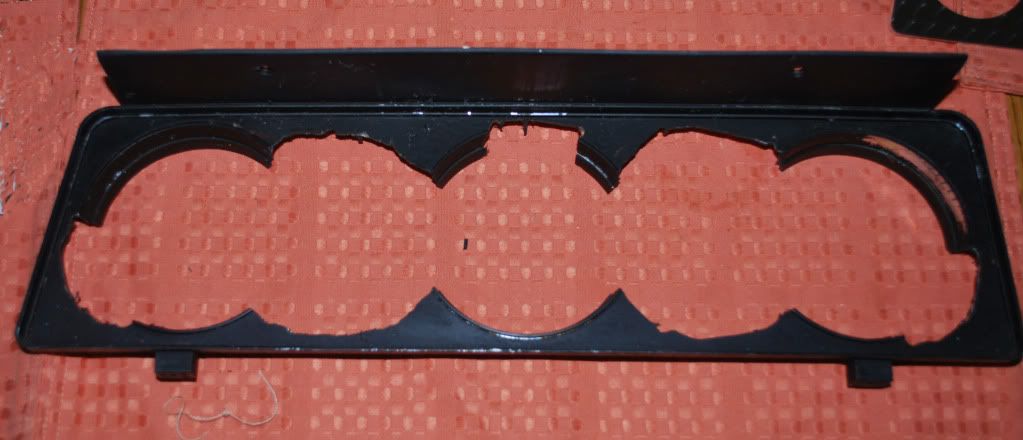
Here is the dash with the gauges removed
DSC_0001z.jpg
And here it is with an engine-turned stainless steel overlay, with cut outs for the new gauges
DSC_0002z.jpg
I had to remove some material for the new gauges to fit in the new locations, but the Dremel made pretty quick work of this part of the project
DSC_0003z.jpg
I still need to install the indicator/warning/CEL lights, and a few other touches, but here is the initial mock-up.
DSC_0012z.jpg
Another view in different lighting
DSC_0006z.jpg
Gauges are from New Vintage.
Thanks,
Lee
I've had this idea for a long time, and finally pulled the trigger.
Here is the dash with the gauges removed
DSC_0001z.jpg
And here it is with an engine-turned stainless steel overlay, with cut outs for the new gauges
DSC_0002z.jpg
I had to remove some material for the new gauges to fit in the new locations, but the Dremel made pretty quick work of this part of the project
DSC_0003z.jpg
I still need to install the indicator/warning/CEL lights, and a few other touches, but here is the initial mock-up.
DSC_0012z.jpg
Another view in different lighting
DSC_0006z.jpg
Gauges are from New Vintage.
Thanks,
Lee
Just an Olds Guy
Joined: Jul 2008
Posts: 24,528
From: Edmonton, AB. And "I am Can 'eh' jun - eh"
I've long wanted to do something different with the dash in my '72 Cutlass Supreme convertible. The woodgrain insert died a long time ago, and we painted the panel flat-black - but never liked it. Bought another woodgrain overlay, but just didn't like it either.
I've had this idea for a long time, and finally pulled the trigger.
Here is the dash with the gauges removed
And here it is with an engine-turned stainless steel overlay, with cut outs for the new gauges
I had to remove some material for the new gauges to fit in the new locations, but the Dremel made pretty quick work of this part of the project
I still need to install the indicator/warning/CEL lights, and a few other touches, but here is the initial mock-up.
Another view in different lighting

Gauges are from New Vintage.
Thanks,
Lee
I've had this idea for a long time, and finally pulled the trigger.
Here is the dash with the gauges removed
And here it is with an engine-turned stainless steel overlay, with cut outs for the new gauges
I had to remove some material for the new gauges to fit in the new locations, but the Dremel made pretty quick work of this part of the project
I still need to install the indicator/warning/CEL lights, and a few other touches, but here is the initial mock-up.
Another view in different lighting
Gauges are from New Vintage.
Thanks,
Lee
Thread Starter
Registered User
Joined: Aug 2011
Posts: 388
From: Crosby, TX
Thanks Allan 
I grew up with 70's Trans Ams. I had one, my dad had two, my closest cousin and best friend each had one, several other friends had several more.... Then later on I saw old Auburns and Deusenbergs with similar dashes, and just WANTED one too!
The blinker indicators will go in the upper right and left holes. Below the gas gauge will be high-beam and "check engine" lights. Also, a few other small holes will be drilled. The speedo is programmable, so I need a hole to mount a small momentary switch - that will work as a trip odometer select/reset button as well.
The oil and water gauges also have a programmable feature, which will require momentary switches for each of them (I CAN hide these switches, have not decided yet). These switches allow me to program in a "low" warning for the oil pressure, with an internal amber light that will flash if the pressure drops below whatever setting I select. Same for a high-temp on the water temp gauge.
The stainless probably is stout enough to handle the gauges. But, the company that made the panel for me wanted to make sure, so they included a matching aluminum backer panel. The mounting devices for the gauges hold it all together to an extent, but I'll probably use some Liquid Nails or weatherstrip adhesive to make SURE it all stays together.
Lee

Registered User
Joined: Nov 2010
Posts: 601
You're headed in the right direction with the gauges, but think some medium charcoal grey carbon fiber material would really do it. Bought an interior CF kit for my daily 08� Pontiac G6 GXP, and somehow just looks right.
Just an Olds Guy
Joined: Jul 2008
Posts: 24,528
From: Edmonton, AB. And "I am Can 'eh' jun - eh"
Lee,
Sturdy dash all right. Now you have to do all the areas that are simulated woodgrain to finish the effect! Looks really nice. Can't wait to see it finished and installed.
Sturdy dash all right. Now you have to do all the areas that are simulated woodgrain to finish the effect! Looks really nice. Can't wait to see it finished and installed.
Thread Starter
Registered User
Joined: Aug 2011
Posts: 388
From: Crosby, TX
CF is great for newer cars, and some updated older cars. But my car is too old/retro. The engine-turned panel looks stunning in person, catching and throwing light in all sorts of cool ways

Registered User
Joined: May 2009
Posts: 2,212
From: USA
AWESOME!!!! Subscribed......
I'm going to be changing mine out to a new gauge cluster soon myself!!!
Few questions for you. (found these guys)
#1. Where did you source the engine turned stainless from??
#2. How did you cut the shape out so smoothly and the holes ??
#3. Are the gauges offered in electrical versions or mechanical only ??
okay......you just turned me over to New Vintage, I didn't know they were LED thru the gauge lit.
These are 1/2 the cost of what the Autometer Ultra-Lite II's were going to cost me.
I just emailed them to confirm if these will work with my LSX install.
Last edited by Aceshigh; Oct 21, 2011 at 04:09 AM.
Thread Starter
Registered User
Joined: Aug 2011
Posts: 388
From: Crosby, TX
Good morning Gents!
O.K, the panel was turned, trimmed, and holed by Haneline USA.
http://www.haneline.com/
I removed my stock gauges, make a paper template inlay, made full-scale cardboard cutouts of the gauges, and then sat in the car and located the gauge templates where I wanted them, then solidly taped them into place once I was satisfied.
I then shipped the template and the dash piece to Haneline. They took what I sent, digitized it (made the gauges a bit more balanced and properly spaced) then cut the whole thing out with a waterjet. Very smooth and flat, no burrs or other blemishes.
I was, at first, just going to get the engine turned panel from them. For the size I needed, it would have been about $125 + shipping. I talked with "Tasha" and she asked what I was planning on doing with the piece, then asked how proposed to cut/trim the piece - then suggested that THEY do that part for me.
All together, with shipping, I paid $226.87. And there is NO WAY I could have cut it as precise and tight as they did! They probably have the pattern saved, so I imagine they can turn around the next one pretty quick.
Oh, Haneline and New Vintage work together pretty often, and you can probably work with one of them and get the gauges and panel as a package. If you want standard gauges, I'd probably go through Haneline. But if you want custom gauges, it would probably be best to work directly with Mark at New Vintage.
Lee
Last edited by Lee_A; Oct 21, 2011 at 04:30 AM.

Thread
Thread Starter
Forum
Replies
Last Post


