
Got the beattch out!!!!

Thread Starter
Registered User
Joined: Feb 2012
Posts: 537
From: Alberta
Got the beattch out!!!!
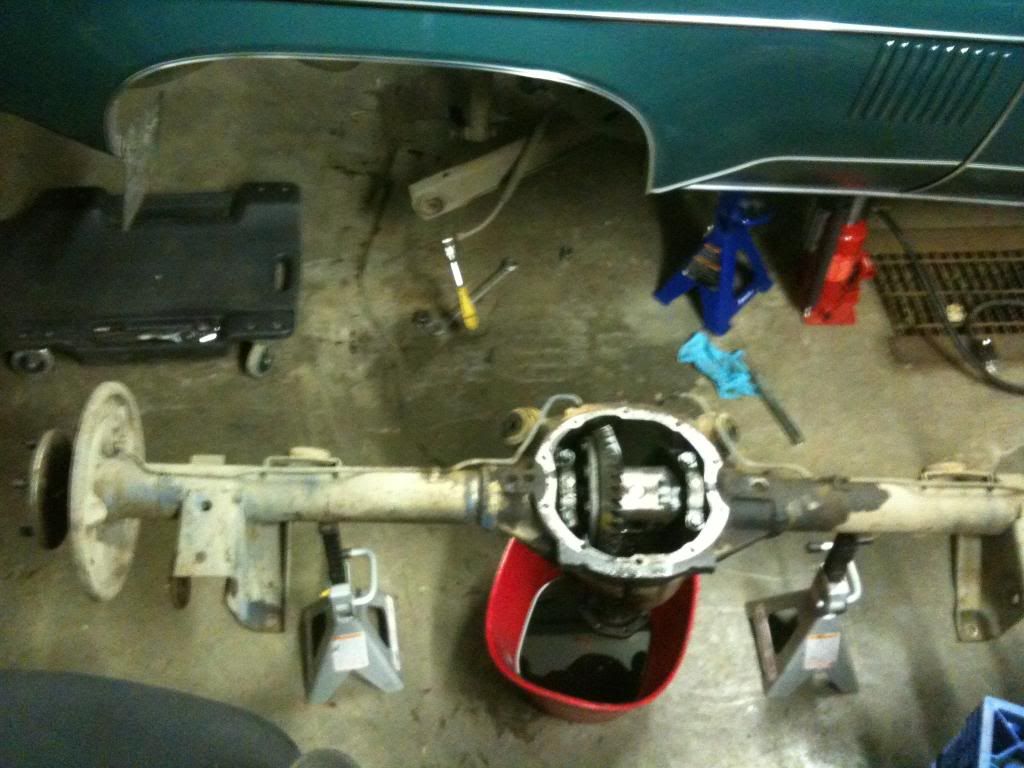
Took my time removing my rear diff to work on and for the most part it was a easy task until I got to the emerg brake cables!!!
After about a 1/2 hour at the first one trying to get those little things through that little hole......which there is probably a special tool for this I used a small hose clampto compress the clip and it worked like a charm!!!
image_zpsac802c5d.jpg
After about a 1/2 hour at the first one trying to get those little things through that little hole......which there is probably a special tool for this I used a small hose clampto compress the clip and it worked like a charm!!!
image_zpsac802c5d.jpg
Hookers under Hood
Joined: Nov 2013
Posts: 3,543
From: Ontario, Canada
Took my time removing my rear diff to work on and for the most part it was a easy task until I got to the emerg brake cables!!!
After about a 1/2 hour at the first one trying to get those little things through that little hole......which there is probably a special tool for this I used a small hose clampto compress the clip and it worked like a charm!!!
After about a 1/2 hour at the first one trying to get those little things through that little hole......which there is probably a special tool for this I used a small hose clampto compress the clip and it worked like a charm!!!

I like this thread I hope you keep us posted scooter!!! Did you get your parts yet?
 Mine are still in the box till spring.

Registered User
Joined: Dec 2011
Posts: 7,286
Great trick, the hose clamp thing
I bought the proper tool yrs ago when it showed up for cheap at the buy-n-sell store. It looks about like this
http://www.ebay.com/itm/Precedent-Br...f35cc8&vxp=mtr
I bought the proper tool yrs ago when it showed up for cheap at the buy-n-sell store. It looks about like this
http://www.ebay.com/itm/Precedent-Br...f35cc8&vxp=mtr

Just an Olds Guy
Joined: Jul 2008
Posts: 24,528
From: Edmonton, AB. And "I am Can 'eh' jun - eh"
For 36.00, the hose clamp is much cheaper and just as fast. Roger - did you get that PM I sent you about this a couple weeks ago? You've taken on a big project my friend.
When you take off the backing plates and brake lines/wheel cylinders are you planning to have the diff cover and axle tubes bead blasted or will you clean them up yourself? After I did mine I found a shop (Jeep Outfitters) that offered that service at a reasonable price. Check Red Deer for something like that. It will be a better and faster clean up.
What did you do with the center brake hose? If you clamped it you will likely need a new one. I got a good quality replacement for my car at NAPA. Only issue was getting the dang thing installed. Hope your brake line fittings are not too corroded.
Connoisseur d'Junque
Joined: Sep 2010
Posts: 21,183
From: The Hudson Valley

Just an Olds Guy
Joined: Jul 2008
Posts: 24,528
From: Edmonton, AB. And "I am Can 'eh' jun - eh"
Good luck with that. If you find more than 1 LMK. Naaww, it'll cost more to ship here than it's worth. I'll stick with the hose clamps
Like you, I was surprised when Chris posted a pic of that thing. Betcha if you know an old mechanic who's selling his business you might find some interesting tools laying about.
Like you, I was surprised when Chris posted a pic of that thing. Betcha if you know an old mechanic who's selling his business you might find some interesting tools laying about.
Connoisseur d'Junque
Joined: Sep 2010
Posts: 21,183
From: The Hudson Valley
What I look for is the garage of a recently departed old mechanic whose wife or kids is selling his stuff, in preparation for selling the house.
Milk crates full of tools, usually 50� or a buck a piece.
- Eric
Thread Starter
Registered User
Joined: Feb 2012
Posts: 537
From: Alberta
For 36.00, the hose clamp is much cheaper and just as fast. Roger - did you get that PM I sent you about this a couple weeks ago? You've taken on a big project my friend.
When you take off the backing plates and brake lines/wheel cylinders are you planning to have the diff cover and axle tubes bead blasted or will you clean them up yourself? After I did mine I found a shop (Jeep Outfitters) that offered that service at a reasonable price. Check Red Deer for something like that. It will be a better and faster clean up.
What did you do with the center brake hose? If you clamped it you will likely need a new one. I got a good quality replacement for my car at NAPA. Only issue was getting the dang thing installed. Hope your brake line fittings are not too corroded.
When you take off the backing plates and brake lines/wheel cylinders are you planning to have the diff cover and axle tubes bead blasted or will you clean them up yourself? After I did mine I found a shop (Jeep Outfitters) that offered that service at a reasonable price. Check Red Deer for something like that. It will be a better and faster clean up.
What did you do with the center brake hose? If you clamped it you will likely need a new one. I got a good quality replacement for my car at NAPA. Only issue was getting the dang thing installed. Hope your brake line fittings are not too corroded.
As for the cleaning of the axel, just going to give it a little cleaning... Maybe some paint!! Also Al when I went to remove the brake lines the came off with ease ... No corrosion. I hope to be ordering my new parts in a few weeks!!
Just an Olds Guy
Joined: Jul 2008
Posts: 24,528
From: Edmonton, AB. And "I am Can 'eh' jun - eh"
That's all good news.
When you hook the center brake hose up again, you can gravity bleed the rears, but I'd still do all 4 corners. The brake lines from the T on the brake hose weren't the ones that will give the trouble - for me it was the brake hose to main line connection. If the center brake hose is in good shape it's probably ok to re-use.
Just a suggestion since you've to the axle out. You should really do the control arm bushings at the same time. They're close to 43 years old and due for replacement. The ones in the housing ears are fun to install....
Thread Starter
Registered User
Joined: Feb 2012
Posts: 537
From: Alberta
Removed the bushings tonight from the rear diff......what a pain to remove
I made my own press out tool using some 1/2 threaded rod and some pipe but they would only go so far.....so I drilled all around the rubber and removed the rubber and then used a hammer and punch!!
image_zps639b0ecc.jpg
I made my own press out tool using some 1/2 threaded rod and some pipe but they would only go so far.....so I drilled all around the rubber and removed the rubber and then used a hammer and punch!!
image_zps639b0ecc.jpg
Registered User
Joined: Jul 2013
Posts: 1,815
From: Mo-Ray-Al, K-Bec.
I'm thinking that would take about 12 seconds to make from a short section of tube and a chicom dollar store screwdriver with a little input from the welder.
Just an Olds Guy
Joined: Jul 2008
Posts: 24,528
From: Edmonton, AB. And "I am Can 'eh' jun - eh"
Removed the bushings tonight from the rear diff......what a pain to remove
I made my own press out tool using some 1/2 threaded rod and some pipe but they would only go so far.....so I drilled all around the rubber and removed the rubber and then used a hammer and punch!![/URL]
I made my own press out tool using some 1/2 threaded rod and some pipe but they would only go so far.....so I drilled all around the rubber and removed the rubber and then used a hammer and punch!![/URL]
72 Olds CS
Joined: Jun 2011
Posts: 6,657
another (cheaper) variant of the cable removal tool this one has 2 sizes i have this one and its pretty sturdy
Thread Starter
Registered User
Joined: Feb 2012
Posts: 537
From: Alberta
So I got a question about my rear axles.....I Will be replacing the bearings and seals so my question is do most guys just cut the old bearings and the bearing retainer ring off and just buy the new retainer ring...if that's what its called??
And the seals go on the shaft before the bearing...is there any special way to install it once its all together....or just push it into place??
I got a mail card today so I think some of my parts from Monza are here
And the seals go on the shaft before the bearing...is there any special way to install it once its all together....or just push it into place??
I got a mail card today so I think some of my parts from Monza are here
Just an Olds Guy
Joined: Jul 2008
Posts: 24,528
From: Edmonton, AB. And "I am Can 'eh' jun - eh"
Roger,
Yes you can cut the old oil seal and bearings off yourself but you really need to be careful. Here's a DIY that shows how to
.
To install the seal and bearing you really need a press. Take it to a local shop and have it done. Measure the location of the bearing and oil seal before you remove them. Pic works really well too.
Yes you can cut the old oil seal and bearings off yourself but you really need to be careful. Here's a DIY that shows how to
To install the seal and bearing you really need a press. Take it to a local shop and have it done. Measure the location of the bearing and oil seal before you remove them. Pic works really well too.
Registered User
Joined: Feb 2013
Posts: 15,394
From: Phoenix, AZ
The new bearings will come with new retainers. They look different than the originals (if that's what you currently have) so don't be alarmed when you see them.
There are various ways to get the bearing and retainer off. Last time I laid the shaft on a metal plate so the bearing was supported, then smacked the bearing with a BFH to crack the outer race. I then used a Dremel to cut the retainer and inner race almost all the way down one side, then used a hammer and chisel to crack them the rest of the way. Once split, they expand and slips right off the shaft.
Once those two are off, the seal and axle retaining flange will slide right off.
Warning! Be careful not to score the shaft during this operation!
Thread Starter
Registered User
Joined: Feb 2012
Posts: 537
From: Alberta
Just an Olds Guy
Joined: Jul 2008
Posts: 24,528
From: Edmonton, AB. And "I am Can 'eh' jun - eh"
Nice work Roger, they look good. While you've got it at this stage it's a great time to slide off the retainer plates, clean and paint them. If your wheel studs are good clean up around them. If you want to replace, they're cheap at NAPA so you can just bang them out with a BFH and have a nice smooth surface to work with on the cleanup.
You might also want to buy some new Backing Plate to Axle Seals
Pn# - INL10312a - 2pc $5.00 Set
1964-79 GM For all 9 1/2" rear drum brake cars
You might also want to buy some new Backing Plate to Axle Seals
Pn# - INL10312a - 2pc $5.00 Set
1964-79 GM For all 9 1/2" rear drum brake cars
Hookers under Hood
Joined: Nov 2013
Posts: 3,543
From: Ontario, Canada
Congrats on your new baby Roger, That takes precedence over any car stuff. Awesome job I am getting more confident as you go here lol . Did Jim take good care of you on the parts? I know I already mentioned that I got my bearings from him as well, I think he called them a9 bearings. I hope everything goes back together ok . I have an extra mag base and a decent indicator if you need one (Mitutoyo mag base with all adapters/ Interapid indicator) If you need it let me know just pay the shipping it yours. Enjoy the new baby!!!
Eric
Eric
 have to wait till monday
Thread Starter
Registered User
Joined: Feb 2012
Posts: 537
From: Alberta
Just an Olds Guy
Joined: Jul 2008
Posts: 24,528
From: Edmonton, AB. And "I am Can 'eh' jun - eh"
Looks nice Roger. Pretty heavy isn't it? Interesting the way you suspended it for painting. Make sure you get out any paint that went into the bushing ears or you'll have a bigger beeatch of a time getting bushings pressed in.
Thread Starter
Registered User
Joined: Feb 2012
Posts: 537
From: Alberta
No worries Al...I taped the inside of the bushing holes!!
Quick question for ya on brake lines...I removed the old ones and will replace with new and I measured the old ones with string and was getting about 34 inches
Can I just buy two with the fittings in each end and bend it the same as the old lines??
Or will I have to cut and flare the new lines??
Quick question for ya on brake lines...I removed the old ones and will replace with new and I measured the old ones with string and was getting about 34 inches
Can I just buy two with the fittings in each end and bend it the same as the old lines??
Or will I have to cut and flare the new lines??
Registered User
Joined: May 2013
Posts: 221
From: Newtown CT

my nads were broken until . . .

I discovered that the car being up on a jack and the rear hanging down
was a bad thing. After jacking the rear up, the cable now was at a nice horizontal angle where before it was slightly up hill. It popped out first try.

George
Thread Starter
Registered User
Joined: Feb 2012
Posts: 537
From: Alberta
a few parts came today...new ring and pinion and shims....more to come!!
Cant wait to get at this
image_zps95afd5df.jpg
Cant wait to get at this
image_zps95afd5df.jpg
Just an Olds Guy
Joined: Jul 2008
Posts: 24,528
From: Edmonton, AB. And "I am Can 'eh' jun - eh"
Like a kid in the candy store! Looks good. Glad to see you have everything labled on the bench. Sometimes folks forget stuff like that. Take your time and do it right. Have you bought your dial caliper for doing the preload and backlash?
Thread Starter
Registered User
Joined: Feb 2012
Posts: 537
From: Alberta
Had one for years Al....for when I re-spoke a few motorcycle wheels....I also did a 9 month machinist diploma back in the day...so im no stranger to a dial indicator.
I will take my time at this, get ready for pics of different patterns
I will take my time at this, get ready for pics of different patterns
Thread Starter
Registered User
Joined: Feb 2012
Posts: 537
From: Alberta
Hi guys today I got the carrier and all the other parts t go with it!
So I begin de burring the carrier and the ring gear and clean it up and the I bolted the ring gear to the carrier using the Loctite and all went well!!
Then as I was going to start on fitting the carrier and pinion I ran into a problem.....the old and new bearing that goes on the pinion just behind the seal will not fit over the new pinion.....seems the shaft is just a little too big!!
Both the old and new bearing fit my old pinion like a glove!!
It does start but binds up just at the bottom of the spline.......Keep in mind this is my first try at this.........so what should be done....polish with emery cloth???
Any thoughts.....will have to take this bearing on and off a few times and then some to get the right pattern so I want to make this as easy as possible....
So I begin de burring the carrier and the ring gear and clean it up and the I bolted the ring gear to the carrier using the Loctite and all went well!!
Then as I was going to start on fitting the carrier and pinion I ran into a problem.....the old and new bearing that goes on the pinion just behind the seal will not fit over the new pinion.....seems the shaft is just a little too big!!
Both the old and new bearing fit my old pinion like a glove!!
It does start but binds up just at the bottom of the spline.......Keep in mind this is my first try at this
.........so what should be done....polish with emery cloth???Any thoughts.....will have to take this bearing on and off a few times and then some to get the right pattern so I want to make this as easy as possible....
Registered User
Joined: Jul 2006
Posts: 1,826
From: Richfield, Oh
Bearings
ALL pinion bearings are a PRESS FIT. They do not slide on and off unless you hone them out for set-up purposes. If your old bearings popped on and off with NO press they were in bad shape and probably spinning on the old pinion shaft... This does happen.
On final assembly, getting the pinion to go through the outer pinion bearing can be a trick. If you can get it through enough to get the yoke on and the pinion nut started with a few threads WITH OUT THE WASHER do it and pull the yoke on enough so you can get the washer on after removing the nut again and reinstalling the washer then you can go all the way to the point where you are starting to crush the pinion crush sleeve. Good luck. Jim
On final assembly, getting the pinion to go through the outer pinion bearing can be a trick. If you can get it through enough to get the yoke on and the pinion nut started with a few threads WITH OUT THE WASHER do it and pull the yoke on enough so you can get the washer on after removing the nut again and reinstalling the washer then you can go all the way to the point where you are starting to crush the pinion crush sleeve. Good luck. Jim
Thread Starter
Registered User
Joined: Feb 2012
Posts: 537
From: Alberta
So tonight as my first attempt with me new carrier....I have .007 backlash and I think the pattern looks pretty good.....BUT WHAT DO I KNOW...lol
I have about 1/8 clearance to the root.....hard to see in the video
I have about 1/8 clearance to the root.....hard to see in the video
Just an Olds Guy
Joined: Jul 2008
Posts: 24,528
From: Edmonton, AB. And "I am Can 'eh' jun - eh"
Roger, it looks like it needs adjustment - the mesh looks like it's too high on coast and drive sides. Drive side (when throttle applied) is the vertical part of the gear and the concave side is the Coast (as in coasting - no gas). I had my carrier and gears done for me, and here's what it looks like with .10 pinion shim on used 3.42:1 gears.
This link has some diagrams that may be useful. I'd also suggest you give Jim a call and ask him for expert advice.
Here's how my 3.42's came out
This link has some diagrams that may be useful. I'd also suggest you give Jim a call and ask him for expert advice.
Here's how my 3.42's came out


