When you click on links to various merchants on this site and make a purchase, this can result in this site earning a commission. Affiliate programs and affiliations include, but are not limited to, the eBay Partner Network.
I am still dry-fitting things. I'm unable to make an A6 bracketry example bolt up to the 455. I don't know what I'm doing wrong and would appreciate learning.
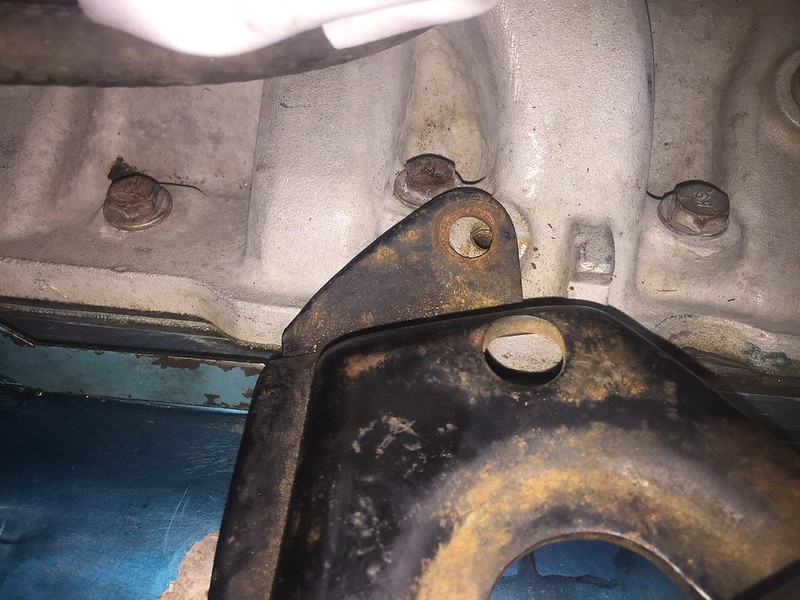
This spare A6 compressor setup came from a 76 Cutlass (possibly a 260, can't recall). I did not start to disassemble the brackets or employ any "persuasion" as I had thought that one A6 bracket should "just fit" just like any other...so I just took the compressor out and tried to fit the bracket to the engine as shown.
I've got two bolts through the "down low, front" part of the bracket and snugged down to the front of the passenger's side head. As shown the bracket does not line up with the "intake manifold bolt hole" - its Super Close, but Not.
Also, the bracket does not bottom out on the "tall head bolt stud" as shown (I removed a plug wire to get the camera in there for the picture). Is there supposed to be a spacer or something on the bolt to make up the difference?
Not sure if the brackets are the same, but you have to leave all attaching bolts loose till all are in. The one picture of the space between bracket and head bolt appears normal, once you tighten it down it will pull tight. Most of the early BB and SB brackets had two sets of holes for difference in deck height. Consult a manual for the year of engine to see if you have the correct brackets.
The Performer I put on my 72 455 442 had a ac compressor bracket mounting hole that was not located right similar to the picture in your post. And that was 20 years ago! I would have thought it was fixed by now. I understand its universal. You have to elongate the hole in the bracket.
First, all Olds A6 brackets are NOT created equal. There are differences from year-to-year and even from model-to-model (in 1967, for example, the B/C-body cars used different brackets than did the A-body cars).
Second, your problem is obvious from this photo.
The notch in the intake is not large enough to clear the tab on the bracket. Grind the tab to fit. This will allow it to sit all the way down on the head bolt stud. Problem solved.
Thank you for the feedback, I appreciate it. My Performer intake is easily 20 years old so if there were a manufacturing defect this one would have it too. I'm unsure about grinding the bracket or wallowing out the hole because:
I don't think this is the correct part. It seems to be "too small". I separated the back half of the bracket from the front half and the "adjuster ring" (in an attempt to fit the manifold bolt and the head stud) and made a new album:
The first three photos show the intake bolt installed, and how the lower hole doesn't come anywhere close to fitting over the head stud when the intake manifold bolt is installed.
Photos 4 thru 8 show the lower hole fit over the head stud, and how that results in the mismatch on the intake manifold bolt. ALSO shown is how the lower part of the bracket is NEVER going to shoulder up to the head stud nut, as it hits the lower rail of the valve cover first.
This is a typical 396021 455 block with C heads.
Re: "consult a manual for the year of engine" - the final two photos are from the 1970 CSM, showcasing an A/C bracket "totally unlike the one I have" - for starters, 1970 is made of cast iron (?) instead of the stamped steel (?) on-hand. 1970 also shows a front bracket with three bolt holes (mine has two) and a "brace" that's not present on mine.
I hypothesize that this bracket is "not made to fit a big block". I have another complete bracket assembly still installed on the 403-powered Pace Car - but it looks like the same design as this one i.e. "not big enough to wrap around/clear the valve cover".
Thoughts? I want an OEM bracket that fits the A6 compressor to the 455. I don't think I have any parts on-hand that were made for the task.
I'm looking into buying cast brackets, as I believe the stamped ones I have are "small block only".
That's irrelevant. The part of the bracket that straddles the valve cover is dimensionally identical for both BBO and SBO as far as the attachment points are concerned. So long as it only bolts to the head and intake, the dimensions are the same. BBO/SBO differences only matter when the bracket spans from the head to the block.
Once again, your problem is the aftermarket intake manifold. Note the relationship between the boss where that bracket mounts and the top surface of the no. 2 runner on this W-30 intake. Note how it sticks up as opposed to the recessed location on yours.
This doesn't look "recessed" to my eyes. Even if the boss was higher the bracket I have isn't "a big enough circle" (viewed longitudinally) to mate with both the hole and the stud.
AND the bracket still hits the valve cover before it shoulders out. If there's supposed to be a spacer there that MAY make a difference but the word around here on that was "no".
Why does it seem verboten to suggest that this Olds A6 bracket doesnt fit a 455? I mean, "it doesn't" as shown. The only other alternative I see is that I'm doing it _so_ wrong that not even photographs can explain it away.
Also I had not previously been aware that the boss on a standard-issue Edelbrock Performer intake was "so off" as to require tons of surgery to AC brackets to install.
This is called logic.
The SBO and BBO heads are externally dimensionally identical. The head bolt locations are dimensionally identical. The valve covers are identical (except for the later 307 covers that are slightly different). What could possibly be different in how the A/C bracket fits? Do you have extra thick valve cover gaskets to clear roller rockers?
Again, you cannot bolt the bracket to the intake first and then try to put it over the stud. That is physically impossible. You have to put it on the stud first then bolt it to the head. If the mounting boss on the intake is too low, the bracket will hit the valve cover. Without having the E-brock next to an OEM intake for comparison, it is impossible to know if that is the problem.
"My God, the man's talking about logic! We're talking about UNIVERSAL ARMAGEDDON!
I hear you about the dimensions - but it still doesn't FIT, do you know what I'm saying? Even if the boss were higher, the hole would have to be farther outboard to mate w this bracket once its been slipped over the head stud. AND the lower part of the bracket still won't shoulder out on the stud without mangling/unsealing the valve cover.
Hacksaw still wants PHOTOS that show a stamped A6 bracket on a big block.
These are regular valve covers, I think from the same 76 cutlass 260 as the brackets. Regular cork fel pro gaskets.
The Oldsmobile parts books say that the sheet metal (as opposed to cast iron) A6 compressor bracket is P/N 419218 and was used on every single Olds V8 from 1975-1979. That includes 260, 350, 403, and 455. Is there a P/N stamped on yours?
The PS pump bracket on my 67 D88 has a similar installation issue. Had I not removed it myself, I would have sworn it would not fit. The trick in my case is that you need to install the bracket over the valve cover FIRST, before anything else. Slide the bracket over the stud and loosely install the bolt on the intake. Then I had to put the stud on the rear of the pump into this bracket, then I could install the front bracket that goes over the pump and bolts to the front of the head. The length of the stud makes it seem like the bracket won't fit, but it does. I suspect yours is a similar geometry problem.
"Why didnt they just put the manifold bolt hole in the right place to begin with?" As it is its "incorrect for all applications".
I dont feel like eating any headgear today because of the business about the missing head stud spacer as well as my UNinformedness re the Edelbrock manifold.
Given the mass and size of the A6, not to mention the bracket clearance problems, I'd suggest ditching all of that and using the Sanden compressor and bracket sold by Classic Auto Air. I got one of these for my 67 D88. The bracket bolts only to the front of the head and has an insane amount of adjustment to ensure belt alignment with any Olds water pump and accessory drive system.
FYI the original compressor is 33lbs, the cast iron brackets and associated parts checks in at ~14 lbs, eliminating the AC and replacing the cast iron intake w an aluminum one saves about 75 lbs of weight!!
Given the mass and size of the A6, not to mention the bracket clearance problems, I'd suggest ditching all of that and using the Sanden compressor and bracket sold by Classic Auto Air. I got one of these for my 67 D88. The bracket bolts only to the front of the head and has an insane amount of adjustment to ensure belt alignment with any Olds water pump and accessory drive system.
No, this isn't a photo of my motor...
Sanden is the plan on my new engine that Mark built for me. 455 Port fuel injected (modified Edelbrock RPM Gap for the port fuel injectors), Pro Comp heads, Mickey Thompson valve covers with 3/8" spacer for the roller rockers. There is no way my old AC compressor and that cast iron bracket are going to bolt up to the new engine, not even going to try.
If you wanna stay cool, save weight, and aren't concerned with the factory look....you can get brackets off eBay for $109 shipped, the compressor for $250, and then get lines made for that Sanden compressor.
If you wanna stay cool, save weight, and aren't concerned with the factory look....you can get brackets off eBay for $109 shipped, the compressor for $250, and then get lines made for that Sanden compressor.
If the plan is to use a Vintage Air Sanden AC bracket, be careful if you purchase off of eBay. If you are good with working with metal and have the tools - then purchase a copy cat part off of eBay, and expect to do a a few hours of work to get it to fit. If you are not good with working metal then make sure you purchase a Vintage Air bracket.
Last week I purchased the bracket off of eBay for $109. It was a copy of the Vintage Air bracket. There are the issues I found with the kit.
1 - The kit should have 5 spacer washers, this kit had 4. If you have to space the compressor away from the valve cover like I do, you need 5 spacer washers.
2 - I was unable to get all 3 bolts into the head because the holes were off on the bracket that bolts to the head. I could hole hogged one of them to get that to fit.
3 - There is a semi-circular bracket that bolts in 3 places to the front of the compressor, one of those holes was not drilled out large enough. I could have drilled that out.
4 - There is a threaded hole in the main bracket that is used for adjusting the tightness of the belt, it was not threaded. I could have purchased a hole threader and fixed that.
5 - There is a stabilizing arm between the main bracket and the water pump, the holes were more than 1/8" off. Not sure how to fix that, maybe more hole hogging but that bracket is not real wide and did not want to weaken it.
6 - The real instructions are 3 pages long plus a 4th page for parts list. This kit was one page, and it looks like a poor copy of the 2nd page of instructions from the Vintage Air instructions with a lot of stuff whited out and the companies name stamped on it.
At that point I figured if I did all that work to the parts, and I got it all together, and based on the poor copy of the real part; are other things off and will the pulleys line up? Since I want to return it, I put all back in the box.
I have tried to return the kit since Tuesday, I noted the above issues, I got a question back "What year is your engine" I answered that 1973, and added it's a 455 - which is the other obvious question they should have asked. I have not heard back for 3 days.
Yesterday I ordered the Vintage Air brackets from Summit for $129. Today I received it. It's tight fit on the head, but all 3 bolts go in without forcing. The stabilizing arm between the water pump and the bracket is tight - but it fits; I will probably drill this out a tiny bit so it is not so tight. I need all 5 spacer washers. This kit was missing a 2-3/4" bolt which it should have come with - but that I can deal with.
What I don't like about both kits. They use nylon lock bolts. Nylon doesn't hold up well under heat for a real long time. Okay on suspension parts, not okay where things can get really hot. Maybe on AC brackets they are okay, but not what I will probably end up with.
This is the Vintage Air Bracket:
5 spacer washers to move it away from valve cover
Front showing stabilizer arm.
Last edited by mrw8i; October 20th, 2017 at 07:36 PM.
Pretty cool looking engine mrw8i. I like that oil fill tube.
The OEM oil filler tube did not fit with the Edelbrock Air Gap intake manifold. For some reason the water passage on the front of the Air Gap is way forward, no reason for it, but it is. The OEM oil filler tube had to be "dented" in order to fit and even then it was a pain. I found this and tried and it cleared, notice the skinnier neck, hopefully when filling with oil it doesn't hinder the flow rate into the block.
The OEM oil filler tube did not fit with the Edelbrock Air Gap intake manifold. For some reason the water passage on the front of the Air Gap is way forward, no reason for it, but it is.
It does beg the question "why?" Considering that the L69 TriCarb intake has the t-stat housing pushed forward to clear the front carb, even that intake doesn't have a problem with the oil fill tube. More crappy engineering on aftermarket parts.
I called in the Marines and got this fixed up last Sunday afternoon.
The modification shown is required to use a c. 1977 factory stamped steel A6 air conditioner compressor bracket on a 455 equipped with OEM heads and the Edelbrock Performer aluminum intake (the hole in the intake manifold for the A/C bracket is "not in the right place").
I hadn't seen this thread until just now. You have experienced a very well documented issue with the Performer intake and AC. The modification you made to the bracket is one method; the other is to drill a smaller hole in the intake boss and use a smaller bolt to hold the bracket down. Some folks install a threaded rod into the existing hole, then drill a new hole for the smaller bolt and use an appropriately sized washer on top.
Since that bracket isn't really load bearing, it doesn't need a 5/16" (or whatever size that is) bolt to secure it.
with the Edlebrock aluminum manifold I put on my 455, the Edlebrock pre drilled AC bracket hole was not even close to maching up with the factory AC bracket. I ended up filling the pre drilled hole by theading an aluminum rod and epoxying it in. I then drilled and tapped a new hole where I needed it.
Last edited by Fun71; November 1st, 2017 at 04:01 PM.
Thread is a little old but I'm looking at replacing my compressor before installing the 455 with an Edelbrock intake. Is the Sanden compressor and bracket offered by Vintage Air or Classic Auto Air? I'm having trouble finding either.
Classic Auto Air. I have this bracket on the BBO in my 67 Delta.
Pictured below. These are the parts I used, which look like the same parts you are looking at. I still had to a bit of hole hogging on the bracket to make it fit without binding.
If the plan is to use a Vintage Air Sanden AC bracket, be careful if you purchase off of eBay. If you are good with working with metal and have the tools - then purchase a copy cat part off of eBay, and expect to do a a few hours of work to get it to fit. If you are not good with working metal then make sure you purchase a Vintage Air bracket.
Last week I purchased the bracket off of eBay for $109. It was a copy of the Vintage Air bracket. There are the issues I found with the kit.
1 - The kit should have 5 spacer washers, this kit had 4. If you have to space the compressor away from the valve cover like I do, you need 5 spacer washers.
2 - I was unable to get all 3 bolts into the head because the holes were off on the bracket that bolts to the head. I could hole hogged one of them to get that to fit.
3 - There is a semi-circular bracket that bolts in 3 places to the front of the compressor, one of those holes was not drilled out large enough. I could have drilled that out.
4 - There is a threaded hole in the main bracket that is used for adjusting the tightness of the belt, it was not threaded. I could have purchased a hole threader and fixed that.
5 - There is a stabilizing arm between the main bracket and the water pump, the holes were more than 1/8" off. Not sure how to fix that, maybe more hole hogging but that bracket is not real wide and did not want to weaken it.
6 - The real instructions are 3 pages long plus a 4th page for parts list. This kit was one page, and it looks like a poor copy of the 2nd page of instructions from the Vintage Air instructions with a lot of stuff whited out and the companies name stamped on it.
At that point I figured if I did all that work to the parts, and I got it all together, and based on the poor copy of the real part; are other things off and will the pulleys line up? Since I want to return it, I put all back in the box.
I have tried to return the kit since Tuesday, I noted the above issues, I got a question back "What year is your engine" I answered that 1973, and added it's a 455 - which is the other obvious question they should have asked. I have not heard back for 3 days.
Yesterday I ordered the Vintage Air brackets from Summit for $129. Today I received it. It's tight fit on the head, but all 3 bolts go in without forcing. The stabilizing arm between the water pump and the bracket is tight - but it fits; I will probably drill this out a tiny bit so it is not so tight. I need all 5 spacer washers. This kit was missing a 2-3/4" bolt which it should have come with - but that I can deal with.
What I don't like about both kits. They use nylon lock bolts. Nylon doesn't hold up well under heat for a real long time. Okay on suspension parts, not okay where things can get really hot. Maybe on AC brackets they are okay, but not what I will probably end up with.
Pictured below. These are the parts I used, which look like the same parts you are looking at. I still had to a bit of hole hogging on the bracket to make it fit without binding.
The bracket from Classic Auto Air is much less complex that that one. I had no issues installing it. The kit was complete, I didn't need to mess with anything, and it was extremely easy to get the belts aligned. I strongly suggest you look at that one before buying this one from Summit.
The bracket from Classic Auto Air is much less complex that that one. I had no issues installing it. The kit was complete, I didn't need to mess with anything, and it was extremely easy to get the belts aligned. I strongly suggest you look at that one before buying this one from Summit.
I'm assuming it's the Firebird kit but I'll give them a call, Joe. Thanks. A couple more questions: will the Sanden compressor have less drag and will the new hoses fit my stock condenser? I really just need the compressor, bracket, and hoses. Unless my current hose fittings are a match. My hoses are in very good shape. I already did a complete rehab, dryer, expansion valve, R134a conversion, etc. so don't think I need the entire kit.
 October 4th, 2017, 11:38 AM


")