LOG IN
REGISTER
Forums
New User Forums
The Newbie Forum
Site Related
General
General Discussion
The Clubhouse
Repair & Restoration
Technical & Reference
Major Builds & Projects
Racing and High Performance
Engine
Transmission and Driveline
Chassis, Tires/Wheels, Brakes, & Related
Body & Paint
Electrical
Interior and Trim
Other
Vehicle Lineup
Cutlass, 442, and Hurst/Olds
Large Oldsmobiles
Final Years Oldsmobiles
Vintage Oldsmobiles
Toronado
Other Oldsmobiles
Classifieds
Buyer & Seller Feedback
Oldsmobile Cars
Oldsmobile Parts
Non-Oldsmobile Classified
Miscellaneous Classifieds
Marketplace
Vendor Directory
Become a Vendor
New Posts
Tools
Car Payment Calculator
Tire Rim Calculator
Recalls
Technical Service Bulletins (TSBs)
Members List
Live Feed
Gallery
View Dark Mode
Please register or login to enable Dark Mode.
Log In
Register
Threads
Google
Threads
Posts
Advanced
Dark Mode
Please register or login to enable Dark Mode.
Log In
Forgot your Password?
By logging into your account, you agree to our
Terms of Use
and
Privacy Policy
, and to the use of cookies as described therein.
Recent
Commented
Albums
My Pictures
My Post Pictures
cdrod
October 15, 2015
2072
0
Sort:
Default
Default
Most Recent
0
2025/02/27 03:39:30
cdrod
I may need to fabricated a guide where the seat belt comes over the seat back. I'll work out these details when I get the seat cushions back in the car.
0
2025/03/02 06:05:49
cdrod
I mounted the retractors in the trunk, behind the convertible top well. These mounting pads were carefully plug-welded thru the trunk floor to the floor brace below for strength.
0
2025/03/02 06:05:51
cdrod
I reinforced the mounting location with a 1/8' steel washer which was plug-welded thru the floor from above.
0
2025/03/02 06:05:53
cdrod
This is the retractor from 2010-2015 Camaro convertible.
0
2025/03/02 06:05:55
cdrod
The retractors have a guide pin in the front to prevent them from rotating and bolted down with a 1/2"-13nc bolt.
0
2025/03/02 06:05:57
cdrod
I secured the other end of the retractor belt to the inner rocker floor, below the hydraulic top rams.
0
2025/03/02 06:05:58
cdrod
0
2025/03/08 09:09:38
cdrod
0
2025/03/08 09:20:08
cdrod
0
2025/03/08 09:20:09
cdrod
0
2025/03/22 06:46:30
cdrod
0
2025/03/25 03:44:54
cdrod
0
2025/03/25 14:32:32
cdrod
Backside of the front fender
0
2025/04/12 10:54:41
cdrod
This is the hidden rust on the fender brace
0
2025/04/12 10:54:43
cdrod
Stripped and prep'd the rust than sprayed with industrial rustoleum paint to protect from future rusting.
0
2025/04/12 10:54:44
cdrod
0
2025/04/21 03:27:33
cdrod
0
2025/04/21 03:40:09
cdrod
I used the ABS plumbing cement to reattached the lighter socket to the dash.
0
2025/04/21 03:40:10
cdrod
I modified my dash to move the cig lighter below the map light and center the radio a bit. Also removed the ashtray and made the compartment big enough to hold my i-phone.
0
2025/04/21 03:40:11
cdrod
0
2025/04/21 03:51:38
cdrod
0
2025/04/21 03:56:54
cdrod
0
2025/04/21 04:00:35
cdrod
0
2025/04/21 14:56:04
cdrod
0
2025/04/21 15:00:15
cdrod
0
2025/04/28 10:03:18
cdrod
0
2025/05/12 08:49:16
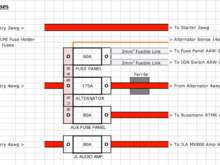
cdrod
The large fuses at the top of this pic are AMI (MIDI) fuses. the other fuse block is made buy Bussmann/Cooper.
0
2025/05/21 20:29:58
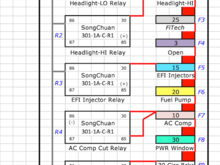
cdrod
This is a partial wiring diagram for the Bussmann fuse block.
0
2025/05/21 20:29:59
cdrod
The AMI fuse holders snap together to form a block; the top fuse feeds the under dash fuse block, the 2nd fuse protects the alternator, 3rd fuse feeds the Bussmann fuse block and the 4th fuse feeds the audio amp directly from the battery.
0
2025/05/21 20:30:01
cdrod
0
2025/05/22 05:23:43
cdrod
0
2025/05/23 14:22:59
cdrod
0
2025/05/23 14:24:38
cdrod
0
2025/05/27 17:56:02
cdrod
0
2025/05/27 18:07:49
cdrod
0
2025/05/27 18:07:51
cdrod
0
2025/05/27 18:07:53
cdrod
0
2025/06/01 03:41:26
cdrod
0
2025/06/01 03:41:28
cdrod
0
2025/06/01 03:41:29
cdrod
First
Page
50 of 52
Last
Go To
Page
1
...
46
47
48
49
50
51
52
50 of 52
Go To
GO
Go to page
of 52
pages
1
...
46
47
48
49
50
51
52