Replacing Head Gaskets On My 330 (lots of pics)
 February 11th, 2015, 05:25 PM
#1
Registered User
Thread Starter

Join Date: Sep 2010
Location: Norfolk, Va
Posts: 1,382
Replacing Head Gaskets On My 330 (lots of pics)
So I am finally getting around to changing out the head gaskets on my 330 because once I got it running it had bubbles in the radiator and was losing coolant. Even though I only drove it maybe 5 miles. The weather here was almost summer-like over the weekend and I couldn't think of anything better to do so I took it apart.
The basic stuff was rather easy to remove, only an alternator and power steering pump for accessories.
IMG_20120312_160454.jpg
I took a picture of the distributor position before removing it.
IMG_20150208_152802647_zps205cc652.jpg
Upper rad and bypass hose, carb and intake, exhaust manifolds and then the heads.
IMG_20150208_155811187_zpsdcdd30fc.jpg
There was a little debris in the lifter valley, but not bad and it cleaned up pretty well.
IMG_20150208_164214070_zps965a5feb.jpg
IMG_20150208_164751097_zpsda436df7.jpg
 February 11th, 2015, 05:34 PM
#2
Registered User
Thread Starter
Join Date: Sep 2010
Location: Norfolk, Va
Posts: 1,382
The heads have been off this engine before and they had been put back on opposite their original location. To my untrained eye it looks like the gaskets failed in multiple places and it makes me wonder if the head and block surfaces were cleaned up before reassembly the last time.
IMG_20150208_162302785_zpsf0c641aa.jpg
IMG_20150208_162355378_HDR_zps110d6443.jpg
IMG_20150208_162343288_zpsd9355e18.jpg
IMG_20150208_162554286_zpscdb4c880.jpg
IMG_20150208_162604404_zpsc788ebad.jpg
IMG_20150208_162302785_zpsf0c641aa.jpg
IMG_20150208_162355378_HDR_zps110d6443.jpg
IMG_20150208_162343288_zpsd9355e18.jpg
IMG_20150208_162554286_zpscdb4c880.jpg
IMG_20150208_162604404_zpsc788ebad.jpg
Last edited by cjsdad; February 11th, 2015 at 05:36 PM.
February 11th, 2015, 05:41 PM
#3
Registered User
Thread Starter
Join Date: Sep 2010
Location: Norfolk, Va
Posts: 1,382
One of the nicest things about working on these older engines is the number of tools it takes to do the work. This is every tool I used to disassemble the engine to this level.
76471f5b-a83c-4c4d-bdab-d92c62a4fac9_zpsbe9edad9.jpg
Hoist.gifHoist.gifHoist.gif
76471f5b-a83c-4c4d-bdab-d92c62a4fac9_zpsbe9edad9.jpg
Hoist.gifHoist.gifHoist.gif
Last edited by cjsdad; February 11th, 2015 at 05:47 PM.
February 11th, 2015, 05:54 PM
#4
Registered User
Thread Starter
Join Date: Sep 2010
Location: Norfolk, Va
Posts: 1,382
Getting this far along was pretty simple and fast, but I did find a few odd things along the way. There were some interesting things in the water jacket. The first goober looks like a glob of silicone and the second is clearly a leaf. Weird.
IMG_20150208_161452628_HDR_zpsd1cc6bdb.jpg
IMG_20150208_161505045_HDR_zps10fe6a2b.jpg
IMG_20150208_161518024_HDR_zps07417a11.jpg
There were a few blocked water passages but I realized some of them were meant to be that way when I put the new gaskets in place. In the photos of the heads with gaskets still in place you can see other blockages as well.
IMG_20150208_161616090_zps420a3137.jpg
February 11th, 2015, 06:05 PM
#5
Registered User
Thread Starter
Join Date: Sep 2010
Location: Norfolk, Va
Posts: 1,382
I may get a little discussion about the way I clean things up, but I have never had any problems doing it like this in the past. Please feel free to offer criticism or instructions as you feel necessary though.
First thing I do is use a large scraper to clean off most of the junk and build-up. This leaves a remarkably smooth surface rather quickly. The scraper is from the paint section of the big box home improvement center. It is designed as a floor scraper I think. That is what I originally bought it for anyway.
IMG_20150208_163649752_HDR_zps7fb1a8ee.jpg
After that I use a long flat board with sandpaper wrapped around it to get the metal surfaces nice and shiny. The board is a cut-off piece of a cubicle desktop and is extremely hard, flat, and fairly rigid. This is 120 grit I think. The photo shows only one hand on the board but I use two hands in the actual sanding operation to keep things flat and even.
IMG_20150208_165008472_zps21d4d64a.jpg
IMG_20150208_165015660_zpsb7e556ff.jpg
Last edited by cjsdad; February 11th, 2015 at 06:07 PM.
February 11th, 2015, 06:19 PM
#7
Registered User
Thread Starter
Join Date: Sep 2010
Location: Norfolk, Va
Posts: 1,382
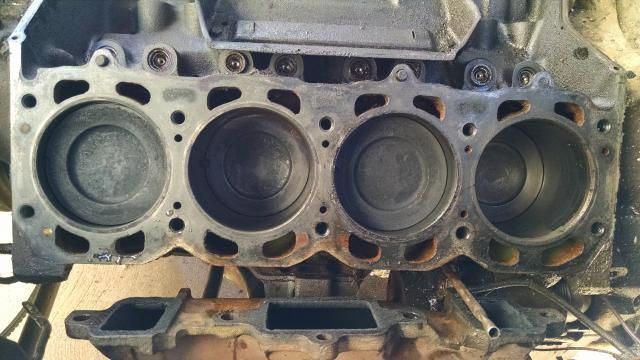
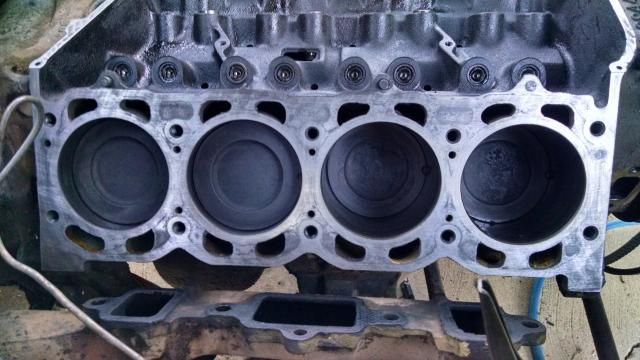
Nice and shiny! The block and heads get the same treatment on all mating surfaces. It looks like a different milling machine was used on each deck surface of the block. Even the heads have a different milled finish on them.
IMG_20150208_171612144_HDR_zps1a7e685e.jpg
IMG_20150208_172017609_zps8fea4b74.jpg
IMG_20150208_172252693_zpsa4b82a07.jpg
IMG_20150208_171612144_HDR_zps1a7e685e.jpg
IMG_20150208_172017609_zps8fea4b74.jpg
IMG_20150208_172252693_zpsa4b82a07.jpg
February 11th, 2015, 06:28 PM
#8
Registered User
Thread Starter
Join Date: Sep 2010
Location: Norfolk, Va
Posts: 1,382
IMG_20150208_165947981_zps70adefbb.jpg
February 11th, 2015, 06:28 PM
#9
Connoisseur d'Junque
Join Date: Sep 2010
Location: The Hudson Valley
Posts: 21,183
I just use a few fine ScotchLock pads with a pneumatic die grinder, after scraping with a gasket scraper, to clean up the surface, but your system certainly looks like it works well.
- Eric
- Eric
February 11th, 2015, 06:40 PM
#10
Registered User
Thread Starter
Join Date: Sep 2010
Location: Norfolk, Va
Posts: 1,382
I didn't get a shot of the cleaned up heads but I used a cup brush on the combustion chamber and scotchbrite pads in my angle grinder to clean up the valves themselves. All that pitting is just carbon build-up. The valves cleaned up pretty nicely.
While I had everything apart I took the fuel pump off and checked the timing chain. It felt reasonably tight and I was able to get a decent photo with my phone. You can see that the teeth on the cam sprocket are steel and there is blue silicone around the mating surfaces of the water pump and timing cover so it has been replaced.
IMG_20150208_170813351_zpsb87e4dba.jpg
IMG_20150208_155833597_zps6dd59cf3.jpg
February 11th, 2015, 06:48 PM
#11
Registered User
Thread Starter
Join Date: Sep 2010
Location: Norfolk, Va
Posts: 1,382
I put the new gaskets in place and torqued the heads down. Not too bad for a single afternoon's work.
IMG_20150208_184123860_HDR_zpsad066d51.jpg
IMG_20150208_211019624_zpse14ff982.jpg
IMG_20150208_184123860_HDR_zpsad066d51.jpg
IMG_20150208_211019624_zpse14ff982.jpg
February 11th, 2015, 07:01 PM
#13
Phantom Phixer
Join Date: Dec 2011
Location: Apopka, FL
Posts: 4,760
Did you take the heads to a machine shop to make sure that they weren't warped ?
If not , then I would suggest you pull them back off and do so. And pick up another pair of head gaskets when you do .
If not , then I would suggest you pull them back off and do so. And pick up another pair of head gaskets when you do .
 February 11th, 2015, 07:02 PM
#14
Connoisseur d'Junque
Join Date: Sep 2010
Location: The Hudson Valley
Posts: 21,183
I have had very good results on piston crown carbon by spraying and soaking with Seafoam and then cleaning with a brass wire brush - repeat several times, and it's amazing how clean they can get.
I definitely advocate smoothing (not quite polishing) the rough casting surfaces of the combustion chambers, especially on high-compression motors, as I have observed reduced pinging when this is done (with measured CC volumes the same before and after, to compare apples to apples).
- Eric
I definitely advocate smoothing (not quite polishing) the rough casting surfaces of the combustion chambers, especially on high-compression motors, as I have observed reduced pinging when this is done (with measured CC volumes the same before and after, to compare apples to apples).
- Eric
February 11th, 2015, 07:05 PM
#15
Registered User
Thread Starter
Join Date: Sep 2010
Location: Norfolk, Va
Posts: 1,382
There were a couple items of concern that came up along the way. One of the rocker bridges is broken. The ends are discolored by oil so it has been broken for a while. Dunno if it was put back on that way by the person that took it apart previously of if it broke while in use after that. I could probably put it back on the way it is but for the price of a new one I think I should replace it.
IMG_20150208_153941310_zps13f18b06.jpg
IMG_20150208_153947952_zpsbb4eca7d.jpg
IMG_20150208_153941310_zps13f18b06.jpg
IMG_20150208_153947952_zpsbb4eca7d.jpg
February 11th, 2015, 07:14 PM
#16
Registered User
Thread Starter
Join Date: Sep 2010
Location: Norfolk, Va
Posts: 1,382
The pistons, by comparison, had very little carbon build-up on them so I didn't worry about that too much. I also noticed along the way down this little trek that there is quite a ridge at the top of the cylinders so this engine will not be much longer for this world. As long as it runs and provides a few more good miles of service it will be replaced in the near future. Probably next winter. I didn't see much reason to put a lot more work into it at this point.
February 11th, 2015, 07:16 PM
#17
Phantom Phixer
Join Date: Dec 2011
Location: Apopka, FL
Posts: 4,760
Yes, by all means replace the broken rocker bridge .
You can pick it up when you get the heads checked. If this thing was blowing bubbles in the coolant , then I can almost guarantee that the heads will need to be re-surfaced.
You can pick it up when you get the heads checked. If this thing was blowing bubbles in the coolant , then I can almost guarantee that the heads will need to be re-surfaced.
February 11th, 2015, 07:48 PM
#19
Registered User
Thread Starter
Join Date: Sep 2010
Location: Norfolk, Va
Posts: 1,382
Dood! You're gonna guaranty from more than half way across the country, sight unseen, that my heads are warped because the gaskets failed? I'm pretty sure the gaskets failed because the engine wasn't cleaned properly the last time they were replaced. Which was probably because the original steel shim gaskets finally rusted out.
February 11th, 2015, 07:57 PM
#20
Registered User
Thread Starter
Join Date: Sep 2010
Location: Norfolk, Va
Posts: 1,382
Yeah, I already bought a turkey tray before I took the engine apart. I'll contact Rock Auto and see if they will trade it for the other gasket set, and a rocker bridge. My last Cutlass didn't have the turkey tray in it either but I don't remember if it had the bolt-in tray. That was about 25 years ago.
February 11th, 2015, 08:26 PM
#21
Phantom Phixer
Join Date: Dec 2011
Location: Apopka, FL
Posts: 4,760

Dood! You're gonna guaranty from more than half way across the country, sight unseen, that my heads are warped because the gaskets failed? I'm pretty sure the gaskets failed because the engine wasn't cleaned properly the last time they were replaced. Which was probably because the original steel shim gaskets finally rusted out.
Laugh all you want! You won't laugh if you have to do the job over because you DIDN'T check the heads .
I've only done this stuff for a living for close to 50 years . What the hell do I know ?
February 11th, 2015, 08:26 PM
#22
Justin
Join Date: Mar 2012
Location: utah
Posts: 3,448
The block sanding is how I was tought years ago by a old school tech. I do like to use the scotch pads on my angle grinder or the 3m rubber ones
Looking good
Out if caution did you put a straight edge on the heads to check them ?
Looking good
Out if caution did you put a straight edge on the heads to check them ?
February 11th, 2015, 08:50 PM
#23
Registered User
Thread Starter
Join Date: Sep 2010
Location: Norfolk, Va
Posts: 1,382
February 11th, 2015, 08:55 PM
#24
Registered User
Thread Starter
Join Date: Sep 2010
Location: Norfolk, Va
Posts: 1,382
I made a living at this stuff for a while myself. So did my Dad. I have enough experience to make educated decisions about what it does or doesn't need at this time of the engine's life. I appreciate your input and it is sound advice, but this engine is too worn out to wast time and money on the heads without a total rebuild.
February 11th, 2015, 09:05 PM
#25
Phantom Phixer
Join Date: Dec 2011
Location: Apopka, FL
Posts: 4,760
It's a lot of work to throw away on the chance that you might be successful.
Anyway, it's you doing the work. I really do wish you the best of luck on it.
BTW it's not really nice to laugh at people.
 February 12th, 2015, 03:49 AM
#26
Registered User
Join Date: Jan 2008
Posts: 904
Dood! You're gonna guaranty from more than half way across the country, sight unseen, that my heads are warped because the gaskets failed? I'm pretty sure the gaskets failed because the engine wasn't cleaned properly the last time they were replaced. Which was probably because the original steel shim gaskets finally rusted out.
You are just asking for trouble the way you are cleaning and re-assembling, just my humble opinion and speaking from experience with short cuts. Do it once and do it right.
February 12th, 2015, 04:09 AM
#27
'87 Delta 88 Royale
Join Date: Dec 2010
Location: Margate, England
Posts: 2,513
The engines weren't blueprinted from the factory, as long as everything was within tolerance it would go together. A couple of people here have posted about blocks with one cylinder bored oversize from the factory.
Iron heads are much less prone too warping than alloy ones. Imo you shouldn't have any issues. Of course in an ideal world you would have the heads rebuilt like new.
On the other hand, if you hadn't a broken rocker bridge i guess you would have it all buttoned up and running the same day. Good work.

Fwiw I have lapped a warped head to a block using valve grinding paste when I was stuck out in the Boonies. It worked.
Roger.
February 12th, 2015, 06:06 AM
#28
Registered User
Thread Starter
Join Date: Sep 2010
Location: Norfolk, Va
Posts: 1,382
If people make funny remarks, it makes me laugh. To indiscriminately tell me that my heads are warped when you have absolutely no idea about the history of me or my engine is bordering on ridiculous. Your experience is impressive, no doubt, so I'm sure your comment was meant to be educational. But you have no idea what my experience or skill level is so your comment was belittling. Be nice and people will be nice back!
If this were a fresh engine then yes I would have checked the deck and heads for straightness. I have a precision ground straight edge in my garage. If I were trying to build a performance engine, you bet it would go to a machine shop for blueprinting. This turned into a minimalist repair when I found 3~4 thousandths ridge in the top of the cylinder bores. If I get a couple of months of top-down motoring this spring and summer I will have been successful in repairing this engine. For now!
If this were a fresh engine then yes I would have checked the deck and heads for straightness. I have a precision ground straight edge in my garage. If I were trying to build a performance engine, you bet it would go to a machine shop for blueprinting. This turned into a minimalist repair when I found 3~4 thousandths ridge in the top of the cylinder bores. If I get a couple of months of top-down motoring this spring and summer I will have been successful in repairing this engine. For now!
Last edited by cjsdad; February 12th, 2015 at 06:08 AM.
February 12th, 2015, 06:25 AM
#29
Registered User

Join Date: Sep 2013
Posts: 3,607
If people make funny remarks, it makes me laugh. To indiscriminately tell me that my heads are warped when you have absolutely no idea about the history of me or my engine is bordering on ridiculous. Your experience is impressive, no doubt, so I'm sure your comment was meant to be educational. But you have no idea what my experience or skill level is so your comment was belittling. Be nice and people will be nice back!
If this were a fresh engine then yes I would have checked the deck and heads for straightness. I have a precision ground straight edge in my garage. If I were trying to build a performance engine, you bet it would go to a machine shop for blueprinting. This turned into a minimalist repair when I found 3~4 thousandths ridge in the top of the cylinder bores. If I get a couple of months of top-down motoring this spring and summer I will have been successful in repairing this engine. For now!
If this were a fresh engine then yes I would have checked the deck and heads for straightness. I have a precision ground straight edge in my garage. If I were trying to build a performance engine, you bet it would go to a machine shop for blueprinting. This turned into a minimalist repair when I found 3~4 thousandths ridge in the top of the cylinder bores. If I get a couple of months of top-down motoring this spring and summer I will have been successful in repairing this engine. For now!
")
Last edited by wr1970; February 12th, 2015 at 07:32 AM.
February 12th, 2015, 08:06 AM
#32
Registered User
Thread Starter
Join Date: Sep 2010
Location: Norfolk, Va
Posts: 1,382
Look, Guys! If this were a full-on restoration, or if I were absolutely going to tear the engine down completely and rebuild it then yes, I would throw the $$$ at it and do it all to your satisfaction. But if replacing head gaskets meant a tear-down and rebuild every time, there would be an awful lot of cars that would never run again. I mentioned that this engine was 45 years old earlier, well I was wrong, it's 48 years old. It has lots of wear on it. It's tired! Not every part that comes off an engine needs to be remanufactured to original tolerances every time it comes apart. This was an expedient repair to get a little more service out of a tired, worn out, 48 year old engine and have a little driving fun in the Hooptie this summer. If you want to offer advice something like, "If this were my engine, the heads would go to the machine shop for a rebuild." Or "The wear on that engine suggests it should be completely rebuilt so it can be reliable and road-worthy." But to tell me I'm a cheap bastard because I didn't put enough money into this tired old dog is not constructive in any way. Make your comments and follow them up with constructive suggestions or criticisms, not just snarky shots about how much money you have in the pocket book. Be nice! I promise that you will get to see a lot more work go into this car. Engine, trans, body, interior, the whole thing. This is not a daily driver so if I get a few miles of fun out of it before I tear it all apart, it was worth it to me.
February 12th, 2015, 08:39 AM
#34
Registered User
Join Date: Sep 2013
Posts: 3,607
Hey you put your talent on display!When i pull a engine down that far i fix it to last! I don't band aid it for 5,000 miles or more! You stated it needed to be redone but you were not doing it! Hence snug in the pocketbook comment! I could careless if that motor works very long or not! You stated you also had many years of working on motors.Well back yard hacking don't count for much!! Now when you say your are doing this just to get by and going to do it right later leads to speculating.I would like to think you can really do a rebuild correctly. That being said no need to defend your position you put on your show. What i would like to see your real talent when you get ready. You can call me a hack when it comes to carpenter work! Have a good day.
That being said no need to defend your position you put on your show. What i would like to see your real talent when you get ready. You can call me a hack when it comes to carpenter work! Have a good day.
February 12th, 2015, 08:50 AM
#37
Registered User
Join Date: Sep 2013
Posts: 3,607
Go away moderator i am not bashing him! There is nothing wrong with doing a job like a backyard hack! Really!He admitted the motor needs to be redone correctly! If the shoe fits then wear it! Maybe you would do it this way but i wouldn't.I am thinking he really can do a quality job just not sound reasoning to band aid for a few months just because you can. I stand behind fix it right and be done.Have a good day ERIC.
February 12th, 2015, 08:58 AM
#38
Registered User
Join Date: Sep 2013
Posts: 3,607
Maybe we should run a poll to see how many of you guys are snug in the pocket book. Fixing one this way when you are broke is one thing but to do this when you have cash that is another. When you know and state the motor needs a overhaul fix it to last.Have a good day all you guys that think i am wrong.
February 12th, 2015, 09:04 AM
#39
morgan
Join Date: Mar 2011
Location: CT
Posts: 1,925
Maybe we should run a poll to see how many of you guys are snug in the pocket book. Fixing one this way when you are broke is one thing but to do this when you have cash that is another. When you know and state the motor needs a overhaul fix it to last.Have a good day all you guys that think i am wrong.


