When you click on links to various merchants on this site and make a purchase, this can result in this site earning a commission. Affiliate programs and affiliations include, but are not limited to, the eBay Partner Network.
Hi guys, just started changing the carb and about 5 minutes in have found two large vacuum leaks The first was just a deteriorating hose at the back of the carb, no big deal. The second looks like it is going to be a little more difficult. The metal pipe from the back as well as this other one go to a piece that bolts onto the intake. Problem is the one that connects to the side basically isn't even connected. After I loosened the nut holding it on it just sort of fell down. Pictures below. Does anyone know what this part is called and if/where I could get another?
I am pretty sure that tube just sits there anyway. It should push into the hole in the manifold just a little bit. It pulls hot air from the exhaust crossover through the choke to heat it up.
I think that part does more than "just sit there." I don't think Olds was in the habit of installing parts that just sat there.
In the photo below, there should be a rubber tube connecting the two ends circled in red. Air is drawn in from the top of the carburetor, so it is filtered air, and follows the path of the yellow arrows down into the manifold. The air is heated in the manifold and then drawn through the choke, where it heats the choke spring as the engine warms up, and then it is drawn into the carburetor, which is the source of vacuum to draw the air in in the first place.
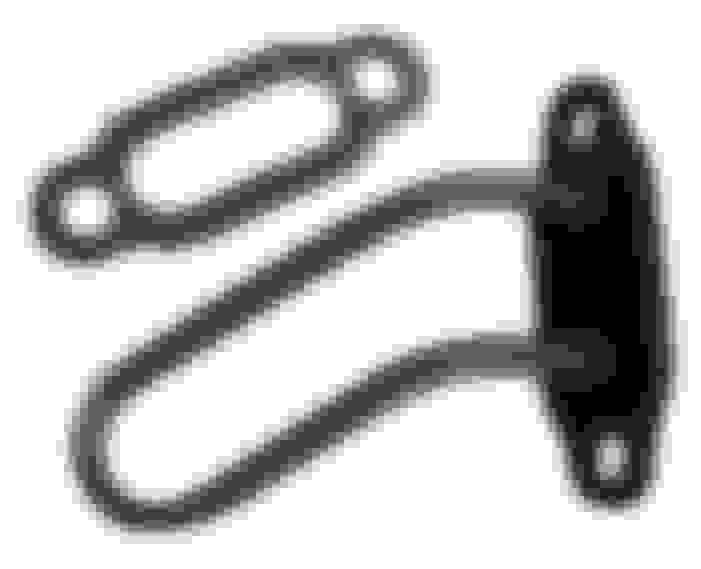
There is just a U-shaped tube under there, and the tube bends back around and comes out where the yellow circle is. That's where the tube is broken, and it can't be fixed as it is just a press fit, and part of the tube is still in the hole. If you can get that piece out, you can re-use that fitting. Otherwise, replacements are available, I believe. The other end of that tube, circled in green, is supposed to be screwed onto the threaded fitting also circled in green. That tube being broken causes a vacuum leak. All of these parts and fittings and tubes need to be properly secured in order to have no vacuum leaks and to have a properly functioning choke.
I see, after finding one on OPGI.com the tube actually just fit into the piece on the manifold. I thought it wall all one piece. Having said that, what would be the best way to get the piece left stuck in the manifold out? I am concerned about pieces falling in...
Or you could skip all of the above, cap the fitting coming off the carburetor circled in red, cap the threaded fitting circled in green, and install an electric choke.
Check this thread for installation of an electric choke.
I wouldn't try to work on it on the engine. Remove the two bolts holding it down (A and B in the photo) and work on it on your workbench.
Here's what it looks like when you pull it out of the engine. I had the exact same problem with the choke set-up on my '78 Toronado, which also has a Quadrajet.
I was able to buy a brand-new one from Fusick, and I suggest you do the same thing. That way, you don't have to bother trying to get the broken piece out of the old one. It even comes with a replacement gasket. It's $36 plus shipping, but well worth it, I think.
Provided you're lucky enough that the choke stove bolts don't break off in the intake manifold and make an even bigger fiasco... Thread a screw into the broken off piece, douse it with penetrating oil and see if you can wrangle it out of there with Vise-Grips or a small slide hammer. Then install the new air tube and you should be good to go.
If the manifold tube itself isn't burned out (you'll hear a pfft-pffft exhaust leak sound if it is) it will still function, you just won't get benefit of filtered air. If it's burned thru, I recommend plugging the heat stove tube openings and changing to an electric choke.
Location: Edmonton, AB. And "I am Can 'eh' jun - eh"
Posts: 24,525
Actually if you run the engine, the heat from the intake will help with the bolt extraction. We all know that one of the easier ways to get a stubborn bolt to release is to heat it.
Thanks guys. I have some replacement parts on the way. I was able to replace the brittle rubber piece at the back on the carb with a fresh piece and for the time being have filed down the broken parts where they meet and use some JB weld until the new pieces get here. It was actually a tight fit where they broke after the line was secured in place so it should be OK for now. Car won't be driven other than an initial test drive until fixed properly. I just want to get it running with the new carb and get the idle speeds set and fuel mixture dialed in, and then of course where the vacuum pressure is at.
Well that was fun. The car fired up and all seemed to be going well. But, about when it got to operating temp I noticed a bit of smoke on the passenger side. When I went to have a look, there was coolant coming from the heater core area on to the exhaust. There was some coming through on the inside too so I assume the heater core sprung a leak.
So, what do you guys think - do I replace the heater core, or is there a safe way to just bypass it? Being strictly a summer vehicle I will never use the heat.
Location: Edmonton, AB. And "I am Can 'eh' jun - eh"
Posts: 24,525
Yes, you can bypass it if you want. Just create a closed loop from the inlet/outlet at the water pump and it's done. If your car has AC, it is a bit of a pain to get the heater core out, but it's doable. I'd be inclined to just replace the heater core and not worry any more. The procedure is detailed in the CSM and good pictures in the AM. It's not a quick job though.
Ok, I will bypass it for the time being and add replacing the heater core to the to-do list.
On a separate note, the car seemed to run OK, a little rough but OK at first in high idle, but after it was warmed up and I kicked it out of high idle it stalled out. The card that came with the carb said to wind the mixture screws in all the way then out 1.5 as a starting point. I went with 2.5 based on the old carb. Have I maybe gone way too rich? I guess what the old messed up carb needed compared to a new one might be very different.
Would it be more likely that it is too rich or too lean given that it would run at high idle and not at low? The low idle set screw seems to be in roughly the same spot but I suppose maybe the idle is just simply too low too.... any thoughts?

 August 19th, 2018, 07:46 AM