
Washer pump not working

Thread Starter
Registered User
Joined: Aug 2013
Posts: 3,900
From: Central Illinois
Washer pump not working
I made sure the lines are clear. Wipers work fine. All the gaskets seem soft and pliable. It's just not moving any fluid.
DO the internals look correct?
[IMG]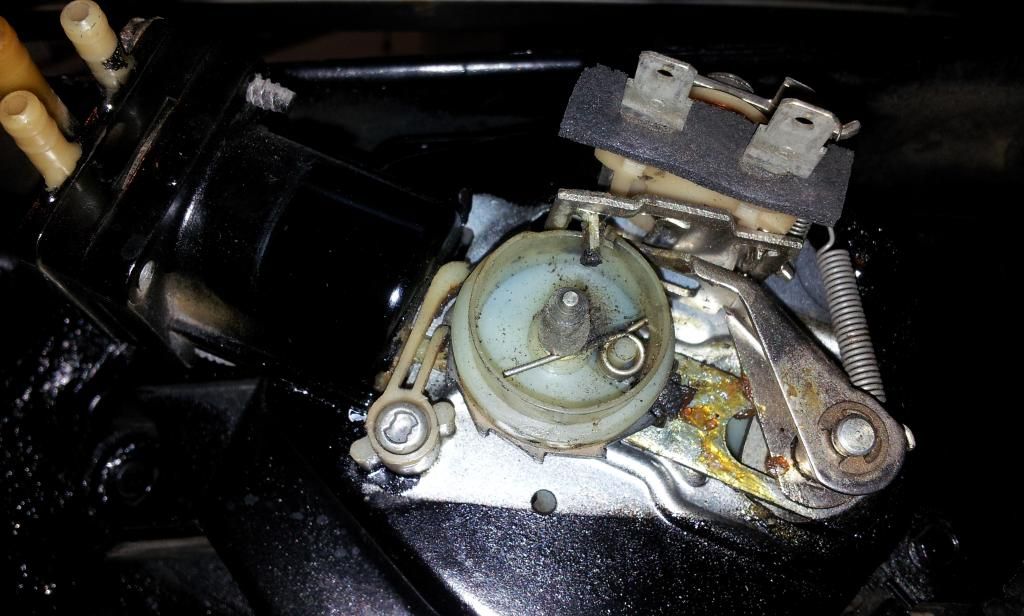 [/IMG]
DO the internals look correct?
[IMG]
 [/IMG]
Registered User
Joined: Jul 2009
Posts: 2,471
From: Colorado - Front Range
I have the same trouble - all looks OK, even rebuilt the pump part. No good. All lines are clear and I have current at the pump connectors when pushing the dash button.
Same question - "What gives?"
Same question - "What gives?"
Thread Starter
Registered User
Joined: Aug 2013
Posts: 3,900
From: Central Illinois

I'm going to pick up a new [valve body?] tomorrow, (that square thing that the hoses hook to). If I play with the little rubber stoppers I can get air through it but a second later it stops.
I'll let you know if it works. Advance has the valve body and entirely new pumps if that helps.
Connoisseur d'Junque
Joined: Sep 2010
Posts: 21,183
From: The Hudson Valley
So you're saying that the solenoid pulls the arm onto the plastic ratcheting gear, and that the pump goes through several cycles of operation, then releases, but that even though the piston is moving, no water comes out, right, Mac?
If so, then, yes, a rebuild kit ought to fix it right up.
This is a common failure mode for these. The rubber valves and piston seal dry up and stop sealing.
The good news is that a kit containing all the parts is easily available, easy to install, and costs about five bucks, if I recall (it was a few years ago, anyway).
- Eric

Registered User
Joined: Aug 2009
Posts: 714
From: Big Lake,MN..Spent most of my life in Boston
Just did my 64 dynamic 88. Kit worked fine. But check to see if the nozzles are clear, mine were caked with gunk. And make sure the lines are actually clear. I blew air into mine and both had an obstruction.
1967 442
Joined: Oct 2011
Posts: 316
From: Riverside, Alabama
The kit I bought for my 67 442 only came with the new plastic 3way cap and gasket. My actual bellow had a small tear in it. I do not remember the name of the company that carried the bellow. It was a Corvette company.
Thread Starter
Registered User
Joined: Aug 2013
Posts: 3,900
From: Central Illinois
So you're saying that the solenoid pulls the arm onto the plastic ratcheting gear, and that the pump goes through several cycles of operation, then releases, but that even though the piston is moving, no water comes out, right, Mac?
If so, then, yes, a rebuild kit ought to fix it right up.
This is a common failure mode for these. The rubber valves and piston seal dry up and stop sealing.
The good news is that a kit containing all the parts is easily available, easy to install, and costs about five bucks, if I recall (it was a few years ago, anyway).
- Eric
If so, then, yes, a rebuild kit ought to fix it right up.
This is a common failure mode for these. The rubber valves and piston seal dry up and stop sealing.
The good news is that a kit containing all the parts is easily available, easy to install, and costs about five bucks, if I recall (it was a few years ago, anyway).
- Eric
I think my bellow is good to go. If not, Advance has the entire pump mechanism for about $20
Thread Starter
Registered User
Joined: Aug 2013
Posts: 3,900
From: Central Illinois
After driving to town I figured I MAW get the entire pump for $20 rather than the valve body for $7-ish. It would take me $6-$7 in gas to get there and back if I had to go back. The pump works great and is A LOT quieter than my old one. And the cover seems to work fine. The only thing that surprised me was that the washer stream didn't even hit the windshield.....but the rear window and truck got nice and clean 
A little bending and I'm good to go.
A little bending and I'm good to go.
Thread Starter
Registered User
Joined: Aug 2013
Posts: 3,900
From: Central Illinois
Registered User
Joined: Feb 2013
Posts: 15,409
From: Phoenix, AZ
Hookers under Hood
Joined: Nov 2013
Posts: 3,543
From: Ontario, Canada
The only thing that surprised me was that the washer stream didn't even hit the windshield.....but the rear window and truck got nice and clean
A little bending and I'm good to go.[/QUOTE]
That could be a nice option to have at the drive-in. Geeez my wife could be laying on the trunk getting ready for the movie to start, Jus a little squirt and she's already wet before the movie starts. Put-'r' ther !!!
A little bending and I'm good to go.[/QUOTE]
That could be a nice option to have at the drive-in. Geeez my wife could be laying on the trunk getting ready for the movie to start, Jus a little squirt and she's already wet before the movie starts. Put-'r' ther !!!
Thread Starter
Registered User
Joined: Aug 2013
Posts: 3,900
From: Central Illinois
[IMG]
 [/IMG]
Oh wait, do you mean the bent arm held on with C-clips? You can have whatever you need off my old one. Or I can just send the whole pump. Just pay for the ride?
Connoisseur d'Junque
Joined: Sep 2010
Posts: 21,183
From: The Hudson Valley
Thread Starter
Registered User
Joined: Aug 2013
Posts: 3,900
From: Central Illinois

I need a specialized tool to get it off?
PM me your address in case I can get it off. Or like I said, I'll send you the whole pump if you'll pay for shipping.
Last edited by Macadoo; Jul 7, 2014 at 06:51 AM.
Registered User
Joined: Feb 2013
Posts: 15,409
From: Phoenix, AZ
I completely understand. I learned what they were when trying to remove the secondary metering plate from a Holley 600 back in the late '80s. I didn't know there were so many different screws.
Not really. These days I have a couple sizes of clutch head screwdriver bits in my screw driver / nut driver / allen driver set, but back then I just used a flat blade screwdriver that fit diagonally across the widest part of that bow-tie inset.
OK.
Not really. These days I have a couple sizes of clutch head screwdriver bits in my screw driver / nut driver / allen driver set, but back then I just used a flat blade screwdriver that fit diagonally across the widest part of that bow-tie inset.
OK.
Registered User
Joined: Jul 2009
Posts: 2,471
From: Colorado - Front Range
Next steps...
Well, now I've got some things to check once I get the engine compartment back together later this year! 1) verify physical operation of plunger mechanism and 2) prime the pump and line before trying again.
Thanks for everyone's input!
Rich
Thanks for everyone's input!
Rich
Thread Starter
Registered User
Joined: Aug 2013
Posts: 3,900
From: Central Illinois
[IMG]
 [/IMG]

Thread
Thread Starter
Forum
Replies
Last Post
67BB
Parts Wanted
6
Apr 5, 2013 01:07 PM


